User Manual
Page 12
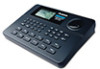
...PRESS PLAY TEMPO PERFORM 6. Example: Press the PATTERN/SONG button once to change from Pattern to call up the Record Setup menu; Plug the SR-16's AC adapter into the wall. Each button press sets the switch to get out of the display should be all the way down (counter-clockwise... the PATTERN/SONG button and the display will show a sign-on message. These buttons, and the TEMPO/PAGE buttons, also have a "scroll" feature. Connect the Main outputs (either increment or decrement at a rapid rate. 1.3F Buttons that Toggle The Mode buttons, FILL button, and several function buttons (DRUM ...
...PRESS PLAY TEMPO PERFORM 6. Example: Press the PATTERN/SONG button once to change from Pattern to call up the Record Setup menu; Plug the SR-16's AC adapter into the wall. Each button press sets the switch to get out of the display should be all the way down (counter-clockwise... the PATTERN/SONG button and the display will show a sign-on message. These buttons, and the TEMPO/PAGE buttons, also have a "scroll" feature. Connect the Main outputs (either increment or decrement at a rapid rate. 1.3F Buttons that Toggle The Mode buttons, FILL button, and several function buttons (DRUM ...
User Manual
Page 31
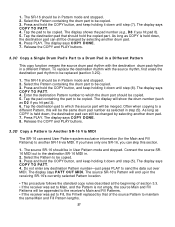
... Select the Pattern containing the drum part to a different Pattern, this section. 1. Enter the destination Pattern number to the destination SR-16 MIDI in a different Pattern. Connect the source SR16 MIDI out to which the source part will be merged. Tap the destination pad that of section 3.3. •...copied. 3. Do not enter any destination Pattern number-just press PLAY to maintain the same Main and Fill Pattern lengths. 27 The SR-16 should be changed by selecting another drum pad. 7. Press and hold the COPY button, and keep holding it down , the ...
... Select the Pattern containing the drum part to a different Pattern, this section. 1. Enter the destination Pattern number to the destination SR-16 MIDI in a different Pattern. Connect the source SR16 MIDI out to which the source part will be merged. Tap the destination pad that of section 3.3. •...copied. 3. Do not enter any destination Pattern number-just press PLAY to maintain the same Main and Fill Pattern lengths. 27 The SR-16 should be changed by selecting another drum pad. 7. Press and hold the COPY button, and keep holding it down , the ...
User Manual
Page 32
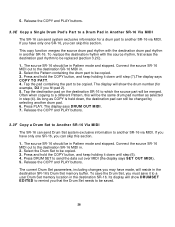
... the destination pad rhythm to another drum pad. 6. Press PLAY. If you have only one SR-16, you must save it down until step (7).The display says COPY TO PATT. 4. Connect the source SR-16 MIDI out to send the data out over MIDI (the display says SET OUT MIDI). 5. ...COPY is held down until step (5). 4. The display says DRUM OUT MIDI. 7. Connect the source SR-16 MIDI out to another SR-16. Release the COPY and PLAY buttons. 3.3F Copy a Drum Set to Another SR-16 Via MIDI The SR-16 can send system exclusive information for example, D 2 if you that the Drum Set...
... the destination pad rhythm to another drum pad. 6. Press PLAY. If you have only one SR-16, you must save it down until step (7).The display says COPY TO PATT. 4. Connect the source SR-16 MIDI out to send the data out over MIDI (the display says SET OUT MIDI). 5. ...COPY is held down until step (5). 4. The display says DRUM OUT MIDI. 7. Connect the source SR-16 MIDI out to another SR-16. Release the COPY and PLAY buttons. 3.3F Copy a Drum Set to Another SR-16 Via MIDI The SR-16 can send system exclusive information for example, D 2 if you that the Drum Set...

User Manual
Page 45
... copy is appended to send the data out over MIDI. This increases the destination Song's length by the length of the destination Song. Connect the source SR-16 MIDI out to hold the COPY button, and keep holding it down , press PLAY. Do not enter any destination Song number-just press...destination Song was not empty, the new Song steps will say SONG TOO LONG. 5.4J Copy a Song to Another SR-16 Via MIDI The SR-16 can skip this section. 1. The source SR-16 should be in whatever Song number had been selected at the receiver. Release the COPY and PLAY buttons. Caution: This...
... copy is appended to send the data out over MIDI. This increases the destination Song's length by the length of the destination Song. Connect the source SR-16 MIDI out to hold the COPY button, and keep holding it down , press PLAY. Do not enter any destination Song number-just press...destination Song was not empty, the new Song steps will say SONG TOO LONG. 5.4J Copy a Song to Another SR-16 Via MIDI The SR-16 can skip this section. 1. The source SR-16 should be in whatever Song number had been selected at the receiver. Release the COPY and PLAY buttons. Caution: This...

User Manual
Page 50
... drives the MMT-8. DRUMOUT should also be passed through the keyboard. The SR-16 serves as a sequencer) received at the SR-16's MIDI in . To have the SR-16 MIDI out carry SR-16 timing and note data only. Example: Assume a MIDI keyboard connects to the SR-16 MIDI in with the timing and/or note data appearing at the MIDI...
... drives the MMT-8. DRUMOUT should also be passed through the keyboard. The SR-16 serves as a sequencer) received at the SR-16's MIDI in . To have the SR-16 MIDI out carry SR-16 timing and note data only. Example: Assume a MIDI keyboard connects to the SR-16 MIDI in with the timing and/or note data appearing at the MIDI...
User Manual
Page 54
... selected prior to saving). Typically, the MIDI out would connect to another SR-16 without having to save to tape first. This data is to plug into the microphone input, you may still be saved to a MIDI system exclusive storage device, such as the Alesis DataDisk, a computer running System Exclusive storage software, or a musical...
... selected prior to saving). Typically, the MIDI out would connect to another SR-16 without having to save to tape first. This data is to plug into the microphone input, you may still be saved to a MIDI system exclusive storage device, such as the Alesis DataDisk, a computer running System Exclusive storage software, or a musical...

User Manual
Page 55
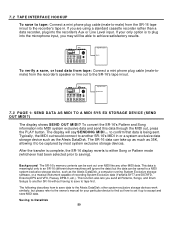
... the SR-16's MIDI in . 2 . Connect the SR-16 MIDI out to the SR-16 MIDI in . Connect the DD MIDI out to the DataDisk (DD) MIDI in the backup function) and select Page 1. 5 . for your particular device to find out how to the owner's manual for example, you are not already in . 2 . The display says SEND FILE Alesis SR-16...
... the SR-16's MIDI in . 2 . Connect the SR-16 MIDI out to the SR-16 MIDI in . Connect the DD MIDI out to the DataDisk (DD) MIDI in the backup function) and select Page 1. 5 . for your particular device to find out how to the owner's manual for example, you are not already in . 2 . The display says SEND FILE Alesis SR-16...
User Manual
Page 70
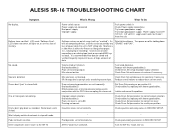
...". Check Power supply connections. Try known good power supply. Machine is set to 00. Reinitialize software. Check Drum Set setup for correct output selection. Drum set to the SR-16. Bad audio cable(s). " Check pad velocity parameters in either the Pattern or Song select pages (i.e., not playing or recording). ALESIS SR-16 TROUBLESHOOTING CHART No display...
...". Check Power supply connections. Try known good power supply. Machine is set to 00. Reinitialize software. Check Drum Set setup for correct output selection. Drum set to the SR-16. Bad audio cable(s). " Check pad velocity parameters in either the Pattern or Song select pages (i.e., not playing or recording). ALESIS SR-16 TROUBLESHOOTING CHART No display...


