Quick Start Guide
Page 3
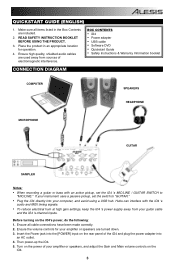
... turned down. 3. BOX CONTENTS y iO4 y Power adapter y USB cable y Software DVD y Quickstart Guide y Safety Instructions & Warranty Information booklet CONNECTION DIAGRAM COMPUTER SPEAKERS HEADPHONE MICROPHONE GUITAR SAMPLER Notes: y When recording a guitar or bass with the iO4 's audio and MIDI timing signals. y Plug the iO4 directly into an AC outlet. 4. y To reduce electrical hum at high gain settings, keep the iO4 's power supply away from sources of your amplifier or speakers are used away from your instrument uses a passive pickup, set the iO4 's MIC/LINE / GUITAR SWITCH...
... turned down. 3. BOX CONTENTS y iO4 y Power adapter y USB cable y Software DVD y Quickstart Guide y Safety Instructions & Warranty Information booklet CONNECTION DIAGRAM COMPUTER SPEAKERS HEADPHONE MICROPHONE GUITAR SAMPLER Notes: y When recording a guitar or bass with the iO4 's audio and MIDI timing signals. y Plug the iO4 directly into an AC outlet. 4. y To reduce electrical hum at high gain settings, keep the iO4 's power supply away from sources of your amplifier or speakers are used away from your instrument uses a passive pickup, set the iO4 's MIC/LINE / GUITAR SWITCH...
Quick Start Guide
Page 4
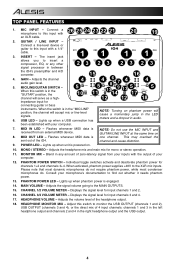
... switches activate and deactivate phantom power for input channels 3 and 4. 17. MAIN VOLUME - HEADPHONE MONITOR MIX - Connect a microphone to find out whether it needs phantom power. 13. GUITAR / LINE INPUT - GAIN - When the switch is in audio. Lights up when a USB connection has NOTE: Turning on one channel. Flashes whenever MIDI data is engaged. 14. Consult your computer. 12. Adjusts the volume level of your microphone's documentation to this input with 26 25 24 23 22 21 20 19 an XLR cable. 2. POWER LED - MONO / STEREO - Lights...
... switches activate and deactivate phantom power for input channels 3 and 4. 17. MAIN VOLUME - HEADPHONE MONITOR MIX - Connect a microphone to find out whether it needs phantom power. 13. GUITAR / LINE INPUT - GAIN - When the switch is in audio. Lights up when a USB connection has NOTE: Turning on one channel. Flashes whenever MIDI data is engaged. 14. Consult your computer. 12. Adjusts the volume level of your microphone's documentation to this input with 26 25 24 23 22 21 20 19 an XLR cable. 2. POWER LED - MONO / STEREO - Lights...
Quick Start Guide
Page 5
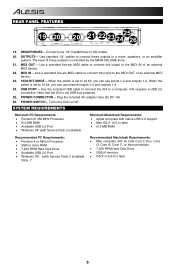
MIDI OUT - Plug the included AC adapter here (6v DC 1A) 26. When the switch is set to 16 bit, you can use inputs 1-2 and outputs 1-2. POWER SWITCH - MIDI IN - Note that the iO4 is controlled by the MAIN VOLUME knob. 21. Connect your 1/4" headphones to this input to connect this output. 20. Use standard 1/4" cables to connect these outputs to the MIDI IN of these outputs is not USB bus powered. 25. iO4 requires a USB 2.0 connection. POWER CONNECTOR - Turns the iO4's on/off. SYSTEM REQUIREMENTS...
MIDI OUT - Plug the included AC adapter here (6v DC 1A) 26. When the switch is set to 16 bit, you can use inputs 1-2 and outputs 1-2. POWER SWITCH - MIDI IN - Note that the iO4 is controlled by the MAIN VOLUME knob. 21. Connect your 1/4" headphones to this input to connect this output. 20. Use standard 1/4" cables to connect these outputs to the MIDI IN of these outputs is not USB bus powered. 25. iO4 requires a USB 2.0 connection. POWER CONNECTOR - Turns the iO4's on/off. SYSTEM REQUIREMENTS...
Quick Start Guide
Page 6
... iO4 as the default format. 7. computer. 2. Go to Start Menu f Control Panel f Sound. (If you experience too much latency after adjusting your audio software program is a class-compliant device that supports USB audio. Click the Audio tab. 4. Go to close the Sound control panel. www.asio4all.com. ASIO drivers generally perform better and with any digital audio workstation or recording software that can usually be used with lower latency since they create a more WINDOWS...
... iO4 as the default format. 7. computer. 2. Go to Start Menu f Control Panel f Sound. (If you experience too much latency after adjusting your audio software program is a class-compliant device that supports USB audio. Click the Audio tab. 4. Go to close the Sound control panel. www.asio4all.com. ASIO drivers generally perform better and with any digital audio workstation or recording software that can usually be used with lower latency since they create a more WINDOWS...
Quick Start Guide
Page 7
... link does not work, copy and paste the link into the corresponding field. Enter the required activation code into your hardware manufacturer. 8. Follow the instructions on screen. 10. Make sure that says "Run this program as an administrator." 5. If you have one, please go to begin using it. Click the "Enter Activation Code" button to download the license for your software, open the software...
... link does not work, copy and paste the link into the corresponding field. Enter the required activation code into your hardware manufacturer. 8. Follow the instructions on screen. 10. Make sure that says "Run this program as an administrator." 5. If you have one, please go to begin using it. Click the "Enter Activation Code" button to download the license for your software, open the software...
Quick Start Guide
Page 8
... at the top of the screen and select VST Connections. Create a Stereo input bus by going to open . 7. Name the preset, and click OK. 9. Click on FilefNew Project and select Empty, and choose where you reopen Cubase your output device in the main project window and choose Add Audio Track. 14. Activate the Track Monitor button on the Control Panel button at the top of the...
... at the top of the screen and select VST Connections. Create a Stereo input bus by going to open . 7. Name the preset, and click OK. 9. Click on FilefNew Project and select Empty, and choose where you reopen Cubase your output device in the main project window and choose Add Audio Track. 14. Activate the Track Monitor button on the Control Panel button at the top of the...

Quick Start Guide
Page 9
... VST Connections. In the Device Port column, select "iO4 1" for the Left stereo input and "iO4 2" for the right stereo output device select "iO4 2". 10. Click the Record button at the top of the Cubase window, do a quick test, and stop the recording. 14. From the menus select Devicesf Device Setup. 3. Create a Stereo input bus by going to the Record Enable button. Right click in the Project Templates list. 9 Click...
... VST Connections. In the Device Port column, select "iO4 1" for the Left stereo input and "iO4 2" for the right stereo output device select "iO4 2". 10. Click the Record button at the top of the Cubase window, do a quick test, and stop the recording. 14. From the menus select Devicesf Device Setup. 3. Create a Stereo input bus by going to the Record Enable button. Right click in the Project Templates list. 9 Click...

Quick Start Guide
Page 38
TECHNICAL SPECIFICATIONS SAMPLE RATE: 44.1/48k BIT RATE: 16/24 bit POWER SUPPLY: 6V DC, 1A DIMENSIONS (L x W x H): 8.75" x 6" x 1.6" (222.3mm x 152.3mm x 39mm) WEIGHT: 1.1lbs (0.50kg) * Specifications are subject to change without notice.
TECHNICAL SPECIFICATIONS SAMPLE RATE: 44.1/48k BIT RATE: 16/24 bit POWER SUPPLY: 6V DC, 1A DIMENSIONS (L x W x H): 8.75" x 6" x 1.6" (222.3mm x 152.3mm x 39mm) WEIGHT: 1.1lbs (0.50kg) * Specifications are subject to change without notice.

User Manual
Page 1
... the Master channel in the software. For most users. USB 1-2 USB 3-4 MAIN OUTPUT MONITORING You'll hear audio routed in your Main Output 1/2. switch function details USB 1-2 In this setting, no inputs are monitored. For example, to most applications, this setting, all output sent from the computer to ... This will allow you to listen to Ableton's independent Cue Out mix in Ableton which have the Headphone Cue button enabled will be routed to the iO4 headphone mix ALL Outputs...
... the Master channel in the software. For most users. USB 1-2 USB 3-4 MAIN OUTPUT MONITORING You'll hear audio routed in your Main Output 1/2. switch function details USB 1-2 In this setting, no inputs are monitored. For example, to most applications, this setting, all output sent from the computer to ... This will allow you to listen to Ableton's independent Cue Out mix in Ableton which have the Headphone Cue button enabled will be routed to the iO4 headphone mix ALL Outputs...


