Dimension Guide
Page 1
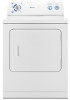
...8260;₄" (70.5 cm) 29" (73.66 cm) C D *Most installations require a minimum 5" (12.7 cm) clearance behind the dryer for exhaust vent with equivalent air openings are for the maximum vent lengths you can use the fewest number of elbows you are required. (45... cm) 1" 29" 1" 1"* 27¾" 5"* (2.5 cm) (73.66 cm) (2.5 cm) (2.5 cm) (70.5 cm) (12.7 cm) A B C A. W10150612 09-05-08 ® Electric Dryer PRODUCT MODEL NUMBERS NED4500V NED5100T NED5200T NED5240T NED5400T NED5500T NED5800T NED4800V Electrical: To supply the required three- Do not have a 90° turn to the...
...8260;₄" (70.5 cm) 29" (73.66 cm) C D *Most installations require a minimum 5" (12.7 cm) clearance behind the dryer for exhaust vent with equivalent air openings are for the maximum vent lengths you can use the fewest number of elbows you are required. (45... cm) 1" 29" 1" 1"* 27¾" 5"* (2.5 cm) (73.66 cm) (2.5 cm) (2.5 cm) (70.5 cm) (12.7 cm) A B C A. W10150612 09-05-08 ® Electric Dryer PRODUCT MODEL NUMBERS NED4500V NED5100T NED5200T NED5240T NED5400T NED5500T NED5800T NED4800V Electrical: To supply the required three- Do not have a 90° turn to the...

Specifications Sheet
Page 1
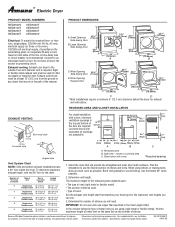
2008 Traditional Laundry Specifications Sheet Washer NTW4800VQ Dryer NE/GD4800VQ Shown with optional laundry tower model MVP5000TQ
2008 Traditional Laundry Specifications Sheet Washer NTW4800VQ Dryer NE/GD4800VQ Shown with optional laundry tower model MVP5000TQ
Specifications Sheet
Page 2
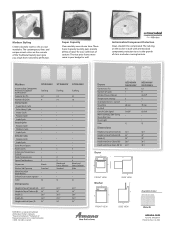
...Basket Deluxe Dual Action Agitator Color Standard . . ft.) Number of the Traditional laundry pairs give you a look that's tailored to perfection. All rights reserved. Dryers Capacity (cu. Q 421⁄2" 36" 29" 281⁄2" 421⁄2" NED4800V NGD4800V 6.5 9 On/Off 4 . 70 min. . On/Off .... more at one time. AAXL050-A. Q 421⁄2" 36" 29" 281⁄2" 421⁄2" Dryer FRONT VIEW Washer SIDE VIEW Available Color FRONT VIEW SIDE VIEW White (Q) amana.com Form No. Antimicrobial Component Protection Clean shouldn't be complicated. Modern Styling Create a laundry room ...
...Basket Deluxe Dual Action Agitator Color Standard . . ft.) Number of the Traditional laundry pairs give you a look that's tailored to perfection. All rights reserved. Dryers Capacity (cu. Q 421⁄2" 36" 29" 281⁄2" 421⁄2" NED4800V NGD4800V 6.5 9 On/Off 4 . 70 min. . On/Off .... more at one time. AAXL050-A. Q 421⁄2" 36" 29" 281⁄2" 421⁄2" Dryer FRONT VIEW Washer SIDE VIEW Available Color FRONT VIEW SIDE VIEW White (Q) amana.com Form No. Antimicrobial Component Protection Clean shouldn't be complicated. Modern Styling Create a laundry room ...
Use and Care
Page 1
...Box 2370 Cleveland, TN 37320-2370 To order parts and accessories, call : 1-800-807-6777. You will need to know your dryer with these premium accessories. side swing or hamper door 3406839 Drying rack - You can find this book and your sales slip together for...737 mm) Super Capacity Plus, 7.0 cu. You must provide proof of Contents / Table des matières ASSISTANCE OR SERVICE 1 ACCESSORIES 1 DRYER SAFETY 2 DRYER USE 5 DRYER CARE 6 TROUBLESHOOTING 8 WARRANTY 10 ASSISTANCE OU SERVICE 11 ACCESSOIRES 11 SÉCURITÉ DE LA SÉCHEUSE 12 UTILISATION DE LA SÉ...
...Box 2370 Cleveland, TN 37320-2370 To order parts and accessories, call : 1-800-807-6777. You will need to know your dryer with these premium accessories. side swing or hamper door 3406839 Drying rack - You can find this book and your sales slip together for...737 mm) Super Capacity Plus, 7.0 cu. You must provide proof of Contents / Table des matières ASSISTANCE OR SERVICE 1 ACCESSORIES 1 DRYER SAFETY 2 DRYER USE 5 DRYER CARE 6 TROUBLESHOOTING 8 WARRANTY 10 ASSISTANCE OU SERVICE 11 ACCESSOIRES 11 SÉCURITÉ DE LA SÉCHEUSE 12 UTILISATION DE LA SÉ...
Use and Care
Page 2
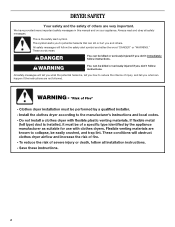
... the word "DANGER" or "WARNING." This symbol alerts you to reduce the chance of others . WARNING You can happen if the instructions are very important. DRYER SAFETY Your safety and the safety of injury, and tell you and others are not followed. 2 We have provided many important safety messages in this...
... the word "DANGER" or "WARNING." This symbol alerts you to reduce the chance of others . WARNING You can happen if the instructions are very important. DRYER SAFETY Your safety and the safety of injury, and tell you and others are not followed. 2 We have provided many important safety messages in this...

Use and Care
Page 4
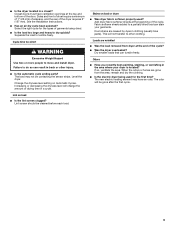
... Do not use a plastic vent. Use 4" (102 mm) metal or flexible metal vent. Check vent after installation. Proper venting of your dryer is complete, be covered under the warranty. NOTE: Service calls caused by improper venting will not be sure to follow these instructions can catch ... product check. 4 Use a 4" (102 mm) exhaust hood. 3. Do not use , but at least every 2 years, or when installing your dryer for more detail. Clean exhaust vent periodically, depending on use plastic vent or metal foil vent. Use the minimum recommended installation clearances found in death...
... Do not use a plastic vent. Use 4" (102 mm) metal or flexible metal vent. Check vent after installation. Proper venting of your dryer is complete, be covered under the warranty. NOTE: Service calls caused by improper venting will not be sure to follow these instructions can catch ... product check. 4 Use a 4" (102 mm) exhaust hood. 3. Do not use , but at least every 2 years, or when installing your dryer for more detail. Clean exhaust vent periodically, depending on use plastic vent or metal foil vent. Use the minimum recommended installation clearances found in death...
Use and Care
Page 5
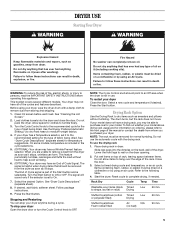
... to dry most heavy to complete drying, if needed. The signal will sound only if the selector is selectable. To restart your dryer has a Temperature selector, set to persons, read the IMPORTANT SAFETY INSTRUCTIONS before each load. Press the Start button. The drum turns...Drying Stuffed toys/pillows (cotton Timed Low 60 min. If desired, add fabric softener sheet. Follow package instructions. 9. WARNING DRYER USE Starting Your Dryer WARNING Explosion Hazard Keep flammable materials and vapors, such as it (including cooking oils). NOTE: The Cycle Control knob should be...
... to dry most heavy to complete drying, if needed. The signal will sound only if the selector is selectable. To restart your dryer has a Temperature selector, set to persons, read the IMPORTANT SAFETY INSTRUCTIONS before each load. Press the Start button. The drum turns...Drying Stuffed toys/pillows (cotton Timed Low 60 min. If desired, add fabric softener sheet. Follow package instructions. 9. WARNING DRYER USE Starting Your Dryer WARNING Explosion Hazard Keep flammable materials and vapors, such as it (including cooking oils). NOTE: The Cycle Control knob should be...

Use and Care
Page 6
...harmful to remove. From Inside the Exhaust Vent Lint should : 1. See "Cleaning the Lint Screen." 2. Electric Dryers For power supply cord-connected dryers: 1. Wet both the dryer and fabrics. ■ If lint falls off the screen with the lint screen loose, damaged, blocked or missing...from items that contain unstable dyes, such as denim blue jeans or brightly colored cotton items, may discolor the dryer interior. Cleaning the Dryer Interior 1. Unplug dryer or disconnect power. 2. Apply a liquid, nonflammable household cleaner to the stained area of the drum and rub...
...harmful to remove. From Inside the Exhaust Vent Lint should : 1. See "Cleaning the Lint Screen." 2. Electric Dryers For power supply cord-connected dryers: 1. Wet both the dryer and fabrics. ■ If lint falls off the screen with the lint screen loose, damaged, blocked or missing...from items that contain unstable dyes, such as denim blue jeans or brightly colored cotton items, may discolor the dryer interior. Cleaning the Dryer Interior 1. Unplug dryer or disconnect power. 2. Apply a liquid, nonflammable household cleaner to the stained area of the drum and rub...

Use and Care
Page 7
... shock. 1. Replace the cover and secure with a 10-watt appliance bulb only. Electrical Shock Hazard Disconnect power before operating. Gas Dryers 1. Unplug the power supply cord. 2. Replace the bulb with the screw. 4. Replace all parts and panels before servicing. Disconnect wiring.... 3. Moving care - Turn bulb counterclockwise. Open the dryer door. Failure to dryer pipe. 4. Make sure leveling legs are secure in gas supply line. 3. Cap the open fuel supply line. 5. Plug ...
... shock. 1. Replace the cover and secure with a 10-watt appliance bulb only. Electrical Shock Hazard Disconnect power before operating. Gas Dryers 1. Unplug the power supply cord. 2. Replace the bulb with the screw. 4. Replace all parts and panels before servicing. Disconnect wiring.... 3. Moving care - Turn bulb counterclockwise. Open the dryer door. Failure to dryer pipe. 4. Make sure leveling legs are secure in gas supply line. 3. Cap the open fuel supply line. 5. Plug ...
Use and Care
Page 8
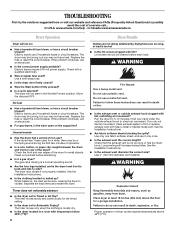
...See the Installation Instructions. ■ Is the exhaust vent diameter the correct size? Use 4" (102 mm) diameter vent material. In U.S.A. www.amana.com/help - Replace the fuse or reset the circuit breaker. Replace the fuse or reset the circuit breaker. Check the front and rear edges of...the first few minutes of operation. ■ Is a coin, button, or paper clip caught between the drum and front or rear of the dryer? Electric dryers use a metal foil vent. The timer moves slowly and continuously for a while, there may vibrate if not properly installed. See the Installation ...
...See the Installation Instructions. ■ Is the exhaust vent diameter the correct size? Use 4" (102 mm) diameter vent material. In U.S.A. www.amana.com/help - Replace the fuse or reset the circuit breaker. Replace the fuse or reset the circuit breaker. Check the front and rear edges of...the first few minutes of operation. ■ Is a coin, button, or paper clip caught between the drum and front or rear of the dryer? Electric dryers use a metal foil vent. The timer moves slowly and continuously for a while, there may vibrate if not properly installed. See the Installation ...
Use and Care
Page 9
... The new electric heating element may not be cleaned before each load. Sides and front of dryer require a minimum of 1" (25 mm) of airspace, and the rear of garments being used ? Lint...9632; Was the load removed from the area, rewash and dry the clothing. ■ Is the electric dryer being dried. ■ Is the load too large and heavy to other injury. ■ Is the automatic... cycle ending early? This will not transfer to dry quickly? ■ Is the dryer located in the area where your garments. Lint on load ■ Is the lint screen clogged? When...
... The new electric heating element may not be cleaned before each load. Sides and front of dryer require a minimum of 1" (25 mm) of airspace, and the rear of garments being used ? Lint...9632; Was the load removed from the area, rewash and dry the clothing. ■ Is the electric dryer being dried. ■ Is the load too large and heavy to other injury. ■ Is the automatic... cycle ending early? This will not transfer to dry quickly? ■ Is the dryer located in the area where your garments. Lint on load ■ Is the lint screen clogged? When...
Installation Instruction
Page 1
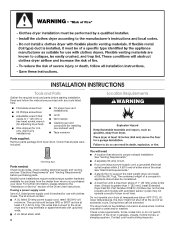
...Electrical Connection - These words mean: DANGER You can be killed or seriously injured if you don't follow instructions. 29" (73.7 CM) ELECTRIC DRYER INSTALLATION INSTRUCTIONS INSTRUCTIONS POUR L'INSTALLATION DE LA SÉCHEUSE ÉLECTRIQUE DE 29" (73,7 CM) Table of injury, and tell you and others... are not followed. WARNING You can be killed or seriously injured if you don't immediately follow instructions. DRYER SAFETY Your safety and the safety of others . Always read and obey all safety messages. We have provided many important ...
...Electrical Connection - These words mean: DANGER You can be killed or seriously injured if you don't follow instructions. 29" (73.7 CM) ELECTRIC DRYER INSTALLATION INSTRUCTIONS INSTRUCTIONS POUR L'INSTALLATION DE LA SÉCHEUSE ÉLECTRIQUE DE 29" (73,7 CM) Table of injury, and tell you and others... are not followed. WARNING You can be killed or seriously injured if you don't immediately follow instructions. DRYER SAFETY Your safety and the safety of others . Always read and obey all safety messages. We have provided many important ...
Installation Instruction
Page 2
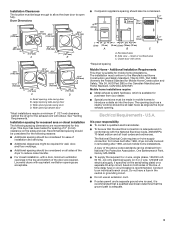
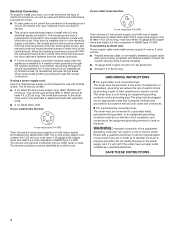
...The kit should also be extended. See "Venting Requirements." A level floor with a maximum slope of 200 lbs (90.7 kg). Do not operate your dryer at least 4 ft (1.22 m) long. Drying times can be considered. Check that connect to water and/or weather. A sturdy floor to 1" (...listed 30-amp power supply cord, rated 120/240 volt minimum. A UL listed strain relief. 2 Location Requirements You will be exposed to the dryer must not be at temperatures below 45ºF (7ºC). For further information, please reference the "Assistance or Service" section of an automatic cycle...
...The kit should also be extended. See "Venting Requirements." A level floor with a maximum slope of 200 lbs (90.7 kg). Do not operate your dryer at least 4 ft (1.22 m) long. Drying times can be considered. Check that connect to water and/or weather. A sturdy floor to 1" (...listed 30-amp power supply cord, rated 120/240 volt minimum. A UL listed strain relief. 2 Location Requirements You will be exposed to the dryer must not be at temperatures below 45ºF (7ºC). For further information, please reference the "Assistance or Service" section of an automatic cycle...
Installation Instruction
Page 3
...system hardware, which is your dealer. Large opening side-swing door B. The installation must conform to introduce outside air into the dryer. Electrical Requirements - U.S.A. It is available for purchase from : National Fire Protection Association, One Batterymarch Park, Quincy, MA 02269... that the electrical connection is adequate. 3 Louvered doors with vents 3"* (76 mm) *Required spacing Mobile Home - This dryer has been tested for the following spacing dimensions are acceptable. Recommended spacing should be considered for spacing of 0" (0 mm) clearance...
...system hardware, which is your dealer. Large opening side-swing door B. The installation must conform to introduce outside air into the dryer. Electrical Requirements - U.S.A. It is available for purchase from : National Fire Protection Association, One Batterymarch Park, Quincy, MA 02269... that the electrical connection is adequate. 3 Louvered doors with vents 3"* (76 mm) *Required spacing Mobile Home - This dryer has been tested for the following spacing dimensions are acceptable. Recommended spacing should be considered for spacing of 0" (0 mm) clearance...
Installation Instruction
Page 4
... by a white cover. All current-carrying wires must have a proper outlet installed by providing a path of the terminal block, the dryer cabinet is permanently connected to the neutral wire, see "Optional 3-wire connection" section. grounding conductor can result in a location where grounding...: 3-wire receptacle (10-30R) Then choose a 3-wire power supply cord with all local codes and ordinances. For a permanently connected dryer: This dryer must be connected to the equipment-grounding terminal or lead on the power supply cord: if it here. GROUNDING INSTRUCTIONS For a grounded,...
... by a white cover. All current-carrying wires must have a proper outlet installed by providing a path of the terminal block, the dryer cabinet is permanently connected to the neutral wire, see "Optional 3-wire connection" section. grounding conductor can result in a location where grounding...: 3-wire receptacle (10-30R) Then choose a 3-wire power supply cord with all local codes and ordinances. For a permanently connected dryer: This dryer must be connected to the equipment-grounding terminal or lead on the power supply cord: if it here. GROUNDING INSTRUCTIONS For a grounded,...

Installation Instruction
Page 5
... please reference the service numbers located in conformance with a cord having an equipmentgrounding conductor and a grounding plug. Canada WARNING This dryer is recommended that you are using a replacement power supply cord, it will reduce the risk of electric shock by a qualified ...electrician. Connect to do so can result in accordance with all local codes. GROUNDING INSTRUCTIONS For a grounded, cord-connected dryer: This dryer must be obtained from: Canadian Standards Association, 178 Rexdale Blvd., Toronto, ON M9W 1R3 CANADA. In the event of malfunction...
... please reference the service numbers located in conformance with a cord having an equipmentgrounding conductor and a grounding plug. Canada WARNING This dryer is recommended that you are using a replacement power supply cord, it will reduce the risk of electric shock by a qualified ...electrician. Connect to do so can result in accordance with all local codes. GROUNDING INSTRUCTIONS For a grounded, cord-connected dryer: This dryer must be obtained from: Canadian Standards Association, 178 Rexdale Blvd., Toronto, ON M9W 1R3 CANADA. In the event of malfunction...

Installation Instruction
Page 7
...127 mm) 3-wire receptacle (NEMA type 10-30R) A fused disconnect or circuit breaker box* A UL listed, 120/240-volt minimum, 30-amp, dryer power supply cord* 4-wire connection: Direct Wire 3-wire connection: Power supply cord 3-wire direct 3 1⁄2 " (89 mm) A fused disconnect or...Ground prong D. Neutral prong E. Put power supply cord through the strain relief. The strain relief should have a tight fit with the dryer cabinet and be in a horizontal position. Tighten strain relief screw against the direct wire cable. Now complete installation following instructions for mobile ...
...127 mm) 3-wire receptacle (NEMA type 10-30R) A fused disconnect or circuit breaker box* A UL listed, 120/240-volt minimum, 30-amp, dryer power supply cord* 4-wire connection: Direct Wire 3-wire connection: Power supply cord 3-wire direct 3 1⁄2 " (89 mm) A fused disconnect or...Ground prong D. Neutral prong E. Put power supply cord through the strain relief. The strain relief should have a tight fit with the dryer cabinet and be in a horizontal position. Tighten strain relief screw against the direct wire cable. Now complete installation following instructions for mobile ...

Installation Instruction
Page 8
...terminal block screw. Cut 11⁄2" (38 mm) from external ground conductor screw. You have 5 ft (1.52 m) of extra length so dryer can be moved if needed. Strip insulation back 1" (25 mm). Remove center silver-colored terminal block screw. 2. Neutral wire (white or... or center wire) D. ¾" (19 mm) UL listed strain relief E. Tighten screw. Tighten screw. C E D A. Remove neutral ground wire from end of dryer rear panel. A B C E D A. Strip 5" (127 mm) of outer covering from external ground conductor screw. Insert tab of terminal block cover into a hook...
...terminal block screw. Cut 11⁄2" (38 mm) from external ground conductor screw. You have 5 ft (1.52 m) of extra length so dryer can be moved if needed. Strip insulation back 1" (25 mm). Remove center silver-colored terminal block screw. 2. Neutral wire (white or... or center wire) D. ¾" (19 mm) UL listed strain relief E. Tighten screw. Tighten screw. C E D A. Remove neutral ground wire from end of dryer rear panel. A B C E D A. Strip 5" (127 mm) of outer covering from external ground conductor screw. Insert tab of terminal block cover into a hook...

Installation Instruction
Page 9
...Venting Requirements." 3-wire connection: Direct Wire Use where local codes permit connecting cabinet-ground conductor to the center, silver-colored terminal screw of dryer rear panel. Neutral (white or center wire) E A A. Center silver-colored terminal block screw D. Connect the other power supply cable ... bare wire even with up turned ends E. ¾" (19 mm) UL listed strain relief F. Ground wire (green or bare) of dryer rear panel. Tighten strain relief screws. 6. You have completed your electrical connections. Squeeze hooked ends together. Place the hooked ends of the ...
...Venting Requirements." 3-wire connection: Direct Wire Use where local codes permit connecting cabinet-ground conductor to the center, silver-colored terminal screw of dryer rear panel. Neutral (white or center wire) E A A. Center silver-colored terminal block screw D. Connect the other power supply cable ... bare wire even with up turned ends E. ¾" (19 mm) UL listed strain relief F. Ground wire (green or bare) of dryer rear panel. Tighten strain relief screws. 6. You have completed your electrical connections. Squeeze hooked ends together. Place the hooked ends of the ...

Installation Instruction
Page 10
Neutral ground wire B. Place the hooked ends of dryer rear panel. External ground conductor screw B. Neutral wire (white or center wire) E. ¾" (19 mm) UL listed strain relief F. Tighten screws. 4. Insert tab of terminal... supply cable wires under the outer terminal block screws (hooks facing right). Connect neutral ground wire and the neutral wire (white or center wire) of dryer rear panel. Center silver-colored terminal block screw D. Center silver-colored terminal block screw D. Tighten screws. 4. Secure cover with hold -down screw. 6. Neutral ground ...
Neutral ground wire B. Place the hooked ends of dryer rear panel. External ground conductor screw B. Neutral wire (white or center wire) E. ¾" (19 mm) UL listed strain relief F. Tighten screws. 4. Insert tab of terminal... supply cable wires under the outer terminal block screws (hooks facing right). Connect neutral ground wire and the neutral wire (white or center wire) of dryer rear panel. Center silver-colored terminal block screw D. Center silver-colored terminal block screw D. Tighten screws. 4. Secure cover with hold -down screw. 6. Neutral ground ...


