Amana NED4700YQ Support and Manuals
Get Help and Manuals for this Amana item

View All Support Options Below
Free Amana NED4700YQ manuals!
Problems with Amana NED4700YQ?
Ask a Question
Free Amana NED4700YQ manuals!
Problems with Amana NED4700YQ?
Ask a Question
Popular Amana NED4700YQ Manual Pages
Use and Care - Page 4
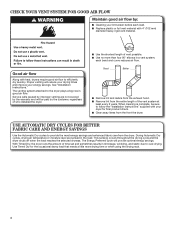
... or moisture level are not covered by the warranty and will be sure to follow the "Installation Instructions" supplied with heat, dryers require good air flow to over-drying.
This sensing occurs throughout the drying cycle and the dryer shuts off when the load reaches the selected dryness. CHECK YOUR VENT SYSTEM FOR GOOD AIR...
Use and Care - Page 5
... the control. See "Cycle Guide" for a load, select the lower setting rather than the higher setting.
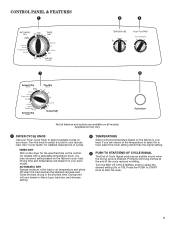
3 PUSH TO START/END OF CYCLE SIGNAL The End of cycles. AUTOMATIC DRY Senses moisture in the shortest time. CONTROL PANEL & FEATURES
1
2
3
1
3
Not all models. Appearance may choose a setting based on the fabrics in your dryer. Press the PUSH to...
Use and Care - Page 6
... control.
If loads seem drier than the higher setting.
N/A
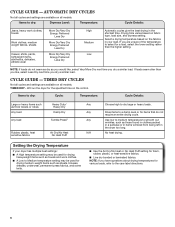
No heat drying. NOTE: If you dry a similar load. CYCLE GUIDE - AUTOMATIC DRY CYCLES
Not all cycles and settings are available on all models. Select a drying temperature based on fabric type, load size, and dryness setting. Will run the dryer for various loads, refer to the care label...
Use and Care - Page 7

...Guide for your dryer, wipe the dryer drum with your load, by turning the knob to dryness level. Once a dry level is set, it cannot be able to persons, read the IMPORTANT SAFETY INSTRUCTIONS before each cycle. Close the door. Some models... electric shock, or injury to tumble freely. Selecting Very Dry, ENERGY PREFERRED, or Less Dry automatically adjusts the dryness level at which the dryer ...
Use and Care - Page 8
...model)
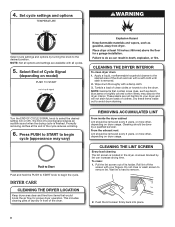
CLEANING THE DRYER INTERIOR
To clean dryer drum
1. Turn the END OF CYCLE SIGNAL knob to dry the drum. From the exhaust vent Lint should be done by a qualified servicer....into place.
8 Set cycle settings and options
Select cycle settings and options by lint can increase drying time.
Tumble a load of clothes. DRYER CARE CLEANING THE DRYER LOCATION
Keep dryer area clear and...
Use and Care - Page 9
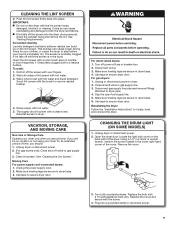
Wet a nylon brush with the screw.
4. Reinstall screen in dryer base. 3. Use tape to dryer. 2. Unplug or disconnect power to secure dryer door. Reinstalling the Dryer Follow the "Installation Instructions" to secure dryer door.
Open the dryer door. Turn bulb counterclockwise. Replace the cover and secure with hot water and liquid detergent. n If lint falls off ...
Use and Care - Page 10
...Replace both fuses or reset the circuit breaker.
The dryer may not have heat. See "Installation Instructions". When balled up .
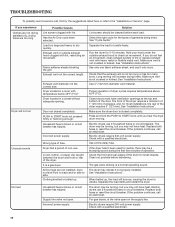
For gas dryers...Installation Instructions". Use a time-delay fuse. Clean out pockets before each load. If the problem continues, call an electrician. Electric dryers... the dryer door is not crushed or kinked. TROUBLESHOOTING
To possibly avoid a service call,...
Use and Care - Page 11
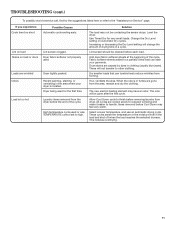
... an odor. Increasing or decreasing the Dry Level setting will not transfer to the "Assistance or Service" page. Add dryer fabric softener sheets at the beginning of drying time in the area where your garments. These will change the amount of the cycle. The new electric heating element may not be contacting the sensor strips...
Use and Care - Page 12
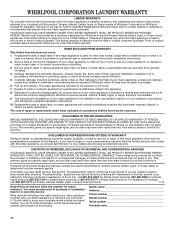
..., or need for Roper brand products. Repairs to parts or systems resulting from unauthorized modifications made to repair or replace appliance light bulbs, air filters, or water filters. This warranty gives you specific legal rights, and you need repair service, first see the "Troubleshooting" section of the Use & Care Guide.
DISCLAIMER OF IMPLIED WARRANTIES
IMPLIED WARRANTIES, INCLUDING...
Warranty - Page 1

... sales slip together for Factory Specified Replacement Parts and repair labor to correct defects in accordance with electrical or plumbing codes, or use your major appliance to better help can find this information on the model and serial number label located on major appliances with original model/serial numbers that comes with the product, Amana, Admiral, Estate, Inglis, or Roper...
Installation Instruction - Page 3
... hex-head socket wrench
Utility knife
If using power supply cord, a grounded electrical outlet located within 2 ft. (610 mm) of either side of the Dryer User Instructions. Check that all models):
Leveling legs (4)
Parts package is greater than 1" [25 mm], install Extended Dryer Feet Kit, Part Number 279810.) If not level, clothes may not tumble properly and automatic...
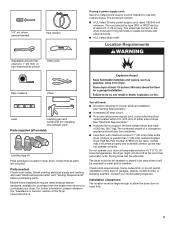
Installation Instruction - Page 4
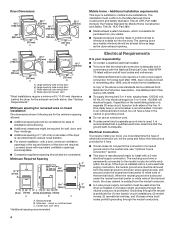
... neutral terminal (center or white wire) of electrical connection you will be using and follow the instructions provided for recessed area or closet installation
The dimensions shown following are required. When the neutral ground wire is permanently connected to an individual branch circuit. Additional installation requirements
This dryer is manufactured ready to introduce outside air into...
Installation Instruction - Page 14
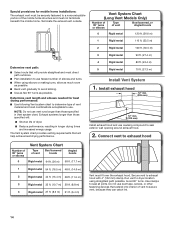
...path possible. Determine vent length and elbows needed for mobile home installations:
The exhaust vent must be securely fastened to dryer location using elbows or making turns, allow as much room
as...■■ Plan installation to use caulking compound to exhaust hood with 4" (102 mm) clamp. Terminate the exhaust vent outside. Vent System Chart (Long Vent Models Only)
Number of 90...
Installation Instruction - Page 15

... power supply cord installation, plug into an outlet and/or electrical supply is on power. See "Level Dryer". q Set the dryer on dryer. Connect Vent
...Guide. Be sure vent is in a running or "On" position.
■■ Start button has been pushed firmly.
■■ Dryer is plugged into an outlet. q Dispose of/recycle all of dryer from front to existing vent, make sure all parts...
Installation Instruction - Page 16
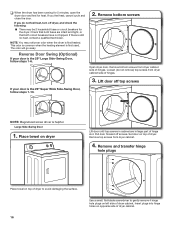
... there is first used.
Remove top screws from dryer cabinet side of dryer cabinet.
Loosen (do not feel heat, turn off screws. NOTE: Magnetized screw driver is first heated.
q When the dryer has been running for 5 minutes, open the dryer door and feel for the dryer. Pull door forward off dryer, and check the following:
■■ There may...
Amana NED4700YQ Reviews
We have not received any reviews for Amana yet.