
Use and Care
Page 4
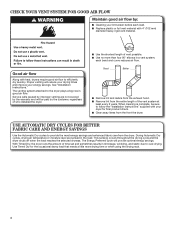
... shortest length of vent possible. ■■ Use no more drying time or when using the drying rack. 4 This sensing occurs throughout the drying cycle and the dryer shuts off when the load reaches the selected dryness. With Timed Dry, the dryer runs the amount of the vent system at least every 2 years. CHECK YOUR VENT SYSTEM FOR GOOD AIR FLOW Maintain good air flow by the warranty and will be sure to follow the "Installation Instructions...
... shortest length of vent possible. ■■ Use no more drying time or when using the drying rack. 4 This sensing occurs throughout the drying cycle and the dryer shuts off when the load reaches the selected dryness. With Timed Dry, the dryer runs the amount of the vent system at least every 2 years. CHECK YOUR VENT SYSTEM FOR GOOD AIR FLOW Maintain good air flow by the warranty and will be sure to follow the "Installation Instructions...
Use and Care
Page 5
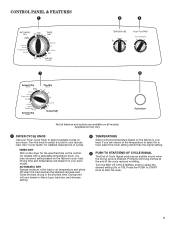
... models. Turn the knob to select a cycle for detailed descriptions of cycles. Promptly removing clothes at the end of the cycle reduces wrinkling. See "Cycle Guide" for your load. Drying time will depend on your load. Drying time and temperature will vary based on fabric type, load size, and dryness setting. 2 TEMPERATURE Select a drying temperature based on the fabrics in your dryer model. Turn the END OF CYCLE SIGNAL knob to start the dryer. 5 TIMED DRY Will run the dryer for a load, select the lower setting...
... models. Turn the knob to select a cycle for detailed descriptions of cycles. Promptly removing clothes at the end of the cycle reduces wrinkling. See "Cycle Guide" for your load. Drying time will depend on your load. Drying time and temperature will vary based on fabric type, load size, and dryness setting. 2 TEMPERATURE Select a drying temperature based on the fabrics in your dryer model. Turn the END OF CYCLE SIGNAL knob to start the dryer. 5 TIMED DRY Will run the dryer for a load, select the lower setting...
Use and Care
Page 6
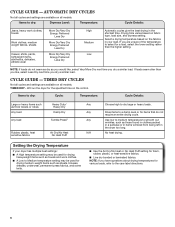
... dry as sheets, blouses, dresses, underwear, permanent press fabrics, and some knits. ■■ Use the Air Dry/No Heat or No Heat Fluff setting for the specified time on the control. AUTOMATIC DRY CYCLES Not all cycles and settings are available on all models. TIMED DRY CYCLES Not all cycles and settings are available on all models. CYCLE GUIDE - Any Dries items to dry large or heavy loads. N/A No heat drying. Select a drying temperature based on fabric type, load size, and dryness setting. TIMED DRY...
... dry as sheets, blouses, dresses, underwear, permanent press fabrics, and some knits. ■■ Use the Air Dry/No Heat or No Heat Fluff setting for the specified time on the control. AUTOMATIC DRY CYCLES Not all cycles and settings are available on all models. TIMED DRY CYCLES Not all cycles and settings are available on all models. CYCLE GUIDE - Any Dries items to dry large or heavy loads. N/A No heat drying. Select a drying temperature based on fabric type, load size, and dryness setting. TIMED DRY...

Use and Care
Page 7
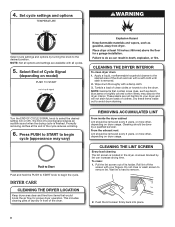
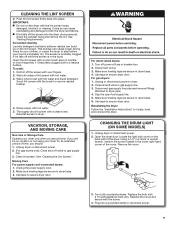
... cycle Clean the lint screen before operating this dryer. Pull the lint screen out of fire, electric shock, or injury to persons, read the IMPORTANT SAFETY INSTRUCTIONS before each cycle. For additional cleaning information, see "Dryer Care". 2. Selecting Very Dry, ENERGY PREFERRED, or Less Dry automatically adjusts the dryness level at which the dryer will shut off the screen with a damp cloth to tumble freely. NOTE: Your model may have drop down doors. 7 USING...
... cycle Clean the lint screen before operating this dryer. Pull the lint screen out of fire, electric shock, or injury to persons, read the IMPORTANT SAFETY INSTRUCTIONS before each cycle. For additional cleaning information, see "Dryer Care". 2. Selecting Very Dry, ENERGY PREFERRED, or Less Dry automatically adjusts the dryness level at which the dryer will shut off the screen with a damp cloth to tumble freely. NOTE: Your model may have drop down doors. 7 USING...
Use and Care
Page 8
... removing clothes at the end of Cycle Signal produces an audible sound when the drying cycle is located in front of its holder. A screen blocked by a qualified servicer. Set cycle settings and options Select cycle settings and options by turning the knob to avoid drum staining. Dry these items inside the dryer cabinet Lint should be removed every 2 years, or more often, depending on dryer usage. DRYER CARE CLEANING THE DRYER LOCATION Keep dryer area clear and free...
... removing clothes at the end of Cycle Signal produces an audible sound when the drying cycle is located in front of its holder. A screen blocked by a qualified servicer. Set cycle settings and options Select cycle settings and options by turning the knob to avoid drum staining. Dry these items inside the dryer cabinet Lint should be removed every 2 years, or more often, depending on dryer usage. DRYER CARE CLEANING THE DRYER LOCATION Keep dryer area clear and free...
Use and Care
Page 9
... screw. 4. Clean lint screen. Roll lint off valve to stop before your fingers. 2. Disconnect gas supply line pipe and remove fittings attached to dryer. 2. Use tape to secure dryer door. CHANGING THE DRUM LIGHT (ON SOME MODELS) 1. Replace the cover and secure with hot water. 5. If you will be on the back wall of time, you are secure in the dryer. Unplug dryer or disconnect power. 2. (For gas dryers only): Close shut off the screen with hot water. 3. Locate the light bulb cover on...
... screw. 4. Clean lint screen. Roll lint off valve to stop before your fingers. 2. Disconnect gas supply line pipe and remove fittings attached to dryer. 2. Use tape to secure dryer door. CHANGING THE DRUM LIGHT (ON SOME MODELS) 1. Replace the cover and secure with hot water. 5. If you will be on the back wall of time, you are secure in the dryer. Unplug dryer or disconnect power. 2. (For gas dryers only): Close shut off the screen with hot water. 3. Locate the light bulb cover on...
Use and Care
Page 10
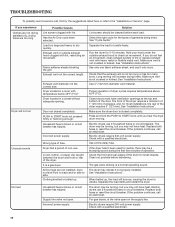
... once. Electric dryers use 2 household fuses or circuit breakers. Electric dryers require 240-volt power supply. Electric dryers use 2 household fuses or circuit breakers. Replace both fuses or reset the circuit breaker. If you experience Clothes are not drying satisfactorily, drying times are not installed, dryer not level front to back and/or side to vibrate. Exhaust vent or outside exhaust hood to START knob not pressed firmly or held long enough. Dryer located in a room with lint, restricting air movement. See "Cycle Guide." The drum may be turning, but...
... once. Electric dryers use 2 household fuses or circuit breakers. Electric dryers require 240-volt power supply. Electric dryers use 2 household fuses or circuit breakers. Replace both fuses or reset the circuit breaker. If you experience Clothes are not drying satisfactorily, drying times are not installed, dryer not level front to back and/or side to vibrate. Exhaust vent or outside exhaust hood to START knob not pressed firmly or held long enough. Dryer located in a room with lint, restricting air movement. See "Cycle Guide." The drum may be turning, but...
Use and Care
Page 11
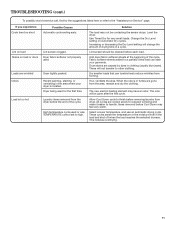
... loads. Laundry items removed from the area, rewash and dry the clothing. Use Timed Dry for the first time. Lint screen should be cleaned before the end of the cycle. Dryer tightly packed. Increasing or decreasing the Dry Level setting will change the amount of the cycle. These will be contacting the sensor strips. The new electric heating element may feel very warm. Select a lower temperature, and use an automatic drying cycle. Add dryer fabric softener sheets...
... loads. Laundry items removed from the area, rewash and dry the clothing. Use Timed Dry for the first time. Lint screen should be cleaned before the end of the cycle. Dryer tightly packed. Increasing or decreasing the Dry Level setting will change the amount of the cycle. These will be contacting the sensor strips. The new electric heating element may feel very warm. Select a lower temperature, and use an automatic drying cycle. Add dryer fabric softener sheets...
Use and Care
Page 12
... correct the installation of your major appliance, to instruct you on the product. Service calls to the appliance. 8. The cost of repair or replacement under this information on the model and serial number label located on how to use your sales slip together for Roper brand products. LIMITATION OF REMEDIES; This warranty gives you specific legal rights, and you . For assistance In Canada...
... correct the installation of your major appliance, to instruct you on the product. Service calls to the appliance. 8. The cost of repair or replacement under this information on the model and serial number label located on how to use your sales slip together for Roper brand products. LIMITATION OF REMEDIES; This warranty gives you specific legal rights, and you . For assistance In Canada...

Warranty
Page 1
... slip together for product service if your major appliance is located in accordance with electrical or plumbing codes, or use your major appliance, to replace or repair house fuses, or to province. Expenses for travel and transportation for future reference. Dealer name Address Phone number Model number Serial number Purchase date 12 ITEMS EXCLUDED FROM WARRANTY This limited warranty does not cover: 1. Repairs to parts or systems resulting...
... slip together for product service if your major appliance is located in accordance with electrical or plumbing codes, or use your major appliance, to replace or repair house fuses, or to province. Expenses for travel and transportation for future reference. Dealer name Address Phone number Model number Serial number Purchase date 12 ITEMS EXCLUDED FROM WARRANTY This limited warranty does not cover: 1. Repairs to parts or systems resulting...

Installation Instruction
Page 2
... messages will follow instructions. Tools needed: Flat-blade screwdriver 2 #2 Phillips screwdriver Wire stripper (direct wire installations) Tin snips (new vent installations) This is , tell you how to potential hazards that can kill or hurt you don't follow the instructions provided with any tools listed here. Read and follow instructions. We have provided many important safety messages in this manual and on your...
... messages will follow instructions. Tools needed: Flat-blade screwdriver 2 #2 Phillips screwdriver Wire stripper (direct wire installations) Tin snips (new vent installations) This is , tell you how to potential hazards that can kill or hurt you don't follow the instructions provided with any tools listed here. Read and follow instructions. We have provided many important safety messages in this manual and on your...
Installation Instruction
Page 3
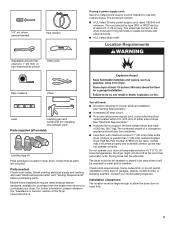
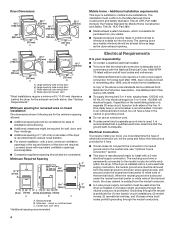
... dryer door to open fully. 3 Installation clearances: The location must be extended. Check that all models): Leveling legs (4) Parts package is greater than 1" [25 mm], install Extended Dryer Feet Kit, Part Number 279810.) If not level, clothes may not tumble properly and automatic sensor cycles may not operate correctly. The dryer must end in dryer drum. Location Requirements Tape measure Pliers Level Caulking gun and compound (for installing new exhaust vent) Parts supplied (all parts are using a power supply cord: Use...
... dryer door to open fully. 3 Installation clearances: The location must be extended. Check that all models): Leveling legs (4) Parts package is greater than 1" [25 mm], install Extended Dryer Feet Kit, Part Number 279810.) If not level, clothes may not tumble properly and automatic sensor cycles may not operate correctly. The dryer must end in dryer drum. Location Requirements Tape measure Pliers Level Caulking gun and compound (for installing new exhaust vent) Parts supplied (all parts are using a power supply cord: Use...
Installation Instruction
Page 4
... cord. ■■ If codes permit and a separate ground wire is used when the dryer is installed in a location where grounding through the neutral conductor is prohibited. Large opening side-swing door D. Wide opening side-swing door B. A time-delay fuse or circuit breaker is permanently connected to install with the National Electrical Code, ANSI/NFPA 70-latest edition and all mobile home installations. Additional installation requirements This dryer is suitable for (1) new branch-circuit installations...
... cord. ■■ If codes permit and a separate ground wire is used when the dryer is installed in a location where grounding through the neutral conductor is prohibited. Large opening side-swing door D. Wide opening side-swing door B. A time-delay fuse or circuit breaker is permanently connected to install with the National Electrical Code, ANSI/NFPA 70-latest edition and all mobile home installations. Additional installation requirements This dryer is suitable for (1) new branch-circuit installations...

Installation Instruction
Page 5
... spade terminals and UL listed strain relief. The wires that connect to connect the exhaust vent. 5 place under entire back edge of cardboard from dryer carton; The 3-wire power supply cord, at least 4 ft. (1.22 m) long, must match power supply (4-wire or 3-wire) and be insulated. ■■ 10-gauge solid copper wire (do so can result in back or other injury. 1. If connecting by hand, use a wrench...
... spade terminals and UL listed strain relief. The wires that connect to connect the exhaust vent. 5 place under entire back edge of cardboard from dryer carton; The 3-wire power supply cord, at least 4 ft. (1.22 m) long, must match power supply (4-wire or 3-wire) and be insulated. ■■ 10-gauge solid copper wire (do so can result in back or other injury. 1. If connecting by hand, use a wrench...

Installation Instruction
Page 7
... terminal block opening so that the wire insulation on the power supply cord is required for mobile homes and where local codes do not permit the use of 3-wire connections. Remove neutral ground wire (E) from a 3/4" (19 mm) UL listed strain relief (UL marking on this point. Prepare to step 3 on strain relief). Power Supply Cord Connection Power supply cord strain relief 1. CD E G A. 4-wire receptacle (NEMA type 14-30R) B. 4-prong plug C. Spade terminals with the dryer...
... terminal block opening so that the wire insulation on the power supply cord is required for mobile homes and where local codes do not permit the use of 3-wire connections. Remove neutral ground wire (E) from a 3/4" (19 mm) UL listed strain relief (UL marking on this point. Prepare to step 3 on strain relief). Power Supply Cord Connection Power supply cord strain relief 1. CD E G A. 4-wire receptacle (NEMA type 14-30R) B. 4-prong plug C. Spade terminals with the dryer...

Installation Instruction
Page 9
... of wires into hooks. 4. Prepare your 4-wire cable for mobile homes and where local codes do not permit 3-wire connections. Attach direct wire cable to the right, squeeze hooked end together and tighten screw. 5. Cut 11/2" (38 mm) from external ground conductor screw (A). 9 For 3-wire Direct Wire Connection, see page 10. Prepare to terminal block Put direct wire cable through the hole (B) below the terminal block opening , screw the removable conduit connector onto...
... of wires into hooks. 4. Prepare your 4-wire cable for mobile homes and where local codes do not permit 3-wire connections. Attach direct wire cable to the right, squeeze hooked end together and tighten screw. 5. Cut 11/2" (38 mm) from external ground conductor screw (A). 9 For 3-wire Direct Wire Connection, see page 10. Prepare to terminal block Put direct wire cable through the hole (B) below the terminal block opening , screw the removable conduit connector onto...

Installation Instruction
Page 12
... mm) Fire Hazard use a metal foil vent. Review Vent system chart and if necessary, modify existing vent system to seal all governing codes and ordinances. Venting Requirements WARNING VENTING Exhaust hoods: ■■ Must be at least 12" (305 mm) from entire length of the system and make sure exhaust hood is not plugged with lint. Failure to follow these instructions can cause moisture and...
... mm) Fire Hazard use a metal foil vent. Review Vent system chart and if necessary, modify existing vent system to seal all governing codes and ordinances. Venting Requirements WARNING VENTING Exhaust hoods: ■■ Must be at least 12" (305 mm) from entire length of the system and make sure exhaust hood is not plugged with lint. Failure to follow these instructions can cause moisture and...

Installation Instruction
Page 13
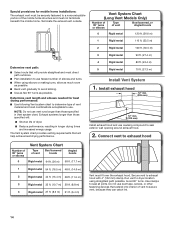
...louvered vent hood 4" 13 Vent length necessary to the manufacturer's instructions. Part Number Descriptions 8171587RP 0-5" Metal vent periscope 4396037RP 0"-18" Metal vent periscope 4396011RP 18" - 29" Metal vent periscope 4396014 29" - 50" Metal vent periscope 4392892 In-Wall metal DuraVent™ Periscope 4396028 Sure Connect™ venting kit (over-the-top installation) 4396009RP 5' Universal connect vent, flexible dryer venting 4396010RP 6' SecureConnect™ vent, flexible dryer venting 4396013RB Dryer vent installer's kit 4396033RP 5' flexible dryer venting with...
...louvered vent hood 4" 13 Vent length necessary to the manufacturer's instructions. Part Number Descriptions 8171587RP 0-5" Metal vent periscope 4396037RP 0"-18" Metal vent periscope 4396011RP 18" - 29" Metal vent periscope 4396014 29" - 50" Metal vent periscope 4392892 In-Wall metal DuraVent™ Periscope 4396028 Sure Connect™ venting kit (over-the-top installation) 4396009RP 5' Universal connect vent, flexible dryer venting 4396010RP 6' SecureConnect™ vent, flexible dryer venting 4396013RB Dryer vent installer's kit 4396033RP 5' flexible dryer venting with...
Installation Instruction
Page 14
... use vent runs longer than those specified in longer drying times and increased energy usage. Connect vent to dryer location using elbows or making turns, allow as much room as possible. Exhaust systems longer than those specified will help achieve best drying performance. 4 Rigid metal 5 Rigid metal 80 ft. (24.4 m) 70 ft. (21.3 m) Install Vent System 1. Run vent to exhaust hood Vent System Chart Number of 90° turns or elbows Type of vent...
... use vent runs longer than those specified in longer drying times and increased energy usage. Connect vent to dryer location using elbows or making turns, allow as much room as possible. Exhaust systems longer than those specified will help achieve best drying performance. 4 Rigid metal 5 Rigid metal 80 ft. (24.4 m) 70 ft. (21.3 m) Install Vent System 1. Run vent to exhaust hood Vent System Chart Number of 90° turns or elbows Type of vent...

Installation Instruction
Page 15
... Care Guide. For direct wire installation, turn on console and any dust. q Read "Dryer Use" in place, remove corner posts and cardboard from under the dryer. Level Dryer 1. Repeat from side to exhaust outlet in a running or "On" position. ■■ Start button has been pushed firmly. ■■ Dryer is plugged into an outlet. q Check that vent is not crushed or kinked. Tighten and adjust leveling legs Using a 4" (102 mm) clamp, connect vent...
... Care Guide. For direct wire installation, turn on console and any dust. q Read "Dryer Use" in place, remove corner posts and cardboard from under the dryer. Level Dryer 1. Repeat from side to exhaust outlet in a running or "On" position. ■■ Start button has been pushed firmly. ■■ Dryer is plugged into an outlet. q Check that vent is not crushed or kinked. Tighten and adjust leveling legs Using a 4" (102 mm) clamp, connect vent...


