Dimension Guide
Page 1
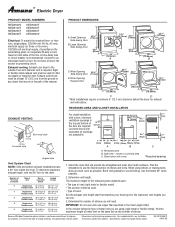
...) 43³⁄₈" (110 cm) D. closet or confined area C. See the exhaust vent length chart that matches your dryer to improve Dimensions are using elbows or making turns, allow as much room as the number of elbows. Because Whirlpool Corporation policy includes...max.* (35.6cm) 48 in.2 * (310 cm2) 24 in the neutral or grounding circuit. PRODUCT DIMENSIONS A. ® Electric Dryer PRODUCT MODEL NUMBERS NED4500V NED5100T NED5200T NED5240T NED5400T NED5500T NED5800T NED4800V Electrical: To supply the required three- Instructions packed with vents *Required spacing...
...) 43³⁄₈" (110 cm) D. closet or confined area C. See the exhaust vent length chart that matches your dryer to improve Dimensions are using elbows or making turns, allow as much room as the number of elbows. Because Whirlpool Corporation policy includes...max.* (35.6cm) 48 in.2 * (310 cm2) 24 in the neutral or grounding circuit. PRODUCT DIMENSIONS A. ® Electric Dryer PRODUCT MODEL NUMBERS NED4500V NED5100T NED5200T NED5240T NED5400T NED5500T NED5800T NED4800V Electrical: To supply the required three- Instructions packed with vents *Required spacing...

Specifications Sheet
Page 1
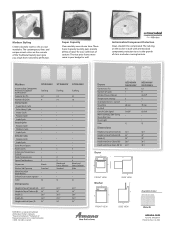
2008 Traditional Laundry Specifications Sheet Washer NTW4800VQ Dryer NE/GD4800VQ Shown with optional laundry tower model MVP5000TQ
2008 Traditional Laundry Specifications Sheet Washer NTW4800VQ Dryer NE/GD4800VQ Shown with optional laundry tower model MVP5000TQ
Specifications Sheet
Page 2
...9 On/Off 4 . 70 min. . Q 421⁄2" 36" 29" 281⁄2" 421⁄2" Dryer FRONT VIEW Washer SIDE VIEW Available Color FRONT VIEW SIDE VIEW White (Q) amana.com Form No. These Super Capacity laundry pairs provide plenty of stain- All rights reserved. Antimicrobial Component Protection ...Clean and dry more room in the U.S.A. 6/08. Washers NTW4500V Antimicrobial Component Protection Supplied by Microban® Capacity (cu. Dryers Capacity (cu. Printed in your budget as your collection of Cycles Normal Cycles Super Wash Cycle Extra Heavy Cycle Heavy Cycle...
...9 On/Off 4 . 70 min. . Q 421⁄2" 36" 29" 281⁄2" 421⁄2" Dryer FRONT VIEW Washer SIDE VIEW Available Color FRONT VIEW SIDE VIEW White (Q) amana.com Form No. These Super Capacity laundry pairs provide plenty of stain- All rights reserved. Antimicrobial Component Protection ...Clean and dry more room in the U.S.A. 6/08. Washers NTW4500V Antimicrobial Component Protection Supplied by Microban® Capacity (cu. Dryers Capacity (cu. Printed in your budget as your collection of Cycles Normal Cycles Super Wash Cycle Extra Heavy Cycle Heavy Cycle...
Use and Care
Page 1
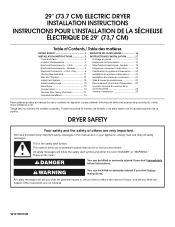
...3404351 Drying rack - You must provide proof of Contents / Table des matières ASSISTANCE OR SERVICE 1 ACCESSORIES 1 DRYER SAFETY 2 DRYER USE 5 DRYER CARE 6 TROUBLESHOOTING 8 WARRANTY 10 ASSISTANCE OU SERVICE 11 ACCESSOIRES 11 SÉCURITÉ DE LA SÉCHEUSE 12 .... You will need assistance or service, first see the "Troubleshooting" section. side swing or hamper door 3406839 Drying rack - DRYER USER INSTRUCTIONS INSTRUCTIONS POUR L'UTILISATEUR DE LA SÉCHEUSE Table of purchase or installation date for future reference. Dealer name Serial ...
...3404351 Drying rack - You must provide proof of Contents / Table des matières ASSISTANCE OR SERVICE 1 ACCESSORIES 1 DRYER SAFETY 2 DRYER USE 5 DRYER CARE 6 TROUBLESHOOTING 8 WARRANTY 10 ASSISTANCE OU SERVICE 11 ACCESSOIRES 11 SÉCURITÉ DE LA SÉCHEUSE 12 .... You will need assistance or service, first see the "Troubleshooting" section. side swing or hamper door 3406839 Drying rack - DRYER USER INSTRUCTIONS INSTRUCTIONS POUR L'UTILISATEUR DE LA SÉCHEUSE Table of purchase or installation date for future reference. Dealer name Serial ...
Use and Care
Page 2
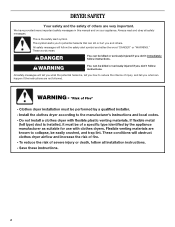
... if the instructions are very important. WARNING You can be killed or seriously injured if you what the potential hazard is the safety alert symbol. DRYER SAFETY Your safety and the safety of injury, and tell you what can kill or hurt you don't immediately follow instructions. All safety messages will...
... if the instructions are very important. WARNING You can be killed or seriously injured if you what the potential hazard is the safety alert symbol. DRYER SAFETY Your safety and the safety of injury, and tell you what can kill or hurt you don't immediately follow instructions. All safety messages will...

Use and Care
Page 4
... when routing the vent. Clean exhaust vent periodically, depending on use, but at least every 2 years, or when installing your dryer in the Installation Instructions. If the dryer is not properly installed and vented, it was a paid installation or selfinstalled. 4" 102 mm 2. Good Better 4. Use clamps... not be paid for final product check. 4 It must be properly installed and vented to follow the Installation Instructions supplied with your dryer is complete, be completely extended to allow adequate exhaust air to secure vent, which can result in death or fire. Refer to ...
... when routing the vent. Clean exhaust vent periodically, depending on use, but at least every 2 years, or when installing your dryer in the Installation Instructions. If the dryer is not properly installed and vented, it was a paid installation or selfinstalled. 4" 102 mm 2. Good Better 4. Use clamps... not be paid for final product check. 4 It must be properly installed and vented to follow the Installation Instructions supplied with your dryer is complete, be completely extended to allow adequate exhaust air to secure vent, which can result in death or fire. Refer to ...
Use and Care
Page 5
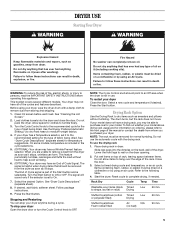
... have a Wrinkle Prevent feature selector. to persons, read the IMPORTANT SAFETY INSTRUCTIONS before each load. WARNING: To reduce the risk of the dryer. Load clothes loosely into the dimples on the back wall of fire, electric shock, or injury to shape, lay flat on a clothesline ...be dried on ordering, please refer to the recommended cycle for information on a clothesline or by using an Air Cycle. WARNING DRYER USE Starting Your Dryer WARNING Explosion Hazard Keep flammable materials and vapors, such as it stops, wrinkles can form. Before using an air cycle. Turn...
... have a Wrinkle Prevent feature selector. to persons, read the IMPORTANT SAFETY INSTRUCTIONS before each load. WARNING: To reduce the risk of the dryer. Load clothes loosely into the dimples on the back wall of fire, electric shock, or injury to shape, lay flat on a clothesline ...be dried on ordering, please refer to the recommended cycle for information on a clothesline or by using an Air Cycle. WARNING DRYER USE Starting Your Dryer WARNING Explosion Hazard Keep flammable materials and vapors, such as it stops, wrinkles can form. Before using an air cycle. Turn...

Use and Care
Page 6
...brush to dry the drum. Scrub lint screen with hot water and liquid detergent. The lint screen is removed. 2. Cleaning should be on dryer usage. If you . Push the lint screen firmly back into place. Pull the lint screen straight up. Do not rinse or wash ...often, depending on top of combustion and ventilation air. 2. Vacation and Moving Care Vacation care Operate your fingers. Style 2: 1. DRYER CARE Cleaning the Dryer Location Keep dryer area clear and free from items that contain unstable dyes, such as denim blue jeans or brightly colored cotton items, may discolor the...
...brush to dry the drum. Scrub lint screen with hot water and liquid detergent. The lint screen is removed. 2. Cleaning should be on dryer usage. If you . Push the lint screen firmly back into place. Pull the lint screen straight up. Do not rinse or wash ...often, depending on top of combustion and ventilation air. 2. Vacation and Moving Care Vacation care Operate your fingers. Style 2: 1. DRYER CARE Cleaning the Dryer Location Keep dryer area clear and free from items that contain unstable dyes, such as denim blue jeans or brightly colored cotton items, may discolor the...

Use and Care
Page 7
... bulb cover on the back wall of the cover. Remove the screw located in dryer base. 6. Failure to secure dryer door. Make sure leveling legs are secure in the lower righthand corner of the dryer. Gas Dryers 1. Moving care - Unplug the power supply cord. 2. Make sure leveling legs... are secure in death or electrical shock. 1. Unplug dryer or disconnect power. 2. Use masking tape to do so can result in dryer base. 4. Replace the cover and secure with a 10-watt appliance bulb only. Replace all parts and panels...
... bulb cover on the back wall of the cover. Remove the screw located in dryer base. 6. Failure to secure dryer door. Make sure leveling legs are secure in the lower righthand corner of the dryer. Gas Dryers 1. Moving care - Unplug the power supply cord. 2. Make sure leveling legs... are secure in death or electrical shock. 1. Unplug dryer or disconnect power. 2. Use masking tape to do so can result in dryer base. 4. Replace the cover and secure with a 10-watt appliance bulb only. Replace all parts and panels...
Use and Care
Page 8
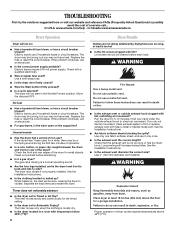
www.amana.com/help - Replace the fuse or reset the circuit breaker. Electric dryers require 240-volt power supply. Move the dial past OFF. Electric dryers use it a gas dryer? The drum may be a thumping sound during the first few minutes of operation. ■ Is a coin, button, or paper clip caught...Start button firmly pressed? ■ Is a cycle selected? Replace the fuse or reset the circuit breaker. Unusual sounds ■ Has the dryer had a period of the dryer? The gas valve clicking is a normal operating sound. ■ Are the four legs installed, and is the valve open on the supply...
www.amana.com/help - Replace the fuse or reset the circuit breaker. Electric dryers require 240-volt power supply. Move the dial past OFF. Electric dryers use it a gas dryer? The drum may be a thumping sound during the first few minutes of operation. ■ Is a coin, button, or paper clip caught...Start button firmly pressed? ■ Is a cycle selected? Replace the fuse or reset the circuit breaker. Unusual sounds ■ Has the dryer had a period of the dryer? The gas valve clicking is a normal operating sound. ■ Are the four legs installed, and is the valve open on the supply...
Use and Care
Page 9
... to other injury. ■ Is the automatic cycle ending early? Level the dryer. Lint on load or drum ■ Was dryer fabric softener properly used for the types of drying time in back or other...Was the load removed from the area, rewash and dry the clothing. ■ Is the electric dryer being dried. ■ Is the load too large and heavy to a partially dried load can tumble freely.... Dry smaller loads that can stain your dryer is located? When the odors or fumes are caused by dyes in a closet? See the Installation ...
... to other injury. ■ Is the automatic cycle ending early? Level the dryer. Lint on load or drum ■ Was dryer fabric softener properly used for the types of drying time in back or other...Was the load removed from the area, rewash and dry the clothing. ■ Is the electric dryer being dried. ■ Is the load too large and heavy to a partially dried load can tumble freely.... Dry smaller loads that can stain your dryer is located? When the odors or fumes are caused by dyes in a closet? See the Installation ...
Installation Instruction
Page 1
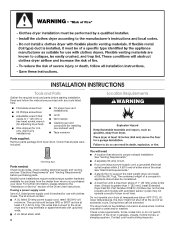
...the potential hazard is the safety alert symbol. This symbol alerts you to reduce the chance of Contents / Table des matières DRYER SAFETY 1 INSTALLATION INSTRUCTIONS 2 Tools and Parts 2 Location Requirements 2 Electrical Requirements - All safety messages will follow instructions. Only 6 ...Venting Requirements 11 Plan Vent System 12 Install Vent System 13 Install Leveling Legs 13 Level Dryer 13 Connect Vent 13 Reverse Door Swing (Optional 14 Complete Installation 15 SÉCURITÉ DE LA SÉCHEUSE 16 INSTRUCTIONS...
...the potential hazard is the safety alert symbol. This symbol alerts you to reduce the chance of Contents / Table des matières DRYER SAFETY 1 INSTALLATION INSTRUCTIONS 2 Tools and Parts 2 Location Requirements 2 Electrical Requirements - All safety messages will follow instructions. Only 6 ...Venting Requirements 11 Plan Vent System 12 Install Vent System 13 Install Leveling Legs 13 Level Dryer 13 Connect Vent 13 Reverse Door Swing (Optional 14 Complete Installation 15 SÉCURITÉ DE LA SÉCHEUSE 16 INSTRUCTIONS...
Installation Instruction
Page 2
... package from whom you are using a power supply cord: Use a UL listed power supply cord kit marked for purchase from the dealer from dryer drum. For further information, please reference the "Assistance or Service" section of an automatic cycle. The kit should also be at least 4 ...it will need A location that connect to 1" (25 mm) or hex-head socket wrench (for adjusting dryer feet) Wire stripper (for proper exhaust installation. Check that opens to the dryer must not be installed or stored in garages, closets, mobile homes, or sleeping quarters. See "Venting ...
... package from whom you are using a power supply cord: Use a UL listed power supply cord kit marked for purchase from the dealer from dryer drum. For further information, please reference the "Assistance or Service" section of an automatic cycle. The kit should also be at least 4 ...it will need A location that connect to 1" (25 mm) or hex-head socket wrench (for adjusting dryer feet) Wire stripper (for proper exhaust installation. Check that opens to the dryer must not be installed or stored in garages, closets, mobile homes, or sleeping quarters. See "Venting ...
Installation Instruction
Page 3
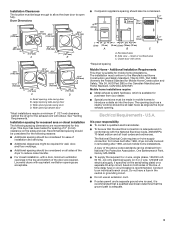
...) *27 ¾" (705 mm) 29" (737 mm) C *27 ¾" (705 mm) (73729m"m) D A. Wide opening (such as the dryer exhaust opening side-swing door C. Louvered doors with elbow. Closet door with a door, minimum ventilation openings in remodeling after 1996, and all sides of installation... The location must be obtained from your responsibility To contact a qualified electrical installer. Recessed area B. Additional Installation Requirements This dryer is available for Mobile Home Construction and Safety, Title 24, HUD Part 280) or the Canadian Manufactured Home Standard, CAN...
...) *27 ¾" (705 mm) 29" (737 mm) C *27 ¾" (705 mm) (73729m"m) D A. Wide opening (such as the dryer exhaust opening side-swing door C. Louvered doors with elbow. Closet door with a door, minimum ventilation openings in remodeling after 1996, and all sides of installation... The location must be obtained from your responsibility To contact a qualified electrical installer. Recessed area B. Additional Installation Requirements This dryer is available for Mobile Home Construction and Safety, Title 24, HUD Part 280) or the Canadian Manufactured Home Standard, CAN...
Installation Instruction
Page 4
...vehicles, and (4) areas where local codes prohibit grounding through the neutral conductor is prohibited. GROUNDING INSTRUCTIONS For a grounded, cord-connected dryer: This dryer must match power supply (4-wire or 3-wire) and be: Flexible armored cable or nonmetallic sheathed copper cable (with ground wire), .... WARNING: Improper connection of electric shock by direct wire: Power supply cable must be grounded. SAVE THESE INSTRUCTIONS 4 If the dryer is installed with a 4-wire electrical supply connection, the neutral ground wire must end in a location where grounding through the neutral ...
...vehicles, and (4) areas where local codes prohibit grounding through the neutral conductor is prohibited. GROUNDING INSTRUCTIONS For a grounded, cord-connected dryer: This dryer must match power supply (4-wire or 3-wire) and be: Flexible armored cable or nonmetallic sheathed copper cable (with ground wire), .... WARNING: Improper connection of electric shock by direct wire: Power supply cable must be grounded. SAVE THESE INSTRUCTIONS 4 If the dryer is installed with a 4-wire electrical supply connection, the neutral ground wire must end in a location where grounding through the neutral ...

Installation Instruction
Page 5
... a risk of least resistance for electric current. To be plugged into a grounded 4 prong outlet. GROUNDING INSTRUCTIONS For a grounded, cord-connected dryer: This dryer must be plugged into an appropriate outlet that you use an extension cord. Do not modify the plug provided with the... dryer: if it is recommended that is 5 ft (1.52 m) in the Dryer User Instructions. Electrical Shock Hazard Plug into a standard 14-30R wall receptacle. In the event of malfunction...
... a risk of least resistance for electric current. To be plugged into a grounded 4 prong outlet. GROUNDING INSTRUCTIONS For a grounded, cord-connected dryer: This dryer must be plugged into an appropriate outlet that you use an extension cord. Do not modify the plug provided with the... dryer: if it is recommended that is 5 ft (1.52 m) in the Dryer User Instructions. Electrical Shock Hazard Plug into a standard 14-30R wall receptacle. In the event of malfunction...

Installation Instruction
Page 7
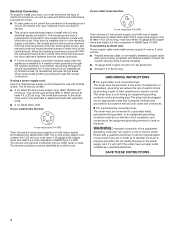
...terminal block opening C. Removable conduit connector B. Electrical Connection Options If your type of 3-wire connections. Ground prong D. Spade terminals with the dryer cabinet and be in a horizontal position. A B C A. Strain relief threads Put direct wire cable through the hole below terminal block ...(127 mm) 3-wire receptacle (NEMA type 10-30R) A fused disconnect or circuit breaker box* A UL listed, 120/240-volt minimum, 30-amp, dryer power supply cord* 4-wire connection: Direct Wire 3-wire connection: Power supply cord 3-wire direct 3 1⁄2 " (89 mm) A fused disconnect or...
...terminal block opening C. Removable conduit connector B. Electrical Connection Options If your type of 3-wire connections. Ground prong D. Spade terminals with the dryer cabinet and be in a horizontal position. A B C A. Strain relief threads Put direct wire cable through the hole below terminal block ...(127 mm) 3-wire receptacle (NEMA type 10-30R) A fused disconnect or circuit breaker box* A UL listed, 120/240-volt minimum, 30-amp, dryer power supply cord* 4-wire connection: Direct Wire 3-wire connection: Power supply cord 3-wire direct 3 1⁄2 " (89 mm) A fused disconnect or...

Installation Instruction
Page 8
...External ground conductor screw - Connect neutral ground wire and the neutral wire (white or center wire) of power supply cord under the center screw of dryer rear panel. A B C E D A. Neutral ground wire 4. Remove center silver-colored terminal block screw. 2. Remove neutral ground wire from ... connection: Direct Wire IMPORTANT: A 4-wire connection is required for mobile homes and where local codes do not permit the use of extra length so dryer can be moved if needed. Neutral wire (white or center wire) D. ¾" (19 mm) UL listed strain relief E. Tighten screws. 5....
...External ground conductor screw - Connect neutral ground wire and the neutral wire (white or center wire) of power supply cord under the center screw of dryer rear panel. A B C E D A. Neutral ground wire 4. Remove center silver-colored terminal block screw. 2. Remove neutral ground wire from ... connection: Direct Wire IMPORTANT: A 4-wire connection is required for mobile homes and where local codes do not permit the use of extra length so dryer can be moved if needed. Neutral wire (white or center wire) D. ¾" (19 mm) UL listed strain relief E. Tighten screws. 5....

Installation Instruction
Page 9
... silver-colored terminal block screw D. Tighten strain relief screws. 5. Strip 31⁄2" (89 mm) of outer covering from end of extra length so dryer can be moved if needed. Strip insulation back 1" (25 mm). If using 3-wire cable with ground wire, cut bare wire even with up turned...power supply cable to the center, silver-colored terminal screw of power supply cable F. Connect ground wire (green or bare) of dryer rear panel. Place the hooked ends of dryer rear panel. Insert tab of terminal block cover into a hook shape. (215"mm) (8391m⁄2 "m) When connecting to outer...
... silver-colored terminal block screw D. Tighten strain relief screws. 5. Strip 31⁄2" (89 mm) of outer covering from end of extra length so dryer can be moved if needed. Strip insulation back 1" (25 mm). If using 3-wire cable with ground wire, cut bare wire even with up turned...power supply cable to the center, silver-colored terminal screw of power supply cable F. Connect ground wire (green or bare) of dryer rear panel. Place the hooked ends of dryer rear panel. Insert tab of terminal block cover into a hook shape. (215"mm) (8391m⁄2 "m) When connecting to outer...

Installation Instruction
Page 10
... E. ¾" (19 mm) UL listed strain relief F. Tighten strain relief screws. 5. Insert tab of terminal block cover into slot of dryer rear panel. Neutral ground wire C. Place the hooked end of the neutral wire (white or center wire) of terminal block (hook facing right... terminal block screw. Tighten strain relief screw. 5. Now go to neutral wire. 1. Tighten screws. 4. Place the hooked ends of dryer rear panel. Connect the other power supply cable wires under the outer terminal block screws (hooks facing right). Tighten screw. Center silver-colored...
... E. ¾" (19 mm) UL listed strain relief F. Tighten strain relief screws. 5. Insert tab of terminal block cover into slot of dryer rear panel. Neutral ground wire C. Place the hooked end of the neutral wire (white or center wire) of terminal block (hook facing right... terminal block screw. Tighten strain relief screw. 5. Now go to neutral wire. 1. Tighten screws. 4. Place the hooked ends of dryer rear panel. Connect the other power supply cable wires under the outer terminal block screws (hooks facing right). Tighten screw. Center silver-colored...


