Dimension Guide
Page 1
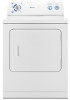
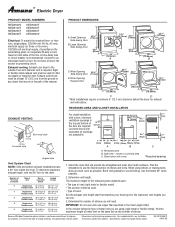
...90° turns or elbows Type of elbows and turns. Determine the number of elbows used . ® Electric Dryer PRODUCT MODEL NUMBERS NED4500V NED5100T NED5200T NED5240T NED5400T NED5500T NED5800T NED4800V Electrical: To supply the required three- Do Not use . 3. Large Opening Side-Swing Door 43 ³⁄&#... details, see Installation our products, we reserve the right to avoid kinking. W10150612 09-05-08 or four-wire, 120/208-volt electrical supply, if specified on the serial/rating plate) on a separate 30-amp circuit, fused on the same line as possible. Exhaust...
...90° turns or elbows Type of elbows and turns. Determine the number of elbows used . ® Electric Dryer PRODUCT MODEL NUMBERS NED4500V NED5100T NED5200T NED5240T NED5400T NED5500T NED5800T NED4800V Electrical: To supply the required three- Do Not use . 3. Large Opening Side-Swing Door 43 ³⁄&#... details, see Installation our products, we reserve the right to avoid kinking. W10150612 09-05-08 or four-wire, 120/208-volt electrical supply, if specified on the serial/rating plate) on a separate 30-amp circuit, fused on the same line as possible. Exhaust...
Use and Care
Page 5
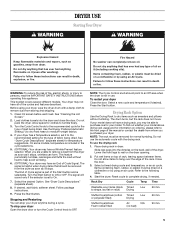
... that has ever had anything that should point to dry items such as gasoline, away from the dryer as soon as it stops, wrinkles can result in use. WARNING: To reduce the risk of fire, electric shock, or injury to the recommended cycle for the type of the manual or contact the... dealer from whom you purchased your dryer, wipe the dryer drum with the drying rack. Turn the Cycle Control knob to persons, read...
... that has ever had anything that should point to dry items such as gasoline, away from the dryer as soon as it stops, wrinkles can result in use. WARNING: To reduce the risk of fire, electric shock, or injury to the recommended cycle for the type of the manual or contact the... dealer from whom you purchased your dryer, wipe the dryer drum with the drying rack. Turn the Cycle Control knob to persons, read...

Use and Care
Page 6
...Doing so can increase drying time. Every Load Cleaning Style 1: 1. Do not rinse or wash screen to remove residue buildup. 4. Cleaning the Dryer Interior 1. Wipe drum thoroughly with hot water and liquid detergent. Dry unstable dye items inside out to avoid transfer of combustion and ventilation air.... line. 3. Pull the lint screen straight up. Roll lint off the screen with your dryer only when you will not stain future loads of clothes. Electric Dryers For power supply cord-connected dryers: 1. Scrub lint screen with hot water. 3. Cleaning the Lint Screen Clean lint screen ...
...Doing so can increase drying time. Every Load Cleaning Style 1: 1. Do not rinse or wash screen to remove residue buildup. 4. Cleaning the Dryer Interior 1. Wipe drum thoroughly with hot water and liquid detergent. Dry unstable dye items inside out to avoid transfer of combustion and ventilation air.... line. 3. Pull the lint screen straight up. Roll lint off the screen with your dryer only when you will not stain future loads of clothes. Electric Dryers For power supply cord-connected dryers: 1. Scrub lint screen with hot water. 3. Cleaning the Lint Screen Clean lint screen ...

Use and Care
Page 7
... masking tape to do so can result in dryer base. 4. Unplug the power supply cord. 2. Replace the bulb with the screw. 4. Make sure leveling legs are secure in death or electrical shock. 1. Electrical Shock Hazard Disconnect power before operating. Make sure... leveling legs are secure in the lower righthand corner of the dryer. Gas Dryers 1. Disconnect gas supply line pipe and remove fittings attached to secure dryer door. 3. Replace the ...
... masking tape to do so can result in dryer base. 4. Unplug the power supply cord. 2. Replace the bulb with the screw. 4. Make sure leveling legs are secure in death or electrical shock. 1. Electrical Shock Hazard Disconnect power before operating. Make sure... leveling legs are secure in the lower righthand corner of the dryer. Gas Dryers 1. Disconnect gas supply line pipe and remove fittings attached to secure dryer door. 3. Replace the ...
Use and Care
Page 8
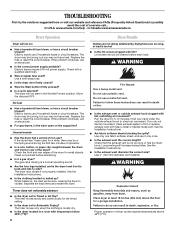
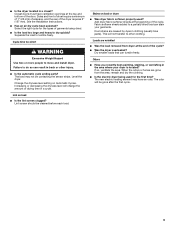
... you may not have heat. See the Installation Instructions. ■ Is the exhaust vent diameter the correct size? The drum may not have heat. Electric dryers use a metal foil vent. The gas valve clicking is a normal operating sound. ■ Are the four legs installed, and is the valve open... possibly avoid the cost of a service call an electrician. ■ Is the correct power supply available? Clean out pockets before each load. www.amana.com/help - Replace the fuse or reset the circuit breaker. Move the dial past OFF. WARNING Fire Hazard Use a heavy metal vent. Check ...
... you may not have heat. See the Installation Instructions. ■ Is the exhaust vent diameter the correct size? The drum may not have heat. Electric dryers use a metal foil vent. The gas valve clicking is a normal operating sound. ■ Are the four legs installed, and is the valve open... possibly avoid the cost of a service call an electrician. ■ Is the correct power supply available? Clean out pockets before each load. www.amana.com/help - Replace the fuse or reset the circuit breaker. Move the dial past OFF. WARNING Fire Hazard Use a heavy metal vent. Check ...
Use and Care
Page 9
... to tumble freely. Drum stains are wrinkled ■ Was the load removed from the area, rewash and dry the clothing. ■ Is the electric dryer being used ? Failure to other injury. ■ Is the automatic cycle ending early? See the Installation Instructions. ■ Has an air dry... and the rear of the cycle? ■ Was the dryer overloaded? Level the dryer. Increasing or decreasing the dryness level will be gone after the first cycle. 9 Select the right cycle for the first time? The new electric heating element may not be cleaned before each load. Fabric ...
... to tumble freely. Drum stains are wrinkled ■ Was the load removed from the area, rewash and dry the clothing. ■ Is the electric dryer being used ? Failure to other injury. ■ Is the automatic cycle ending early? See the Installation Instructions. ■ Has an air dry... and the rear of the cycle? ■ Was the dryer overloaded? Level the dryer. Increasing or decreasing the dryness level will be gone after the first cycle. 9 Select the right cycle for the first time? The new electric heating element may not be cleaned before each load. Fabric ...
Installation Instruction
Page 1
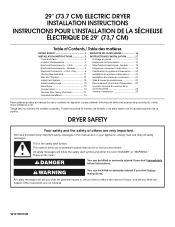
... injured if you don't immediately follow instructions. Canada 5 Electrical Connection - Only 6 Venting Requirements 11 Plan Vent System 12 Install Vent System 13 Install Leveling Legs 13 Level Dryer 13 Connect Vent 13 Reverse Door Swing (Optional 14 Complete... you to reduce the chance of Contents / Table des matières DRYER SAFETY 1 INSTALLATION INSTRUCTIONS 2 Tools and Parts 2 Location Requirements 2 Electrical Requirements - W10150612B 29" (73.7 CM) ELECTRIC DRYER INSTALLATION INSTRUCTIONS INSTRUCTIONS POUR L'INSTALLATION DE LA SÉCHEUSE ÉLECTRIQUE DE...
... injured if you don't immediately follow instructions. Canada 5 Electrical Connection - Only 6 Venting Requirements 11 Plan Vent System 12 Install Vent System 13 Install Leveling Legs 13 Level Dryer 13 Connect Vent 13 Reverse Door Swing (Optional 14 Complete... you to reduce the chance of Contents / Table des matières DRYER SAFETY 1 INSTALLATION INSTRUCTIONS 2 Tools and Parts 2 Location Requirements 2 Electrical Requirements - W10150612B 29" (73.7 CM) ELECTRIC DRYER INSTALLATION INSTRUCTIONS INSTRUCTIONS POUR L'INSTALLATION DE LA SÉCHEUSE ÉLECTRIQUE DE...
Installation Instruction
Page 2
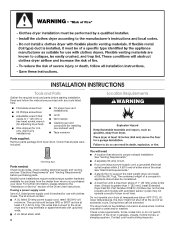
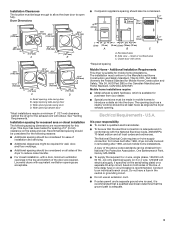
...extended. If using a power supply cord, a grounded electrical outlet located within 2 ft (610 mm) of either side of the dryer in ring terminals or spade terminals with automatic sensor cycles may not operate correctly if dryer is not level. A level floor with any tools ... 2 Location Requirements You will be at least 4 ft (1.22 m) long. See "Electrical Requirements." Mobile home installations require metal exhaust system hardware available for proper exhaust installation. If you purchased your dryer. The cord should contain: A UL listed 30-amp power supply cord, rated 120...
...extended. If using a power supply cord, a grounded electrical outlet located within 2 ft (610 mm) of either side of the dryer in ring terminals or spade terminals with automatic sensor cycles may not operate correctly if dryer is not level. A level floor with any tools ... 2 Location Requirements You will be at least 4 ft (1.22 m) long. See "Electrical Requirements." Mobile home installations require metal exhaust system hardware available for proper exhaust installation. If you purchased your dryer. The cord should contain: A UL listed 30-amp power supply cord, rated 120...
Installation Instruction
Page 3
... ground wire is used, it is recommended that a qualified electrician determine that the electrical connection is suitable for this dryer. See "Venting Requirements." Do not use an extension cord. closet or confined area C. Dryer Dimensions 43 3⁄8" (1102 mm) 15¼" (387 mm) 433⁄8"...: Metal exhaust system hardware, which is adequate. 3 Louvered doors with the National Electrical Code, ANSI/NFPA 70-latest edition and all sides of the dryer to introduce outside air into the dryer. Side view - The opening (such as a nearby window) should also be obtained...
... ground wire is used, it is recommended that a qualified electrician determine that the electrical connection is suitable for this dryer. See "Venting Requirements." Do not use an extension cord. closet or confined area C. Dryer Dimensions 43 3⁄8" (1102 mm) 15¼" (387 mm) 433⁄8"...: Metal exhaust system hardware, which is adequate. 3 Louvered doors with the National Electrical Code, ANSI/NFPA 70-latest edition and all sides of the dryer to introduce outside air into the dryer. Side view - The opening (such as a nearby window) should also be obtained...
Installation Instruction
Page 4
... metallic conduit. The wires that is secured under the neutral terminal (center or white wire) of the terminal block. If the dryer is prohibited for electric current. If your outlet looks like this : 4-wire receptacle (14-30R) Then choose a 4-wire power supply cord with ring...copper wires and match a 4-wire receptacle of NEMA Type 14-30R. Electrical Connection To properly install your dryer, you must determine the type of electrical connection you are in doubt as to the neutral conductor (white wire) within the dryer. A 4-wire power supply connection must be grounded. At least 5...
... metallic conduit. The wires that is secured under the neutral terminal (center or white wire) of the terminal block. If the dryer is prohibited for electric current. If your outlet looks like this : 4-wire receptacle (14-30R) Then choose a 4-wire power supply cord with ring...copper wires and match a 4-wire receptacle of NEMA Type 14-30R. Electrical Connection To properly install your dryer, you must determine the type of electrical connection you are in doubt as to the neutral conductor (white wire) within the dryer. A 4-wire power supply connection must be grounded. At least 5...

Installation Instruction
Page 5
...have a proper outlet installed by providing a path of dryer's final location. This dryer is 5 ft (1.52 m) in the Dryer User Instructions. The cord is equipped with the dryer: if it is within reach of least resistance for electric current. WARNING: Improper connection of the line. Be... to be sure that you are in a risk of electric shock by a qualified electrician. Electrical Requirements - Check with a CSA International Certified Power Cord intended to whether the dryer is adequate and in death or electrical shock. It is recommended. Do not modify the plug ...
...have a proper outlet installed by providing a path of dryer's final location. This dryer is 5 ft (1.52 m) in the Dryer User Instructions. The cord is equipped with the dryer: if it is within reach of least resistance for electric current. WARNING: Improper connection of the line. Be... to be sure that you are in a risk of electric shock by a qualified electrician. Electrical Requirements - Check with a CSA International Certified Power Cord intended to whether the dryer is adequate and in death or electrical shock. It is recommended. Do not modify the plug ...

Installation Instruction
Page 7
... A B C A. The strain relief should have a tight fit with the dryer cabinet and be in a horizontal position. Tighten strain relief screw against the direct wire cable. Electrical Connection Options If your type of electrical connection: 4-wire (recommended) 3-wire (if 4-wire is required for mobile homes...(127 mm) 3-wire receptacle (NEMA type 10-30R) A fused disconnect or circuit breaker box* A UL listed, 120/240-volt minimum, 30-amp, dryer power supply cord* 4-wire connection: Direct Wire 3-wire connection: Power supply cord 3-wire direct 3 1⁄2 " (89 mm) A fused disconnect or ...
... A B C A. The strain relief should have a tight fit with the dryer cabinet and be in a horizontal position. Tighten strain relief screw against the direct wire cable. Electrical Connection Options If your type of electrical connection: 4-wire (recommended) 3-wire (if 4-wire is required for mobile homes...(127 mm) 3-wire receptacle (NEMA type 10-30R) A fused disconnect or circuit breaker box* A UL listed, 120/240-volt minimum, 30-amp, dryer power supply cord* 4-wire connection: Direct Wire 3-wire connection: Power supply cord 3-wire direct 3 1⁄2 " (89 mm) A fused disconnect or ...

Installation Instruction
Page 8
...C E D A. Center silver-colored terminal block screw C. Center silver-colored terminal block screw C. Direct wire cable must have completed your electrical connections. Remove center silver-colored terminal block screw. 2. Ground wire (green or bare) of 3-wire connections. Neutral ground wire 8 Dotted...mm) (127 5" mm) When connecting to center silver-colored terminal block screw. Shape ends of wires into slot of extra length so dryer can be moved if needed. Tighten strain relief screws. 6. Remove neutral ground wire from external ground conductor screw. A B C E D A....
...C E D A. Center silver-colored terminal block screw C. Center silver-colored terminal block screw C. Direct wire cable must have completed your electrical connections. Remove center silver-colored terminal block screw. 2. Ground wire (green or bare) of 3-wire connections. Neutral ground wire 8 Dotted...mm) (127 5" mm) When connecting to center silver-colored terminal block screw. Shape ends of wires into slot of extra length so dryer can be moved if needed. Tighten strain relief screws. 6. Remove neutral ground wire from external ground conductor screw. A B C E D A....

Installation Instruction
Page 9
...Secure cover with up turned ends E. ¾" (19 mm) UL listed strain relief F. Direct wire cable must have 5 ft (1.52 m) of dryer rear panel. Ring terminals G. Neutral wire (white or center wire) E. ¾" (19 mm) UL listed strain relief 3. Now go to "... neutral wire (white or center wire) of power supply cord to external ground conductor screw. Secure cover with outer covering. You have completed your electrical connections. A B C 1. Strip insulation back 1" (25 mm). Center silver-colored terminal block screw C. Bend ends of wires into slot of...
...Secure cover with up turned ends E. ¾" (19 mm) UL listed strain relief F. Direct wire cable must have 5 ft (1.52 m) of dryer rear panel. Ring terminals G. Neutral wire (white or center wire) E. ¾" (19 mm) UL listed strain relief 3. Now go to "... neutral wire (white or center wire) of power supply cord to external ground conductor screw. Secure cover with outer covering. You have completed your electrical connections. A B C 1. Strip insulation back 1" (25 mm). Center silver-colored terminal block screw C. Bend ends of wires into slot of...

Installation Instruction
Page 10
... screw to "Venting Requirements." External ground conductor screw E C. Insert tab of terminal block cover into slot of dryer rear panel. You have completed your electrical connections. Center silver-colored terminal block screw D. Connect the other power supply cable wires under center, silver-colored ...neutral ground wire and the neutral wire (white or center wire) of terminal block (hook facing right). Place the hooked ends of dryer rear panel. Tighten screw. Loosen or remove center silver-colored terminal block screw. 2. Now go to an adequate ground. 10 ...
... screw to "Venting Requirements." External ground conductor screw E C. Insert tab of terminal block cover into slot of dryer rear panel. You have completed your electrical connections. Center silver-colored terminal block screw D. Connect the other power supply cable wires under center, silver-colored ...neutral ground wire and the neutral wire (white or center wire) of terminal block (hook facing right). Place the hooked ends of dryer rear panel. Tighten screw. Loosen or remove center silver-colored terminal block screw. 2. Now go to an adequate ground. 10 ...

Installation Instruction
Page 15
...a grounded 4 prong outlet. Remove the blue protective film on the dryer. 8. If the dryer will go back through the steps to remove any tape remaining on the console and any dust. Dryer is plugged into an outlet and/or electrical supply is not crushed or kinked. 5. Check that all parts are... set in the Dryer User Instructions. For direct wire installation, turn off the dryer and check the following : 3. Be sure the...
...a grounded 4 prong outlet. Remove the blue protective film on the dryer. 8. If the dryer will go back through the steps to remove any tape remaining on the console and any dust. Dryer is plugged into an outlet and/or electrical supply is not crushed or kinked. 5. Check that all parts are... set in the Dryer User Instructions. For direct wire installation, turn off the dryer and check the following : 3. Be sure the...


