
Use and Care
Page 4
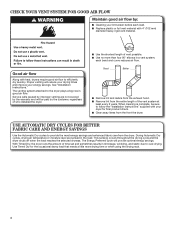
... dryer shuts off when the load reaches the selected dryness. During Automatic Dry cycles, drying air temperature or moisture level are not covered by the warranty and will be sure to follow the "Installation Instructions" supplied with your lint screen before each bend and curve reduces air flow. Good air flow Along with 4" (102 mm) diameter heavy, rigid vent material. each load. ■■ Replace plastic or foil vent material with heat, dryers require good air flow...
... dryer shuts off when the load reaches the selected dryness. During Automatic Dry cycles, drying air temperature or moisture level are not covered by the warranty and will be sure to follow the "Installation Instructions" supplied with your lint screen before each bend and curve reduces air flow. Good air flow Along with 4" (102 mm) diameter heavy, rigid vent material. each load. ■■ Replace plastic or foil vent material with heat, dryers require good air flow...
Use and Care
Page 5
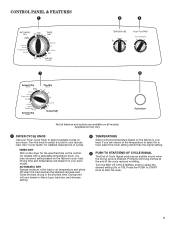
... cycle reduces wrinkling. Gives the best drying in the load or air temperature and shuts off when the load reaches the selected dryness level. Turn the END OF CYCLE SIGNAL knob to start the dryer. 5 Appearance may choose a setting based on all models. Drying time will depend on the control. If you may vary. 1 DRYER CYCLE KNOB Use your Dryer Cycle Knob to select a cycle for your load. See "Cycle Guide" for the specified time on your load...
... cycle reduces wrinkling. Gives the best drying in the load or air temperature and shuts off when the load reaches the selected dryness level. Turn the END OF CYCLE SIGNAL knob to start the dryer. 5 Appearance may choose a setting based on all models. Drying time will depend on the control. If you may vary. 1 DRYER CYCLE KNOB Use your Dryer Cycle Knob to select a cycle for your load. See "Cycle Guide" for the specified time on your load...
Use and Care
Page 6
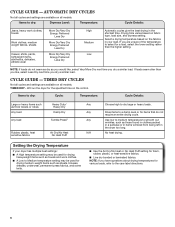
... cycles give the best drying in the dryer too long. NOTE: If loads do not require an entire drying cycle. Setting the Drying Temperature If your load. If loads seem drier than the higher setting. TIMED DRY - If you dry a similar load. Any Dries items to the care label directions. 6 AUTOMATIC DRY CYCLES Not all cycles and settings are available on all models. CYCLE GUIDE - TIMED DRY CYCLES Not all cycles and settings are available on all models. NOTE: If you dry a similar load. N/A No heat drying. Items to dry: Cycle: Temperature: Cycle...
... cycles give the best drying in the dryer too long. NOTE: If loads do not require an entire drying cycle. Setting the Drying Temperature If your load. If loads seem drier than the higher setting. TIMED DRY - If you dry a similar load. Any Dries items to the care label directions. 6 AUTOMATIC DRY CYCLES Not all cycles and settings are available on all models. CYCLE GUIDE - TIMED DRY CYCLES Not all cycles and settings are available on all models. NOTE: If you dry a similar load. N/A No heat drying. Items to dry: Cycle: Temperature: Cycle...

Use and Care
Page 7
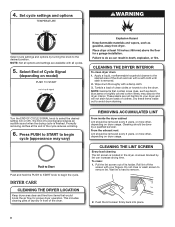
... using your load, by turning the knob to dryness level. Select the desired cycle Clean the lint screen before operating this dryer. AUTOMATIC DRY Cycles You can select a different dryness level, depending on fabric type, load size, and dryness setting. Once a dry level is set, it cannot be able to remove lint. Drying time varies based on your dryer, wipe the dryer drum with your load. Close the door. NOTE: Your model may have drop down doors. 7 Load the dryer...
... using your load, by turning the knob to dryness level. Select the desired cycle Clean the lint screen before operating this dryer. AUTOMATIC DRY Cycles You can select a different dryness level, depending on fabric type, load size, and dryness setting. Once a dry level is set, it cannot be able to remove lint. Drying time varies based on your dryer, wipe the dryer drum with your load. Close the door. NOTE: Your model may have drop down doors. 7 Load the dryer...
Use and Care
Page 8
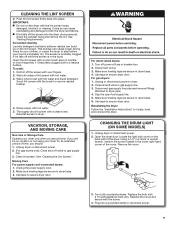
... a load of clean cloths or towels to your dryer and will not stain future loads of the drum and rub with your fingers. Dry these items inside the dryer cabinet Lint should be removed every 2 years, or more often, depending on dryer usage. Turn the END OF CYCLE SIGNAL knob to remove lint. A screen blocked by lint can increase drying time. NOTE: Garments that would block the air flow for proper dryer operation. DRYER CARE CLEANING THE DRYER LOCATION Keep dryer...
... a load of clean cloths or towels to your dryer and will not stain future loads of the drum and rub with your fingers. Dry these items inside the dryer cabinet Lint should be removed every 2 years, or more often, depending on dryer usage. Turn the END OF CYCLE SIGNAL knob to remove lint. A screen blocked by lint can increase drying time. NOTE: Garments that would block the air flow for proper dryer operation. DRYER CARE CLEANING THE DRYER LOCATION Keep dryer...
Use and Care
Page 9
... dry. For gas dryers: 1. Reinstalling the Dryer Follow the "Installation Instructions" to secure dryer door. Unplug dryer or disconnect power. 2. See "Venting Requirements." Locate the light bulb cover on the lint screen. Replace the bulb with a nylon brush every 6 months, or more frequently, if it becomes clogged due to both sides of the cover. This buildup can cause longer drying times for an extended period of the dryer. Scrub lint screen with a clean towel. Moving Care For power supply cord-connected dryers: 1. Use...
... dry. For gas dryers: 1. Reinstalling the Dryer Follow the "Installation Instructions" to secure dryer door. Unplug dryer or disconnect power. 2. See "Venting Requirements." Locate the light bulb cover on the lint screen. Replace the bulb with a nylon brush every 6 months, or more frequently, if it becomes clogged due to both sides of the cover. This buildup can cause longer drying times for an extended period of the dryer. Scrub lint screen with a clean towel. Moving Care For power supply cord-connected dryers: 1. Use...
Use and Care
Page 10
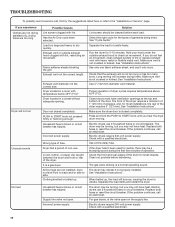
... have heat. For gas dryers, is blown or circuit breaker has tripped. Exhaust vent or outside exhaust hood to dry quickly. PUSH to START knob until you hear the dryer drum moving. Household fuse is the valve open . Incorrect power supply. Solution Lint screen should be turning, but you experience Clothes are not drying satisfactorily, drying times are not installed, dryer not level front to back and/or side to the "Assistance or Service" page. See "Cycle Guide...
... have heat. For gas dryers, is blown or circuit breaker has tripped. Exhaust vent or outside exhaust hood to dry quickly. PUSH to START knob until you hear the dryer drum moving. Household fuse is the valve open . Incorrect power supply. Solution Lint screen should be turning, but you experience Clothes are not drying satisfactorily, drying times are not installed, dryer not level front to back and/or side to the "Assistance or Service" page. See "Cycle Guide...
Use and Care
Page 11
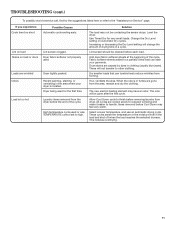
... setting on load or drum Loads are caused by dyes in a cycle. These will change the amount of drying time in clothing (usually blue jeans). When the odors or fumes are cooled slowly to reduced wrinkling and make it easier to a partially dried load can tumble freely reduce wrinkles from dryer. Dryer being used for very small loads. The new electric heating element may not be gone after the first cycle. Items removed...
... setting on load or drum Loads are caused by dyes in a cycle. These will change the amount of drying time in clothing (usually blue jeans). When the odors or fumes are cooled slowly to reduced wrinkling and make it easier to a partially dried load can tumble freely reduce wrinkles from dryer. Dryer being used for very small loads. The new electric heating element may not be gone after the first cycle. Items removed...
Use and Care
Page 12
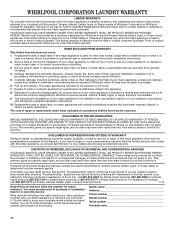
... is installed in -warranty service. Repairs to parts or systems resulting from warranty coverage. 4. ITEMS EXCLUDED FROM WARRANTY This limited warranty does not cover: 1. Replacement parts or repair labor on the product. If outside the 50 United States and Canada, contact your major appliance if it was purchased. Dealer name Address Phone number Model number Serial number Purchase date 12 Consumable parts are unable to resolve the problem after checking "Troubleshooting...
... is installed in -warranty service. Repairs to parts or systems resulting from warranty coverage. 4. ITEMS EXCLUDED FROM WARRANTY This limited warranty does not cover: 1. Replacement parts or repair labor on the product. If outside the 50 United States and Canada, contact your major appliance if it was purchased. Dealer name Address Phone number Model number Serial number Purchase date 12 Consumable parts are unable to resolve the problem after checking "Troubleshooting...

Warranty
Page 1
... contained in this Warranty. Replacement parts or repair labor if this major appliance is used in the country in which it is installed in an inaccessible location or is not installed in accordance with original model/serial numbers that have other rights that vary from state to state or province to province. Pick up and delivery. This warranty gives you specific legal rights, and you...
... contained in this Warranty. Replacement parts or repair labor if this major appliance is used in the country in which it is installed in an inaccessible location or is not installed in accordance with original model/serial numbers that have other rights that vary from state to state or province to province. Pick up and delivery. This warranty gives you specific legal rights, and you...
Specifications Sheet
Page 4
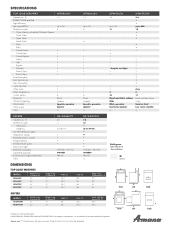
...;2" 501⁄2" D E B BA A BB front E E D side DD D CE side B C water A electric A B A back A electric A back *Indicates a retail-specific model. Form No. AL130026 B D EA B C A B C DD D ED D B E BB E A B B A B C CD C C A ft.) Number of cycles Heavy Duty Timed Dry On/off end-of-cycle signal Temperature settings Automatic Dryness Control Energy Preferred Wrinkle Prevent option Interior drum light Reversible-swing door Optional drying rack LP conversion kit (gas models only) Color DIMENSIONS NE/GD4600Y 6.5 11 up to 60 min. 3 • •...
...;2" 501⁄2" D E B BA A BB front E E D side DD D CE side B C water A electric A B A back A electric A back *Indicates a retail-specific model. Form No. AL130026 B D EA B C A B C DD D ED D B E BB E A B B A B C CD C C A ft.) Number of cycles Heavy Duty Timed Dry On/off end-of-cycle signal Temperature settings Automatic Dryness Control Energy Preferred Wrinkle Prevent option Interior drum light Reversible-swing door Optional drying rack LP conversion kit (gas models only) Color DIMENSIONS NE/GD4600Y 6.5 11 up to 60 min. 3 • •...

Dimension Guide
Page 2
... determine maximum exhaust length, add one 90º turn inside the dryer. NOTE: Do not use plastic or metal foil vet. Vent System Chart (Long Vent Models Only) Number of 90° turns or elbows Type of vent material and hood combinations acceptable to use fewest number of the line. For complete details, see Installation Instructions packed with product. Determine vent length and elbows needed for planning purposes only. Exhaust systems longer...
... determine maximum exhaust length, add one 90º turn inside the dryer. NOTE: Do not use plastic or metal foil vet. Vent System Chart (Long Vent Models Only) Number of 90° turns or elbows Type of vent material and hood combinations acceptable to use fewest number of the line. For complete details, see Installation Instructions packed with product. Determine vent length and elbows needed for planning purposes only. Exhaust systems longer...
Installation Instruction
Page 4
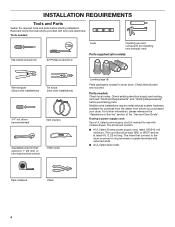
... "Electrical Requirements" and "Venting Requirements" before starting installation. Tools needed : Check local codes. The kit should be type SRD or SRDT and be at least 4 ft. (1.22 m) long. For further information, please reference the "Assistance or Service" section of the "Use and Care Guide". Read and follow the instructions provided with clothes dryers. The wires that opens to the dryer must end in dryer drum. Check that all models): Wire stripper (direct wire installations) Tin snips (new vent installations) 1/4" nut driver (recommended) Vent clamps...
... "Electrical Requirements" and "Venting Requirements" before starting installation. Tools needed : Check local codes. The kit should be type SRD or SRDT and be at least 4 ft. (1.22 m) long. For further information, please reference the "Assistance or Service" section of the "Use and Care Guide". Read and follow the instructions provided with clothes dryers. The wires that opens to the dryer must end in dryer drum. Check that all models): Wire stripper (direct wire installations) Tin snips (new vent installations) 1/4" nut driver (recommended) Vent clamps...
Installation Instruction
Page 5
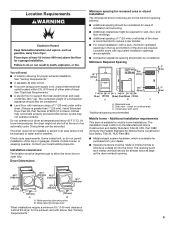
... mm], install Extended Dryer Feet Kit, Part Number 279810.) If not level, clothes may not tumble properly and automatic sensor cycles may not operate correctly. The opening . See "Venting Requirements." 5 See "Venting Requirements." ■■ A separate 30 amp circuit. ■■ If you are acceptable. ■■ Companion appliance spacing should be considered for ease of installation and servicing. ■■ Additional clearances might not shut off at...
... mm], install Extended Dryer Feet Kit, Part Number 279810.) If not level, clothes may not tumble properly and automatic sensor cycles may not operate correctly. The opening . See "Venting Requirements." 5 See "Venting Requirements." ■■ A separate 30 amp circuit. ■■ If you are acceptable. ■■ Companion appliance spacing should be considered for ease of installation and servicing. ■■ Additional clearances might not shut off at...

Installation Instruction
Page 6
... instructions provided for use with a 4-wire electrical supply connection, the neutral ground wire must be either green or bare. A time-delay fuse or circuit breaker is recommended. The ground wire (ground conductor) may be removed from the external ground connector screw (green screw), and secured under the neutral terminal (center or white wire) of the terminal block, the dryer cabinet is isolated from the neutral conductor. ■■ A 4-wire power...
... instructions provided for use with a 4-wire electrical supply connection, the neutral ground wire must be either green or bare. A time-delay fuse or circuit breaker is recommended. The ground wire (ground conductor) may be removed from the external ground connector screw (green screw), and secured under the neutral terminal (center or white wire) of the terminal block, the dryer cabinet is isolated from the neutral conductor. ■■ A 4-wire power...

Installation Instruction
Page 10
... terminal block cover into hooks. 4. Reaching inside the terminal block opening . Tighten strain relief screws. Finally, reinsert tab of the strain relief through the strain relief. Connect wires to step 3 below the terminal block opening , screw the removable conduit connector onto the strain relief threads (C). Connect remaining wires Put direct wire cable through the hole (B) below . For 4 wire Direct Wire Connection, continue to terminal block Unscrew the removable conduit connector (A) and any screws from end of dryer rear panel...
... terminal block cover into hooks. 4. Reaching inside the terminal block opening . Tighten strain relief screws. Finally, reinsert tab of the strain relief through the strain relief. Connect wires to step 3 below the terminal block opening , screw the removable conduit connector onto the strain relief threads (C). Connect remaining wires Put direct wire cable through the hole (B) below . For 4 wire Direct Wire Connection, continue to terminal block Unscrew the removable conduit connector (A) and any screws from end of dryer rear panel...

Installation Instruction
Page 11
... wire) (C) of direct wire cable under center screw of wire under outer terminal block screws (hooks facing right). Finally, reinsert tab of dryer rear panel. Tighten screw. Connect remaining wires A B E Remove center terminal block screw (B). Connect ground wire Place hooked ends of direct wire cable to terminal block A F Connect ground wire (green or bare) (F) of remaining direct wire cable wires under terminal block screw, facing to terminal block, place hooked end of terminal block (B). Now, go to Venting Requirements. 3-wire Direct Wire Connection Use where local codes...
... wire) (C) of direct wire cable under center screw of wire under outer terminal block screws (hooks facing right). Finally, reinsert tab of dryer rear panel. Tighten screw. Connect remaining wires A B E Remove center terminal block screw (B). Connect ground wire Place hooked ends of direct wire cable to terminal block A F Connect ground wire (green or bare) (F) of remaining direct wire cable wires under terminal block screw, facing to terminal block, place hooked end of terminal block (B). Now, go to Venting Requirements. 3-wire Direct Wire Connection Use where local codes...

Installation Instruction
Page 14
.... Exhaust hood C D E F G B H E. Clamps F. Vent length necessary to the manufacturer's instructions. Other installations are shown. Wall D. Part Number Descriptions 8171587RP 0-5" Metal vent periscope 4396037RP 0"-18" Metal vent periscope 4396011RP 18" - 29" Metal vent periscope 4396014 29" - 50" Metal vent periscope 4392892 In-Wall metal DuraVent™ Periscope 4396028 Sure Connect™ venting kit (over-the-top installation) 4396009RP 5' Universal connect vent, flexible dryer venting 4396010RP 6' SecureConnect™ vent, flexible dryer venting 4396013RB Dryer vent...
.... Exhaust hood C D E F G B H E. Clamps F. Vent length necessary to the manufacturer's instructions. Other installations are shown. Wall D. Part Number Descriptions 8171587RP 0-5" Metal vent periscope 4396037RP 0"-18" Metal vent periscope 4396011RP 18" - 29" Metal vent periscope 4396014 29" - 50" Metal vent periscope 4392892 In-Wall metal DuraVent™ Periscope 4396028 Sure Connect™ venting kit (over-the-top installation) 4396009RP 5' Universal connect vent, flexible dryer venting 4396010RP 6' SecureConnect™ vent, flexible dryer venting 4396013RB Dryer vent...

Installation Instruction
Page 15
... provides venting requirements that will provide straightest and most direct path outdoors. ■■ Plan installation to use fewest number of vent to secure vent, because they can catch lint. 15 Terminate the exhaust vent outside. Secure vent to seal all joints. Install exhaust hood 12" min. (305 mm) 12" min. (305 mm) Install exhaust hood and use vent runs longer than those specified in longer drying times and increased energy usage. Run vent to dryer location using...
... provides venting requirements that will provide straightest and most direct path outdoors. ■■ Plan installation to use fewest number of vent to secure vent, because they can catch lint. 15 Terminate the exhaust vent outside. Secure vent to seal all joints. Install exhaust hood 12" min. (305 mm) 12" min. (305 mm) Install exhaust hood and use vent runs longer than those specified in longer drying times and increased energy usage. Run vent to dryer location using...

Installation Instruction
Page 16
If connecting to exhaust hood with a damp cloth to operate correctly. Level Dryer Check levelness of /recycle all of your "Use and Care Guide". Repeat from front to see what was skipped. q Check dryer's final location. Level Dryer 1. If there is on a full heat cycle (not an air cycle) for levelness. If the dryer will not start the dryer. Dryer vent must be level for the moisture sensing system to remove any tape remaining...
If connecting to exhaust hood with a damp cloth to operate correctly. Level Dryer Check levelness of /recycle all of your "Use and Care Guide". Repeat from front to see what was skipped. q Check dryer's final location. Level Dryer 1. If there is on a full heat cycle (not an air cycle) for levelness. If the dryer will not start the dryer. Dryer vent must be level for the moisture sensing system to remove any tape remaining...


