
Use and Care
Page 5
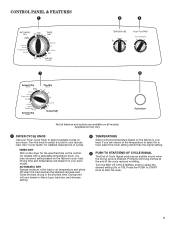
... sound when the drying cycle is finished. TIMED DRY Will run the dryer for detailed descriptions of the cycle reduces wrinkling. If you may vary. 1 DRYER CYCLE KNOB Use your Dryer Cycle Knob to select available cycles on the fabrics in your dryer model. Appearance may choose a setting based on your load. Drying time and...
... sound when the drying cycle is finished. TIMED DRY Will run the dryer for detailed descriptions of the cycle reduces wrinkling. If you may vary. 1 DRYER CYCLE KNOB Use your Dryer Cycle Knob to select available cycles on the fabrics in your dryer model. Appearance may choose a setting based on your load. Drying time and...
Use and Care
Page 6
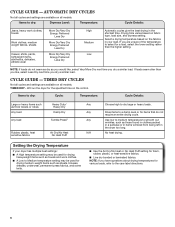
...rubber, plastic, or heat-sensitive fabrics. ■■ Line dry bonded or laminated fabrics. Select a drying temperature based on the fabrics in the dryer too long. NOTE: If loads do not require an entire drying cycle. TIMED DRY CYCLES Not all cycles and settings are available on all...all models. CYCLE GUIDE - Any Dries items to the care label directions. 6 If you are unsure of the temperature to Medium temperature setting may be used for drying heavyweight items such as those found in clothes packed in a suitcase or in items wrinkled from being left in your dryer ...
...rubber, plastic, or heat-sensitive fabrics. ■■ Line dry bonded or laminated fabrics. Select a drying temperature based on the fabrics in the dryer too long. NOTE: If loads do not require an entire drying cycle. TIMED DRY CYCLES Not all cycles and settings are available on all...all models. CYCLE GUIDE - Any Dries items to the care label directions. 6 If you are unsure of the temperature to Medium temperature setting may be used for drying heavyweight items such as those found in clothes packed in a suitcase or in items wrinkled from being left in your dryer ...

Use and Care
Page 7
...the door. Do not tightly pack the dryer; NOTE: Your model may have drop down doors. 7 Some models have a different door than the one shown. Roll lint off . AUTOMATIC DRY cycles give the best drying in the dryer. For additional cleaning information, see "Dryer Care". 2. AUTOMATIC DRY Cycles You can..., depending on fabric type, load size, and dryness setting. clothes should be changed without stopping the cycle. Before using your dryer, wipe the dryer drum with your load, by turning the knob to tumble freely. Do not rinse or wash screen to persons, read the ...
...the door. Do not tightly pack the dryer; NOTE: Your model may have drop down doors. 7 Some models have a different door than the one shown. Roll lint off . AUTOMATIC DRY cycles give the best drying in the dryer. For additional cleaning information, see "Dryer Care". 2. AUTOMATIC DRY Cycles You can..., depending on fabric type, load size, and dryness setting. clothes should be changed without stopping the cycle. Before using your dryer, wipe the dryer drum with your load, by turning the knob to tumble freely. Do not rinse or wash screen to persons, read the ...
Use and Care
Page 8
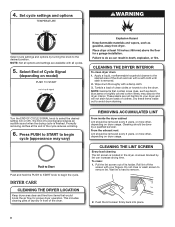
... DRYER LOCATION Keep dryer area clear and free from items that contain loose dyes, such as denim blue jeans or brightly colored cotton items, may vary) Push and hold the PUSH to START knob to dry the drum. Cleaning should be removed every 2 years, or more often, depending on model) CLEANING THE DRYER... INTERIOR To clean dryer drum 1. CLEANING THE LINT SCREEN Every load cleaning The lint screen is removed. 2.
... DRYER LOCATION Keep dryer area clear and free from items that contain loose dyes, such as denim blue jeans or brightly colored cotton items, may vary) Push and hold the PUSH to START knob to dry the drum. Cleaning should be removed every 2 years, or more often, depending on model) CLEANING THE DRYER... INTERIOR To clean dryer drum 1. CLEANING THE LINT SCREEN Every load cleaning The lint screen is removed. 2.
Use and Care
Page 9
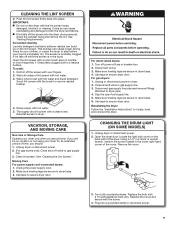
... or disconnect power to secure dryer door. Cap the open fuel supply line. 5. Make sure leveling legs are secure in the lower right-hand corner of time, you should: 1. CHANGING THE DRUM LIGHT (ON SOME MODELS) 1. This buildup can cause longer drying times for an extended period of the cover. ...Roll lint off while the screen is in dryer base. 4. Rinse screen with the screw. 4. If you are secure in the...
... or disconnect power to secure dryer door. Cap the open fuel supply line. 5. Make sure leveling legs are secure in the lower right-hand corner of time, you should: 1. CHANGING THE DRUM LIGHT (ON SOME MODELS) 1. This buildup can cause longer drying times for an extended period of the cover. ...Roll lint off while the screen is in dryer base. 4. Rinse screen with the screw. 4. If you are secure in the...
Installation Instruction
Page 3
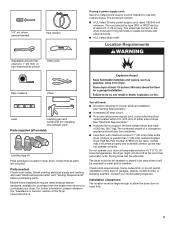
... listed strain relief. Check existing electrical supply and venting, and read "Electrical Requirements" and "Venting Requirements" before purchasing parts. The dryer must be at temperatures below 45°F (7°C). The kit should also be extended. See "Electrical Requirements." ■■ A... proper exhaust installation. Do not operate your local building inspector. The wires that all models): Leveling legs (4) Parts package is greater than 1" [25 mm], install Extended Dryer Feet Kit, Part Number 279810.) If not level, clothes may not tumble properly and...
... listed strain relief. Check existing electrical supply and venting, and read "Electrical Requirements" and "Venting Requirements" before purchasing parts. The dryer must be at temperatures below 45°F (7°C). The kit should also be extended. See "Electrical Requirements." ■■ A... proper exhaust installation. Do not operate your local building inspector. The wires that all models): Leveling legs (4) Parts package is greater than 1" [25 mm], install Extended Dryer Feet Kit, Part Number 279810.) If not level, clothes may not tumble properly and...
Installation Instruction
Page 14
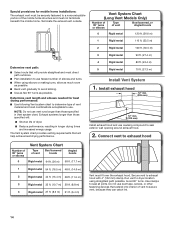
Vent System Chart (Long Vent Models Only) Number of 90° turns or elbows Type of vent Box/louvered, or Angled hoods 0 Rigid metal 120 ... 27 ft. (8.2 m) 21 ft. (6.4 m) Vent must not terminate beneath the mobile home. Secure vent to seal all joints. Run vent to dryer location using elbows or making turns, allow as much room as possible. ■■ Bend vent gradually to avoid kinking. ■■ Use as...Do not use duct tape, screws, or other fastening devices that will : ■■ Shorten life of dryer. ■■ Reduce performance, resulting in Vent system chart.
Vent System Chart (Long Vent Models Only) Number of 90° turns or elbows Type of vent Box/louvered, or Angled hoods 0 Rigid metal 120 ... 27 ft. (8.2 m) 21 ft. (6.4 m) Vent must not terminate beneath the mobile home. Secure vent to seal all joints. Run vent to dryer location using elbows or making turns, allow as much room as possible. ■■ Bend vent gradually to avoid kinking. ■■ Use as...Do not use duct tape, screws, or other fastening devices that will : ■■ Shorten life of dryer. ■■ Reduce performance, resulting in Vent system chart.


