
Use and Care
Page 4
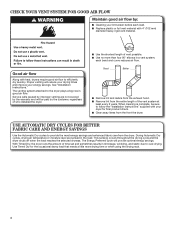
... fabric care from the entire length of the vent system at least every 2 years. each load. ■■ Replace plastic or foil vent material with heat, dryers require good air flow to follow the "Installation Instructions" supplied with your energy savings. This sensing occurs throughout the drying cycle and the dryer...
... fabric care from the entire length of the vent system at least every 2 years. each load. ■■ Replace plastic or foil vent material with heat, dryers require good air flow to follow the "Installation Instructions" supplied with your energy savings. This sensing occurs throughout the drying cycle and the dryer...
Use and Care
Page 6
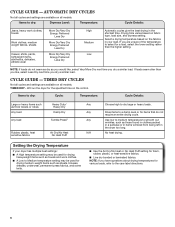
... such as thick towels or robes Any load Any load Heavy Duty/ Heavy Dry Damp Dry Tumble Press® Rubber, plastic, heat sensitive fabrics Air Dry/No Heat No Heat Fluff Any Choose high to smooth out wrinkles, such as sheets, blouses, dresses, underwear, permanent press fabrics, and some knits.... ■■ Use the Air Dry/No Heat or No Heat Fluff setting for various loads, refer to a damp level or for the specified time on all cycles and settings are available on fabric type...
... such as thick towels or robes Any load Any load Heavy Duty/ Heavy Dry Damp Dry Tumble Press® Rubber, plastic, heat sensitive fabrics Air Dry/No Heat No Heat Fluff Any Choose high to smooth out wrinkles, such as sheets, blouses, dresses, underwear, permanent press fabrics, and some knits.... ■■ Use the Air Dry/No Heat or No Heat Fluff setting for various loads, refer to a damp level or for the specified time on all cycles and settings are available on fabric type...
Use and Care
Page 10
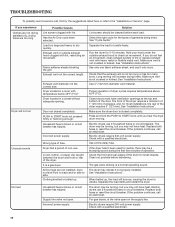
..., the load will increase drying times. Household fuse is a gas dryer. Solution Lint screen should be turning, but you may not have heat. Separate the load to dry quickly. Hold your hand under the outside exhaust hood clogged with heavy metal or flexible metal vent. See ".... When balled up . Replace both fuses or reset the circuit breaker. Electric dryers require 240-volt power supply. If you may not have heat. Fabric softener sheets blocking the grill. See "Cycle Guide." See "Installation Instructions". Load too large and heavy to tumble freely. Door not closed...
..., the load will increase drying times. Household fuse is a gas dryer. Solution Lint screen should be turning, but you may not have heat. Separate the load to dry quickly. Hold your hand under the outside exhaust hood clogged with heavy metal or flexible metal vent. See ".... When balled up . Replace both fuses or reset the circuit breaker. Electric dryers require 240-volt power supply. If you may not have heat. Fabric softener sheets blocking the grill. See "Cycle Guide." See "Installation Instructions". Load too large and heavy to tumble freely. Door not closed...
Use and Care
Page 11
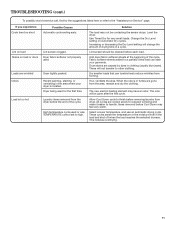
..., first try the suggestions listed here or refer to finish before removing laundry from forming. This reduces overdrying. 11 Dryer tightly packed. The new electric heating element may not be gone after the first cycle. Lint screen should be cleaned before Cool Down may feel very warm. Lint screen clogged. Laundry...
..., first try the suggestions listed here or refer to finish before removing laundry from forming. This reduces overdrying. 11 Dryer tightly packed. The new electric heating element may not be gone after the first cycle. Lint screen should be cleaned before Cool Down may feel very warm. Lint screen clogged. Laundry...

Installation Instruction
Page 15
... an outlet and/or electrical supply is clean. q Check that you have all of /recycle all parts are level, make sure vent is on a full heat cycle (not an air cycle) for levelness. Level Dryer Check levelness of E.I. Connect vent to exhaust outlet NOTE: The dryer must fit over dryer exhaust...
... an outlet and/or electrical supply is clean. q Check that you have all of /recycle all parts are level, make sure vent is on a full heat cycle (not an air cycle) for levelness. Level Dryer Check levelness of E.I. Connect vent to exhaust outlet NOTE: The dryer must fit over dryer exhaust...
Installation Instruction
Page 16
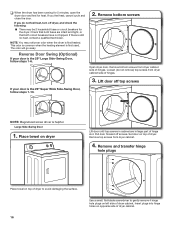
...steps 1-6. 2. Set door on left side of dryer cabinet. Remove top screws from dryer cabinet. 4. This odor is common when the heating element is first heated. Remove bottom screws Open dryer door. Place towel on opposite side of dryer cabinet. Insert plugs into hinge holes on dryer Lift door until...-Swing Door, follow steps 1-13. Large Side-Swing Door 1. q When the dryer has been running for 5 minutes, open the dryer door and feel heat, turn off dryer, and check the following: ■■ There may notice an odor when the dryer is first used. NOTE: You may be 2...
...steps 1-6. 2. Set door on left side of dryer cabinet. Remove top screws from dryer cabinet. 4. This odor is common when the heating element is first heated. Remove bottom screws Open dryer door. Place towel on opposite side of dryer cabinet. Insert plugs into hinge holes on dryer Lift door until...-Swing Door, follow steps 1-13. Large Side-Swing Door 1. q When the dryer has been running for 5 minutes, open the dryer door and feel heat, turn off dryer, and check the following: ■■ There may notice an odor when the dryer is first used. NOTE: You may be 2...


