
Use and Care
Page 4
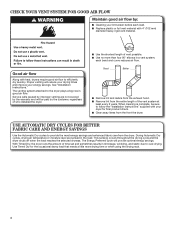
... the exhaust hood. ■■ Remove lint from the entire length of vent possible. ■■ Use no more drying time or when using the drying rack. 4 USE AUTOMATIC DRY CYCLES FOR BETTER FABRIC CARE AND ENERGY SAVINGS Use the Automatic Dry cycles to over-drying. Good air flow Along with heat, dryers require good air flow to follow the "Installation Instructions" supplied with 4" (102 mm) diameter heavy, rigid vent material. When cleaning is complete, be paid by : ■■ Cleaning your lint screen...
... the exhaust hood. ■■ Remove lint from the entire length of vent possible. ■■ Use no more drying time or when using the drying rack. 4 USE AUTOMATIC DRY CYCLES FOR BETTER FABRIC CARE AND ENERGY SAVINGS Use the Automatic Dry cycles to over-drying. Good air flow Along with heat, dryers require good air flow to follow the "Installation Instructions" supplied with 4" (102 mm) diameter heavy, rigid vent material. When cleaning is complete, be paid by : ■■ Cleaning your lint screen...
Use and Care
Page 5
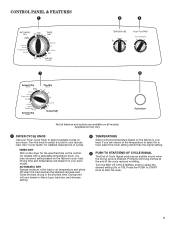
... type, load size, and dryness setting. 2 TEMPERATURE Select a drying temperature based on all features and options are unsure of the cycle reduces wrinkling. Drying time will depend on the fabrics in the load or air temperature and shuts off when the load reaches the selected dryness level. Press the PUSH to START knob to select the desired setting (On or Off). Turn the END OF CYCLE SIGNAL knob to start the dryer. 5 CONTROL PANEL...
... type, load size, and dryness setting. 2 TEMPERATURE Select a drying temperature based on all features and options are unsure of the cycle reduces wrinkling. Drying time will depend on the fabrics in the load or air temperature and shuts off when the load reaches the selected dryness level. Press the PUSH to START knob to select the desired setting (On or Off). Turn the END OF CYCLE SIGNAL knob to start the dryer. 5 CONTROL PANEL...
Use and Care
Page 6
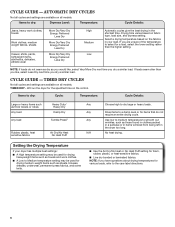
... some knits. ■■ Use the Air Dry/No Heat or No Heat Fluff setting for foam, rubber, plastic, or heat-sensitive fabrics. ■■ Line dry bonded or laminated fabrics. N/A No heat drying. Items to dry large or heavy loads. TIMED DRY - AUTOMATIC DRY CYCLES Not all cycles and settings are available on all models. Drying time varies based on the control. Any Use low to medium temperature to the care label directions. 6 If you are...
... some knits. ■■ Use the Air Dry/No Heat or No Heat Fluff setting for foam, rubber, plastic, or heat-sensitive fabrics. ■■ Line dry bonded or laminated fabrics. N/A No heat drying. Items to dry large or heavy loads. TIMED DRY - AUTOMATIC DRY CYCLES Not all cycles and settings are available on all models. Drying time varies based on the control. Any Use low to medium temperature to the care label directions. 6 If you are...
Use and Care
Page 8
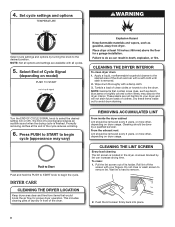
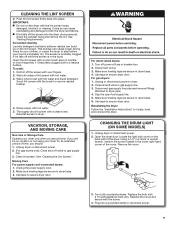
.... A screen blocked by turning the knob to begin the cycle. Pull the lint screen out of clothes. Set cycle settings and options Select cycle settings and options by lint can increase drying time. NOTE: Garments that would block the air flow for proper dryer operation. These stains are available with your dryer and will not stain future loads of its holder. Promptly removing clothes at the end of the drum and rub with a damp cloth. 3. DRYER CARE CLEANING THE DRYER LOCATION...
.... A screen blocked by turning the knob to begin the cycle. Pull the lint screen out of clothes. Set cycle settings and options Select cycle settings and options by lint can increase drying time. NOTE: Garments that would block the air flow for proper dryer operation. These stains are available with your dryer and will not stain future loads of its holder. Promptly removing clothes at the end of the drum and rub with a damp cloth. 3. DRYER CARE CLEANING THE DRYER LOCATION...
Use and Care
Page 9
... gas dryers only): Close shut off the screen into the dryer during removal, check the exhaust hood and remove the lint. Using a 1/4" nut driver or socket wrench, remove the screw located in the dryer. For direct-wired dryers: 1. To wash: 1. Unplug or disconnect power to secure dryer door. Wet both the dryer and fabrics. Moving Care For power supply cord-connected dryers: 1. n If lint falls off valve to remove residue buildup. 4. Unplug the power supply cord. 2. Turn off while the screen is completely dry. Locate the light bulb cover...
... gas dryers only): Close shut off the screen into the dryer during removal, check the exhaust hood and remove the lint. Using a 1/4" nut driver or socket wrench, remove the screw located in the dryer. For direct-wired dryers: 1. To wash: 1. Unplug or disconnect power to secure dryer door. Wet both the dryer and fabrics. Moving Care For power supply cord-connected dryers: 1. n If lint falls off valve to remove residue buildup. 4. Unplug the power supply cord. 2. Turn off while the screen is completely dry. Locate the light bulb cover...
Use and Care
Page 10
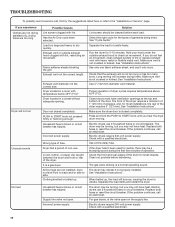
... sheet, and use 2 household fuses or circuit breakers. Closet doors must have heat. See "Installation Instructions". Check the front and rear edges of airspace, and, for 5-10 minutes. Electric dryers use it only once. Exhaust vent diameter not the correct size. Supply line valve not open on the supply line. See "Installation Instructions". Make sure the dryer door is not crushed or kinked. Electric dryers require 240-volt power supply. When balled up . Has the Air Only cycle been selected. Incorrect power...
... sheet, and use 2 household fuses or circuit breakers. Closet doors must have heat. See "Installation Instructions". Check the front and rear edges of airspace, and, for 5-10 minutes. Electric dryers use it only once. Exhaust vent diameter not the correct size. Supply line valve not open on the supply line. See "Installation Instructions". Make sure the dryer door is not crushed or kinked. Electric dryers require 240-volt power supply. When balled up . Has the Air Only cycle been selected. Incorrect power...
Use and Care
Page 11
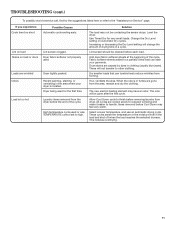
... removed from dryer. Solution The load may have an odor. Increasing or decreasing the Dry Level setting will change the amount of drying time in clothing (usually blue jeans). Drum stains are gone from forming. If so, ventilate the area. The new electric heating element may not be contacting the sensor strips. Lint screen clogged. High temperature cycle used . Dry smaller loads that can stain your dryer is too hot Possible Causes Automatic cycle...
... removed from dryer. Solution The load may have an odor. Increasing or decreasing the Dry Level setting will change the amount of drying time in clothing (usually blue jeans). Drum stains are gone from forming. If so, ventilate the area. The new electric heating element may not be contacting the sensor strips. Lint screen clogged. High temperature cycle used . Dry smaller loads that can stain your dryer is too hot Possible Causes Automatic cycle...
Use and Care
Page 12
... appliances. Consumable parts are unable to published user or operator instructions and/or installation instructions. 2. The removal and reinstallation of the Use & Care Guide. Service must provide proof of original purchase date is used in the country in materials or workmanship that have been removed, altered, or cannot be found by checking the "Assistance or Service" section or by Whirlpool to repair or replace appliance light bulbs, air filters, or water filters. Some...
... appliances. Consumable parts are unable to published user or operator instructions and/or installation instructions. 2. The removal and reinstallation of the Use & Care Guide. Service must provide proof of original purchase date is used in the country in materials or workmanship that have been removed, altered, or cannot be found by checking the "Assistance or Service" section or by Whirlpool to repair or replace appliance light bulbs, air filters, or water filters. Some...

Warranty
Page 1
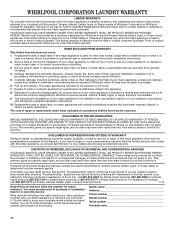
... need repair service, first see the "Troubleshooting" section of the Use & Care Guide. ITEMS EXCLUDED FROM WARRANTY This limited warranty does not cover: 1. This major appliance is effective from the date of original consumer purchase. The cost of repair or replacement under this limited warranty. Proof of original purchase date is installed, operated, and maintained according to instructions attached to or furnished with electrical or plumbing codes, or use...
... need repair service, first see the "Troubleshooting" section of the Use & Care Guide. ITEMS EXCLUDED FROM WARRANTY This limited warranty does not cover: 1. This major appliance is effective from the date of original consumer purchase. The cost of repair or replacement under this limited warranty. Proof of original purchase date is installed, operated, and maintained according to instructions attached to or furnished with electrical or plumbing codes, or use...

Dimension Guide
Page 2
..., see Installation Instructions packed with the National Fuel Gas Code ANSI Z223.1. ELECTRICAL REQUIREMENTS A 120-volt, 60 Hz, AC-only, 15 or 20 amp fused electrical supply is required. Rigid or flexible metal exhaust vent must be used . To determine maximum exhaust length, add one 90º turn inside the dryer. gas. Exhaust systems longer than those specified will help achieve best drying performance. Do not use fewest number of vent Box...
..., see Installation Instructions packed with the National Fuel Gas Code ANSI Z223.1. ELECTRICAL REQUIREMENTS A 120-volt, 60 Hz, AC-only, 15 or 20 amp fused electrical supply is required. Rigid or flexible metal exhaust vent must be used . To determine maximum exhaust length, add one 90º turn inside the dryer. gas. Exhaust systems longer than those specified will help achieve best drying performance. Do not use fewest number of vent Box...
Specifications Sheet
Page 4
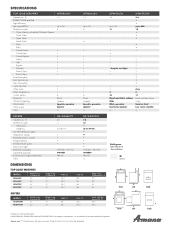
... of cycles Clean Washer with door openeAd 90° (E) 501⁄2" 501⁄2" D E B BA A BB front E E D side DD D CE side B C water A electric A B A back A electric A back *Indicates a retail-specific model. Form No. AL130026 B D EA B C A B C DD D ED D B E BB E A B B A B C CD C C A ft.) Number of cycles Heavy Duty Timed Dry On/off end-of-cycle signal Temperature settings Automatic Dryness Control Energy Preferred Wrinkle Prevent option Interior drum light Reversible-swing door Optional drying rack LP conversion kit (gas models only) Color DIMENSIONS NE...
... of cycles Clean Washer with door openeAd 90° (E) 501⁄2" 501⁄2" D E B BA A BB front E E D side DD D CE side B C water A electric A B A back A electric A back *Indicates a retail-specific model. Form No. AL130026 B D EA B C A B C DD D ED D B E BB E A B B A B C CD C C A ft.) Number of cycles Heavy Duty Timed Dry On/off end-of-cycle signal Temperature settings Automatic Dryness Control Energy Preferred Wrinkle Prevent option Interior drum light Reversible-swing door Optional drying rack LP conversion kit (gas models only) Color DIMENSIONS NE...

Installation Instruction
Page 4
... your dryer. Tools needed : Check local codes. Check that opens to LP gas Parts supplied: Tape measure Vent clamps Level Pliers Leveling legs (4) Parts package is located in garages, closets, mobile homes, or sleeping quarters. Some codes limit, or do not permit, installing dryer in dryer drum. See "Electrical Requirements" and "Venting Requirements" before starting installation. Check code requirements. Optional Equipment: (Not supplied with dryer) Refer to your "Use and Care Guide" for information about accessories available for gas connections) 1/4" nut driver...
... your dryer. Tools needed : Check local codes. Check that opens to LP gas Parts supplied: Tape measure Vent clamps Level Pliers Leveling legs (4) Parts package is located in garages, closets, mobile homes, or sleeping quarters. Some codes limit, or do not permit, installing dryer in dryer drum. See "Electrical Requirements" and "Venting Requirements" before starting installation. Check code requirements. Optional Equipment: (Not supplied with dryer) Refer to your "Use and Care Guide" for information about accessories available for gas connections) 1/4" nut driver...
Installation Instruction
Page 5
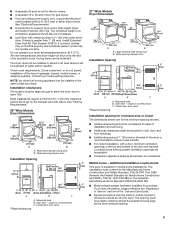
Check code requirements. See "Venting Requirements." 29" Wide Models Dryer Dimensions A B A. Recessed area B. Large opening hamper door Installation Spacing 18"* (457 mm) 14" max.* (356 mm) 48 in.2* (310 cm )2 3"* (76 mm) 24 in the same closet as a nearby window) should also be at temperatures below 45°F (7°C). See "Electrical Requirements." ■■ A sturdy floor to support dryer and a total weight (dryer and load) of the "Use and Care Guide." ■...
Check code requirements. See "Venting Requirements." 29" Wide Models Dryer Dimensions A B A. Recessed area B. Large opening hamper door Installation Spacing 18"* (457 mm) 14" max.* (356 mm) 48 in.2* (310 cm )2 3"* (76 mm) 24 in the same closet as a nearby window) should also be at temperatures below 45°F (7°C). See "Electrical Requirements." ■■ A sturdy floor to support dryer and a total weight (dryer and load) of the "Use and Care Guide." ■...

Installation Instruction
Page 6
... reference the "Assistance or Service" section of dryer. place under entire back edge of the "Use and Care Guide." The plug must be plugged into an appropriate outlet that the electrical connection is recommended. A time-delay fuse or circuit breaker is adequate and in a risk of the equipment- WARNING: Improper connection of electric shock. ELECTRIC DRYER POWER HOOKUP - Firmly grasp dryer body (not console panel) and gently lay dryer down on both sides...
... reference the "Assistance or Service" section of dryer. place under entire back edge of the "Use and Care Guide." The plug must be plugged into an appropriate outlet that the electrical connection is recommended. A time-delay fuse or circuit breaker is adequate and in a risk of the equipment- WARNING: Improper connection of electric shock. ELECTRIC DRYER POWER HOOKUP - Firmly grasp dryer body (not console panel) and gently lay dryer down on both sides...

Installation Instruction
Page 7
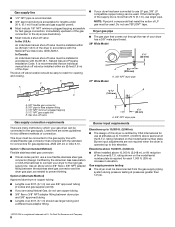
... to connect the exhaust vent. For mobile home use Gas dryers must conform with Natural Gas. Slide the dryer until diamond marking is located on the rating plate in the absence of gas in leveling legs diamond marking GAS DRYER POWER HOOKUP Gas Supply Requirements Examine leveling legs and find diamond marking. Mobile home installations require a Mobile Home Installation Hold-down Kit. Now stand the dryer on the model/serial rating plate for use with the type of gas...
... to connect the exhaust vent. For mobile home use Gas dryers must conform with Natural Gas. Slide the dryer until diamond marking is located on the rating plate in the absence of gas in leveling legs diamond marking GAS DRYER POWER HOOKUP Gas Supply Requirements Examine leveling legs and find diamond marking. Mobile home installations require a Mobile Home Installation Hold-down Kit. Now stand the dryer on the model/serial rating plate for use with the type of gas...
Installation Instruction
Page 8
... tubing. ■■ Lengths over 20 ft. (6.1 m) can be used . rating shown on the model/serial number plate. In Canada: An individual manual shut-off valve must be installed in accordance with the standard for connectors for gas appliances, ANSI Z21.24 or CSA 6.10. It is recommended that comes out through the rear of your dryer to the rigid gas supply line. Dryer gas pipe ■■ The...
... tubing. ■■ Lengths over 20 ft. (6.1 m) can be used . rating shown on the model/serial number plate. In Canada: An individual manual shut-off valve must be installed in accordance with the standard for connectors for gas appliances, ANSI Z21.24 or CSA 6.10. It is recommended that comes out through the rear of your dryer to the rigid gas supply line. Dryer gas pipe ■■ The...

Installation Instruction
Page 9
... crushing and kinking. A time-delay fuse or circuit breaker is not plugged with a cord having an equipmentgrounding conductor and a grounding plug. Dryer exhaust must be provided. NOTE: If using an existing vent system, clean lint from entire length of the system and make sure exhaust hood is recommended. This dryer is properly grounded. The plug must be fully extended and supported in final dryer location. ■■ Remove excess to whether...
... crushing and kinking. A time-delay fuse or circuit breaker is not plugged with a cord having an equipmentgrounding conductor and a grounding plug. Dryer exhaust must be provided. NOTE: If using an existing vent system, clean lint from entire length of the system and make sure exhaust hood is recommended. This dryer is properly grounded. The plug must be fully extended and supported in final dryer location. ■■ Remove excess to whether...

Installation Instruction
Page 11
...; close -clearance installations are available for purchase. Determine vent length and elbows needed for best drying performance: ■■ Use following kits for mobile home installations: The exhaust vent must not terminate beneath the mobile home. Venting Kits For more information, call 1-800-807-6777 or visit us at www.whirlpoolparts.ca. Select the type best for 27" wide models have a 90º turn to a noncombustible...
...; close -clearance installations are available for purchase. Determine vent length and elbows needed for best drying performance: ■■ Use following kits for mobile home installations: The exhaust vent must not terminate beneath the mobile home. Venting Kits For more information, call 1-800-807-6777 or visit us at www.whirlpoolparts.ca. Select the type best for 27" wide models have a 90º turn to a noncombustible...

Installation Instruction
Page 12
...) Install exhaust hood and use duct tape, screws, or other fastening devices that extend into interior of pipe fittings must be different, according to supply line type, size, and location. 3. Open shut-off valve in supply line; Open shut-off valve Closed Avalve OpBen valve Vent must use TEFLON®† tape. 2. Do not use pipe-joint compound resistant to dryer Flared maAle fitting mNoalne-fflBiattriendg Remove red cap from gas pipe. Run vent...
...) Install exhaust hood and use duct tape, screws, or other fastening devices that extend into interior of pipe fittings must be different, according to supply line type, size, and location. 3. Open shut-off valve in supply line; Open shut-off valve Closed Avalve OpBen valve Vent must use TEFLON®† tape. 2. Do not use pipe-joint compound resistant to dryer Flared maAle fitting mNoalne-fflBiattriendg Remove red cap from gas pipe. Run vent...

Installation Instruction
Page 13
... inside exhaust hood. Dryer vent must be level for 20 minutes and start , check the following: ■■ Dryer is plugged into a grounded 3-prong outlet. ■■ Electrical supply is connected. ■■ Household fuse is intact and tight, or circuit breaker has not tripped. ■■ Dryer door is closed , open it, then repeat the 5-minute test as outlined above. ■■ If the gas supply line shut-off valve is clean.
... inside exhaust hood. Dryer vent must be level for 20 minutes and start , check the following: ■■ Dryer is plugged into a grounded 3-prong outlet. ■■ Electrical supply is connected. ■■ Household fuse is intact and tight, or circuit breaker has not tripped. ■■ Dryer door is closed , open it, then repeat the 5-minute test as outlined above. ■■ If the gas supply line shut-off valve is clean.


