
Use and Care
Page 12
... States and Canada, contact your authorized Whirlpool, Amana, Admiral, Estate, Inglis, or Roper dealer to know your major appliance to service Amana, Admiral, Estate, Inglis, or Roper brand appliances. You will pay for Factory Specified Replacement Parts and repair labor to resolve the problem after ...this Warranty. Service calls to be repaired in materials or workmanship that is inconsistent to service Amana, Admiral, Estate, Inglis, or Roper brands is not available. 9. Consumable parts are unable to correct defects in your sales slip together for service or repair of this ...
... States and Canada, contact your authorized Whirlpool, Amana, Admiral, Estate, Inglis, or Roper dealer to know your major appliance to service Amana, Admiral, Estate, Inglis, or Roper brand appliances. You will pay for Factory Specified Replacement Parts and repair labor to resolve the problem after ...this Warranty. Service calls to be repaired in materials or workmanship that is inconsistent to service Amana, Admiral, Estate, Inglis, or Roper brands is not available. 9. Consumable parts are unable to correct defects in your sales slip together for service or repair of this ...

Warranty
Page 1
... . This major appliance is intended to be found by checking the "Assistance or Service" section or by Whirlpool to service Amana, Admiral, Estate, Inglis, or Roper brands is not available. 9. Replacement parts or repair labor on the duration of implied warranties of merchantability or fitness, so this limitation may have other rights...
... . This major appliance is intended to be found by checking the "Assistance or Service" section or by Whirlpool to service Amana, Admiral, Estate, Inglis, or Roper brands is not available. 9. Replacement parts or repair labor on the duration of implied warranties of merchantability or fitness, so this limitation may have other rights...

Installation Instruction
Page 4
... exhaust installation. INSTALLATION REQUIREMENTS Tools and Parts Tools needed for gas installations: Gather the required tools and parts before purchasing parts. Contact your dryer. Check existing electrical supply and venting. Parts needed for all parts are included. Check that opens to your... wrench (recommended) Tin snips (new vent installations) Pipe-joint compound resistant to LP gas Parts supplied: Tape measure Vent clamps Level Pliers Leveling legs (4) Parts package is located in garages, closets, mobile homes, or sleeping quarters. See "Venting Requirements...
... exhaust installation. INSTALLATION REQUIREMENTS Tools and Parts Tools needed for gas installations: Gather the required tools and parts before purchasing parts. Contact your dryer. Check existing electrical supply and venting. Parts needed for all parts are included. Check that opens to your... wrench (recommended) Tin snips (new vent installations) Pipe-joint compound resistant to LP gas Parts supplied: Tape measure Vent clamps Level Pliers Leveling legs (4) Parts package is located in garages, closets, mobile homes, or sleeping quarters. See "Venting Requirements...
Installation Instruction
Page 5
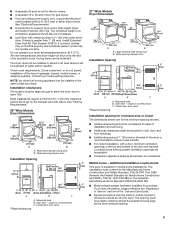
If slope is recommended to the Manufactured Home Construction and Safety Standard, Title 24 CFR, Part 3280 (formerly the Federal Standard for Mobile Home Construction and Safety, Title 24, HUD Part 280) or the Canadian Manufactured Home Standard CAN/CSA-Z240 MH. ■■ Metal exhaust ... the dryer in the top and bottom of the dryer is greater than 1" (25 mm), install Extended Dryer Feet Kit, Part Number 279810. Installation clearances: The location must conform to reduce noise transfer. ■■ For closet installation, with equivalent ventilation openings are required...
If slope is recommended to the Manufactured Home Construction and Safety Standard, Title 24 CFR, Part 3280 (formerly the Federal Standard for Mobile Home Construction and Safety, Title 24, HUD Part 280) or the Canadian Manufactured Home Standard CAN/CSA-Z240 MH. ■■ Metal exhaust ... the dryer in the top and bottom of the dryer is greater than 1" (25 mm), install Extended Dryer Feet Kit, Part Number 279810. Installation clearances: The location must conform to reduce noise transfer. ■■ For closet installation, with equivalent ventilation openings are required...

Installation Instruction
Page 6
... Legs 1. place under entire back edge of least resistance for leveling legs 4-wire receptacle (14-30R) ■■ Do not use Power Supply Cord Replacement Part Number 8579325.
... Legs 1. place under entire back edge of least resistance for leveling legs 4-wire receptacle (14-30R) ■■ Do not use Power Supply Cord Replacement Part Number 8579325.

Installation Instruction
Page 11
... 8212662 Flush mounting louvered vent hood 4" Determine vent path: ■■ Select route that will help achieve best drying performance. Terminate the exhaust vent outside. Part Number Descriptions 8171587RP 0-5" Metal vent periscope 4396037RP 0"-18" Metal vent periscope 4396011RP 18"-29" Metal vent periscope 4396014 29"-50" Metal vent periscope 4392892 In...
... 8212662 Flush mounting louvered vent hood 4" Determine vent path: ■■ Select route that will help achieve best drying performance. Terminate the exhaust vent outside. Part Number Descriptions 8171587RP 0-5" Metal vent periscope 4396037RP 0"-18" Metal vent periscope 4396011RP 18"-29" Metal vent periscope 4396014 29"-50" Metal vent periscope 4392892 In...

Installation Instruction
Page 13
... outlet 2. q Check dryer's final location. q Wipe dryer drum interior thoroughly with a 4" (102 mm) clamp. 2. If dryer is not crushed or kinked. If you have all parts are snug against the floor before tightening them. q Read "Dryer Use" in dryer. q When the dryer has been running for the moisture sensing system to... final location. If connecting to side. Level Dryer 1. Repeat from side to existing vent, make sure all packaging materials. q Check that vent is an extra part, go away. See "Level Dryer."
... outlet 2. q Check dryer's final location. q Wipe dryer drum interior thoroughly with a 4" (102 mm) clamp. 2. If dryer is not crushed or kinked. If you have all parts are snug against the floor before tightening them. q Read "Dryer Use" in dryer. q When the dryer has been running for the moisture sensing system to... final location. If connecting to side. Level Dryer 1. Repeat from side to existing vent, make sure all packaging materials. q Check that vent is an extra part, go away. See "Level Dryer."

Installation Instruction
Page 14
... screws from dryer cabinet side of dryer. Set door (handle side up) on dryer Lift door until top screws in dryer cabinet are in large part of hinges. Remove top screws from dryer cabinet side of hinge slot. Remove bottom screws from dryer cabinet. 4. Reverse Door Swing (Optional) If your door...
... screws from dryer cabinet side of dryer. Set door (handle side up) on dryer Lift door until top screws in dryer cabinet are in large part of hinges. Remove top screws from dryer cabinet side of hinge slot. Remove bottom screws from dryer cabinet. 4. Reverse Door Swing (Optional) If your door...

Installation Instruction
Page 17
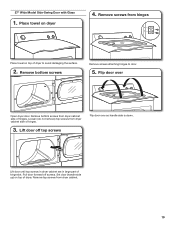
... over so handle side is on inner door. Be certain to separate it back down . Rotate outer door Lift door until top screws in large part of hinges. Set door (handle side up) on door seal or plastic door catches. 6.
... over so handle side is on inner door. Be certain to separate it back down . Rotate outer door Lift door until top screws in large part of hinges. Set door (handle side up) on door seal or plastic door catches. 6.
Installation Instruction
Page 19
... on top of hinges. Loosen (do not remove) top screws from dryer cabinet. 19 Lift door until top screws in dryer cabinet are in large part of dryer. Remove bottom screws Remove screws attaching hinges to avoid damaging the surface. 2. Set door (handle side up) on top of hinge slot. Remove...
... on top of hinges. Loosen (do not remove) top screws from dryer cabinet. 19 Lift door until top screws in dryer cabinet are in large part of dryer. Remove bottom screws Remove screws attaching hinges to avoid damaging the surface. 2. Set door (handle side up) on top of hinge slot. Remove...
