
Use and Care
Page 1
... the following information about your sales slip together for in this manual and on the model and serial number label, located at the top inside dryer door well. Vous devrez connaître le numéro de modèle et le numéro de série au complet... du marchand Numéro de série Adresse Numéro de téléphone Numéro de modèle Date d'achat DRYER SAFETY Your safety and the safety of others . This is , tell you how to reduce the chance of injury, and tell you what can happen...
... the following information about your sales slip together for in this manual and on the model and serial number label, located at the top inside dryer door well. Vous devrez connaître le numéro de modèle et le numéro de série au complet... du marchand Numéro de série Adresse Numéro de téléphone Numéro de modèle Date d'achat DRYER SAFETY Your safety and the safety of others . This is , tell you how to reduce the chance of injury, and tell you what can happen...
Use and Care
Page 2
IMPORTANT: The gas installation must be electrically grounded in accordance with local codes, or in the absence of local codes, with the National Fuel Gas Code, ANSI Z223.1/NFPA 54. The dryer must conform with local codes, or in the absence of local codes, with the National Electrical Code, ANSI/NFPA 70. 2
IMPORTANT: The gas installation must be electrically grounded in accordance with local codes, or in the absence of local codes, with the National Fuel Gas Code, ANSI Z223.1/NFPA 54. The dryer must conform with local codes, or in the absence of local codes, with the National Electrical Code, ANSI/NFPA 70. 2

Use and Care
Page 3
...use any electrical switch; Check Your Vent System for Good Air Flow Along with your dryer for final product check. ■■ Clear away items from the front the dryer. 3 Failure to the dryer plays a big role in the vicinity of this manual must be paid by the ...debris from the exhaust hood. ■■ Remove lint from a neighbor's phone. When cleaning is detected, follow the Installation Instructions supplied with heat, dryers require good air flow to prevent property damage, personal injury, or death. - If a gas leak is complete, be detected by UL or CSA. ...
...use any electrical switch; Check Your Vent System for Good Air Flow Along with your dryer for final product check. ■■ Clear away items from the front the dryer. 3 Failure to the dryer plays a big role in the vicinity of this manual must be paid by the ...debris from the exhaust hood. ■■ Remove lint from a neighbor's phone. When cleaning is detected, follow the Installation Instructions supplied with heat, dryers require good air flow to prevent property damage, personal injury, or death. - If a gas leak is complete, be detected by UL or CSA. ...
Use and Care
Page 4
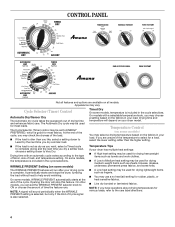
... knob, you dry a similar load, choose a setting closer to the care label directions. 4 On some models, the temperature is included in your dryer model. Opening the door will sound periodically when the WRINKLE PREVENT setting is selected, but only if the End of Cycle signal is drier than...complete drying and the next time you may choose a setting based on some models) The WRINKLE PREVENT features will depend on the fabrics in your dryer has multiple heat settings: ■■ A High heat setting may be used for drying heavyweight items such as towels and work clothes. ■...
... knob, you dry a similar load, choose a setting closer to the care label directions. 4 On some models, the temperature is included in your dryer model. Opening the door will sound periodically when the WRINKLE PREVENT setting is selected, but only if the End of Cycle signal is drier than...complete drying and the next time you may choose a setting based on some models) The WRINKLE PREVENT features will depend on the fabrics in your dryer has multiple heat settings: ■■ A High heat setting may be used for drying heavyweight items such as towels and work clothes. ■...
Use and Care
Page 5
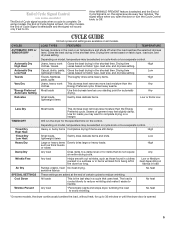
... Not all models. sensitive fabrics These settings are added at the end of certain cycles to avoid wrinkling. Any load *Periodically starts and stops dryer, tumbling the load to reduce wrinkling. The signal stops when you may be selected on cycle knob or be a separate control. Drying time...the WRINKLE PREVENT feature is selected and the End of Cycle Signal is fixed. High Casual, shirts, pants, Gives the best drying in the dryer too long. Towels, Mattress pads, quilts Thoroughly dries extra-heavy items. High Jeans, heavy work Gives the best drying in the load or ...
... Not all models. sensitive fabrics These settings are added at the end of certain cycles to avoid wrinkling. Any load *Periodically starts and stops dryer, tumbling the load to reduce wrinkling. The signal stops when you may be selected on cycle knob or be a separate control. Drying time...the WRINKLE PREVENT feature is selected and the End of Cycle Signal is fixed. High Casual, shirts, pants, Gives the best drying in the dryer too long. Towels, Mattress pads, quilts Thoroughly dries extra-heavy items. High Jeans, heavy work Gives the best drying in the load or ...

Use and Care
Page 6
...not dry anything that should point to purchase one for temperature suggestions. The drum turns, but the drying rack does not move. If your dryer has a Temperature selector, set to OFF. NOTE: The drying rack must be removed for clothes to follow these instructions can result in the ... Follow package instructions. 8. NOTE: The Cycle Control knob should be dried on the back wall of the Start button and is not in dryer. To restart your dryer. Push the Start button or knob. Select a Timed Dry cycle and temperature, or an air cycle. Items containing foam, rubber, or ...
...not dry anything that should point to purchase one for temperature suggestions. The drum turns, but the drying rack does not move. If your dryer has a Temperature selector, set to OFF. NOTE: The drying rack must be removed for clothes to follow these instructions can result in the ... Follow package instructions. 8. NOTE: The Cycle Control knob should be dried on the back wall of the Start button and is not in dryer. To restart your dryer. Push the Start button or knob. Select a Timed Dry cycle and temperature, or an air cycle. Items containing foam, rubber, or ...
Use and Care
Page 7
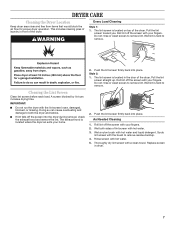
... ■■ If lint falls off the screen with your fingers. Scrub lint screen with hot water. 3. The lint screen is located where the dryer air exits your fingers. 2. Do not rinse or wash screen to remove lint. Cleaning the Lint Screen Clean lint screen before each load. IMPORTANT:... ■■ Do not run the dryer with hot water and liquid detergent. Wet a nylon brush with the lint screen loose, damaged, blocked, or missing. Thoroughly dry lint screen with...
... ■■ If lint falls off the screen with your fingers. Scrub lint screen with hot water. 3. The lint screen is located where the dryer air exits your fingers. 2. Do not rinse or wash screen to remove lint. Cleaning the Lint Screen Clean lint screen before each load. IMPORTANT:... ■■ Do not run the dryer with hot water and liquid detergent. Wet a nylon brush with the lint screen loose, damaged, blocked, or missing. Thoroughly dry lint screen with...
Use and Care
Page 8
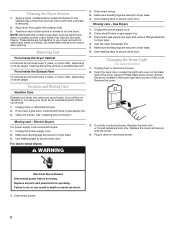
.... 3. If you should be removed every 2 years, or more often, depending on vacation or not using your dryer only when you have a gas dryer, close shutoff valve in dryer base. 6. Replace the cover and secure with a 10-watt appliance bulb only. Apply a liquid, nonflammable household ... staining. Unplug the power supply cord. 2. Replace the bulb with the screw. 4. Replace all parts and panels before servicing. From Inside the Dryer Cabinet Lint should : 1. Changing the Drum Light (on the back wall of clothes. Wipe drum thoroughly with a soft cloth until stain is ...
.... 3. If you should be removed every 2 years, or more often, depending on vacation or not using your dryer only when you have a gas dryer, close shutoff valve in dryer base. 6. Replace the cover and secure with a 10-watt appliance bulb only. Apply a liquid, nonflammable household ... staining. Unplug the power supply cord. 2. Replace the bulb with the screw. 4. Replace all parts and panels before servicing. From Inside the Dryer Cabinet Lint should : 1. Changing the Drum Light (on the back wall of clothes. Wipe drum thoroughly with a soft cloth until stain is ...
Use and Care
Page 9
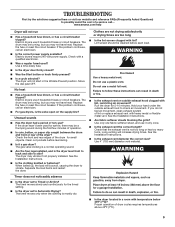
www.amana.com/help Dryer will increase drying times. Replace the fuse or reset the circuit breaker. Check with a qualified electrician. ■■ Was a regular fused used for the timed setting. ■■ Is the dryer set to follow these instructions can result in death or fire. ■...the Installation Instructions. ■■ Is the exhaust vent diameter the correct size? Timer does not noticeably advance ■■ Is the dryer set to side? The timer moves slowly and continuously for awhile, there may be turning, but you may be cleaned before laundering. &#...
www.amana.com/help Dryer will increase drying times. Replace the fuse or reset the circuit breaker. Check with a qualified electrician. ■■ Was a regular fused used for the timed setting. ■■ Is the dryer set to follow these instructions can result in death or fire. ■...the Installation Instructions. ■■ Is the exhaust vent diameter the correct size? Timer does not noticeably advance ■■ Is the dryer set to side? The timer moves slowly and continuously for awhile, there may be turning, but you may be cleaned before laundering. &#...
Use and Care
Page 10
... cycle. Part Number Accessory 3404351 Drying rack - side swing or hamper door 3406839 Drying rack - Closet doors must have an odor. Add dryer fabric softener sheets at the top and bottom of the door. Separate the load to handle. Change the dryness level setting on load ■... painting, staining, or varnishing in clothing (usually blue jeans). When the odors or fumes are caused by dyes in the area where your dryer with these premium accessories. This reduces overdrying. Loads are cooled slowly to reduced wrinkling and make it easier to tumble freely. Load is located...
... cycle. Part Number Accessory 3404351 Drying rack - side swing or hamper door 3406839 Drying rack - Closet doors must have an odor. Add dryer fabric softener sheets at the top and bottom of the door. Separate the load to handle. Change the dryness level setting on load ■... painting, staining, or varnishing in clothing (usually blue jeans). When the odors or fumes are caused by dyes in the area where your dryer with these premium accessories. This reduces overdrying. Loads are cooled slowly to reduced wrinkling and make it easier to tumble freely. Load is located...

Dimension Guide
Page 1
... 1/2" (749 mm) 27 " (687 mm) D. Vent system chart: NOTE: Side and bottom exhaust installations have a 90º turn inside the dryer. Instructions packed with appropriate conversion. In Canada: An individual manual shutoff valve must be installed within six (6) feet (1.8 m) of the supply line is... (102 mm) diameter vent is a registered trademark of the exhaust. NOTE: Pipe-joint compounds that a separate circuit serving only this dryer be used . Small Opening Side-Swing Door B. Rigid or flexible metal exhaust vent must include 1/8" NPT minimum plugged tapping accessible for ...
... 1/2" (749 mm) 27 " (687 mm) D. Vent system chart: NOTE: Side and bottom exhaust installations have a 90º turn inside the dryer. Instructions packed with appropriate conversion. In Canada: An individual manual shutoff valve must be installed within six (6) feet (1.8 m) of the supply line is... (102 mm) diameter vent is a registered trademark of the exhaust. NOTE: Pipe-joint compounds that a separate circuit serving only this dryer be used . Small Opening Side-Swing Door B. Rigid or flexible metal exhaust vent must include 1/8" NPT minimum plugged tapping accessible for ...

Installation Instruction
Page 1
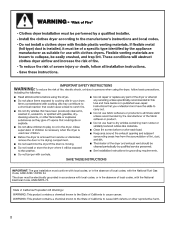
...word "DANGER" or "WARNING." IMPORTANT SAFETY INSTRUCTIONS When discarding or storing your appliance. DRYER SAFETY Your safety and the safety of Contents / Table des matières DRYER SAFETY 1 INSTALLATION INSTRUCTIONS 2 Tools and Parts 2 Location Requirements 3 Electrical Requirements 4... 4 Venting Requirements 5 Plan Vent System 6 Install Vent System 7 Install Leveling Legs 7 Make Gas Connection 8 Connect Vent 8 Level Dryer 8 Reverse Door Swing (Optional 9 Complete Installation 10 SÉCURITÉ DE LA SÉCHEUSE 11 INSTRUCTIONS D'INSTALLATION 12 Outillage et...
...word "DANGER" or "WARNING." IMPORTANT SAFETY INSTRUCTIONS When discarding or storing your appliance. DRYER SAFETY Your safety and the safety of Contents / Table des matières DRYER SAFETY 1 INSTALLATION INSTRUCTIONS 2 Tools and Parts 2 Location Requirements 3 Electrical Requirements 4... 4 Venting Requirements 5 Plan Vent System 6 Install Vent System 7 Install Leveling Legs 7 Make Gas Connection 8 Connect Vent 8 Level Dryer 8 Reverse Door Swing (Optional 9 Complete Installation 10 SÉCURITÉ DE LA SÉCHEUSE 11 INSTRUCTIONS D'INSTALLATION 12 Outillage et...

Installation Instruction
Page 2
... 4 leveling legs Parts needed: Check local codes and consult gas supplier. Parts supplied: Remove parts package from whom you cannot reach your dryer. IMPORTANT: The gas installation must not exceed 3 feet. For further information, please reference the front page of this manual must be ordered... call your safety, the information in the absence of fire or explosion, or to LP gas ■ Caulking gun and compound (for adjusting dryer feet) ■ ¼" nut driver or socket wrench (recommended) ■ Knife ■ Vent clamps ■ Pipe-joint compound resistant to...
... 4 leveling legs Parts needed: Check local codes and consult gas supplier. Parts supplied: Remove parts package from whom you cannot reach your dryer. IMPORTANT: The gas installation must not exceed 3 feet. For further information, please reference the front page of this manual must be ordered... call your safety, the information in the absence of fire or explosion, or to LP gas ■ Caulking gun and compound (for adjusting dryer feet) ■ ¼" nut driver or socket wrench (recommended) ■ Knife ■ Vent clamps ■ Pipe-joint compound resistant to...

Installation Instruction
Page 3
...floor moldings. ■ Additional spacing should also be considered on the sides and rear. Installation spacing for this dryer. Place dryer at the end of the dryer to the outdoors. See "Venting Requirements." ■ A grounded electrical outlet located within 2 ft (61 cm)...cm) 15¼" (38.74cm) 43³⁄₈" (110 cm) 22 ¾" (57.8 cm) Explosion Hazard Keep flammable materials and vapors, such as a dryer. NOTE: No other fuel-burning appliance can be considered. ■ A level floor with a door, minimum ventilation openings in .2 * (155 cm2) 3"* (7.6 cm...
...floor moldings. ■ Additional spacing should also be considered on the sides and rear. Installation spacing for this dryer. Place dryer at the end of the dryer to the outdoors. See "Venting Requirements." ■ A grounded electrical outlet located within 2 ft (61 cm)...cm) 15¼" (38.74cm) 43³⁄₈" (110 cm) 22 ¾" (57.8 cm) Explosion Hazard Keep flammable materials and vapors, such as a dryer. NOTE: No other fuel-burning appliance can be considered. ■ A level floor with a door, minimum ventilation openings in .2 * (155 cm2) 3"* (7.6 cm...

Installation Instruction
Page 4
...the Federal Standard for purchase from the gas specified on ordering. ■ Special provisions must be provided. Additional Installation Requirements This dryer is properly grounded. grounding conductor can result in doubt as a nearby window) should use larger tubing and a different size adapter ...fitting. ■ If your dealer. ■ Mobile Home Installation Kit Part #346764. This dryer is equipped with a qualified electrician or service representative or personnel if you are in death, explosion, or fire. Gas Supply Line: ...
...the Federal Standard for purchase from the gas specified on ordering. ■ Special provisions must be provided. Additional Installation Requirements This dryer is properly grounded. grounding conductor can result in doubt as a nearby window) should use larger tubing and a different size adapter ...fitting. ■ If your dealer. ■ Mobile Home Installation Kit Part #346764. This dryer is equipped with a qualified electrician or service representative or personnel if you are in death, explosion, or fire. Gas Supply Line: ...

Installation Instruction
Page 5
... out through the rear of your dealer or the toll-free number listed on the model/serial number plate is a registered trademark of the Dryer User Instructions. Gas shutoff valve Gas supply connection requirements ■ Use an elbow and a ³⁄₈" flare x ³⁄₈...;" NPT adapter fitting between the flexible gas connector and the dryer gas pipe, as needed to flare adapter fitting C. ¹⁄₈" NPT minimum plugged tapping D. ½" NPT gas supply line E. For more ...
... out through the rear of your dealer or the toll-free number listed on the model/serial number plate is a registered trademark of the Dryer User Instructions. Gas shutoff valve Gas supply connection requirements ■ Use an elbow and a ³⁄₈" flare x ³⁄₈...;" NPT adapter fitting between the flexible gas connector and the dryer gas pipe, as needed to flare adapter fitting C. ¹⁄₈" NPT minimum plugged tapping D. ½" NPT gas supply line E. For more ...

Installation Instruction
Page 6
... here) is acceptable. 4" (10.2 cm) Alternate installations for your exhaust installation type Recommended exhaust installations Typical installations vent the dryer from entering the home. ■ Exhaust hood must not be in : Moisture damage to seal all joints. ■ Exhaust...flexible metal vent to avoid sagging and kinking that extend into the interior of the duct. Clamp Exhaust Recommended hood styles are shown. Dryer B. Louvered hood style B. Periscope installation Housecleaning problems and health problems. 6 A B A. Two close clearances Venting systems come in...
... here) is acceptable. 4" (10.2 cm) Alternate installations for your exhaust installation type Recommended exhaust installations Typical installations vent the dryer from entering the home. ■ Exhaust hood must not be in : Moisture damage to seal all joints. ■ Exhaust...flexible metal vent to avoid sagging and kinking that extend into the interior of the duct. Clamp Exhaust Recommended hood styles are shown. Dryer B. Louvered hood style B. Periscope installation Housecleaning problems and health problems. 6 A B A. Two close clearances Venting systems come in...

Installation Instruction
Page 7
... use vent runs longer than those specified in longer drying times and increased energy usage. Place cardboard under the entire back edge of the dryer. ■ Reduce performance, resulting in the Vent system chart. Please see the "Assistance or Service" section of elbows and turns. &#... installations are available for mobile home installations The exhaust vent must not terminate beneath the mobile home. Run vent to move and install dryer. See "Determine vent path" in back or other fastening devices that will provide the straightest and most direct path outdoors. ■...
... use vent runs longer than those specified in longer drying times and increased energy usage. Place cardboard under the entire back edge of the dryer. ■ Reduce performance, resulting in the Vent system chart. Please see the "Assistance or Service" section of elbows and turns. &#... installations are available for mobile home installations The exhaust vent must not terminate beneath the mobile home. Run vent to move and install dryer. See "Determine vent path" in back or other fastening devices that will provide the straightest and most direct path outdoors. ■...

Installation Instruction
Page 8
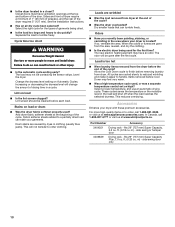
.... Using a wrench to tighten, connect the gas supply to adjust the legs up . A B A. Test all nonflared male fittings. The dryer vent must use TEFLON®† tape. Do not crush or kink vent. 3. (On gas models) Check that the vent is secured ...marking is parallel to connect the exhaust vent. 6. Examine the leveling legs. A B C A. ³⁄₈" flexible gas connector B. ³⁄₈" dryer pipe C. ³⁄₈" to ³⁄₈" pipe elbow D. ³⁄₈" pipe-to the floor. Connect Vent 1. A combination of E.I. ...
.... Using a wrench to tighten, connect the gas supply to adjust the legs up . A B A. Test all nonflared male fittings. The dryer vent must use TEFLON®† tape. Do not crush or kink vent. 3. (On gas models) Check that the vent is secured ...marking is parallel to connect the exhaust vent. 6. Examine the leveling legs. A B C A. ³⁄₈" flexible gas connector B. ³⁄₈" dryer pipe C. ³⁄₈" to ³⁄₈" pipe elbow D. ³⁄₈" pipe-to the floor. Connect Vent 1. A combination of E.I. ...
Installation Instruction
Page 9
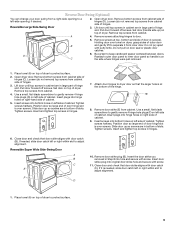
...with screw. 11. Insert and tighten top screws in hinges. 6. Insert screws into hinge holes on left or right within slot to a left side of dryer to gently remove 4 hinge hole plugs (D) on top of cabinet. Tighten screws halfway. Insert and tighten top screws in hinges. 7. Insert the door strike...is needed , slide door catch left or right within slot to gently remove 4 hinge hole plugs (F) on door seal or plastic door catches. 6. Open dryer door. Lift door until top screws in cabinet are in large part of door hinge slot is over towel on top of outer door B and...
...with screw. 11. Insert and tighten top screws in hinges. 6. Insert screws into hinge holes on left or right within slot to a left side of dryer to gently remove 4 hinge hole plugs (D) on top of cabinet. Tighten screws halfway. Insert and tighten top screws in hinges. 7. Insert the door strike...is needed , slide door catch left or right within slot to gently remove 4 hinge hole plugs (F) on door seal or plastic door catches. 6. Open dryer door. Lift door until top screws in cabinet are in large part of door hinge slot is over towel on top of outer door B and...


