Manual
Page 4
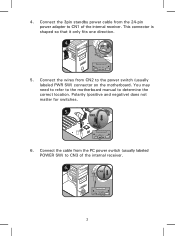
Connect the 3pin standby power cable from the PC power switch (usually labeled POWER SW) to CN1 of the internal receiver. 2 This connector is shaped so that it only fits one direction. 5. Connect the cable from the 24-pin power adapter to CN3 of the internal receiver. Polarity (positive and negative) does not matter for switches. 6. 4. You may need to refer to the motherboard manual to the power switch (usually labeled PWR SW) connector on the motherboard. Connect the wires from CN2 to determine the correct location.
Connect the 3pin standby power cable from the PC power switch (usually labeled POWER SW) to CN1 of the internal receiver. 2 This connector is shaped so that it only fits one direction. 5. Connect the cable from the 24-pin power adapter to CN3 of the internal receiver. Polarity (positive and negative) does not matter for switches. 6. 4. You may need to refer to the motherboard manual to the power switch (usually labeled PWR SW) connector on the motherboard. Connect the wires from CN2 to determine the correct location.
Manual
Page 5
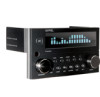
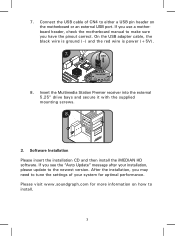
If you use a motherboard header, check the motherboard manual to make sure you may need to tune the settings of CN4 to either a USB pin header on how to the newest version. On the ... correct. Software Installation Please insert the installation CD and then install the iMEDIAN HD software. Please visit www.soundgraph.com for optimal performance. Insert the Multimedia Station Premier receiver into the external 5.25" drive bays and secure it with the supplied mounting screws. 2. If you see the "Auto Update" message after your system...
If you use a motherboard header, check the motherboard manual to make sure you may need to tune the settings of CN4 to either a USB pin header on how to the newest version. On the ... correct. Software Installation Please insert the installation CD and then install the iMEDIAN HD software. Please visit www.soundgraph.com for optimal performance. Insert the Multimedia Station Premier receiver into the external 5.25" drive bays and secure it with the supplied mounting screws. 2. If you see the "Auto Update" message after your system...