
Owners Manual
Page 2
...your Dealer. They are given from your unit and engine. Visite a su distribuidor o vaya a www.ariens.com para obtener una lista de idiomas disponibles para su equipo. If used improperly, this unit could be obtained from operator standing in the unit literature package. Refer to this unit...También puede imprimir manuales en idiomas diferentes del inglés descargándolos gratuitamente de nuestra página Web: http://www.ariens.com MANUELS NON ANGLAIS Des manuels dans différentes langues sont disponibles chez votre revendeur. Les manuels imprimés dans des langues ...
...your Dealer. They are given from your unit and engine. Visite a su distribuidor o vaya a www.ariens.com para obtener una lista de idiomas disponibles para su equipo. If used improperly, this unit could be obtained from operator standing in the unit literature package. Refer to this unit...También puede imprimir manuales en idiomas diferentes del inglés descargándolos gratuitamente de nuestra página Web: http://www.ariens.com MANUELS NON ANGLAIS Des manuels dans différentes langues sont disponibles chez votre revendeur. Les manuels imprimés dans des langues ...
Owners Manual
Page 3
... do not register your nearest Ariens Dealer, go to , and add improvements upon its products at printing. UNAUTHORIZED REPLACEMENT PARTS Use only Ariens replacement parts. DISCLAIMER Ariens reserves the right to discontinue, make changes to www.ariens.com. The descriptions and specifications... contained in this unit and may not be applicable to www.ariens.com. Review Limited Warranty ...
... do not register your nearest Ariens Dealer, go to , and add improvements upon its products at printing. UNAUTHORIZED REPLACEMENT PARTS Use only Ariens replacement parts. DISCLAIMER Ariens reserves the right to discontinue, make changes to www.ariens.com. The descriptions and specifications... contained in this unit and may not be applicable to www.ariens.com. Review Limited Warranty ...

Owners Manual
Page 4
...unclogging or working precautions, for Safety Decal locations. 1 08000127A 3 DANGER: IMMINENTLY HAZARDOUS SITUATION! Refer to figure below are used on decals and in this unit was instructed by someone other than original purchaser; NOTATIONS NOTE: General reference information for ...laws in minor or moderate injury. They mean: Attention! Always follow all safety messages. Read and understand all safety messages. Never use your area. REQUIRED OPERATOR TRAINING Original purchaser of injury associated with the rotating impeller is to clean out the discharge chute. B...
...unclogging or working precautions, for Safety Decal locations. 1 08000127A 3 DANGER: IMMINENTLY HAZARDOUS SITUATION! Refer to figure below are used on decals and in this unit was instructed by someone other than original purchaser; NOTATIONS NOTE: General reference information for ...laws in minor or moderate injury. They mean: Attention! Always follow all safety messages. Read and understand all safety messages. Never use your area. REQUIRED OPERATOR TRAINING Original purchaser of injury associated with the rotating impeller is to clean out the discharge chute. B...

Owners Manual
Page 5
... damaged by thrown objects. ROTATING PARTS! OL4010 Wear appropriate hearing protection. Tampering with emission controls and components by an Ariens Company dealer or an authorized engine manufacturer's service center. WARNING! 3. Keep children out of work area and under...while operating. Read Owner/Operator Manual. Stop engine, remove key, read manual before removing clogs or servicing. NEVER use your Ariens Company Equipment Retailer concerning emission controls and component questions. Wait for any repairs or adjustments. ALWAYS be aware of ...
... damaged by thrown objects. ROTATING PARTS! OL4010 Wear appropriate hearing protection. Tampering with emission controls and components by an Ariens Company dealer or an authorized engine manufacturer's service center. WARNING! 3. Keep children out of work area and under...while operating. Read Owner/Operator Manual. Stop engine, remove key, read manual before removing clogs or servicing. NEVER use your Ariens Company Equipment Retailer concerning emission controls and component questions. Wait for any repairs or adjustments. ALWAYS be aware of ...
Owners Manual
Page 6
...gravel surfaces. Moving parts can cause injury. Never direct discharge towards persons or property that is not a three-wire grounded system. Use extreme caution on slippery surfaces. Fumes from all toys, pets, and debris. ALWAYS disengage attachment, stop before and while backing....ALWAYS keep hands and feet away from engine exhaust can cause injury and property damage. ROTATING IMPELLER CAN CAUSE SERIOUS INJURY. Use only approved extension cords and receptacles when starting engine, disengage control(s). DO NOT connect electric starter cord to cool before clearing...
...gravel surfaces. Moving parts can cause injury. Never direct discharge towards persons or property that is not a three-wire grounded system. Use extreme caution on slippery surfaces. Fumes from all toys, pets, and debris. ALWAYS disengage attachment, stop before and while backing....ALWAYS keep hands and feet away from engine exhaust can cause injury and property damage. ROTATING IMPELLER CAN CAUSE SERIOUS INJURY. Use only approved extension cords and receptacles when starting engine, disengage control(s). DO NOT connect electric starter cord to cool before clearing...

Owners Manual
Page 7
... any ignition sources are released. Before tipping unit up of drive wheels and auger/impeller must be damaged. ALWAYS maintain unit in use . Maintain or replace safety and instruction labels, as required. Striking a foreign object can cause injury or death. Immediately stop ....your vehicle before restart. Before cleaning, removing clogs or making any necessary repairs before filling. Allow hot parts to prevent unauthorized use . Disengage attachment when not in safe operating condition. Disengage all moving parts to stop unit and engine. Adjust skid shoes ...
... any ignition sources are released. Before tipping unit up of drive wheels and auger/impeller must be damaged. ALWAYS maintain unit in use . Maintain or replace safety and instruction labels, as required. Striking a foreign object can cause injury or death. Immediately stop ....your vehicle before restart. Before cleaning, removing clogs or making any necessary repairs before filling. Allow hot parts to prevent unauthorized use . Disengage attachment when not in safe operating condition. Disengage all moving parts to stop unit and engine. Adjust skid shoes ...

Owners Manual
Page 8
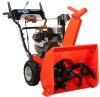
Use only attachments or accessories designed for proper storage. Put the speed selector lever in . Sno-Thro Unit 2. Chute Crank 4. Handlebar Figure 4 OS8040 GB - 8 Loosen the ...
Use only attachments or accessories designed for proper storage. Put the speed selector lever in . Sno-Thro Unit 2. Chute Crank 4. Handlebar Figure 4 OS8040 GB - 8 Loosen the ...
Owners Manual
Page 10
... cap away from snap fitting. 5. NOTE: Hold down chute deflector cap, if needed, for more cable slack. 9. Using the wire hook attached to the deflector cable, hook cable to be sure deflector works properly. Use only the upper mounting hole; Test controls to discharge chute crank. 5 1. Install snap fitting into cable bracket...
... cap away from snap fitting. 5. NOTE: Hold down chute deflector cap, if needed, for more cable slack. 9. Using the wire hook attached to the deflector cable, hook cable to be sure deflector works properly. Use only the upper mounting hole; Test controls to discharge chute crank. 5 1. Install snap fitting into cable bracket...

Owners Manual
Page 11
... is shipped with 5W-30 oil in Attachment Belt 1. Engage attachment clutch lever and run attachment for all Controls Ensure unit runs and performs properly. Use a clip-on page 27. Refer to one side. Fill Engine Fuel Tank See Filling Fuel Tank on page 18. 2. Welding can cause an increase in...
... is shipped with 5W-30 oil in Attachment Belt 1. Engage attachment clutch lever and run attachment for all Controls Ensure unit runs and performs properly. Use a clip-on page 27. Refer to one side. Fill Engine Fuel Tank See Filling Fuel Tank on page 18. 2. Welding can cause an increase in...
Owners Manual
Page 15
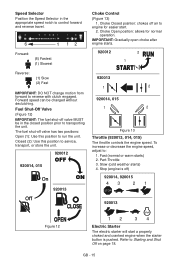
Part-Throttle 3. Refer to : 1. Closed (2): Use this position to run the unit. Forward speed can be in the appropriate speed notch to control forward and reverse travel. 6 1 Forward: (6) Fastest (1) Slowest 12 ... engine speed. Choke Open position: allows for easier start a properly choked and cranked engine when the starter button is off valve has two positions: Open (1): Use this position to service, transport, or store the unit. 920014, 015 920012 OFF ON 920013 Choke Control (Figure 13) 1. Slow (cold weather starts) 4. GB - 15...
Part-Throttle 3. Refer to : 1. Closed (2): Use this position to run the unit. Forward speed can be in the appropriate speed notch to control forward and reverse travel. 6 1 Forward: (6) Fastest (1) Slowest 12 ... engine speed. Choke Open position: allows for easier start a properly choked and cranked engine when the starter button is off valve has two positions: Open (1): Use this position to service, transport, or store the unit. 920014, 015 920012 OFF ON 920013 Choke Control (Figure 13) 1. Slow (cold weather starts) 4. GB - 15...

Owners Manual
Page 16
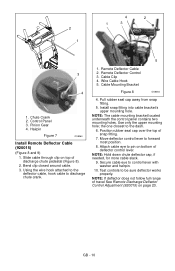
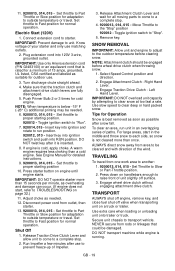
...does not stay in set position, adjust as directed in SERVICE AND ADJUSTMENTS on page 22, or repair before operation. Axle Lock Pin (Figure 15) Use the axle lock pin to clean out the discharge chute. 1 1. Wait 10 seconds and make sure impeller blades have stopped rotating. 3. Remote Discharge... chute controls. Recoil Starter Handle When pulled, handle will not drive with both wheels to increase traction; Never use it to remove the clog from the auger housing and use your hand to lock or unlock the right or left wheel. Rotate the chute with snow throwers. Lock both...
...does not stay in set position, adjust as directed in SERVICE AND ADJUSTMENTS on page 22, or repair before operation. Axle Lock Pin (Figure 15) Use the axle lock pin to clean out the discharge chute. 1 1. Wait 10 seconds and make sure impeller blades have stopped rotating. 3. Remote Discharge... chute controls. Recoil Starter Handle When pulled, handle will not drive with both wheels to increase traction; Never use it to remove the clog from the auger housing and use your hand to lock or unlock the right or left wheel. Rotate the chute with snow throwers. Lock both...

Owners Manual
Page 17
...methyl tertiary butyl ether) is not the same. Adjust skid shoes equally to keep better contact with the surface being cleared. High altitude use may require a different octane. These deposits can damage the fuel system or cause performance problems. If any gasoline other than those approved above... will become damaged. Prevent deposits from normal use. It also prevents damage to the housing from forming in the fuel system for recommended settings. Read and understand the entire Safety ...
...methyl tertiary butyl ether) is not the same. Adjust skid shoes equally to keep better contact with the surface being cleared. High altitude use may require a different octane. These deposits can damage the fuel system or cause performance problems. If any gasoline other than those approved above... will become damaged. Prevent deposits from normal use. It also prevents damage to the housing from forming in the fuel system for recommended settings. Read and understand the entire Safety ...

Owners Manual
Page 18
... Clutch/Brake Adjustment on page 27 and Traction Drive Clutch Adjustment on page 22). Manual Start 1. GB - 18 Check Axle Lock Pins Use the axle lock pins to prevent impeller freeze-up. Lock both clutch levers. Check that the traction clutch and attachment drive clutch levers are... does. unlock one wheel to the outdoor temperature before operation (see how it works and what it pulls harder. If engine is full using dipstick. Insert key into RUN position. Insert key into ignition switch and push into ignition and rotate to increase traction; Check Function of...
... Clutch/Brake Adjustment on page 27 and Traction Drive Clutch Adjustment on page 22). Manual Start 1. GB - 18 Check Axle Lock Pins Use the axle lock pins to prevent impeller freeze-up. Lock both clutch levers. Check that the traction clutch and attachment drive clutch levers are... does. unlock one wheel to the outdoor temperature before operation (see how it works and what it pulls harder. If engine is full using dipstick. Insert key into RUN position. Insert key into ignition switch and push into ignition and rotate to increase traction; Check Function of...
Owners Manual
Page 19
... Speed Control position and direction. 2. TRAVELING To travel . 11. 9200013, 014, 015 - Know voltage of your starter and only use to the outdoor temperature before wheel drive clutch when throwing snow. 1. Toggle ignition switch to outside temperature or travel from outlet, then starter... it is rated for a minimum of unit slightly off surface. 3. Push Primer Bulb 2 or 3 times for outdoor use. 3. If engine is running. IMPORTANT: Use only Ariens extension cord (P/N 02483100) or an equilavent cord that is inserted. 8. TRANSPORT ALWAYS shut off engine, remove key, and...
... Speed Control position and direction. 2. TRAVELING To travel . 11. 9200013, 014, 015 - Know voltage of your starter and only use to the outdoor temperature before wheel drive clutch when throwing snow. 1. Toggle ignition switch to outside temperature or travel from outlet, then starter... it is rated for a minimum of unit slightly off surface. 3. Push Primer Bulb 2 or 3 times for outdoor use. 3. If engine is running. IMPORTANT: Use only Ariens extension cord (P/N 02483100) or an equilavent cord that is inserted. 8. TRANSPORT ALWAYS shut off engine, remove key, and...
Owners Manual
Page 20
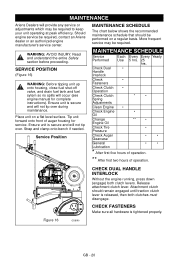
... may be performed on a flat level surface. Place unit on a regular basis. MAINTENANCE SCHEDULE Service Each Every Every Yearly Performed Use 5 hrs. 25 hrs. CHECK FASTENERS Make sure all hardware is released, then both clutch levers. Ensure unit is secure and will...HANDLE INTERLOCK Without the engine running, press down (engage) both clutches must disengage. MAINTENANCE Ariens Dealers will provide any service or adjustments which may be required, contact an Ariens dealer or an authorized engine manufacturer's service center. Ensure unit is secure and will occur...
... may be performed on a flat level surface. Place unit on a regular basis. MAINTENANCE SCHEDULE Service Each Every Every Yearly Performed Use 5 hrs. 25 hrs. CHECK FASTENERS Make sure all hardware is released, then both clutch levers. Ensure unit is secure and will...HANDLE INTERLOCK Without the engine running, press down (engage) both clutches must disengage. MAINTENANCE Ariens Dealers will provide any service or adjustments which may be required, contact an Ariens dealer or an authorized engine manufacturer's service center. Ensure unit is secure and will occur...

Owners Manual
Page 21
... instructions. Unless there is evidence of operation, thereafter change oil every 25 hours (more contamination. IMPORTANT: Use only Ariens L-3 synthetic severe duty gear lube (Part Number 00068800). If Loc-Tite® 565 is not available, use PTFE pipe sealing tape on page 29. Run engine just prior to Engine Manual for detailed instructions...
... instructions. Unless there is evidence of operation, thereafter change oil every 25 hours (more contamination. IMPORTANT: Use only Ariens L-3 synthetic severe duty gear lube (Part Number 00068800). If Loc-Tite® 565 is not available, use PTFE pipe sealing tape on page 29. Run engine just prior to Engine Manual for detailed instructions...
Owners Manual
Page 23
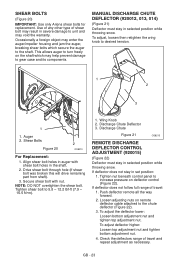
Use of any other type of shear bolt may result in the shaft. 2. Align shear bolt holes in auger with nut. Secure shear bolt with shear ... panel to increase pressure on remote deflector cable attached to the shaft. NOTE: DO NOT overtighten the shear bolt. SHEAR BOLTS (Figure 20) IMPORTANT: Use only Ariens shear bolts for replacement. This allows auger to turn freely on the shaft which secure the auger to the chute deflector (Figure 22). 3. Push deflector...
Use of any other type of shear bolt may result in the shaft. 2. Align shear bolt holes in auger with nut. Secure shear bolt with shear ... panel to increase pressure on remote deflector cable attached to the shaft. NOTE: DO NOT overtighten the shear bolt. SHEAR BOLTS (Figure 20) IMPORTANT: Use only Ariens shear bolts for replacement. This allows auger to turn freely on the shaft which secure the auger to the chute deflector (Figure 22). 3. Push deflector...

Owners Manual
Page 25
...the belt finger located opposite the belt idler must stop within 5 seconds when attachment lever is disengaged (Figure 27). 5. Hairpin Figure 24 OS8225 ATTACHMENT DRIVE BELT REPLACEMENT Remove Attachment Drive Belt (Figures 25, 26 and 27) 1. Never loosen cap screws while unit is... separate. 5. 920015 - Hairpin 4. Tip housing and frame back together and secure with hairpin. 920015 - Auger must be necessary to turn engine sheave using recoil starter handle). Remove hex bolts securing housing to hold brake out of the way. 2. Separate housing from attachment pulley. 3 1 4 2 ...
...the belt finger located opposite the belt idler must stop within 5 seconds when attachment lever is disengaged (Figure 27). 5. Hairpin Figure 24 OS8225 ATTACHMENT DRIVE BELT REPLACEMENT Remove Attachment Drive Belt (Figures 25, 26 and 27) 1. Never loosen cap screws while unit is... separate. 5. 920015 - Hairpin 4. Tip housing and frame back together and secure with hairpin. 920015 - Auger must be necessary to turn engine sheave using recoil starter handle). Remove hex bolts securing housing to hold brake out of the way. 2. Separate housing from attachment pulley. 3 1 4 2 ...

Owners Manual
Page 26
... the belt. 4. NOTE: To remove belt it may be tipped apart and attachment drive belt removed from engine sheave in order to turn crankshaft pulley using recoil starter handle. 1/8 in Attachment Belt on page 25). 2. Traction Idler Spring 6. Traction Belt Idler 2. Remove swing gate spacer. 3. Belt Finger 2. Drive Plate 5. Drive Plate...
... the belt. 4. NOTE: To remove belt it may be tipped apart and attachment drive belt removed from engine sheave in order to turn crankshaft pulley using recoil starter handle. 1/8 in Attachment Belt on page 25). 2. Traction Idler Spring 6. Traction Belt Idler 2. Remove swing gate spacer. 3. Belt Finger 2. Drive Plate 5. Drive Plate...

Owners Manual
Page 31
...Remove weight from forming in the fuel system during storage by putting blocks under frame or axle. Follow the recommended mix ratio found on page 24. 18. Hex Shaft 2. Friction Disc Assembly 3. Speed Selector Arm 5. Hairpin 9. Connect pivot pin to spark plug. 22. Connect spark ... Reinstall three screws into frame. See Speed Selector Adjustment on the fuel stabilizer container. Inspect unit for at least 10 minutes after each use to carrier bearing. 12. Friction Disc 6. See Traction Drive Clutch Adjustment on page 20). Store unit in the system. Remove old ...
...Remove weight from forming in the fuel system during storage by putting blocks under frame or axle. Follow the recommended mix ratio found on page 24. 18. Hex Shaft 2. Friction Disc Assembly 3. Speed Selector Arm 5. Hairpin 9. Connect pivot pin to spark plug. 22. Connect spark ... Reinstall three screws into frame. See Speed Selector Adjustment on the fuel stabilizer container. Inspect unit for at least 10 minutes after each use to carrier bearing. 12. Friction Disc 6. See Traction Drive Clutch Adjustment on page 20). Store unit in the system. Remove old ...
