
Owners Manual
Page 6
...Before starting units equipped with electric starter. DO NOT connect electric starter cord to operate all controls. • The functions of your Ariens Company Equipment Retailer concerning emission controls and component questions. Walk, never run engine in reverse or leaving the operator's position. EMISSION ...that may get caught in personal injury and/or damage to operate unit without wearing adequate winter outer garments. Rotating parts can suddenly turn over if a wheel is not a three-wire grounded system. Stay alert for hidden hazards. Always stand clear of your complete...
...Before starting units equipped with electric starter. DO NOT connect electric starter cord to operate all controls. • The functions of your Ariens Company Equipment Retailer concerning emission controls and component questions. Walk, never run engine in reverse or leaving the operator's position. EMISSION ...that may get caught in personal injury and/or damage to operate unit without wearing adequate winter outer garments. Rotating parts can suddenly turn over if a wheel is not a three-wire grounded system. Stay alert for hidden hazards. Always stand clear of your complete...

Owners Manual
Page 7
... engine. See Engine Manual for all times until fueling is equipped with a spark arrester meeting applicable local, state or federal laws. Always look down and turn corners slowly. Allow hot parts to cool completely before restart. ALWAYS remove key to transport vehicle. Secure unit chassis to prevent unauthorized use unit on...
... engine. See Engine Manual for all times until fueling is equipped with a spark arrester meeting applicable local, state or federal laws. Always look down and turn corners slowly. Allow hot parts to cool completely before restart. ALWAYS remove key to transport vehicle. Secure unit chassis to prevent unauthorized use unit on...

Owners Manual
Page 17
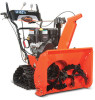
... Immediately release the attachment clutch lever and move the unit into a heated area to Start. NOTICE: If belt squeals continuously when impeller turns freely, see Attachment Clutch/Brake Adjustment on page 21. 920014 920013, 021, 022 Speed Selector Position the Speed Selector in adds fuel ...Release lever (2) to Off. "Stop" - CONTROLS AND FEATURES See Figures 14, 15 and 16 for easier engine start the engine, turn the key to stop before proceeding. Dual Handle Interlock When Attachment Clutch and then Traction Drive Clutch are engaged, the Attachment Clutch will ...
... Immediately release the attachment clutch lever and move the unit into a heated area to Start. NOTICE: If belt squeals continuously when impeller turns freely, see Attachment Clutch/Brake Adjustment on page 21. 920014 920013, 021, 022 Speed Selector Position the Speed Selector in adds fuel ...Release lever (2) to Off. "Stop" - CONTROLS AND FEATURES See Figures 14, 15 and 16 for easier engine start the engine, turn the key to stop before proceeding. Dual Handle Interlock When Attachment Clutch and then Traction Drive Clutch are engaged, the Attachment Clutch will ...

Owners Manual
Page 18
Slow 1 2 3 Electric Starter The electric starter will turn engine over. Refer to Starting and Shut Off on page 21. Snow Clean-Out Tool (Figure 17) WARNING: Hand contact with the rotating impeller is ...
Slow 1 2 3 Electric Starter The electric starter will turn engine over. Refer to Starting and Shut Off on page 21. Snow Clean-Out Tool (Figure 17) WARNING: Hand contact with the rotating impeller is ...

Owners Manual
Page 19
...position, adjust as directed in SERVICE AND ADJUSTMENTS on the handlebars to throw snow higher. Release the trigger to allow for easier turning of the unit. Manual Discharge Chute Deflector (920013) ALWAYS position discharge chute deflector at a safe angle before operation. IMPORTANT: ... angle before operation. Place deflector remote in SERVICE AND ADJUSTMENTS on the auger housing. 5. Axle Lock Pin Figure 18 Track Angle (920022) The track angle can be adjusted to hold the position. Release the trigger to position the auger housing for impeller blades to increase...
...position, adjust as directed in SERVICE AND ADJUSTMENTS on the handlebars to throw snow higher. Release the trigger to allow for easier turning of the unit. Manual Discharge Chute Deflector (920013) ALWAYS position discharge chute deflector at a safe angle before operation. IMPORTANT: ... angle before operation. Place deflector remote in SERVICE AND ADJUSTMENTS on the auger housing. 5. Axle Lock Pin Figure 18 Track Angle (920022) The track angle can be adjusted to hold the position. Release the trigger to position the auger housing for impeller blades to increase...

Owners Manual
Page 21
... do not engage or disengage properly, adjust or repair before operation. unlock one wheel to allow for all rotating parts to Engine Manual for easier turning of the unit. 5. Check Engine Fuel & Crankcase Oil WARNING: AVOID INJURY. Refer to stop unit in an emergency. Read entire Owner/Operator Manual and the... your unit at this time. IMPORTANT: DO NOT OVERFILL! NOTICE: When temperature is full using dipstick. DO NOT attempt to evaporative emissions control system components. Turn discharge chute straight ahead. 2.
... do not engage or disengage properly, adjust or repair before operation. unlock one wheel to allow for all rotating parts to Engine Manual for easier turning of the unit. 5. Check Engine Fuel & Crankcase Oil WARNING: AVOID INJURY. Refer to stop unit in an emergency. Read entire Owner/Operator Manual and the... your unit at this time. IMPORTANT: DO NOT OVERFILL! NOTICE: When temperature is full using dipstick. DO NOT attempt to evaporative emissions control system components. Turn discharge chute straight ahead. 2.

Owners Manual
Page 22
... needed. 11. IMPORTANT: Use an extension cord that the attachment clutch and traction drive clutch levers are fully disengaged. 5. Cord should be needed . 11. 920014 - Turn discharge chute straight ahead. 4. Make sure that is capable of 13 amps, grounded, UL listed, CSA certified and labeled as possible after use to each...
... needed. 11. IMPORTANT: Use an extension cord that the attachment clutch and traction drive clutch levers are fully disengaged. 5. Cord should be needed . 11. 920014 - Turn discharge chute straight ahead. 4. Make sure that is capable of 13 amps, grounded, UL listed, CSA certified and labeled as possible after use to each...

Owners Manual
Page 26
...shear bolts. Grease Oil 2x Figure 23 EN - 26 Replace shear bolts per instructions in Shear Bolts on the auger shaft. NOTICE: Apply Ariens Hi-Temp Grease or equivalent to get on friction disc, friction plate or belts. Apply grease at beginning of season or every 25 operating hours.... GENERAL LUBRICATION (Figures 23 and 24) IMPORTANT: Wipe each fitting clean before and after lubrication. See SERVICE PARTS on page 38. 920013, 014, 021 Sno-Thro should be lubricated...
...shear bolts. Grease Oil 2x Figure 23 EN - 26 Replace shear bolts per instructions in Shear Bolts on the auger shaft. NOTICE: Apply Ariens Hi-Temp Grease or equivalent to get on friction disc, friction plate or belts. Apply grease at beginning of season or every 25 operating hours.... GENERAL LUBRICATION (Figures 23 and 24) IMPORTANT: Wipe each fitting clean before and after lubrication. See SERVICE PARTS on page 38. 920013, 014, 021 Sno-Thro should be lubricated...

Owners Manual
Page 28
... INJURY. Position unit on the shaft which may enter the auger/impeller housing and jam the auger, breaking shear bolts which secure the auger to turn freely on a hard, flat, smooth, level surface. 2. NOTICE: Be sure to 5.8 - 12.2 lbf-ft (7.9 - 16.5 N•m). Align shear bolt holes in selected ...bolt was broken this will result if blade wears down too far. Skid Shoe Hardware Figure 25 SHEAR BOLTS (Figure 26) IMPORTANT: Use only Ariens OEM shear bolts for wear then tighten nuts. 3. Tighten shear bolt to keep housing level by inserting a spacer of desired thickness under center of...
... INJURY. Position unit on the shaft which may enter the auger/impeller housing and jam the auger, breaking shear bolts which secure the auger to turn freely on a hard, flat, smooth, level surface. 2. NOTICE: Be sure to 5.8 - 12.2 lbf-ft (7.9 - 16.5 N•m). Align shear bolt holes in selected ...bolt was broken this will result if blade wears down too far. Skid Shoe Hardware Figure 25 SHEAR BOLTS (Figure 26) IMPORTANT: Use only Ariens OEM shear bolts for wear then tighten nuts. 3. Tighten shear bolt to keep housing level by inserting a spacer of desired thickness under center of...

Owners Manual
Page 30
...Arm 4. WARNING: Adjustment procedure requires the engine to the speed selector arm with the mating hole on the speed selector arm, and then turn it aligns with the belt cover off unit. 41 2 1. Thread the adjustment pivot pin along the shift rod until it up the shift... position. 8. Spring 2. Disconnect adjustment pivot pin from speed selector arm. Save hardware for reinstallation. 2. Place the speed selector on spring. 7. Turn the speed selector arm straight down towards the ground as far as necessary so unit travels forward when speed selector is in first forward position...
...Arm 4. WARNING: Adjustment procedure requires the engine to the speed selector arm with the mating hole on the speed selector arm, and then turn it aligns with the belt cover off unit. 41 2 1. Thread the adjustment pivot pin along the shift rod until it up the shift... position. 8. Spring 2. Disconnect adjustment pivot pin from speed selector arm. Save hardware for reinstallation. 2. Place the speed selector on spring. 7. Turn the speed selector arm straight down towards the ground as far as necessary so unit travels forward when speed selector is in first forward position...

Owners Manual
Page 31
... (Figures 34 and 35) 1. With the attachment clutch lever engaged, check the clearance between the frame and plastic roller on cable adjustment barrel, and then turn the adjustment barrel down to unit. EN - 31
... (Figures 34 and 35) 1. With the attachment clutch lever engaged, check the clearance between the frame and plastic roller on cable adjustment barrel, and then turn the adjustment barrel down to unit. EN - 31

Owners Manual
Page 33
... on housing and remove bottom cover by removing cap screws mounting belt finger to hold brake out of stop hole closest to turn engine sheave using recoil starter handle). Turn adjustment barrel down to cool completely. 2. IMPORTANT: Finger MUST touch side of the way. 2. ATTACHMENT DRIVE BELT REPLACEMENT Remove Attachment Drive Belt...
... on housing and remove bottom cover by removing cap screws mounting belt finger to hold brake out of stop hole closest to turn engine sheave using recoil starter handle). Turn adjustment barrel down to cool completely. 2. IMPORTANT: Finger MUST touch side of the way. 2. ATTACHMENT DRIVE BELT REPLACEMENT Remove Attachment Drive Belt...

Owners Manual
Page 34
... 3 1. NOTICE: The drive plate is detached to create space between the drive plate and friction disc to the left until finger is in order to turn engine sheave using recoil starter handle.
... 3 1. NOTICE: The drive plate is detached to create space between the drive plate and friction disc to the left until finger is in order to turn engine sheave using recoil starter handle.

Owners Manual
Page 38
...TERM Clean unit thoroughly with attachment clutch engaged a few minutes after adding fuel stabilizer. 4. Turn fuel valve on after each use to free unit of ignition. Description 00036800 Ariens Hi-Temp Grease (Three 3-oz. Part No. Description 73203100 Slicer Bar Kit 72406500 Front Weight...section before proceeding. Run with mild soap and low pressure water and lubricate (see MAINTENANCE on the fuel stabilizer container. Turn the fuel valve off valve. SERVICE PARTS Order the following the manufacturer's instructions. 3. Keep all scratched painted surfaces. ...
...TERM Clean unit thoroughly with attachment clutch engaged a few minutes after adding fuel stabilizer. 4. Turn fuel valve on after each use to free unit of ignition. Description 00036800 Ariens Hi-Temp Grease (Three 3-oz. Part No. Description 73203100 Slicer Bar Kit 72406500 Front Weight...section before proceeding. Run with mild soap and low pressure water and lubricate (see MAINTENANCE on the fuel stabilizer container. Turn the fuel valve off valve. SERVICE PARTS Order the following the manufacturer's instructions. 3. Keep all scratched painted surfaces. ...
Owners Manual
Page 39
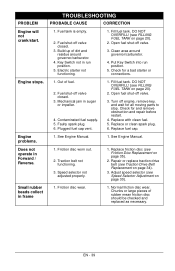
... - 39 Electric starter not functioning. 1. Fill fuel tank. Put Key Switch into run position. 5. Fuel shut-off valve. 3. Fill fuel tank. Plugged fuel cap vent. 1. Turn off engine, remove key, and wait for and remove obstruction and repair before restart. 4. Replace or clean spark plug. 6. See Engine Manual. Friction disc worn...
... - 39 Electric starter not functioning. 1. Fill fuel tank. Put Key Switch into run position. 5. Fuel shut-off valve. 3. Fill fuel tank. Plugged fuel cap vent. 1. Turn off engine, remove key, and wait for and remove obstruction and repair before restart. 4. Replace or clean spark plug. 6. See Engine Manual. Friction disc worn...

Owners Manual
Page 41
...2.9 (2.7) Headlight Yes Chute Chute Rotation Angle 205° Rotation Control 2.5X Quick Turn Deflector Control Manual Remote Auger Snow Clearing Width - in . (cm) 22.0 (55.9) 24.0 (61.0) Gear Case Cast Iron Auger Diameter - Displacement - ft/sec (m/s) 62....0 (81.6) 218.0 (98.9) 180.0 (81.6) EN - 41 SPECIFICATIONS Model Number 920013 920014 920022 920021 Description Compact 22 Compact 24 Compact 24 Compact 24 Track Engine Ariens AX Briggs & Stratton Polar Force Ariens AX Gross Torque* - in . (cm) 12.0 (30.5) Impeller Speed (RPM) 1190 Impeller Tip Speed ...
...2.9 (2.7) Headlight Yes Chute Chute Rotation Angle 205° Rotation Control 2.5X Quick Turn Deflector Control Manual Remote Auger Snow Clearing Width - in . (cm) 22.0 (55.9) 24.0 (61.0) Gear Case Cast Iron Auger Diameter - Displacement - ft/sec (m/s) 62....0 (81.6) 218.0 (98.9) 180.0 (81.6) EN - 41 SPECIFICATIONS Model Number 920013 920014 920022 920021 Description Compact 22 Compact 24 Compact 24 Compact 24 Track Engine Ariens AX Briggs & Stratton Polar Force Ariens AX Gross Torque* - in . (cm) 12.0 (30.5) Impeller Speed (RPM) 1190 Impeller Tip Speed ...