
Owners Manual
Page 2
...1 • Record unit model and serial numbers here. • Record engine model and serial numbers here. PRODUCT REGISTRATION The Ariens dealer must register the product at the time of purchase if you with safety instructions for engine service recommendations. The contents will... card is covered by a separate manual specific to www.ariens.com. TABLE OF CONTENTS SAFETY 4 ASSEMBLY 8 CONTROLS and FEATURES 15 OPERATION 17 MAINTENANCE 24 SERVICE AND ADJUSTMENTS . . . . . 27 STORAGE 35 SERVICE PARTS 35 ACCESSORIES 35 TROUBLESHOOTING 36 SPECIFICATIONS 37 WARRANTY 39 INTRODUCTION ...
...1 • Record unit model and serial numbers here. • Record engine model and serial numbers here. PRODUCT REGISTRATION The Ariens dealer must register the product at the time of purchase if you with safety instructions for engine service recommendations. The contents will... card is covered by a separate manual specific to www.ariens.com. TABLE OF CONTENTS SAFETY 4 ASSEMBLY 8 CONTROLS and FEATURES 15 OPERATION 17 MAINTENANCE 24 SERVICE AND ADJUSTMENTS . . . . . 27 STORAGE 35 SERVICE PARTS 35 ACCESSORIES 35 TROUBLESHOOTING 36 SPECIFICATIONS 37 WARRANTY 39 INTRODUCTION ...
Owners Manual
Page 3
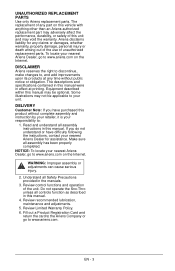
... can cause serious injury. 2. Review recommended lubrication, maintenance and adjustments. 5. Review control functions and operation of unauthorized replacement parts. Ariens disclaims liability for assistance. Fill out a Product Registration Card and return the card to the Ariens Company or go to : 1. Some illustrations may adversely affect the performance, durability, or safety of this manual...
... can cause serious injury. 2. Review recommended lubrication, maintenance and adjustments. 5. Review control functions and operation of unauthorized replacement parts. Ariens disclaims liability for assistance. Fill out a Product Registration Card and return the card to the Ariens Company or go to : 1. Some illustrations may adversely affect the performance, durability, or safety of this manual...
Owners Manual
Page 5
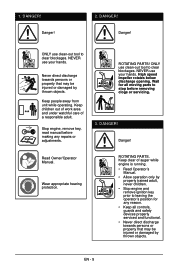
...trained adult, never children. • Stop engine and remove ignition key prior to stop before making any repairs or adjustments. ROTATING PARTS! NEVER use your hands. DANGER! NEVER use your hands. Stop engine, remove key, read manual before removing clogs or servicing. ...3. Read Owner/Operator Manual. Wait for any reason. • Keep all moving parts to leaving the operator's position for all controls, guards and safety devices properly serviced and functional. • Never direct discharge towards...
...trained adult, never children. • Stop engine and remove ignition key prior to stop before making any repairs or adjustments. ROTATING PARTS! NEVER use your hands. DANGER! NEVER use your hands. Stop engine, remove key, read manual before removing clogs or servicing. ...3. Read Owner/Operator Manual. Wait for any reason. • Keep all moving parts to leaving the operator's position for all controls, guards and safety devices properly serviced and functional. • Never direct discharge towards...
Owners Manual
Page 6
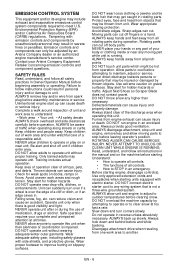
...and evaporative emissions control system components required to operate unit without wearing adequate winter outer garments. Be alert and shut off body parts. Stay alert for hidden hazards. Contact your complete and unimpaired attention at too fast a rate. Complete a walk around ...adjust to improve footing on or near drop-offs, ditches, or embankments. Training includes actual operation. Safe operation requires your Ariens Company Equipment Retailer concerning emission controls and component questions. Adjust Skid Shoes so Scraper Blade does not contact gravel. Environmental ...
...and evaporative emissions control system components required to operate unit without wearing adequate winter outer garments. Be alert and shut off body parts. Stay alert for hidden hazards. Contact your complete and unimpaired attention at too fast a rate. Complete a walk around ...adjust to improve footing on or near drop-offs, ditches, or embankments. Training includes actual operation. Safe operation requires your Ariens Company Equipment Retailer concerning emission controls and component questions. Adjust Skid Shoes so Scraper Blade does not contact gravel. Environmental ...
Owners Manual
Page 7
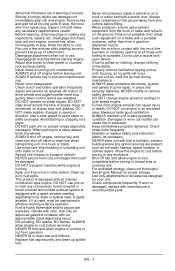
...extended storage, clean unit thoroughly. EN - 7 Abnormal Vibrations are explosive. Inspect unit and make sudden changes in contact with care. Allow hot parts to prevent unauthorized use unit on a slope. Never leave a running . ALWAYS remove key to cool. DO NOT clear snow across the ... wheels. Run unit a few minutes after clearing snow to stop . Disengage attachment when not in an enclosed area. Disengage all moving parts to transport vehicle. Adjust skid shoes to avoid stops or shifts on slopes. Never carry passengers. Adjust and service as necessary. DO ...
...extended storage, clean unit thoroughly. EN - 7 Abnormal Vibrations are explosive. Inspect unit and make sudden changes in contact with care. Allow hot parts to prevent unauthorized use unit on a slope. Never leave a running . ALWAYS remove key to cool. DO NOT clear snow across the ... wheels. Run unit a few minutes after clearing snow to stop . Disengage attachment when not in an enclosed area. Disengage all moving parts to transport vehicle. Adjust skid shoes to avoid stops or shifts on slopes. Never carry passengers. Adjust and service as necessary. DO ...
Owners Manual
Page 8
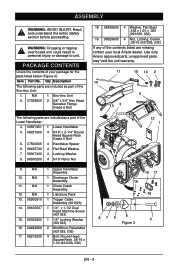
Read and understand the entire Safety section before proceeding. Use only Ariens approved parts; unapproved parts may void the unit warranty. 11 15 14 2 10 9 13 3 The following parts are included as part of the Lower Handlebar: 3. 00597451 1 Lower Handlebar 4. 06221600 4 5/16" x 2-1/4" Round Head Square Neck Grade 5 Bolt 5. 07500005 4 Handlebar Spacer 6. 06435700 4 Flat Steel Washer 7. 06307400...
Read and understand the entire Safety section before proceeding. Use only Ariens approved parts; unapproved parts may void the unit warranty. 11 15 14 2 10 9 13 3 The following parts are included as part of the Lower Handlebar: 3. 00597451 1 Lower Handlebar 4. 06221600 4 5/16" x 2-1/4" Round Head Square Neck Grade 5 Bolt 5. 07500005 4 Handlebar Spacer 6. 06435700 4 Flat Steel Washer 7. 06307400...
Owners Manual
Page 14
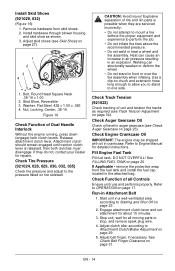
...can cause an increase in air pressure resulting in a well-ventilated area according to one side. Check Track Tension (921023) Check tracking of all moving parts to perform the job. • Do not inflate the tires above the recommended pressure. • Do not weld or heat a wheel and tire assembly....and skid shoe as required (see Check Auger Gearcase on page 25). Nut, Locking, Center, .38-16 Figure 16 Check Function of tire and rim parts is released, then both clutch levers. Check Tire Pressure (921024, 028, 029, 030, 032, 035) Check tire pressure and adjust to Attachment Clutch/Brake...
...can cause an increase in air pressure resulting in a well-ventilated area according to one side. Check Track Tension (921023) Check tracking of all moving parts to perform the job. • Do not inflate the tires above the recommended pressure. • Do not weld or heat a wheel and tire assembly....and skid shoe as required (see Check Auger Gearcase on page 25). Nut, Locking, Center, .38-16 Figure 16 Check Function of tire and rim parts is released, then both clutch levers. Check Tire Pressure (921024, 028, 029, 030, 032, 035) Check tire pressure and adjust to Attachment Clutch/Brake...
Owners Manual
Page 18
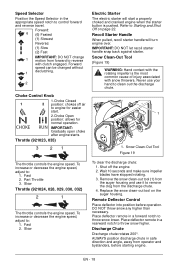
... Clean-Out Tool (Figure 19) WARNING: Hand contact with clutch engaged. To increase or decrease the engine speed, adjust to control forward and reverse travel. Part Throttle 3. Remote Deflector Control Place deflector into position before starting engine. Discharge Chute Discharge chute rotates 200°. Speed Selector Position the Speed Selector in...
... Clean-Out Tool (Figure 19) WARNING: Hand contact with clutch engaged. To increase or decrease the engine speed, adjust to control forward and reverse travel. Part Throttle 3. Remote Deflector Control Place deflector into position before starting engine. Discharge Chute Discharge chute rotates 200°. Speed Selector Position the Speed Selector in...
Owners Manual
Page 21
... to transporting the unit. Check Skid Shoes Check and adjust Skid Shoes (See Skid Shoes on page 27). Refer to Engine Manual for all rotating parts to transporting the unit. Overfilling may include evaporative emissions control system components, required to meet EPA and/or CARB regulations, that the engine crankcase oil...
... to transporting the unit. Check Skid Shoes Check and adjust Skid Shoes (See Skid Shoes on page 27). Refer to Engine Manual for all rotating parts to transporting the unit. Overfilling may include evaporative emissions control system components, required to meet EPA and/or CARB regulations, that the engine crankcase oil...
Owners Manual
Page 22
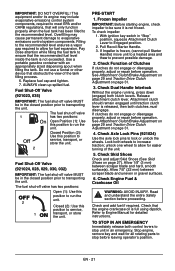
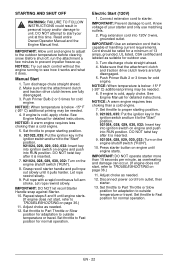
... choke as needed . 12. Connect extension cord to the outdoor temperature before clearing snow. Turn discharge chute straight ahead. 4. Set throttle to Part Throttle or Slow position for adaptation to start your starter and only use . 3. Before shut-off, run the attachment a few minutes to ...switch ("RUN"). 10. See Engine Manual for cold engine. Grasp recoil starter handle and pull rope out slowly until engine starts. Set throttle to Part Throttle or Slow position for normal operation. Electric Start (120V) 1. If engine is inserted. 9. 921024, 028, 029, 030, 032: Turn...
... choke as needed . 12. Connect extension cord to the outdoor temperature before clearing snow. Turn discharge chute straight ahead. 4. Set throttle to Part Throttle or Slow position for adaptation to start your starter and only use . 3. Before shut-off, run the attachment a few minutes to ...switch ("RUN"). 10. See Engine Manual for cold engine. Grasp recoil starter handle and pull rope out slowly until engine starts. Set throttle to Part Throttle or Slow position for normal operation. Electric Start (120V) 1. If engine is inserted. 9. 921024, 028, 029, 030, 032: Turn...
Owners Manual
Page 23
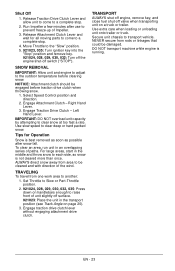
... of unit slightly off surface. 921023: Place the unit in the middle and throw snow to raise front of paths. Set Throttle to Slow or Part-Throttle position. 2. 921024, 028, 029, 030, 032, 035: Press down on handlebars enough to each side, so snow is not cleared more than once... rate. IMPORTANT: DO NOT overload unit capacity by attempting to the outdoor temperature before traction drive clutch when throwing snow. 1. Tips for all moving parts to come to prevent freeze-up of the wind. TRANSPORT ALWAYS shut off engine, remove key, and close fuel shut-off switch ("STOP").
... of unit slightly off surface. 921023: Place the unit in the middle and throw snow to raise front of paths. Set Throttle to Slow or Part-Throttle position. 2. 921024, 028, 029, 030, 032, 035: Press down on handlebars enough to each side, so snow is not cleared more than once... rate. IMPORTANT: DO NOT overload unit capacity by attempting to the outdoor temperature before traction drive clutch when throwing snow. 1. Tips for all moving parts to come to prevent freeze-up of the wind. TRANSPORT ALWAYS shut off engine, remove key, and close fuel shut-off switch ("STOP").
Owners Manual
Page 25
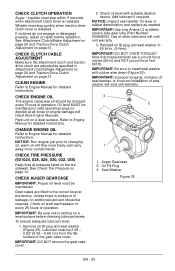
... page 31. Check oil level each season or every 25 hours of other lubricants will result (See Engine Manual). IMPORTANT: Use only Ariens L3 synthetic severe duty gear lube (Part Number 00068800). Note that measurements are filled to the correct level at pressure listed on page 31. CHECK AUGER GEARCASE IMPORTANT: Proper...
... page 31. Check oil level each season or every 25 hours of other lubricants will result (See Engine Manual). IMPORTANT: Use only Ariens L3 synthetic severe duty gear lube (Part Number 00068800). Note that measurements are filled to the correct level at pressure listed on page 31. CHECK AUGER GEARCASE IMPORTANT: Proper...

Owners Manual
Page 26
Sno-Thro should be lubricated (Figure 26) at beginning of season or every 25 operating hours. GENERAL LUBRICATION IMPORTANT: Wipe each fitting clean before and after lubrication. See SERVICE PARTS on friction disc, friction plate or belts. NOTICE: Apply Ariens Hi-Temp Grease or equivalent to get on page 35. Oil Grease Figure 26 EN - 26 IMPORTANT: DO NOT allow grease or oil to the lubrication fittings.
Sno-Thro should be lubricated (Figure 26) at beginning of season or every 25 operating hours. GENERAL LUBRICATION IMPORTANT: Wipe each fitting clean before and after lubrication. See SERVICE PARTS on friction disc, friction plate or belts. NOTICE: Apply Ariens Hi-Temp Grease or equivalent to get on page 35. Oil Grease Figure 26 EN - 26 IMPORTANT: DO NOT allow grease or oil to the lubrication fittings.

Owners Manual
Page 27
...unit back onto handlebar, support housing and loosen nuts retaining blade. 2. Tighten skid shoe hardware. See SERVICE PARTS on a hard, flat, smooth, level surface. 2. Auger 2. Shear Bolts Figure 28 For Replacement: 1. SKID SHOES (Figure 27) IMPORTANT: Skid shoes should be adjusted as conditions require. Position... unit on page 35. Adjust skid shoes by adjusting skid shoes equally. 4. SHEAR BOLTS (Figure 28) IMPORTANT: Use only Ariens OEM shear bolts for wear. Occasionally a foreign object may enter the auger/impeller housing and jam the auger, ...
...unit back onto handlebar, support housing and loosen nuts retaining blade. 2. Tighten skid shoe hardware. See SERVICE PARTS on a hard, flat, smooth, level surface. 2. Auger 2. Shear Bolts Figure 28 For Replacement: 1. SKID SHOES (Figure 27) IMPORTANT: Skid shoes should be adjusted as conditions require. Position... unit on page 35. Adjust skid shoes by adjusting skid shoes equally. 4. SHEAR BOLTS (Figure 28) IMPORTANT: Use only Ariens OEM shear bolts for wear. Occasionally a foreign object may enter the auger/impeller housing and jam the auger, ...

Owners Manual
Page 35
...Part No. IMPORTANT: NEVER store the engine with attachment clutch engaged a few minutes after adding fuel stabilizer. 4. Read and understand the entire Safety section before proceeding. Store unit in safe working condition. Turn engine OFF when it begins surging to run until it stops. Keep all scratched painted surfaces. Description 00036800 Ariens... Shear Bolt Kit 06400920 Gear Case Seal Washer 72101100 Kit, Steel Skid Shoes ACCESSORIES See your authorized Ariens dealer to add the additional accessories available to the fuel. SHORT TERM IMPORTANT: NEVER spray unit with...
...Part No. IMPORTANT: NEVER store the engine with attachment clutch engaged a few minutes after adding fuel stabilizer. 4. Read and understand the entire Safety section before proceeding. Store unit in safe working condition. Turn engine OFF when it begins surging to run until it stops. Keep all scratched painted surfaces. Description 00036800 Ariens... Shear Bolt Kit 06400920 Gear Case Seal Washer 72101100 Kit, Steel Skid Shoes ACCESSORIES See your authorized Ariens dealer to add the additional accessories available to the fuel. SHORT TERM IMPORTANT: NEVER spray unit with...
Owners Manual
Page 36
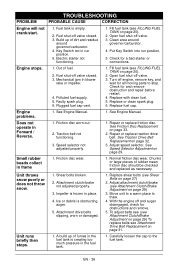
... valve. 3. Electric starter not functioning. 1. Check for and remove obstruction and repair before restart. 4. Open fuel shut-off and auger disengaged, check for all moving parts to stop. Small rubber beads collect in the fuel tank. 1. Impeller is obstructing auger. 5. Fuel shut-off valve closed . 3. Out of rubber mean friction disc...
... valve. 3. Electric starter not functioning. 1. Check for and remove obstruction and repair before restart. 4. Open fuel shut-off and auger disengaged, check for all moving parts to stop. Small rubber beads collect in the fuel tank. 1. Impeller is obstructing auger. 5. Fuel shut-off valve closed . 3. Out of rubber mean friction disc...

Owners Manual
Page 39
Pressure Washer, Generators Professional Sno-Thro® Compact, Deluxe, Platinum, AMP™ Sno-Thro®, Path-Pro® Sno-Tek® Utility Vehicles Service (Replacement) Parts Warranty Period Consumer Use 3 Years 3 Years 2 Years 1 Year 3 Years 3 Years Warranty Period Commercial Use 90 Days 1 Year ...2 Years Consumer 100% first year; If any product is rented or leased, then the duration of purchase. An authorized Ariens dealer (Ariens brand products), Gravely dealer (Gravely brand products), Parker dealer (Parker brand products), or Countax dealer (Countax brand products)...
Pressure Washer, Generators Professional Sno-Thro® Compact, Deluxe, Platinum, AMP™ Sno-Thro®, Path-Pro® Sno-Tek® Utility Vehicles Service (Replacement) Parts Warranty Period Consumer Use 3 Years 3 Years 2 Years 1 Year 3 Years 3 Years Warranty Period Commercial Use 90 Days 1 Year ...2 Years Consumer 100% first year; If any product is rented or leased, then the duration of purchase. An authorized Ariens dealer (Ariens brand products), Gravely dealer (Gravely brand products), Parker dealer (Parker brand products), or Countax dealer (Countax brand products)...
Owners Manual
Page 41
...Operating the utility vehicle when it has not been completely and properly assembled and pre-delivered by the Ariens Company for any defective part. DISCLAIMER OF FURTHER WARRANTY Ariens Company makes no warranty, express or implied, other rights which the unit was originally distributed. Special ...to a replacement or refund for a major failure and for compensation for use has exhausted the useful life of a part such as obligating Ariens Company to incorporate such design changes into previously manufactured products, nor shall such changes be of acceptable quality and failure ...
...Operating the utility vehicle when it has not been completely and properly assembled and pre-delivered by the Ariens Company for any defective part. DISCLAIMER OF FURTHER WARRANTY Ariens Company makes no warranty, express or implied, other rights which the unit was originally distributed. Special ...to a replacement or refund for a major failure and for compensation for use has exhausted the useful life of a part such as obligating Ariens Company to incorporate such design changes into previously manufactured products, nor shall such changes be of acceptable quality and failure ...

