
Owners Manual
Page 8
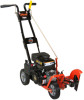
CONTROLS AND FEATURES 1 2 3 13 11 12 9 11 5 4 10 1. Operator Presence Control 2. Fuel Shut Off 11. Cutting Angle Adjuster 4. Blade 5. Oil Drain Plug 87 Figure 4 6 8. Engine Shut Off Switch 9. Choke 13. Recoil Starter 10. Rear Wheel Height Adjuster 12. Throttle GB - 8 Oil Fill/Dipstick 6. Cutting Depth Adjuster 3. Front Wheel Adjuster 7.
CONTROLS AND FEATURES 1 2 3 13 11 12 9 11 5 4 10 1. Operator Presence Control 2. Fuel Shut Off 11. Cutting Angle Adjuster 4. Blade 5. Oil Drain Plug 87 Figure 4 6 8. Engine Shut Off Switch 9. Choke 13. Recoil Starter 10. Rear Wheel Height Adjuster 12. Throttle GB - 8 Oil Fill/Dipstick 6. Cutting Depth Adjuster 3. Front Wheel Adjuster 7.

Owners Manual
Page 10
NOTE: The head pivots from the axle and position the front wheel on the right or left or right to support the edger when working along curbs or other uneven terrain. IMPORTANT: Make sure the cutting blade will not contact wheel before starting the engine. 1. Rear Wheel Height Adjuster (Figure 7) GB - 10 Sets the rear...
NOTE: The head pivots from the axle and position the front wheel on the right or left or right to support the edger when working along curbs or other uneven terrain. IMPORTANT: Make sure the cutting blade will not contact wheel before starting the engine. 1. Rear Wheel Height Adjuster (Figure 7) GB - 10 Sets the rear...

Owners Manual
Page 11
Choke Throttle Engine Shut Off Switch Bushings Position wheel nearer the blade for bevel cutting or trimming. Oil Fill/Dipstick Check the engine oil level (Figure 10). NOTE: Do not choke a warm engine. Push ... the choke when starting a cold engine. 2.Once the engine starts and begins to fast (rabbit) when edging. Set the engine shut off a running engine. Position wheel away from the blade for edging. Fuel Shut Off 1.
Choke Throttle Engine Shut Off Switch Bushings Position wheel nearer the blade for bevel cutting or trimming. Oil Fill/Dipstick Check the engine oil level (Figure 10). NOTE: Do not choke a warm engine. Push ... the choke when starting a cold engine. 2.Once the engine starts and begins to fast (rabbit) when edging. Set the engine shut off a running engine. Position wheel away from the blade for edging. Fuel Shut Off 1.

Owners Manual
Page 13
... lot of the path. 7. Set the choke to the closed position and the throttle to stop when traveling between work areas or resetting the wheel height and position. Tie unit down by linkages, guards, cables or other parts that is disengaged before leaving the operator's position. 5. Stop ...the engine starts and set the throttle to appropriate location on the engine shut off valve. 4. OPERATING EDGER 1. Set the rear wheel to the appropriate height and the front wheel to full fast before leaving the operator's position. Slowly lower the cutting head into the turf and lock...
... lot of the path. 7. Set the choke to the closed position and the throttle to stop when traveling between work areas or resetting the wheel height and position. Tie unit down by linkages, guards, cables or other parts that is disengaged before leaving the operator's position. 5. Stop ...the engine starts and set the throttle to appropriate location on the engine shut off valve. 4. OPERATING EDGER 1. Set the rear wheel to the appropriate height and the front wheel to full fast before leaving the operator's position. Slowly lower the cutting head into the turf and lock...

Owners Manual
Page 14
Clean Unit Check Tires Each Use Check Edger Blade and Mounting Hardware Check Guards and Mounting Hardware Check ...shows the recommended service schedule. Test this system does not function as needed . on page 10 and Front Wheel Adjuster on page 15. Change engine oil according to instructions provided in good repair. Interval Task Check Safety Interlock... a light oil to the pivot shaft and all dirt, grease, leaves, etc. See Make sure the front wheel does not contact the blade when angling the blade for wear or damage. MAINTENANCE SCHEDULE WARNING: AVOID INJURY. Check...
Clean Unit Check Tires Each Use Check Edger Blade and Mounting Hardware Check Guards and Mounting Hardware Check ...shows the recommended service schedule. Test this system does not function as needed . on page 10 and Front Wheel Adjuster on page 15. Change engine oil according to instructions provided in good repair. Interval Task Check Safety Interlock... a light oil to the pivot shaft and all dirt, grease, leaves, etc. See Make sure the front wheel does not contact the blade when angling the blade for wear or damage. MAINTENANCE SCHEDULE WARNING: AVOID INJURY. Check...
Owners Manual
Page 17
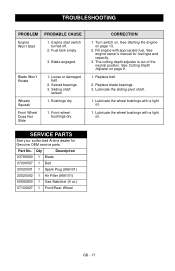
... 1 Blade 07200507 1 Belt 20020001 1 Spark Plug (986101) 20020002 1 Air Filter (986101) 00592900 1 Gas Stabilizer (4 oz.) 07100827 1 Front/Rear Wheel GB - 17 Fill engine with a light oil. 1. Blade engaged. SERVICE PARTS See your authorized Ariens dealer for fuel type and capacity. 3. See engine owner's manual for Genuine OEM service parts. Engine start switch...
... 1 Blade 07200507 1 Belt 20020001 1 Spark Plug (986101) 20020002 1 Air Filter (986101) 00592900 1 Gas Stabilizer (4 oz.) 07100827 1 Front/Rear Wheel GB - 17 Fill engine with a light oil. 1. Blade engaged. SERVICE PARTS See your authorized Ariens dealer for fuel type and capacity. 3. See engine owner's manual for Genuine OEM service parts. Engine start switch...

