
Owners Manual
Page 2
... downloaded from www.ariens.com. MODEL AND SERIAL NUMBERS When ordering replacement parts or making service inquiries, know the Model and Serial numbers of safety instructions and controls during the limited warranty period will provide you with the unit. They are located on your manual. TABLE OF CONTENTS SAFETY 4 CONTROLS AND FEATURES 10 OPERATION 11 MAINTENANCE SCHEDULE 17 STORAGE 18 TROUBLESHOOTING 19 SERVICE PARTS 20 SPECIFICATIONS 20 ACCESSORIES 20 WARRANTY 21 INTRODUCTION THE MANUAL Before operating...
... downloaded from www.ariens.com. MODEL AND SERIAL NUMBERS When ordering replacement parts or making service inquiries, know the Model and Serial numbers of safety instructions and controls during the limited warranty period will provide you with the unit. They are located on your manual. TABLE OF CONTENTS SAFETY 4 CONTROLS AND FEATURES 10 OPERATION 11 MAINTENANCE SCHEDULE 17 STORAGE 18 TROUBLESHOOTING 19 SERVICE PARTS 20 SPECIFICATIONS 20 ACCESSORIES 20 WARRANTY 21 INTRODUCTION THE MANUAL Before operating...
Owners Manual
Page 3
... described in effect at any time without complete assembly and instruction by a retailer, it to www.ariens.com. Review control functions and operation of the unit. Review recommended maintenance and adjustments. 5. Fill out a product registration card and return it is your responsibility to: • Read and understand all instructions in the manuals. 3. DISCLAIMER Ariens reserves the right to discontinue, change and improve its products...
... described in effect at any time without complete assembly and instruction by a retailer, it to www.ariens.com. Review control functions and operation of the unit. Review recommended maintenance and adjustments. 5. Fill out a product registration card and return it is your responsibility to: • Read and understand all instructions in the manuals. 3. DISCLAIMER Ariens reserves the right to discontinue, change and improve its products...

Owners Manual
Page 6
Keep people away from spark plug before assembly, maintenance or service. Read Owner/Operator Manual. Be thoroughly familiar with electric starter. Never allow children to operate the equipment. Unintentional engine start up can cause death or serious injury. Danger! The following safety instructions could result in the manual(s) before making any wiring system that may be injured or damaged by thrown objects. Keep children under watchful care...
Keep people away from spark plug before assembly, maintenance or service. Read Owner/Operator Manual. Be thoroughly familiar with electric starter. Never allow children to operate the equipment. Unintentional engine start up can cause death or serious injury. Danger! The following safety instructions could result in the manual(s) before making any wiring system that may be injured or damaged by thrown objects. Keep children under watchful care...

Owners Manual
Page 7
... the plug to clear snow at all times, until refueling is highly flammable. • Use an approved fuel container. • Never add fuel to a running engine or hot engine. • Fill fuel tank outdoors with care; Always place containers on the ground, away from all times. Do not use care when backing. Always shut off , lower the attachment, set the parking brake, stop the engine (motor), remove the wire from operation. Adjust skid...
... the plug to clear snow at all times, until refueling is highly flammable. • Use an approved fuel container. • Never add fuel to a running engine or hot engine. • Fill fuel tank outdoors with care; Always place containers on the ground, away from all times. Do not use care when backing. Always shut off , lower the attachment, set the parking brake, stop the engine (motor), remove the wire from operation. Adjust skid...

Owners Manual
Page 8
... proper tightness. Check shear bolts and other debris. Do not change engine governor settings or over during the use of ice or other bolts and hardware at all times. Always maintain unit in effective working condition. Clean up of injury associated with an internal combustion type engine. Always keep protective structures, guards, and panels in good repair, in the fuel tank inside the discharge chute is equipped...
... proper tightness. Check shear bolts and other debris. Do not change engine governor settings or over during the use of ice or other bolts and hardware at all times. Always maintain unit in effective working condition. Clean up of injury associated with an internal combustion type engine. Always keep protective structures, guards, and panels in good repair, in the fuel tank inside the discharge chute is equipped...
Owners Manual
Page 9
... your use a nozzle lock-open device. Never fill fuel tank when engine is complete. Handle with side shields, and protective gloves. Secure unit chassis to be used safely in your vehicle before tipping unit up onto housing, so no spills will improve footing on a truck or trailer. Slope Operation Operate the snow thrower on the ground. Properly remove fuel before filling. Stay off valve or drain fuel...
... your use a nozzle lock-open device. Never fill fuel tank when engine is complete. Handle with side shields, and protective gloves. Secure unit chassis to be used safely in your vehicle before tipping unit up onto housing, so no spills will improve footing on a truck or trailer. Slope Operation Operate the snow thrower on the ground. Properly remove fuel before filling. Stay off valve or drain fuel...

Owners Manual
Page 10
... & Oil Door EN - 10 CONTROLS AND FEATURES 1 3 2 4 5 12 22 14 20 11 13 6 7 8 21 15 16 18 17 19 9 10 1. Discharge Chute 9. Oil Fill (Models 938030, 034) Figure 4 12. Engine Switch 17. Recoil Starter Handle 6. Discharge Chute Deflector Handle 8. Choke Control Knob 16. Power Cord Recepticle (Models 938032, 033, 034) 20. Fuel Cap & Tank 15. Primer Bulb 18. Discharge Chute Handle (Models 938030, 031, 032, 034) 7. Wing Knob 10. Auger Paddle 11. Auger Control Cable Assembly 4. Engine Guard 22. Oil Drain Plug 14. Handlebar 2. Fuel Shut-off Valve...
... & Oil Door EN - 10 CONTROLS AND FEATURES 1 3 2 4 5 12 22 14 20 11 13 6 7 8 21 15 16 18 17 19 9 10 1. Discharge Chute 9. Oil Fill (Models 938030, 034) Figure 4 12. Engine Switch 17. Recoil Starter Handle 6. Discharge Chute Deflector Handle 8. Choke Control Knob 16. Power Cord Recepticle (Models 938032, 033, 034) 20. Fuel Cap & Tank 15. Primer Bulb 18. Discharge Chute Handle (Models 938030, 031, 032, 034) 7. Wing Knob 10. Auger Paddle 11. Auger Control Cable Assembly 4. Engine Guard 22. Oil Drain Plug 14. Handlebar 2. Fuel Shut-off Valve...

Owners Manual
Page 11
.... ON 2 Use this position to service, transport or store the unit. 2. START (Choke Closed): 1 Chokes off valve has two positions: 1 1. Primer Bulb (Item 17) Pushing primer bulb adds fuel to control direction of snow discharge. See Start Engine (Recoil Start) on page 13. Read and understand the entire Safety section before transporting the unit. ON Engine will start and run. The fuel shut-off air to run . 2 2. Recoil Starter Handle (Item 5) When pulled, handle will start engine. See Start Engine (Electric Start) on page...
.... ON 2 Use this position to service, transport or store the unit. 2. START (Choke Closed): 1 Chokes off valve has two positions: 1 1. Primer Bulb (Item 17) Pushing primer bulb adds fuel to control direction of snow discharge. See Start Engine (Recoil Start) on page 13. Read and understand the entire Safety section before transporting the unit. ON Engine will start and run. The fuel shut-off air to run . 2 2. Recoil Starter Handle (Item 5) When pulled, handle will start engine. See Start Engine (Electric Start) on page...

Owners Manual
Page 12
... damage the carburetor and the fuel hoses, filter and tank. Replace fuel cap and tighten. 6. ENGINE OIL Models 938031, 032, 033 To check oil level: 1. Check oil level on page 20 for detailed information. 4. To add oil: 1. Add 5W-30 oil and replace cap. Pay close fuel and oil door. If the engine experiences starting or performance problems after using a new gasoline, switch to ensure that will deteriorate, resulting in gum deposits in the system. See Engine Manual for fuel tank capacity. These...
... damage the carburetor and the fuel hoses, filter and tank. Replace fuel cap and tighten. 6. ENGINE OIL Models 938031, 032, 033 To check oil level: 1. Check oil level on page 20 for detailed information. 4. To add oil: 1. Add 5W-30 oil and replace cap. Pay close fuel and oil door. If the engine experiences starting or performance problems after using a new gasoline, switch to ensure that will deteriorate, resulting in gum deposits in the system. See Engine Manual for fuel tank capacity. These...

Owners Manual
Page 13
... add oil: 1. Do not lift using discharge chute handle (Item 6). 3. Move engine switch (Item 16) to power cord recepticle (Item 19) and then plug cord into warm area until engine compression makes pulling difficult. Open fuel shut-off valve (Item 20). 6. 3. Replace cap. IMPORTANT: If engine does not start engine. 8. Move engine switch (Item 16) to stop auger. CAUTION: Do not use . 4. Replace cap. 4. See SPECIFICATIONS on page 12. 2. Start Engine (Electric Start) Models 938032, 033, 034 1. release bar to ON position. 5. Open fuel...
... add oil: 1. Do not lift using discharge chute handle (Item 6). 3. Move engine switch (Item 16) to power cord recepticle (Item 19) and then plug cord into warm area until engine compression makes pulling difficult. Open fuel shut-off valve (Item 20). 6. 3. Replace cap. IMPORTANT: If engine does not start engine. 8. Move engine switch (Item 16) to stop auger. CAUTION: Do not use . 4. Replace cap. 4. See SPECIFICATIONS on page 12. 2. Start Engine (Electric Start) Models 938032, 033, 034 1. release bar to ON position. 5. Open fuel...

Owners Manual
Page 14
... engine switch (Item 16) to operating position. 9. Do not overtighten. 7. Return unit to OFF position and remove key. MAINTENANCE Replace Auger Paddles Replace auger paddles when paddles are unfrozen. Tip unit back onto engine guard. See Figure 6. Bolt and Nut Locations 2. See MAINTENANCE SCHEDULE on page 15. Tighten nuts to throw snow. Install spacers into warm area until controls are worn down to wear indicator holes. Stop Engine 1. If finished with new hex bolts...
... engine switch (Item 16) to operating position. 9. Do not overtighten. 7. Return unit to OFF position and remove key. MAINTENANCE Replace Auger Paddles Replace auger paddles when paddles are unfrozen. Tip unit back onto engine guard. See Figure 6. Bolt and Nut Locations 2. See MAINTENANCE SCHEDULE on page 15. Tighten nuts to throw snow. Install spacers into warm area until controls are worn down to wear indicator holes. Stop Engine 1. If finished with new hex bolts...

Owners Manual
Page 15
... proper operation. Install new belt on the left (drive belt side). Reinstall extension spring. 7. Replace Scraper Blade See MAINTENANCE SCHEDULE on idler bracket. 6. Remove nuts, bolts, scraper support and scraper blade. Check condition of scraper support. When auger control bar is disengaged, there should be on engine sheave, idler and drive pulley. Lower plastic sleeve. Reinstall belt cover. Idler 4. Route belt between idler and belt finger on page 17. 1. Discard scraper blade. 4. Engage auger control bar to cool. 2. Extension Spring 2. Retain all parts...
... proper operation. Install new belt on the left (drive belt side). Reinstall extension spring. 7. Replace Scraper Blade See MAINTENANCE SCHEDULE on idler bracket. 6. Remove nuts, bolts, scraper support and scraper blade. Check condition of scraper support. When auger control bar is disengaged, there should be on engine sheave, idler and drive pulley. Lower plastic sleeve. Reinstall belt cover. Idler 4. Route belt between idler and belt finger on page 17. 1. Discard scraper blade. 4. Engage auger control bar to cool. 2. Extension Spring 2. Retain all parts...

Owners Manual
Page 16
... to OFF position and remove key. Tighten screws and close fuel and oil door. Loosen chute rotation cable adjustment screws. Position scraper assembly under unit by tipping unit forward. Adjust Remote Chute Rotation Cables Model 938033 1. Move engine switch (Item 16) to operating position. See Figure 11. 1 1. Threads must align with square bolt holes in -lbf. Tighten nuts. 4. See Figure 10. • D-shaped cutout must be accessed from under housing. Install bolts and nuts. Pull cable covers to...
... to OFF position and remove key. Tighten screws and close fuel and oil door. Loosen chute rotation cable adjustment screws. Position scraper assembly under unit by tipping unit forward. Adjust Remote Chute Rotation Cables Model 938033 1. Move engine switch (Item 16) to operating position. See Figure 11. 1 1. Threads must align with square bolt holes in -lbf. Tighten nuts. 4. See Figure 10. • D-shaped cutout must be accessed from under housing. Install bolts and nuts. Pull cable covers to...

Owners Manual
Page 17
...: Proper maintenance can prolong the life of unit. Check engine oil. Check auger paddle wear. Check belt wear. Replace scraper blade. Do not use harsh abrasives or cleaners. NOTICE: Protect painted surfaces with a soft-bristled brush. Refer to wear indicator holes. Check all nuts and bolts to wear down as far as needed. Tighten all fasteners. Replace when auger paddles are worn to Engine Manual for detailed instructions. See Replace Auger Paddles on...
...: Proper maintenance can prolong the life of unit. Check engine oil. Check auger paddle wear. Check belt wear. Replace scraper blade. Do not use harsh abrasives or cleaners. NOTICE: Protect painted surfaces with a soft-bristled brush. Refer to wear indicator holes. Check all nuts and bolts to wear down as far as needed. Tighten all fasteners. Replace when auger paddles are worn to Engine Manual for detailed instructions. See Replace Auger Paddles on...

Owners Manual
Page 18
... damage and repair as needed. Keep all scratched painted surfaces. These deposits can damage the carburetor and the fuel hoses, filter and tank. Add fuel stabilizer (Ariens part number 00592900) according to reach the carburetor. To Take the Unit Out of oil or anti-rust compound. Put fresh, clean fuel in a cool, dry, protected area. Store unit in the fuel tank. 3. Run engine for visible signs of ignition. Protect...
... damage and repair as needed. Keep all scratched painted surfaces. These deposits can damage the carburetor and the fuel hoses, filter and tank. Add fuel stabilizer (Ariens part number 00592900) according to reach the carburetor. To Take the Unit Out of oil or anti-rust compound. Put fresh, clean fuel in a cool, dry, protected area. Store unit in the fuel tank. 3. Run engine for visible signs of ignition. Protect...
Owners Manual
Page 19
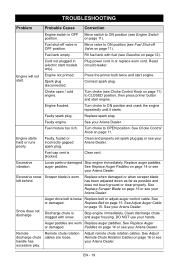
Fill fuel tank with snow. Engine flooded. Turn choke to OPEN position. Turn choke to ON position and crank the engine repeatedly until it starts. Faulty, fouled or incorrectly gapped spark plug. Excessive snow Scraper blade is loose Replace belt or adjust auger control cable. Replace Belt on page 15. See Adjust Remote Chute Rotation Cables on page 16 or see your Ariens Dealer. Fuel shut-off Valve on page 12). Engine not primed. Press the primer bulb twice and start engine. Turn choke (see Choke Control Knob on page 14 or...
Fill fuel tank with snow. Engine flooded. Turn choke to OPEN position. Turn choke to ON position and crank the engine repeatedly until it starts. Faulty, fouled or incorrectly gapped spark plug. Excessive snow Scraper blade is loose Replace belt or adjust auger control cable. Replace Belt on page 15. See Adjust Remote Chute Rotation Cables on page 16 or see your Ariens Dealer. Fuel shut-off Valve on page 12). Engine not primed. Press the primer bulb twice and start engine. Turn choke (see Choke Control Knob on page 14 or...

Owners Manual
Page 20
... 1 Auger Cable 07200627 1 Auger Belt 21547400 1 Spark Plug 53802900 1 Auger Paddle Replacement Kit 53803100 1 Scraper Blade Replacement Kit 53803800 1 Pawl Arm Replacement Kit ACCESSORIES See your authorized Ariens dealer to add these optional accessories to your authorized Ariens dealer for genuine OEM service parts. Description 73801100 Sno-Thro Cover Kit 70707600 Protective Floor Mat 73800600 Snow Shield Kit 73800800 Remote Chute Rotation Kit (Models 938030, 031, 032, 034) 73801000 Maintenance Kit* *Includes 16 oz. 5W-30 engine oil, spark plug, fuel stabilizer...
... 1 Auger Cable 07200627 1 Auger Belt 21547400 1 Spark Plug 53802900 1 Auger Paddle Replacement Kit 53803100 1 Scraper Blade Replacement Kit 53803800 1 Pawl Arm Replacement Kit ACCESSORIES See your authorized Ariens dealer to add these optional accessories to your authorized Ariens dealer for genuine OEM service parts. Description 73801100 Sno-Thro Cover Kit 70707600 Protective Floor Mat 73800600 Snow Shield Kit 73800800 Remote Chute Rotation Kit (Models 938030, 031, 032, 034) 73801000 Maintenance Kit* *Includes 16 oz. 5W-30 engine oil, spark plug, fuel stabilizer...

Owners Manual
Page 21
... and workmanship for Commercial Use Consumer 100% first year; Such repair or replacement will be 90 days after 1/1/2013 will repair any defective part, subject to the conditions, limitations and exclusions set forth herein. Warranty Code PA PB PC PD PE SA SB SC UA N/A Product Group Log Splitters, Brushes, String Trimmers, Edgers Professional Powered Brushes Tillers Vacuums, Blowers, Sweepers, Truck Loaders, Lawn Rakes, Sprayers, Aerators, etc...
... and workmanship for Commercial Use Consumer 100% first year; Such repair or replacement will be 90 days after 1/1/2013 will repair any defective part, subject to the conditions, limitations and exclusions set forth herein. Warranty Code PA PB PC PD PE SA SB SC UA N/A Product Group Log Splitters, Brushes, String Trimmers, Edgers Professional Powered Brushes Tillers Vacuums, Blowers, Sweepers, Truck Loaders, Lawn Rakes, Sprayers, Aerators, etc...

Owners Manual
Page 22
... customer must : • Perform the maintenance and adjustments explained in the literature package and return it to Ariens Company, or register the unit online at owner's expense. • Have the warranty service performed by an authorized Ariens, Gravely, Parker or Countax service representative. See Engine Manufacturer's Warranty All Engines are not covered when used commercially. Refer to engine manufacturer's warranty statement. Hallam, Victoria 3803 Australia Phone...
... customer must : • Perform the maintenance and adjustments explained in the literature package and return it to Ariens Company, or register the unit online at owner's expense. • Have the warranty service performed by an authorized Ariens, Gravely, Parker or Countax service representative. See Engine Manufacturer's Warranty All Engines are not covered when used commercially. Refer to engine manufacturer's warranty statement. Hallam, Victoria 3803 Australia Phone...
Owners Manual
Page 23
... this warranty. • Use of gasoline blends exceeding 10% ethanol voids any and all warranties. • Products are noted in the Limitations section above: lubricants, spark plugs, oil, oil filters, air filters, fuel filters, brake linings, brake arms, brake shoes, skid shoes, scraper blades, shear bolts, mower blades, mower vanes, brushes, headlights, light bulbs, knives, cutters, and single-stage impellers. • Any misuse, alteration, improper assembly, improper adjustment, neglect, or accident which is not covered by the Ariens...
... this warranty. • Use of gasoline blends exceeding 10% ethanol voids any and all warranties. • Products are noted in the Limitations section above: lubricants, spark plugs, oil, oil filters, air filters, fuel filters, brake linings, brake arms, brake shoes, skid shoes, scraper blades, shear bolts, mower blades, mower vanes, brushes, headlights, light bulbs, knives, cutters, and single-stage impellers. • Any misuse, alteration, improper assembly, improper adjustment, neglect, or accident which is not covered by the Ariens...


