Owners Manual
Page 5
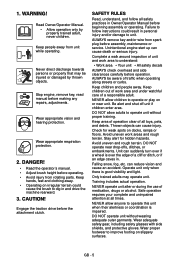
...without proper training. Wear proper footwear to operate or play on slippery surfaces. DANGER! • Read the operator's manual. • Adjust brush height before operation. DO NOT operate near unit. Read Owner/Operator Manual. • Allow operation only by thrown objects. 1. Never direct... on docks, ramps or floors. ALWAYS remove key and/or wire from spark plug before making any repairs, adjustments. Unintentional engine start up can cause injury. Thrown objects can cause death or serious injury. Avoid uneven work areas and rough terrain. Falling snow, fog...
...without proper training. Wear proper footwear to operate or play on slippery surfaces. DANGER! • Read the operator's manual. • Adjust brush height before operation. DO NOT operate near unit. Read Owner/Operator Manual. • Allow operation only by thrown objects. 1. Never direct... on docks, ramps or floors. ALWAYS remove key and/or wire from spark plug before making any repairs, adjustments. Unintentional engine start up can cause injury. Thrown objects can cause death or serious injury. Avoid uneven work areas and rough terrain. Falling snow, fog...
Owners Manual
Page 6
...or direction. Always look down and turn corners slowly. Disengage attachment when not in rotating parts. If brush is set too low or if terrain is running. Avoid starting engine, disengage control(s). Use extra care when loading or unloading unit onto trailer or truck. NEVER ..., repairs, etc.: disengage clutch(es), stop unit and engine, remove key, allow unit and engine to adjust to outdoor temperatures before starting units equipped with electric starter. When parking on gravel surfaces. Secure unit chassis to cool. Keep unit free of slopes. Wear appropriate ...
...or direction. Always look down and turn corners slowly. Disengage attachment when not in rotating parts. If brush is set too low or if terrain is running. Avoid starting engine, disengage control(s). Use extra care when loading or unloading unit onto trailer or truck. NEVER ..., repairs, etc.: disengage clutch(es), stop unit and engine, remove key, allow unit and engine to adjust to outdoor temperatures before starting units equipped with electric starter. When parking on gravel surfaces. Secure unit chassis to cool. Keep unit free of slopes. Wear appropriate ...
Owners Manual
Page 8
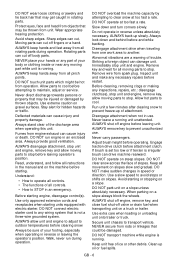
...area according to damage cable spring hooks when rotating handlebars upward. 5. Rotate the handlebars into operating position. IMPORTANT: Be careful not to Starting and Shut Off on tire sidewall. Check Engine Crankcase Oil IMPORTANT: Engine is possible when they are serviced incorrectly: • Do ...not attempt to mount a tire without the proper equipment and experience to Engine Manual for detailed instructions. Start unit in an explosion. Remove the lower and loosen the upper hardware on the shift rod. 3. Adjust clutch idler according to ...
...area according to damage cable spring hooks when rotating handlebars upward. 5. Rotate the handlebars into operating position. IMPORTANT: Be careful not to Starting and Shut Off on tire sidewall. Check Engine Crankcase Oil IMPORTANT: Engine is possible when they are serviced incorrectly: • Do ...not attempt to mount a tire without the proper equipment and experience to Engine Manual for detailed instructions. Start unit in an explosion. Remove the lower and loosen the upper hardware on the shift rod. 3. Adjust clutch idler according to ...
Owners Manual
Page 9
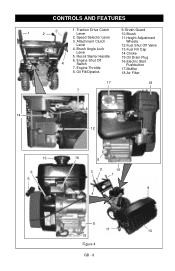
Brush Angle Lock 13.Fuel Fill Cap Lever 14.Choke 5. Oil Fill/Dipstick 18.Air Filter 17 18 7 14 12 13 6 5 16 8 32 15 1 9 4 8 11 10 15 Figure 4 GB - 9 CONTROLS AND FEATURES 1 3 2 1. Speed Selector Lever 11.Height Adjustment 3. Engine Shut Off 4 Switch 16.Electric Start Pushbutton 7. Engine Throttle 17.Muffler 8. Brush Guard 10.Brush 2. Attachment Clutch Wheels Lever 12.Fuel Shut Off Valve 4. Recoil Starter Handle 15.Oil Drain Plug 6. Traction Drive Clutch Lever 9.
Brush Angle Lock 13.Fuel Fill Cap Lever 14.Choke 5. Oil Fill/Dipstick 18.Air Filter 17 18 7 14 12 13 6 5 16 8 32 15 1 9 4 8 11 10 15 Figure 4 GB - 9 CONTROLS AND FEATURES 1 3 2 1. Speed Selector Lever 11.Height Adjustment 3. Engine Shut Off 4 Switch 16.Electric Start Pushbutton 7. Engine Throttle 17.Muffler 8. Brush Guard 10.Brush 2. Attachment Clutch Wheels Lever 12.Fuel Shut Off Valve 4. Recoil Starter Handle 15.Oil Drain Plug 6. Traction Drive Clutch Lever 9.

Owners Manual
Page 10
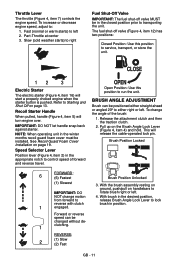
... press down ) if released. To stop movement. Choke Open position (lever to brush. Engage the traction drive clutch without engaging the attachment drive clutch. Release clutch lever (2) to disengage power 1 to right): allows for propelling unit. Attachment Drive Clutch - Right Hand Lever... Traction Drive Clutch - Set the engine shut off air to start . 2. Choke Control Lever 1. Set the engine shut off a running engine. Read and understand the entire Safety section before the attachment clutch when brushing. Engine Shut-Off Switch (Figure 5) 1. WARNING: To avoid...
... press down ) if released. To stop movement. Choke Open position (lever to brush. Engage the traction drive clutch without engaging the attachment drive clutch. Release clutch lever (2) to disengage power 1 to right): allows for propelling unit. Attachment Drive Clutch - Right Hand Lever... Traction Drive Clutch - Set the engine shut off air to start . 2. Choke Control Lever 1. Set the engine shut off a running engine. Read and understand the entire Safety section before the attachment clutch when brushing. Engine Shut-Off Switch (Figure 5) 1. WARNING: To avoid...
Owners Manual
Page 11
...When operating unit in the closed position prior to IMPORTANT: DO rotate brush right or left . BRUSH ANGLE ADJUSTMENT Brush can be changed without declutching. 1 REVERSE: 2 (1) Slow (2) Fast GB - 11 Slow (cold weather starts) to either straight ahead or angled 20º to right Fuel ... traction clutch. 2. Refer to : 1. Open Position: Use this position to run the unit. Fast (normal or warm starts) to control speed of the brush: 1. Part-Throttle at center 3. IMPORTANT: DO NOT let handle snap back against starter. See Recoil Guard Foam Cover Installation...
...When operating unit in the closed position prior to IMPORTANT: DO rotate brush right or left . BRUSH ANGLE ADJUSTMENT Brush can be changed without declutching. 1 REVERSE: 2 (1) Slow (2) Fast GB - 11 Slow (cold weather starts) to either straight ahead or angled 20º to right Fuel ... traction clutch. 2. Refer to : 1. Open Position: Use this position to run the unit. Fast (normal or warm starts) to control speed of the brush: 1. Part-Throttle at center 3. IMPORTANT: DO NOT let handle snap back against starter. See Recoil Guard Foam Cover Installation...
Owners Manual
Page 12
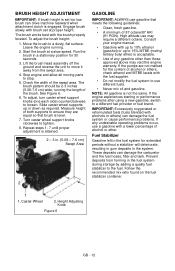
...caster wheel support knobs clockwise to a different fuel provider or fuel brand. High altitude use gasoline that brush is level. 7. To adjust the brush height: 1. Start the brush at proper height. The brush pattern should be 2-3 inches (5.08-7.6 cm) wide, running . 2. See Figure 6. 6. If...A minimum of alcohol or ether. If the engine experiences starting or performance problems after using a new gasoline, switch to tighten. 8. Prevent deposits from the swept area. 4. Height Adjusting Knob Figure 6 GB - 12 Move the brush to 15% MTBE (methyl tertiary butyl ether) is acceptable...
...caster wheel support knobs clockwise to a different fuel provider or fuel brand. High altitude use gasoline that brush is level. 7. To adjust the brush height: 1. Start the brush at proper height. The brush pattern should be 2-3 inches (5.08-7.6 cm) wide, running . 2. See Figure 6. 6. If...A minimum of alcohol or ether. If the engine experiences starting or performance problems after using a new gasoline, switch to tighten. 8. Prevent deposits from the swept area. 4. Height Adjusting Knob Figure 6 GB - 12 Move the brush to 15% MTBE (methyl tertiary butyl ether) is acceptable...
Owners Manual
Page 13
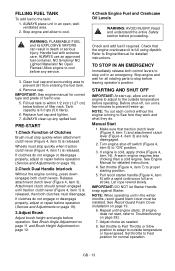
... any spilled fuel. Fill fuel tank to the tank: 1. PRE-START 1.Check Function of Clutches Brush must disengage. Attachment clutch should remain engaged until engine starts. (If engine does not start -up any service. 3. Check and add fuel if required. STARTING AND SHUT OFF IMPORTANT: At start , refer to Troubleshooting on page 19). 2.Check Dual Handle...
... any spilled fuel. Fill fuel tank to the tank: 1. PRE-START 1.Check Function of Clutches Brush must disengage. Attachment clutch should remain engaged until engine starts. (If engine does not start -up any service. 3. Check and add fuel if required. STARTING AND SHUT OFF IMPORTANT: At start , refer to Troubleshooting on page 19). 2.Check Dual Handle...
Owners Manual
Page 14
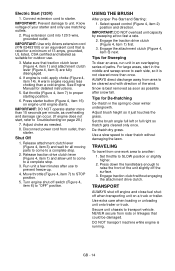
... to "OFF" position. Run unit a few minutes after snow fall. USING THE BRUSH After proper Pre-Start and Starting: 1. Engage the attachment clutch (Figure 4, item 3) next. IMPORTANT: Use only Ariens extension cord (P/N 02483100) or an equivalent cord that traction clutch lever (Figure 4,... item 1) and attachment clutch lever (Figure 4, item 3) are fully disengaged. 4. Disconnect power...
... to "OFF" position. Run unit a few minutes after snow fall. USING THE BRUSH After proper Pre-Start and Starting: 1. Engage the attachment clutch (Figure 4, item 3) next. IMPORTANT: Use only Ariens extension cord (P/N 02483100) or an equivalent cord that traction clutch lever (Figure 4,... item 1) and attachment clutch lever (Figure 4, item 3) are fully disengaged. 4. Disconnect power...
Owners Manual
Page 15
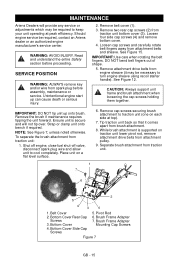
...See Figure 12. Remove the brush if maintenance requires tipping the unit forward. To separate the brush attachment from spark plug before proceeding. Bottom Cover Side Cap Screws 5. MAINTENANCE Ariens Dealers will not tip over. Unintentional engine start up onto brush. Brush Frame Adapter Mounting Cap Screws...and allow unit to turn engine sheave using recoil starter handle). While brush attachment is secure and will provide any service or adjustments which may be required, contact an Ariens dealer or an authorized engine manufacturer's service center. Bottom Cover Rear ...
...See Figure 12. Remove the brush if maintenance requires tipping the unit forward. To separate the brush attachment from spark plug before proceeding. Bottom Cover Side Cap Screws 5. MAINTENANCE Ariens Dealers will not tip over. Unintentional engine start up onto brush. Brush Frame Adapter Mounting Cap Screws...and allow unit to turn engine sheave using recoil starter handle). While brush attachment is secure and will provide any service or adjustments which may be required, contact an Ariens dealer or an authorized engine manufacturer's service center. Bottom Cover Rear ...
Owners Manual
Page 19
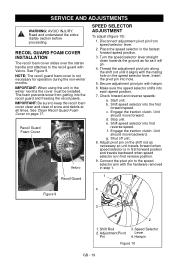
... Figure 10 GB - 19 NOTE: The recoil guard foam cover is in step 1. 1 Recoil Guard 4 Figure 9 3 2 1. Insert the pivot pin into the first forward speed. Start unit. Unit should move forward. Engage the traction clutch. See Figure 9. Secure adjustment pivot pin with the hardware removed in first reverse position. 9. Make sure...
... Figure 10 GB - 19 NOTE: The recoil guard foam cover is in step 1. 1 Recoil Guard 4 Figure 9 3 2 1. Insert the pivot pin into the first forward speed. Start unit. Unit should move forward. Engage the traction clutch. See Figure 9. Secure adjustment pivot pin with the hardware removed in first reverse position. 9. Make sure...
Owners Manual
Page 22
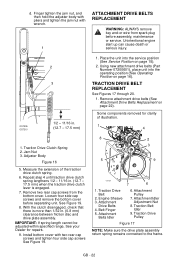
... new attachment drive belts (Part Number 07200601), place unit into the service position (See Service Position on page 15). 2. Attachment Idler Adjustment Nut 8. Unintentional engine start up can cause death or serious injury. TRACTION DRIVE BELT REPLACEMENT See Figures 17 through 20. 1. Attachment Pulley 7. Remove two rear cap screws from spark...
... new attachment drive belts (Part Number 07200601), place unit into the service position (See Service Position on page 15). 2. Attachment Idler Adjustment Nut 8. Unintentional engine start up can cause death or serious injury. TRACTION DRIVE BELT REPLACEMENT See Figures 17 through 20. 1. Attachment Pulley 7. Remove two rear cap screws from spark...

Owners Manual
Page 24
...Spring Clip Pin 5. Place unit on one end. Loosen each bearing setscrew and slide bearings inward, away from brush assembly. Manually move traction unit backwards, pulling brush housing away from horizontal end supports. See Figure 20. 3. Bottom Cover Rear Cap Screw 5 21 37 6...plug wire and allow unit to prevent damage. Support splined shaft to cool completely. Unintentional engine start up can cause death or serious injury. 1. Friction Disc 2. IMPORTANT: Brush gearbox splined shaft will separate from spark plug before assembly, maintenance or service. NOTE: The...
...Spring Clip Pin 5. Place unit on one end. Loosen each bearing setscrew and slide bearings inward, away from brush assembly. Manually move traction unit backwards, pulling brush housing away from horizontal end supports. See Figure 20. 3. Bottom Cover Rear Cap Screw 5 21 37 6...plug wire and allow unit to prevent damage. Support splined shaft to cool completely. Unintentional engine start up can cause death or serious injury. 1. Friction Disc 2. IMPORTANT: Brush gearbox splined shaft will separate from spark plug before assembly, maintenance or service. NOTE: The...
Owners Manual
Page 28
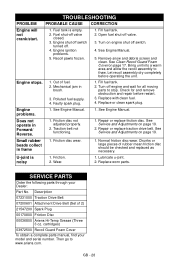
... fuel. 4. U-joint is empty. 2. TROUBLESHOOTING PROBLEM PROBABLE CAUSE CORRECTION Engine will not crank/start. 1. Chunks or large pieces of 2) 21547200 Spark Plug 00170800 Friction Disc 00036800 Ariens Hi-Temp Grease (Three 3 oz. SERVICE PARTS Order the following parts through your model and... serial number. Fuel tank is noisy 1. Fuel shut-off valve closed. 3. Does not operate in frame 1. See Service and Adjustments on engine shut off . 4. Wear. 1. Mechanical jam in brush...
... fuel. 4. U-joint is empty. 2. TROUBLESHOOTING PROBLEM PROBABLE CAUSE CORRECTION Engine will not crank/start. 1. Chunks or large pieces of 2) 21547200 Spark Plug 00170800 Friction Disc 00036800 Ariens Hi-Temp Grease (Three 3 oz. SERVICE PARTS Order the following parts through your model and... serial number. Fuel tank is noisy 1. Fuel shut-off valve closed. 3. Does not operate in frame 1. See Service and Adjustments on engine shut off . 4. Wear. 1. Mechanical jam in brush...


