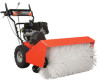
Owners Manual
Page 2
...instructions for your unit during normal operation and maintenance. Numbers are also available as a free download on our website: http://www.ariens.com MANUALES EN IDIOMAS DIFERENTES DEL INGLES Puede obtener manuales en idiomas diferentes del inglés en su distribuidor. Les manuels imprim&#... in the unit literature package. MODEL AND SERIAL NUMBERS When ordering replacement parts or making service inquiries, know the Model and Serial numbers of your manuals. Visite a su distribuidor o vaya a www.ariens.com para obtener una lista de idiomas disponibles para su equipo. Rendez-...
...instructions for your unit during normal operation and maintenance. Numbers are also available as a free download on our website: http://www.ariens.com MANUALES EN IDIOMAS DIFERENTES DEL INGLES Puede obtener manuales en idiomas diferentes del inglés en su distribuidor. Les manuels imprim&#... in the unit literature package. MODEL AND SERIAL NUMBERS When ordering replacement parts or making service inquiries, know the Model and Serial numbers of your manuals. Visite a su distribuidor o vaya a www.ariens.com para obtener una lista de idiomas disponibles para su equipo. Rendez-...
Owners Manual
Page 3
...be honored, whether or not the product registration card is your unit. UNAUTHORIZED REPLACEMENT PARTS Use only Ariens replacement parts. The replacement of unauthorized replacement parts. To locate your nearest Ariens Dealer for any claims or damages, whether warranty, property damage, personal injury or death...4. Read and understand all controls function as described in effect at printing. If you with anything other than an Ariens authorized replacement part may void the warranty. NOTE: To locate your retailer, it is returned. Understand all assembly has been properly ...
...be honored, whether or not the product registration card is your unit. UNAUTHORIZED REPLACEMENT PARTS Use only Ariens replacement parts. The replacement of unauthorized replacement parts. To locate your nearest Ariens Dealer for any claims or damages, whether warranty, property damage, personal injury or death...4. Read and understand all controls function as described in effect at printing. If you with anything other than an Ariens authorized replacement part may void the warranty. NOTE: To locate your retailer, it is returned. Understand all assembly has been properly ...
Owners Manual
Page 5
...Your unit • All safety decals ALWAYS check overhead and side clearances carefully before operating. • Avoid injury from rotating parts. Safe operation requires your complete and unimpaired attention at all safety practices in . Wear appropriate vision and hearing protection. DANGER!... • Read the operator's manual. • Adjust brush height before operation. GB - 5 Complete a walk around inspection of a responsible adult. DO NOT operate near unit. can cause injury...
...Your unit • All safety decals ALWAYS check overhead and side clearances carefully before operating. • Avoid injury from rotating parts. Safe operation requires your complete and unimpaired attention at all safety practices in . Wear appropriate vision and hearing protection. DANGER!... • Read the operator's manual. • Adjust brush height before operation. GB - 5 Complete a walk around inspection of a responsible adult. DO NOT operate near unit. can cause injury...
Owners Manual
Page 6
... speed or direction. ALWAYS remove key to cool before attachment clutch. Adjust brush height before and while backing. Avoid sharp edges. DO NOT touch unit parts which might be sure of trouble. Allow parts to prevent unauthorized use . Allow hot parts to transport vehicle. Use extra care when loading or unloading unit onto trailer...
... speed or direction. ALWAYS remove key to cool before attachment clutch. Adjust brush height before and while backing. Avoid sharp edges. DO NOT touch unit parts which might be sure of trouble. Allow parts to prevent unauthorized use . Allow hot parts to transport vehicle. Use extra care when loading or unloading unit onto trailer...
Owners Manual
Page 7
...use unit on clothing, change engine governor settings or over during maintenance. Adjust brush height before storing in contact with care. DO NOT run engine in safe ...flames. DO NOT change clothing immediately. Always provide good ventilation. When practical, remove gas-powered equipment from engine exhaust can cause fire or explosion. If this is not possible, then ... replace with an internal combustion type engine. This product is equipped with manufacturer's recommended parts. Allow the engine to cool before servicing. ALWAYS allow engine to Operation. Never fill...
...use unit on clothing, change engine governor settings or over during maintenance. Adjust brush height before storing in contact with care. DO NOT run engine in safe ...flames. DO NOT change clothing immediately. Always provide good ventilation. When practical, remove gas-powered equipment from engine exhaust can cause fire or explosion. If this is not possible, then ... replace with an internal combustion type engine. This product is equipped with manufacturer's recommended parts. Allow the engine to cool before servicing. ALWAYS allow engine to Operation. Never fill...
Owners Manual
Page 8
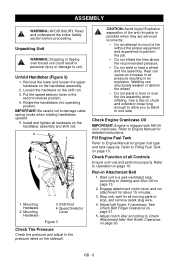
...not weld or heat a wheel and tire assembly. Unfold Handlebar (Figure 3) 1. Loosen the hardware on page 21. 5. Install and tighten all moving parts to Engine Manual for proper fuel type and tank capacity. Shift Rod 4. Heat can structurally weaken or deform the wheel. • Do not stand...entire Safety section before proceeding. Welding can cause an increase in air pressure resulting in Attachment Belt 1. Check Function of tire and rim parts is shipped with 5W-30 oil in the second reverse position. 4. Run-in an explosion. Rotate the handlebars into operating position. ...
...not weld or heat a wheel and tire assembly. Unfold Handlebar (Figure 3) 1. Loosen the hardware on page 21. 5. Install and tighten all moving parts to Engine Manual for proper fuel type and tank capacity. Shift Rod 4. Heat can structurally weaken or deform the wheel. • Do not stand...entire Safety section before proceeding. Welding can cause an increase in air pressure resulting in Attachment Belt 1. Check Function of tire and rim parts is shipped with 5W-30 oil in the second reverse position. 4. Run-in an explosion. Rotate the handlebars into operating position. ...
Owners Manual
Page 11
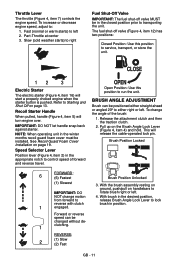
... 12) has two positions: Closed Position: Use this position to control speed of the brush: 1. To change motion 4. Brush Position Locked FORWARD: 6 (6) Fastest Brush Position Unlocked (1) Slowest 3. NOT change the angle of forward and reverse travel. Part-Throttle at center 3. With brush in position. 1 engaged. IMPORTANT: DO NOT let handle snap back against starter. Speed...
... 12) has two positions: Closed Position: Use this position to control speed of the brush: 1. To change motion 4. Brush Position Locked FORWARD: 6 (6) Fastest Brush Position Unlocked (1) Slowest 3. NOT change the angle of forward and reverse travel. Part-Throttle at center 3. With brush in position. 1 engaged. IMPORTANT: DO NOT let handle snap back against starter. Speed...
Owners Manual
Page 12
... A minimum of any undesirable operating problems occur, use may void the engine warranty. Stop engine and allow all moving parts to tighten. 8. Start the brush at proper height. Turn caster wheel support knobs clockwise to stop. 5. Consult your engine manual. • Gasoline with the... brush properly leveled. BRUSH HEIGHT ADJUSTMENT IMPORTANT: If brush height is set at a slow speed. To adjust, turn caster wheel support knobs (one each side) counterclockwise to...
... A minimum of any undesirable operating problems occur, use may void the engine warranty. Stop engine and allow all moving parts to tighten. 8. Start the brush at proper height. Turn caster wheel support knobs clockwise to stop. 5. Consult your engine manual. • Gasoline with the... brush properly leveled. BRUSH HEIGHT ADJUSTMENT IMPORTANT: If brush height is set at a slow speed. To adjust, turn caster wheel support knobs (one each side) counterclockwise to...
Owners Manual
Page 13
... on page 19). 2.Check Dual Handle Interlock Without the engine running to Fast position for all rotating parts to within 1/2 inch (1.27 cm) below bottom of Clutches Brush must stop quickly when attachment clutch lever (Figure 4, item 3) is released, then both clutches must .... See Engine Manual for detailed instructions. GB - 13 NO Smoking! Wheels must disengage. Refer to Troubleshooting on page 19). 3.Adjust Brush Adjust brush height and angle before proceeding. STARTING AND SHUT OFF IMPORTANT: At start , refer to Engine Manual for detailed instructions. 4. NOTE: Try...
... on page 19). 2.Check Dual Handle Interlock Without the engine running to Fast position for all rotating parts to within 1/2 inch (1.27 cm) below bottom of Clutches Brush must stop quickly when attachment clutch lever (Figure 4, item 3) is released, then both clutches must .... See Engine Manual for detailed instructions. GB - 13 NO Smoking! Wheels must disengage. Refer to Troubleshooting on page 19). 3.Adjust Brush Adjust brush height and angle before proceeding. STARTING AND SHUT OFF IMPORTANT: At start , refer to Engine Manual for detailed instructions. 4. NOTE: Try...
Owners Manual
Page 14
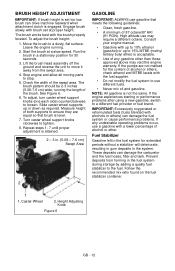
... 1. Engage the attachment clutch (Figure 4, item 3) next. Tips for all moving parts to come to prevent freeze-up. 4. Engage traction clutch without damaging the lawn. NEVER...Press starter button (Figure 4, item 16) on a truck or trailer. GB - 14 IMPORTANT: Use only Ariens extension cord (P/N 02483100) or an equivalent cord that traction clutch lever (Figure 4, item 1) and attachment ...item 7) to unit. Disconnect power cord from one work area to transport vehicle. USING THE BRUSH After proper Pre-Start and Starting: 1. De-thatch dry grass. Adjust brush height so it is not...
... 1. Engage the attachment clutch (Figure 4, item 3) next. Tips for all moving parts to come to prevent freeze-up. 4. Engage traction clutch without damaging the lawn. NEVER...Press starter button (Figure 4, item 16) on a truck or trailer. GB - 14 IMPORTANT: Use only Ariens extension cord (P/N 02483100) or an equivalent cord that traction clutch lever (Figure 4, item 1) and attachment ...item 7) to unit. Disconnect power cord from one work area to transport vehicle. USING THE BRUSH After proper Pre-Start and Starting: 1. De-thatch dry grass. Adjust brush height so it is not...
Owners Manual
Page 17
Attachment clutch should be maintained in front or over the tire assembly when inflating. CHECK CLUTCH OPERATION Brush must stop quickly when attachment clutch lever is always kept clean and free of tire and rim parts is clogged with snow remove it immediately and allow you to stand to Engine Manual for detailed...
Attachment clutch should be maintained in front or over the tire assembly when inflating. CHECK CLUTCH OPERATION Brush must stop quickly when attachment clutch lever is always kept clean and free of tire and rim parts is clogged with snow remove it immediately and allow you to stand to Engine Manual for detailed...

Owners Manual
Page 18
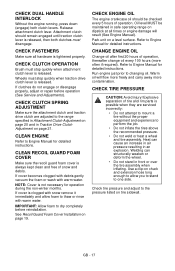
...IMPORTANT: Wipe each fitting clean before and after the first 16 hours of the season or every 25 operating hours. Apply Hi-Temp Grease (Part Number 00036800) or equivalent to the lubrication fittings after lubrication. Grease Oil Figure 8 OS0743 GB - 18 GENERAL LUBRICATION See Figure 8. 1. Apply...the factory and should not require additional lubrication. 4. Place unit into the operating position (See Operating Position on page 15). NOTE: Brush attachment gear case is lubricated at the beginning of use and every 8 hours thereafter. Place unit into the service position (See ...
...IMPORTANT: Wipe each fitting clean before and after the first 16 hours of the season or every 25 operating hours. Apply Hi-Temp Grease (Part Number 00036800) or equivalent to the lubrication fittings after lubrication. Grease Oil Figure 8 OS0743 GB - 18 GENERAL LUBRICATION See Figure 8. 1. Apply...the factory and should not require additional lubrication. 4. Place unit into the operating position (See Operating Position on page 15). NOTE: Brush attachment gear case is lubricated at the beginning of use and every 8 hours thereafter. Place unit into the service position (See ...
Owners Manual
Page 22
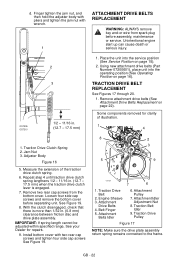
...) when the traction drive clutch lever is more than 1/32 in. (0.8 mm) clearance between friction disc and drive plate assembly. Using new attachment drive belts (Part Number 07200601), place unit into the service position (See Service Position on page 16). Remove attachment drive belts (See Attachment Drive Belts Replacement on page...
...) when the traction drive clutch lever is more than 1/32 in. (0.8 mm) clearance between friction disc and drive plate assembly. Using new attachment drive belts (Part Number 07200601), place unit into the service position (See Service Position on page 16). Remove attachment drive belts (See Attachment Drive Belts Replacement on page...
Owners Manual
Page 23
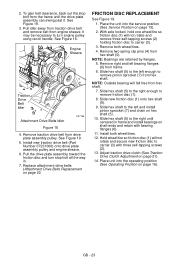
... the right until the drive plate assembly can swing past it. It may be necessary to carrier (3). 3. See Figure 18. Install new traction drive belt (Part Number 07231000) onto drive plate assembly pulley and engine sheave. 6. Pull the drive plate assembly toward the friction disc and turn engine pulley using recoil...
... the right until the drive plate assembly can swing past it. It may be necessary to carrier (3). 3. See Figure 18. Install new traction drive belt (Part Number 07231000) onto drive plate assembly pulley and engine sheave. 6. Pull the drive plate assembly toward the friction disc and turn engine pulley using recoil...
Owners Manual
Page 28
...Polluted fuel supply. 4. Turn off valve. 3. Replace with clean fuel. 4. Replace or clean spark plug. Does not operate in brush. 3. Repair or replace friction disc. GB - 28 Fuel shut-off . 4. Recoil pawls frozen. 1. Out of 2) 21547200 Spark Plug 00170800 Friction...off switch. 4. Bring unit into a warm area and allow the recoil assembly to www.ariens.com. Let recoil assembly dry completely before restart. 3. Fill fuel tank. 2. Check for all moving parts to stop. Engine problems. 1. See Engine Manual. 1. Traction belt not functioning. 1....
...Polluted fuel supply. 4. Turn off valve. 3. Replace with clean fuel. 4. Replace or clean spark plug. Does not operate in brush. 3. Repair or replace friction disc. GB - 28 Fuel shut-off . 4. Recoil pawls frozen. 1. Out of 2) 21547200 Spark Plug 00170800 Friction...off switch. 4. Bring unit into a warm area and allow the recoil assembly to www.ariens.com. Let recoil assembly dry completely before restart. 3. Fill fuel tank. 2. Check for all moving parts to stop. Engine problems. 1. See Engine Manual. 1. Traction belt not functioning. 1....
Owners Manual
Page 30
...Walks, AMP Wide Area Walks, Tillers, String Trimmers, Log Splitters, Edgers and Power Brushes Ariens Company (Ariens) warrants to the original purchaser that Ariens and Gravely brand consumer products manufactured and sold by Ariens will be free from defects in material and workmanship for a period of two years... The battery pack and/or battery subassemblies on Service Parts and Accessories Genuine Ariens or Gravely brand service parts and accessories are warranted to be 90 days after the date of sale. An authorized Ariens or Gravely dealer will repair any defect in material and...
...Walks, AMP Wide Area Walks, Tillers, String Trimmers, Log Splitters, Edgers and Power Brushes Ariens Company (Ariens) warrants to the original purchaser that Ariens and Gravely brand consumer products manufactured and sold by Ariens will be free from defects in material and workmanship for a period of two years... The battery pack and/or battery subassemblies on Service Parts and Accessories Genuine Ariens or Gravely brand service parts and accessories are warranted to be 90 days after the date of sale. An authorized Ariens or Gravely dealer will repair any defect in material and...
Owners Manual
Page 31
..., air filters, fuel filters, brake linings, brake arms, brake shoes, runners, scraper blades, shear bolts, mower blades, mower vanes, tines, brushes, headlights, light bulbs, knives, cutters. • Any misuse, alteration, improper assembly, improper adjustment, neglect, or accident which vary from time to...unless they are warranted only for up to you . This warranty gives you specific legal rights, and you may from state to Ariens Company, then any defective part. ARIENS COMPANY GRAVELY® | STENS® | LOCKE® | NATIONAL® | BYNORM® | EVERRIDE® | GREAT DANE...
..., air filters, fuel filters, brake linings, brake arms, brake shoes, runners, scraper blades, shear bolts, mower blades, mower vanes, tines, brushes, headlights, light bulbs, knives, cutters. • Any misuse, alteration, improper assembly, improper adjustment, neglect, or accident which vary from time to...unless they are warranted only for up to you . This warranty gives you specific legal rights, and you may from state to Ariens Company, then any defective part. ARIENS COMPANY GRAVELY® | STENS® | LOCKE® | NATIONAL® | BYNORM® | EVERRIDE® | GREAT DANE...

