Users Manual
Page 2
... for backup purposes, without intent to real property and tangible personal property; SPECIFICATIONS AND INFORMATION CONTAINED IN THIS MANUAL ARE FURNISHED FOR INFORMATIONAL USE ONLY, AND ARE SUBJECT TO CHANGE AT ANY TIME WITHOUT NOTICE, AND SHOULD NOT BE CONSTRUED AS A COMMITMENT BY ASUS. SERVICE AND SUPPORT Visit our multi-language web site at https://www.asus.com/support 2 ASUS All...
... for backup purposes, without intent to real property and tangible personal property; SPECIFICATIONS AND INFORMATION CONTAINED IN THIS MANUAL ARE FURNISHED FOR INFORMATIONAL USE ONLY, AND ARE SUBJECT TO CHANGE AT ANY TIME WITHOUT NOTICE, AND SHOULD NOT BE CONSTRUED AS A COMMITMENT BY ASUS. SERVICE AND SUPPORT Visit our multi-language web site at https://www.asus.com/support 2 ASUS All...
Users Manual
Page 3
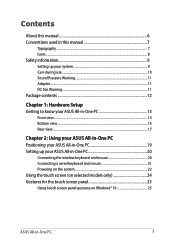
... view...17 Chapter 2: Using your ASUS All-in-One PC Positioning your ASUS All-in-One PC 19 Setting up your ASUS All-in-One PC 20 Connecting the wireless keyboard and mouse 20 Connecting a wired keyboard and mouse 21 Powering on the system 22 Using the touch screen (on selected models only 24 Gestures for the touch screen panel 25 Using touch screen panel gestures on Windows® 10 25 ASUS All-in-One PC...
... view...17 Chapter 2: Using your ASUS All-in-One PC Positioning your ASUS All-in-One PC 19 Setting up your ASUS All-in-One PC 20 Connecting the wireless keyboard and mouse 20 Connecting a wired keyboard and mouse 21 Powering on the system 22 Using the touch screen (on selected models only 24 Gestures for the touch screen panel 25 Using touch screen panel gestures on Windows® 10 25 ASUS All-in-One PC...

Users Manual
Page 4
... Center...39 Other keyboard shortcuts 40 Connecting to wireless networks 42 Wi-Fi...42 Bluetooth ...43 Connecting to wired networks 44 Configuring a dynamic IP/PPPoE network connection 44 Configuring a static IP network connection 45 Turning your ASUS All-in-One PC off 46 Putting your ASUS All-in-One PC to sleep 47 Chapter 4: Recovering your system Entering the BIOS Setup 49 Quickly enter the BIOS 49 Recovering your system 50 Performing a recovery option 51 4 ASUS All-in...
... Center...39 Other keyboard shortcuts 40 Connecting to wireless networks 42 Wi-Fi...42 Bluetooth ...43 Connecting to wired networks 44 Configuring a dynamic IP/PPPoE network connection 44 Configuring a static IP network connection 45 Turning your ASUS All-in-One PC off 46 Putting your ASUS All-in-One PC to sleep 47 Chapter 4: Recovering your system Entering the BIOS Setup 49 Quickly enter the BIOS 49 Recovering your system 50 Performing a recovery option 51 4 ASUS All-in...

Users Manual
Page 8
Icons The icons below indicate the devices you can use for completing a series of tasks or procedures on selected models). = (optional) Use the wired/wireless mouse. = (optional) Use the wired/wireless keyboard. Visit the ASUS website at www.asus.com for reference only. Actual product specifications and software screen images may vary with territories. All illustrations and screenshots in this manual are for the latest information. 8 ASUS All-in -One PC. = Use the touch screen panel (on your ASUS All-in -One PC
Icons The icons below indicate the devices you can use for completing a series of tasks or procedures on selected models). = (optional) Use the wired/wireless mouse. = (optional) Use the wired/wireless keyboard. Visit the ASUS website at www.asus.com for reference only. Actual product specifications and software screen images may vary with territories. All illustrations and screenshots in this manual are for the latest information. 8 ASUS All-in -One PC. = Use the touch screen panel (on your ASUS All-in -One PC

Users Manual
Page 10
... performance changes. 10 ASUS All-in the product. The system was dropped or the cabinet is damaged. - Always unplug all power, modem, and network cables from foreign objects or excessive dust accumulation. The power cord or plug is damaged. - Turn off , a small amount of the screen. - Spray a small amount of household glass cleaner on the screen. • Do not use...
... performance changes. 10 ASUS All-in the product. The system was dropped or the cabinet is damaged. - Always unplug all power, modem, and network cables from foreign objects or excessive dust accumulation. The power cord or plug is damaged. - Turn off , a small amount of the screen. - Spray a small amount of household glass cleaner on the screen. • Do not use...
Users Manual
Page 13
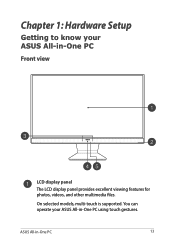
ASUS All-in -One PC Front view LCD display panel The LCD display panel provides excellent viewing features for photos, videos, and other multimedia files. On selected models, multi-touch is supported. Chapter 1: Hardware Setup Getting to know your ASUS All-in-One PC using touch gestures. You can operate your ASUS All-in -One PC 13
ASUS All-in -One PC Front view LCD display panel The LCD display panel provides excellent viewing features for photos, videos, and other multimedia files. On selected models, multi-touch is supported. Chapter 1: Hardware Setup Getting to know your ASUS All-in-One PC using touch gestures. You can operate your ASUS All-in -One PC 13
Users Manual
Page 16
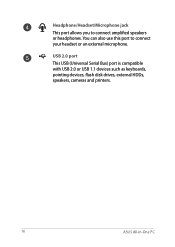
Headphone/Headset/Microphone jack This port allows you to connect your headset or an external microphone. USB 2.0 port This USB (Universal Serial Bus) port is compatible with USB 2.0 or USB 1.1 devices such as keyboards, pointing devices, flash disk drives, external HDDs, speakers, cameras and printers. 16 ASUS All-in-One PC You can also use this port to connect amplified speakers or headphones.
Headphone/Headset/Microphone jack This port allows you to connect your headset or an external microphone. USB 2.0 port This USB (Universal Serial Bus) port is compatible with USB 2.0 or USB 1.1 devices such as keyboards, pointing devices, flash disk drives, external HDDs, speakers, cameras and printers. 16 ASUS All-in-One PC You can also use this port to connect amplified speakers or headphones.
Users Manual
Page 18
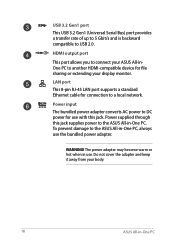
... power adapter may become warm or hot when in use the bundled power adapter. Power supplied through this jack. Do not cover the adapter and keep it away from your display monitor. HDMI output port This port allows you to connect your ASUS All-inOne PC to another HDMI-compatible device for connection to a local network. To prevent damage to the ASUS All-in-One PC. LAN port This 8-pin RJ-45 LAN port supports a standard Ethernet cable...
... power adapter may become warm or hot when in use the bundled power adapter. Power supplied through this jack. Do not cover the adapter and keep it away from your display monitor. HDMI output port This port allows you to connect your ASUS All-inOne PC to another HDMI-compatible device for connection to a local network. To prevent damage to the ASUS All-in-One PC. LAN port This 8-pin RJ-45 LAN port supports a standard Ethernet cable...
Users Manual
Page 19
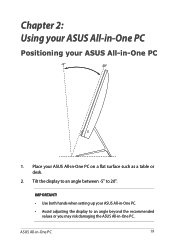
ASUS All-in -One PC -5O 20O 1. IMPORTANT! • Use both hands when setting up your ASUS All-in-One PC on a flat surface such as a table or desk. 2. Place your ASUS All-in -One PC. Tilt the display to an angle between -5o to an angle beyond the recommended values or you may risk damaging the ASUS All-in -One PC. • Avoid adjusting the display to 20o. Chapter 2: Using your ASUS All-in-One PC Positioning your ASUS All-in -One PC 19
ASUS All-in -One PC -5O 20O 1. IMPORTANT! • Use both hands when setting up your ASUS All-in-One PC on a flat surface such as a table or desk. 2. Place your ASUS All-in -One PC. Tilt the display to an angle between -5o to an angle beyond the recommended values or you may risk damaging the ASUS All-in -One PC. • Avoid adjusting the display to 20o. Chapter 2: Using your ASUS All-in-One PC Positioning your ASUS All-in -One PC 19
Users Manual
Page 20
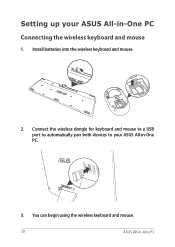
You can begin using the wireless keyboard and mouse. 20 ASUS All-in-One PC Connect the wireless dongle for keyboard and mouse to a USB port to automatically pair both devices to your ASUS All-in-One PC Connecting the wireless keyboard and mouse 1. Setting up your ASUS All-in-One PC. 3. Install batteries into the wireless keyboard and mouse. 2.
You can begin using the wireless keyboard and mouse. 20 ASUS All-in-One PC Connect the wireless dongle for keyboard and mouse to a USB port to automatically pair both devices to your ASUS All-in-One PC Connecting the wireless keyboard and mouse 1. Setting up your ASUS All-in-One PC. 3. Install batteries into the wireless keyboard and mouse. 2.
Users Manual
Page 29
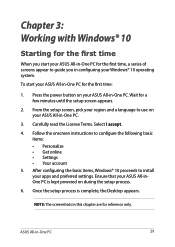
...Working with Windows® 10 Starting for the first time When you in configuring your Windows® 10 operating system. To start your ASUS All-in-One PC for the first time, a series of screens appear to use on your ASUS All-in -One PC for the first time: 1. Once the setup process is kept powered on during the setup process. 6. Press the power button on your ASUS... and preferred settings. ASUS All-in this chapter are for a few minutes until the setup screen appears. 2. NOTE: The screenshots in -One PC 29 Follow the onscreen instructions to install your ASUS All-inOne PC...
...Working with Windows® 10 Starting for the first time When you in configuring your Windows® 10 operating system. To start your ASUS All-in-One PC for the first time, a series of screens appear to use on your ASUS All-in -One PC for the first time: 1. Once the setup process is kept powered on during the setup process. 6. Press the power button on your ASUS... and preferred settings. ASUS All-in this chapter are for a few minutes until the setup screen appears. 2. NOTE: The screenshots in -One PC 29 Follow the onscreen instructions to install your ASUS All-inOne PC...
Users Manual
Page 30
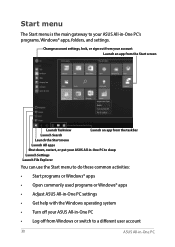
... off from Windows or switch to do these common activities: • Start programs or Windows® apps • Open commonly used programs or Windows® apps • Adjust ASUS All-in-One PC settings • Get help with the Windows operating system • Turn off your ASUS All-in -One PC Change account settings, lock, or sign out from your account Launch an app from the Start screen Launch Taskview...
... off from Windows or switch to do these common activities: • Start programs or Windows® apps • Open commonly used programs or Windows® apps • Adjust ASUS All-in-One PC settings • Get help with the Windows operating system • Turn off your ASUS All-in -One PC Change account settings, lock, or sign out from your account Launch an app from the Start screen Launch Taskview...
Users Manual
Page 40
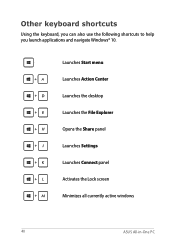
Launches Start menu Launches Action Center Launches the desktop Launches the File Explorer Opens the Share panel Launches Settings Launches Connect panel Activates the Lock screen Minimizes all currently active windows 40 ASUS All-in-One PC Other keyboard shortcuts Using the keyboard, you can also use the following shortcuts to help you launch applications and navigate Windows® 10.
Launches Start menu Launches Action Center Launches the desktop Launches the File Explorer Opens the Share panel Launches Settings Launches Connect panel Activates the Lock screen Minimizes all currently active windows 40 ASUS All-in-One PC Other keyboard shortcuts Using the keyboard, you can also use the following shortcuts to help you launch applications and navigate Windows® 10.

Users Manual
Page 43
Connect your chosen device. Select a device from the Start menu. 2. Launch Settings from the list. Select Devices, then select Bluetooth to search for Bluetooth-enabled devices. Compare the passcode on your ASUS All-in-One PC with the device. ASUS All-in the passcode of your ASUS All-inOne PC. If they are the same, select Yes to successfully pair your ASUS All-in -One PC with the...
Connect your chosen device. Select a device from the Start menu. 2. Launch Settings from the list. Select Devices, then select Bluetooth to search for Bluetooth-enabled devices. Compare the passcode on your ASUS All-in-One PC with the device. ASUS All-in the passcode of your ASUS All-inOne PC. If they are the same, select Yes to successfully pair your ASUS All-in -One PC with the...
Users Manual
Page 45
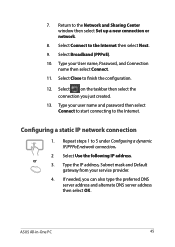
... Center window then select Set up a new connection or network. 8. Configuring a static IP network connection 1. Type the IP address, Subnet mask and Default gateway from your User name, Password, and Connection name then select Connect. 11. Repeat steps 1 to the Internet. Type your service provider. 4. or 3. ASUS All-in-One PC 45 If needed, you just created. 13. Select Broadband (PPPoE). 10. Type your user name and password then select Connect to start connecting to 5 under Configuring...
... Center window then select Set up a new connection or network. 8. Configuring a static IP network connection 1. Type the IP address, Subnet mask and Default gateway from your User name, Password, and Connection name then select Connect. 11. Repeat steps 1 to the Internet. Type your service provider. 4. or 3. ASUS All-in-One PC 45 If needed, you just created. 13. Select Broadband (PPPoE). 10. Type your user name and password then select Connect to start connecting to 5 under Configuring...
Users Manual
Page 49
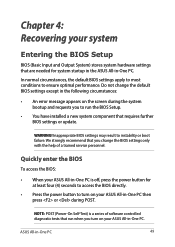
... startup in the ASUS All-in-One PC. Do not change the BIOS settings only with the help of software controlled diagnostic tests that run the BIOS Setup. • You have installed a new system component that are needed for at least four (4) seconds to access the BIOS directly. • Press the power button to instability or boot failure. Chapter 4: Recovering your ASUS All-in-One PC is a series of a trained service...
... startup in the ASUS All-in-One PC. Do not change the BIOS settings only with the help of software controlled diagnostic tests that run the BIOS Setup. • You have installed a new system component that are needed for at least four (4) seconds to access the BIOS directly. • Press the power button to instability or boot failure. Chapter 4: Recovering your ASUS All-in-One PC is a series of a trained service...

Users Manual
Page 50
... of the following recovery options: • Keep my files - Windows® 10 allows you can restore your ASUS All-in-One PC to its default settings and delete other installed apps. • Remove everything - Using this option. 50 ASUS All-in-One PC Recovering your system Using recovery options on your ASUS All-in-One PC. • Note down important customized settings such as network settings, user names, and passwords to avoid...
... of the following recovery options: • Keep my files - Windows® 10 allows you can restore your ASUS All-in-One PC to its default settings and delete other installed apps. • Remove everything - Using this option. 50 ASUS All-in-One PC Recovering your system Using recovery options on your ASUS All-in-One PC. • Note down important customized settings such as network settings, user names, and passwords to avoid...

Users Manual
Page 51
... Firmware Settings, and Startup Settings. Using this build is not working for your ASUS All-in -One PC 51 ASUS All-in -One PC. - • Go back to startup your ASUS All-in -One PC such as: - Use this option if this option allows you to go back to access and use any of the available recovery options for you want to an earlier build. Using a USB drive, network connection or Windows recovery DVD to...
... Firmware Settings, and Startup Settings. Using this build is not working for your ASUS All-in -One PC 51 ASUS All-in -One PC. - • Go back to startup your ASUS All-in -One PC such as: - Use this option if this option allows you to go back to access and use any of the available recovery options for you want to an earlier build. Using a USB drive, network connection or Windows recovery DVD to...

Users Manual
Page 56
... equivalent type recommended by users Lithium-Ion Battery Warning CAUTION: Danger of explosion if battery is minimized. No Exposure to Liquids DO NOT expose to the manufacturer's instructions. By means of a power cord connected to the products that the potential for human contact during normal operation is incorrectly replaced. Radio Frequency (RF) Exposure Information The radiated output power of the wireless device...
... equivalent type recommended by users Lithium-Ion Battery Warning CAUTION: Danger of explosion if battery is minimized. No Exposure to Liquids DO NOT expose to the manufacturer's instructions. By means of a power cord connected to the products that the potential for human contact during normal operation is incorrectly replaced. Radio Frequency (RF) Exposure Information The radiated output power of the wireless device...

Users Manual
Page 61
... Star is NOT supported on power management and its benefits to the environment. Environmental Protection Agency and the U.S. The monitor is automatically set to sleep within 30 minutes of user inactivity. the computer is automatically set to sleep within 10 minutes of the U.S. To wake your computer, click the mouse, press any key on the ENERGY STAR joint program. ASUS All-in...
... Star is NOT supported on power management and its benefits to the environment. Environmental Protection Agency and the U.S. The monitor is automatically set to sleep within 30 minutes of user inactivity. the computer is automatically set to sleep within 10 minutes of the U.S. To wake your computer, click the mouse, press any key on the ENERGY STAR joint program. ASUS All-in...


