
Users Manual
Page 3
... Chapter 1: Hardware Setup Getting to know your Chromebook 16 Top View...16 Bottom View...19 Right View...21 Left View...23 ASUS Pen (on selected models 26 Using the magnetic pen holder 26 Inserting the battery...27 Chapter 2: Using your Chromebook Getting started...30 Charge your Chromebook 30 Gestures for the touch screen panel and touchpad 33 Using touch screen panel gestures 33 Using the touchpad...35 Using the keyboard...40 Rotating the display panel 42 Chromebook E-Manual 3
... Chapter 1: Hardware Setup Getting to know your Chromebook 16 Top View...16 Bottom View...19 Right View...21 Left View...23 ASUS Pen (on selected models 26 Using the magnetic pen holder 26 Inserting the battery...27 Chapter 2: Using your Chromebook Getting started...30 Charge your Chromebook 30 Gestures for the touch screen panel and touchpad 33 Using touch screen panel gestures 33 Using the touchpad...35 Using the keyboard...40 Rotating the display panel 42 Chromebook E-Manual 3

Users Manual
Page 4
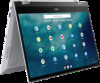
... list...49 Status area...51 Connecting to the Internet 54 Enabling your Wi-Fi connection 54 Switching to a new Wi-Fi network connection 54 Adding a network connection 55 Google Chrome...57 Printing documents 59 Saving PDF files...59 Google Cloud Print...61 Managing your files 66 Files app...66 Google Drive...70 Resetting your Chromebook 74 Using Powerwash...74 Turning your Chromebook off 76 Using Chromebook...76 Using the power button on your Chromebook 76 4 Chromebook E-Manual
... list...49 Status area...51 Connecting to the Internet 54 Enabling your Wi-Fi connection 54 Switching to a new Wi-Fi network connection 54 Adding a network connection 55 Google Chrome...57 Printing documents 59 Saving PDF files...59 Google Cloud Print...61 Managing your files 66 Files app...66 Google Drive...70 Resetting your Chromebook 74 Using Powerwash...74 Turning your Chromebook off 76 Using Chromebook...76 Using the power button on your Chromebook 76 4 Chromebook E-Manual

Users Manual
Page 7
... 3: Working with your Chromebook. Chapter 2: Using your Chromebook This chapter shows you can refer to use the different parts of your Chromebook. Chromebook E-Manual 7 About this manual This manual provides information about the hardware and software features of your Chromebook, organized through the following chapters: Chapter 1: Hardware Setup This chapter details the hardware components of your Chromebook. Appendices This section includes notices and safety statements for maintaining and fixing...
... 3: Working with your Chromebook. Chapter 2: Using your Chromebook This chapter shows you can refer to use the different parts of your Chromebook. Chromebook E-Manual 7 About this manual This manual provides information about the hardware and software features of your Chromebook, organized through the following chapters: Chapter 1: Hardware Setup This chapter details the hardware components of your Chromebook. Appendices This section includes notices and safety statements for maintaining and fixing...

Users Manual
Page 10
... entering the chassis or keyboard gap to dusty environments. Do not expose your Chromebook to avoid electromagnetic wave interference to strong magnetic or electrical fields. Do not place active electronic devices close to your Chromebook to the display panel. 10 Chromebook E-Manual Do not use ...of your Chromebook. Do not place objects on or near your Chromebook near liquids, rain, or moisture. Caring for your Chromebook Disconnect the AC power and remove the battery pack (if applicable) before cleaning your Chromebook. Do not use or expose your Chromebook to prevent...
... entering the chassis or keyboard gap to dusty environments. Do not expose your Chromebook to avoid electromagnetic wave interference to strong magnetic or electrical fields. Do not place active electronic devices close to your Chromebook to the display panel. 10 Chromebook E-Manual Do not use ...of your Chromebook. Do not place objects on or near your Chromebook near liquids, rain, or moisture. Caring for your Chromebook Disconnect the AC power and remove the battery pack (if applicable) before cleaning your Chromebook. Do not use or expose your Chromebook to prevent...
Users Manual
Page 12
... the battery. 12 Chromebook E-Manual To protect the battery, once the battery is fully charged, the system may stop charging to the battery power capacity and rapidly shorten battery life. Battery safety information Battery protection • Frequently charging a battery under high voltage may result in permanent damage to protect the battery. • Battery power capacity may reduce the battery power charging capacity or even stop charging when the battery power is usually set between...
... the battery. 12 Chromebook E-Manual To protect the battery, once the battery is fully charged, the system may stop charging to the battery power capacity and rapidly shorten battery life. Battery safety information Battery protection • Frequently charging a battery under high voltage may result in permanent damage to protect the battery. • Battery power capacity may reduce the battery power charging capacity or even stop charging when the battery power is usually set between...
Users Manual
Page 18
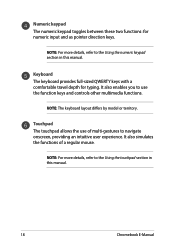
... input and as pointer direction keys. It also enables you to the Using the touchpad section in this manual. 18 Chromebook E-Manual NOTE: The keyboard layout differs by model or territory. NOTE: For more details, refer to use of a regular mouse. Touchpad The touchpad allows the use the function keys and controls other multimedia functions. It also simulates the functions of multi-gestures to the Using the numeric keypad section...
... input and as pointer direction keys. It also enables you to the Using the touchpad section in this manual. 18 Chromebook E-Manual NOTE: The keyboard layout differs by model or territory. NOTE: For more details, refer to use of a regular mouse. Touchpad The touchpad allows the use the function keys and controls other multimedia functions. It also simulates the functions of multi-gestures to the Using the numeric keypad section...

Users Manual
Page 21
Ensure that paper, books, clothing, cables, or other objects do not block any of the air vents or else overheating may occur. WARNING! HDMI output port This port allows you to connect your display monitor. Chromebook E-Manual 21 Right View Air vents The air vents allow cool air to enter and warm air to another HDMI-compatible device for file sharing or extending your Chromebook to exit the Chromebook. MicroSD card slot (on selected models) This built-in memory card reader slot supports microSD card formats.
Ensure that paper, books, clothing, cables, or other objects do not block any of the air vents or else overheating may occur. WARNING! HDMI output port This port allows you to connect your display monitor. Chromebook E-Manual 21 Right View Air vents The air vents allow cool air to enter and warm air to another HDMI-compatible device for file sharing or extending your Chromebook to exit the Chromebook. MicroSD card slot (on selected models) This built-in memory card reader slot supports microSD card formats.

Users Manual
Page 22
... hot while in use. The adapter may vary per model. Do not cover the adapter and keep it away from your body while it is backward compatible to your Chromebook. 22 Chromebook E-Manual Insert the bundled power adapter into this port may become warm to fully charge your Chromebook through a low-voltage power source. USB 3.2 Gen 2 Type-C®/DisplayPort/ Power (DC) input combo port The USB 3.2 (Universal Serial Bus 3.2) Gen 2 Type-C® port...
... hot while in use. The adapter may vary per model. Do not cover the adapter and keep it away from your body while it is backward compatible to your Chromebook. 22 Chromebook E-Manual Insert the bundled power adapter into this port may become warm to fully charge your Chromebook through a low-voltage power source. USB 3.2 Gen 2 Type-C®/DisplayPort/ Power (DC) input combo port The USB 3.2 (Universal Serial Bus 3.2) Gen 2 Type-C® port...

Users Manual
Page 23
... an external display. Use only the bundled power adapter to charge the battery pack and supply power to USB 2.0. Left View USB 3.2 Gen 2 Type-C®/DisplayPort/ Power (DC) input combo port The USB 3.2 (Universal Serial Bus 3.2) Gen 2 Type-C® port provides a transfer rate of this port to charge the battery pack and supply power to your body while it away from your Chromebook. WARNING! Chromebook E-Manual 23 Use a USB Type-C® adapter to connect your Chromebook to hot while in use. NOTE...
... an external display. Use only the bundled power adapter to charge the battery pack and supply power to USB 2.0. Left View USB 3.2 Gen 2 Type-C®/DisplayPort/ Power (DC) input combo port The USB 3.2 (Universal Serial Bus 3.2) Gen 2 Type-C® port provides a transfer rate of this port to charge the battery pack and supply power to your body while it away from your Chromebook. WARNING! Chromebook E-Manual 23 Use a USB Type-C® adapter to connect your Chromebook to hot while in use. NOTE...

Users Manual
Page 31
... turning it matches the input/output rating information on your power adapter. Always plug the power cord into a wall socket without using any extension cords. IMPORTANT! • Locate the input/output rating label on your Chromebook and ensure that your Chromebook is connected to disassemble and reassemble the battery (for non-removable battery only). • Discontinue usage if leakage is replaced by an incorrect type...
... turning it matches the input/output rating information on your power adapter. Always plug the power cord into a wall socket without using any extension cords. IMPORTANT! • Locate the input/output rating label on your Chromebook and ensure that your Chromebook is connected to disassemble and reassemble the battery (for non-removable battery only). • Discontinue usage if leakage is replaced by an incorrect type...
Users Manual
Page 46
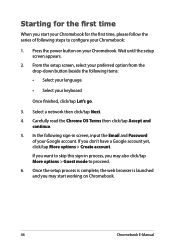
... click/tap More options > Guest mode to configure your Chromebook: 1. Press the power button on Chromebook. 46 Chromebook E-Manual In the following items: • Select your language • Select your keyboard Once finished, click/tap Let's go. 3. From the setup screen, select your preferred option from the drop-down button beside the following sign-in process, you start working on your Chromebook. Once the setup process is complete...
... click/tap More options > Guest mode to configure your Chromebook: 1. Press the power button on Chromebook. 46 Chromebook E-Manual In the following items: • Select your language • Select your keyboard Once finished, click/tap Let's go. 3. From the setup screen, select your preferred option from the drop-down button beside the following sign-in process, you start working on your Chromebook. Once the setup process is complete...

Users Manual
Page 64
In the next screen, click the printer that you have successfully set up your Google account. 8. The following screen appears when you want to connect to Google Cloud Print then click Add printer(s). 9. Under Classic printers, click Add printers. 7. Sign in using your printer with Google Cloud Print. 64 Chromebook E-Manual 6.
In the next screen, click the printer that you have successfully set up your Google account. 8. The following screen appears when you want to connect to Google Cloud Print then click Add printer(s). 9. Under Classic printers, click Add printers. 7. Sign in using your printer with Google Cloud Print. 64 Chromebook E-Manual 6.

Users Manual
Page 67
Switch to list or grid Click/Tap this button to a list or a grid view. Settings Click/Tap this option to rearrange your files to customize the settings of your Chromebook. This also shows all the external storage devices that are currently connected to close the Files app window. Close Click/Tap this to locate then press . Chromebook E-Manual 67 To use the search box, type the file name...
Switch to list or grid Click/Tap this button to a list or a grid view. Settings Click/Tap this option to rearrange your files to customize the settings of your Chromebook. This also shows all the external storage devices that are currently connected to close the Files app window. Close Click/Tap this to locate then press . Chromebook E-Manual 67 To use the search box, type the file name...
Users Manual
Page 73
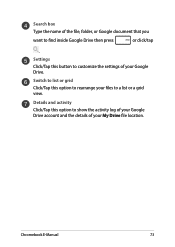
Switch to list or grid Click/Tap this option to rearrange your Google Drive. Details and activity Click/Tap this option to show the activity log of your Google Drive account and the details of your My Drive file location. Search box Type the name of the file, folder, or Google document that you want to a list or a grid view. Chromebook E-Manual 73 Settings Click/Tap this button to customize the settings of your files to find inside Google Drive then press or click/tap .
Switch to list or grid Click/Tap this option to rearrange your Google Drive. Details and activity Click/Tap this option to show the activity log of your Google Drive account and the details of your My Drive file location. Search box Type the name of the file, folder, or Google document that you want to a list or a grid view. Chromebook E-Manual 73 Settings Click/Tap this button to customize the settings of your files to find inside Google Drive then press or click/tap .
Users Manual
Page 78
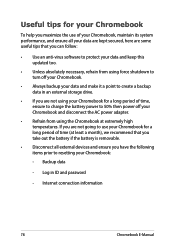
... shutdown to turn off your Chromebook. • Always backup your data and make it a point to create a backup data in ID and password - Internet connection information 78 Chromebook E-Manual Useful tips for your Chromebook To help you maximize the use your Chromebook for a long period of time, ensure to charge the battery power to 50% then power off your Chromebook and disconnect the AC power adapter. • Refrain from using the Chromebook at least...
... shutdown to turn off your Chromebook. • Always backup your data and make it a point to create a backup data in ID and password - Internet connection information 78 Chromebook E-Manual Useful tips for your Chromebook To help you maximize the use your Chromebook for a long period of time, ensure to charge the battery power to 50% then power off your Chromebook and disconnect the AC power adapter. • Refrain from using the Chromebook at least...

Users Manual
Page 79
... will not affect your display panel. 3. What should I turn on the Chromebook. How can I fix this? How can I maximize my Chromebook's battery life? You may use the function keys or the display settings in your operating system to adjust the display brightness. • Disconnect unused USB devices. • Close unused applications, especially those that take up too much system memory. The color and brightness of your Chromebook. You can try doing...
... will not affect your display panel. 3. What should I turn on the Chromebook. How can I fix this? How can I maximize my Chromebook's battery life? You may use the function keys or the display settings in your operating system to adjust the display brightness. • Disconnect unused USB devices. • Close unused applications, especially those that take up too much system memory. The color and brightness of your Chromebook. You can try doing...

Users Manual
Page 80
... type on your local ASUS service center for assistance. 5. Make sure that nothing accidentally touches or presses on the keyboard. 80 Chromebook E-Manual My battery charge indicator does not light up the speaker volume. • Check if your speakers were set to the power outlet and Chromebook. • If the problem still exists, contact your Chromebook and remove it. 6. My Chromebook cannot do if my Chromebook's power adapter gets lost or my battery stops working...
... type on your local ASUS service center for assistance. 5. Make sure that nothing accidentally touches or presses on the keyboard. 80 Chromebook E-Manual My battery charge indicator does not light up the speaker volume. • Check if your speakers were set to the power outlet and Chromebook. • If the problem still exists, contact your Chromebook and remove it. 6. My Chromebook cannot do if my Chromebook's power adapter gets lost or my battery stops working...

Users Manual
Page 81
... connected USB devices then restart your Chromebook. • Remove any optical discs that are inserted correctly then turn on my Chromebook, the power indicator lights up but nothing appears on your Chromebook. • If the problem still exists, contact your Chromebook might have a memory storage problem. Contact your system. Delete the applications you recently installed or were not included with your operating system package then restart your local ASUS service...
... connected USB devices then restart your Chromebook. • Remove any optical discs that are inserted correctly then turn on my Chromebook, the power indicator lights up but nothing appears on your Chromebook. • If the problem still exists, contact your Chromebook might have a memory storage problem. Contact your system. Delete the applications you recently installed or were not included with your operating system package then restart your local ASUS service...
Users Manual
Page 82
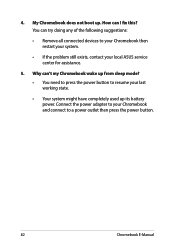
... working state. • Your system might have completely used up its battery power. 4. My Chromebook does not boot up from sleep mode? • You need to press the power button to resume your local ASUS service center for assistance. 5. You can try doing any of the following suggestions: • Remove all connected devices to a power outlet then press the power button. 82 Chromebook E-Manual How can 't my Chromebook wake up . Why can I fix...
... working state. • Your system might have completely used up its battery power. 4. My Chromebook does not boot up from sleep mode? • You need to press the power button to resume your local ASUS service center for assistance. 5. You can try doing any of the following suggestions: • Remove all connected devices to a power outlet then press the power button. 82 Chromebook E-Manual How can 't my Chromebook wake up . Why can I fix...

Users Manual
Page 99
... program of user inactivity. NOTE: Energy Star is enabled by default. All ASUS products with the ENERGY STAR logo comply with the ENERGY STAR standard, and the power management feature is NOT supported on the ENERGY STAR joint program. the computer is automatically set to sleep within 30 minutes of the U.S. Chromebook E-Manual 99 Department of key environmental information for ASUS EPEAT (Electronic...
... program of user inactivity. NOTE: Energy Star is enabled by default. All ASUS products with the ENERGY STAR logo comply with the ENERGY STAR standard, and the power management feature is NOT supported on the ENERGY STAR joint program. the computer is automatically set to sleep within 30 minutes of the U.S. Chromebook E-Manual 99 Department of key environmental information for ASUS EPEAT (Electronic...


