
Users Manual
Page 2
... SUBJECT TO CHANGE AT ANY TIME WITHOUT NOTICE, AND SHOULD NOT BE CONSTRUED AS A COMMITMENT BY ASUS. ASUS will only be registered trademarks or copyrights of ASUSTeK COMPUTER INC. ("ASUS"). ASUS ASSUMES NO RESPONSIBILITY OR LIABILITY FOR ANY ERRORS OR INACCURACIES THAT MAY APPEAR IN THIS MANUAL, INCLUDING THE PRODUCTS AND SOFTWARE DESCRIBED IN IT. SERVICE AND SUPPORT Visit our...
... SUBJECT TO CHANGE AT ANY TIME WITHOUT NOTICE, AND SHOULD NOT BE CONSTRUED AS A COMMITMENT BY ASUS. ASUS will only be registered trademarks or copyrights of ASUSTeK COMPUTER INC. ("ASUS"). ASUS ASSUMES NO RESPONSIBILITY OR LIABILITY FOR ANY ERRORS OR INACCURACIES THAT MAY APPEAR IN THIS MANUAL, INCLUDING THE PRODUCTS AND SOFTWARE DESCRIBED IN IT. SERVICE AND SUPPORT Visit our...
Users Manual
Page 3
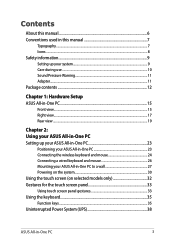
... Rear view...19 Chapter 2: Using your ASUS All-in-One PC Setting up your ASUS All-in-One PC 23 Positioning your ASUS All-in-One PC 23 Connecting the wireless keyboard and mouse 24 Connecting a wired keyboard and mouse 26 Mounting your ASUS All-in-One PC to a wall 27 Powering on the system 30 Using the touch screen (on selected models only 32 Gestures for the touch screen panel...
... Rear view...19 Chapter 2: Using your ASUS All-in-One PC Setting up your ASUS All-in-One PC 23 Positioning your ASUS All-in-One PC 23 Connecting the wireless keyboard and mouse 24 Connecting a wired keyboard and mouse 26 Mounting your ASUS All-in-One PC to a wall 27 Powering on the system 30 Using the touch screen (on selected models only 32 Gestures for the touch screen panel...
Users Manual
Page 4
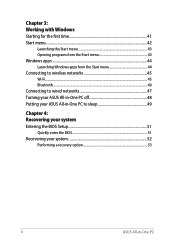
Chapter 3: Working with Windows Starting for the first time 41 Start menu...42 Launching the Start menu 43 Opening programs from the Start menu 43 Windows apps...44 Launching Windows apps from the Start menu 44 Connecting to wireless networks 45 Wi-Fi...45 Bluetooth...46 Connecting to wired networks 47 Turning your ASUS All-in-One PC off 48 Putting your ASUS All-in-One PC to sleep 49 Chapter 4: Recovering your system Entering the BIOS Setup 51 Quickly enter the BIOS 51 Recovering your system 52 Performing a recovery option 53 4 ASUS All-in-One PC
Chapter 3: Working with Windows Starting for the first time 41 Start menu...42 Launching the Start menu 43 Opening programs from the Start menu 43 Windows apps...44 Launching Windows apps from the Start menu 44 Connecting to wireless networks 45 Wi-Fi...45 Bluetooth...46 Connecting to wired networks 47 Turning your ASUS All-in-One PC off 48 Putting your ASUS All-in-One PC to sleep 49 Chapter 4: Recovering your system Entering the BIOS Setup 51 Quickly enter the BIOS 51 Recovering your system 52 Performing a recovery option 53 4 ASUS All-in-One PC
Users Manual
Page 8
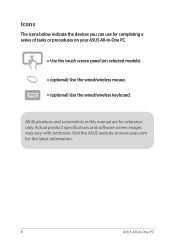
Visit the ASUS website at www.asus.com for the latest information. 8 ASUS All-in -One PC. = Use the touch screen panel (on selected models). = (optional) Use the wired/wireless mouse. = (optional) Use the wired/wireless keyboard. Actual product specifications and software screen images may vary with territories. Icons The icons below indicate the devices you can use for completing a series of tasks or procedures on your ASUS All-in -One PC All illustrations and screenshots in this manual are for reference only.
Visit the ASUS website at www.asus.com for the latest information. 8 ASUS All-in -One PC. = Use the touch screen panel (on selected models). = (optional) Use the wired/wireless mouse. = (optional) Use the wired/wireless keyboard. Actual product specifications and software screen images may vary with territories. Icons The icons below indicate the devices you can use for completing a series of tasks or procedures on your ASUS All-in -One PC All illustrations and screenshots in this manual are for reference only.
Users Manual
Page 9
Ensure that you leave plenty of the devices plugged into the extension cord does not exceed its ampere rating. Never insert objects of any kind into the ventilation openings. • Use this product near water or a heated source such as a radiator. • Be cautious while moving...use an extension cord, ensure that the total ampere rating of space around the system for ventilation. ASUS All-in-One PC 9 Do not block or cover these openings. However, to prevent injuries. • Set up your system • Read and follow all instructions in the documentation before you operate...
Ensure that you leave plenty of the devices plugged into the extension cord does not exceed its ampere rating. Never insert objects of any kind into the ventilation openings. • Use this product near water or a heated source such as a radiator. • Be cautious while moving...use an extension cord, ensure that the total ampere rating of space around the system for ventilation. ASUS All-in-One PC 9 Do not block or cover these openings. However, to prevent injuries. • Set up your system • Read and follow all instructions in the documentation before you operate...
Users Manual
Page 10
... cleaning the screen. • If you follow the operating instructions. - The power cord or plug is damaged. - The system performance changes. 10 ASUS All-in the product. Liquid has been spilled into the system. - The system does not function properly even if you encounter the following technical problems with the product, unplug the power cord and contact a qualified service technician or...
... cleaning the screen. • If you follow the operating instructions. - The power cord or plug is damaged. - The system performance changes. 10 ASUS All-in the product. Liquid has been spilled into the system. - The system does not function properly even if you encounter the following technical problems with the product, unplug the power cord and contact a qualified service technician or...
Users Manual
Page 16
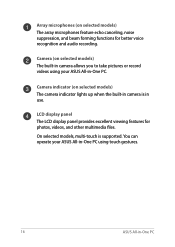
... operate your ASUS All-in -One PC Array microphones (on selected models) The array microphones feature echo canceling, noise suppression, and beam forming functions for photos, videos, and other multimedia files. Camera indicator (on selected models) The camera indicator lights up when the built-in camera is supported. On selected models, multi-touch is in use. LCD display panel The LCD display panel...
... operate your ASUS All-in -One PC Array microphones (on selected models) The array microphones feature echo canceling, noise suppression, and beam forming functions for photos, videos, and other multimedia files. Camera indicator (on selected models) The camera indicator lights up when the built-in camera is supported. On selected models, multi-touch is in use. LCD display panel The LCD display panel...
Users Manual
Page 18
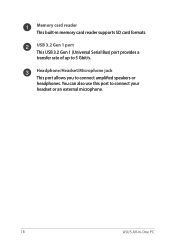
You can also use this port to 5 Gbit/s. USB 3.2 Gen 1 port This USB 3.2 Gen 1 (Universal Serial Bus) port provides a transfer rate of up to connect your headset or an external microphone. 18 ASUS All-in memory card reader supports SD card formats. Headphone/Headset/Microphone jack This port allows you to connect amplified speakers or headphones. Memory card reader This built-in -One PC
You can also use this port to 5 Gbit/s. USB 3.2 Gen 1 port This USB 3.2 Gen 1 (Universal Serial Bus) port provides a transfer rate of up to connect your headset or an external microphone. 18 ASUS All-in memory card reader supports SD card formats. Headphone/Headset/Microphone jack This port allows you to connect amplified speakers or headphones. Memory card reader This built-in -One PC
Users Manual
Page 20
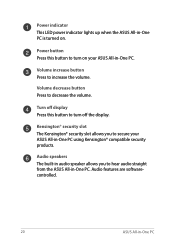
... using Kensington® compatible security products. Turn off the display. Volume decrease button Press to turn on . Power indicator This LED power indicator lights up when the ASUS All-in-One PC is turned on your ASUS All-in -One PC Audio speakers The built-in audio speaker allows you to hear audio straight from the ASUS All-in-One PC. Kensington® security slot The Kensington® security slot...
... using Kensington® compatible security products. Turn off the display. Volume decrease button Press to turn on . Power indicator This LED power indicator lights up when the ASUS All-in-One PC is turned on your ASUS All-in -One PC Audio speakers The built-in audio speaker allows you to hear audio straight from the ASUS All-in-One PC. Kensington® security slot The Kensington® security slot...
Users Manual
Page 21
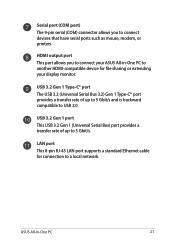
... HDMI-compatible device for connection to 5 Gbit/s. Serial port (COM port) The 9-pin serial (COM) connector allows you to connect your ASUS All-in -One PC 21 LAN port This 8-pin RJ-45 LAN port supports a standard Ethernet cable for file sharing or extending your display monitor. HDMI output port This port allows you to USB 2.0. USB 3.2 Gen 1 port This USB 3.2 Gen 1 (Universal Serial Bus) port provides a transfer rate of up to a local network. USB 3.2 Gen 1 Type-C® port The USB 3.2 (Universal Serial Bus 3.2) Gen 1 Type-C® port...
... HDMI-compatible device for connection to 5 Gbit/s. Serial port (COM port) The 9-pin serial (COM) connector allows you to connect your ASUS All-in -One PC 21 LAN port This 8-pin RJ-45 LAN port supports a standard Ethernet cable for file sharing or extending your display monitor. HDMI output port This port allows you to USB 2.0. USB 3.2 Gen 1 port This USB 3.2 Gen 1 (Universal Serial Bus) port provides a transfer rate of up to a local network. USB 3.2 Gen 1 Type-C® port The USB 3.2 (Universal Serial Bus 3.2) Gen 1 Type-C® port...
Users Manual
Page 24
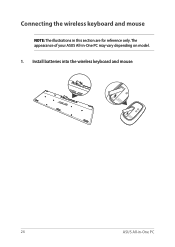
Install batteries into the wireless keyboard and mouse. 24 ASUS All-in -One PC may vary depending on model. 1. The appearance of your ASUS All-in -One PC Connecting the wireless keyboard and mouse NOTE: The illustrations in this section are for reference only.
Install batteries into the wireless keyboard and mouse. 24 ASUS All-in -One PC may vary depending on model. 1. The appearance of your ASUS All-in -One PC Connecting the wireless keyboard and mouse NOTE: The illustrations in this section are for reference only.
Users Manual
Page 25
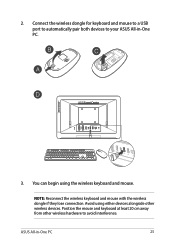
ASUS All-in -One PC. 3. NOTE: Reconnect the wireless keyboard and mouse with the wireless dongle if they lose connection. Position the mouse and keyboard at least 20 cm away from other wireless devices. 2. Connect the wireless dongle for keyboard and mouse to a USB port to automatically pair both devices to avoid interference. Avoid using the wireless keyboard and mouse. You can begin using either devices alongside other wireless hardware to your ASUS All-in -One PC 25
ASUS All-in -One PC. 3. NOTE: Reconnect the wireless keyboard and mouse with the wireless dongle if they lose connection. Position the mouse and keyboard at least 20 cm away from other wireless devices. 2. Connect the wireless dongle for keyboard and mouse to a USB port to automatically pair both devices to avoid interference. Avoid using the wireless keyboard and mouse. You can begin using either devices alongside other wireless hardware to your ASUS All-in -One PC 25
Users Manual
Page 26
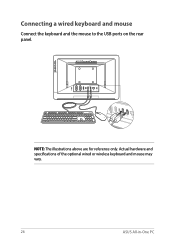
Actual hardware and specifications of the optional wired or wireless keyboard and mouse may vary. 26 ASUS All-in-One PC Connecting a wired keyboard and mouse Connect the keyboard and the mouse to the USB ports on the rear panel. NOTE: The illustrations above are for reference only.
Actual hardware and specifications of the optional wired or wireless keyboard and mouse may vary. 26 ASUS All-in-One PC Connecting a wired keyboard and mouse Connect the keyboard and the mouse to the USB ports on the rear panel. NOTE: The illustrations above are for reference only.
Users Manual
Page 41
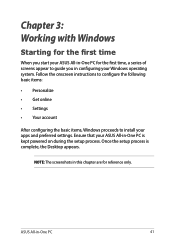
... you start your ASUS All-in-One PC for reference only. Once the setup process is kept powered on during the setup process. ASUS All-in this chapter are for the first time, a series of screens appear to install your apps and preferred settings. NOTE: The screenshots in -One PC 41 Ensure that your Windows operating system. Follow the onscreen instructions to configure the...
... you start your ASUS All-in-One PC for reference only. Once the setup process is kept powered on during the setup process. ASUS All-in this chapter are for the first time, a series of screens appear to install your apps and preferred settings. NOTE: The screenshots in -One PC 41 Ensure that your Windows operating system. Follow the onscreen instructions to configure the...
Users Manual
Page 46
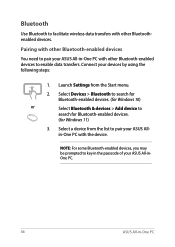
... Devices > Bluetooth to search for Bluetooth-enabled devices. (for Windows 10) or Select Bluetooth & devices > Add device to facilitate wireless data transfers with other Bluetooth-enabled devices You need to pair your ASUS All-in -One PC Bluetooth Use Bluetooth to search for Bluetooth-enabled devices. (for Windows 11) 3. Pairing with the device. Connect your ASUS Allin-One PC with other Bluetoothenabled devices. Select a device from the Start menu. 2. Launch Settings from the list to enable...
... Devices > Bluetooth to search for Bluetooth-enabled devices. (for Windows 10) or Select Bluetooth & devices > Add device to facilitate wireless data transfers with other Bluetooth-enabled devices You need to pair your ASUS All-in -One PC Bluetooth Use Bluetooth to search for Bluetooth-enabled devices. (for Windows 11) 3. Pairing with the device. Connect your ASUS Allin-One PC with other Bluetoothenabled devices. Select a device from the Start menu. 2. Launch Settings from the list to enable...
Users Manual
Page 47
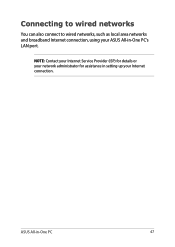
NOTE: Contact your Internet Service Provider (ISP) for details or your network administrator for assistance in setting up your ASUS All-in -One PC 47 Connecting to wired networks You can also connect to wired networks, such as local area networks and broadband Internet connection, using your Internet connection. ASUS All-in -One PC's LAN port.
NOTE: Contact your Internet Service Provider (ISP) for details or your network administrator for assistance in setting up your ASUS All-in -One PC 47 Connecting to wired networks You can also connect to wired networks, such as local area networks and broadband Internet connection, using your Internet connection. ASUS All-in -One PC's LAN port.
Users Manual
Page 51
... help of software controlled diagnostic tests that run when you to turn on the screen during POST. We strongly recommend that are needed for at least four (4) seconds to access the BIOS directly. • Press the power button to run the BIOS Setup. • You have installed a new system component that requires further BIOS settings or update. In normal circumstances, the default BIOS settings apply to most conditions to instability or boot failure. Inappropriate BIOS settings may...
... help of software controlled diagnostic tests that run when you to turn on the screen during POST. We strongly recommend that are needed for at least four (4) seconds to access the BIOS directly. • Press the power button to run the BIOS Setup. • You have installed a new system component that requires further BIOS settings or update. In normal circumstances, the default BIOS settings apply to most conditions to instability or boot failure. Inappropriate BIOS settings may...
Users Manual
Page 52
... without affecting personal files (photos, music, videos, documents). Using this option, you to a power source before doing this option. 52 ASUS All-in -One PC to its default settings and delete other installed apps. • Remove everything - This option resets your ASUS All-in -One PC Windows allows you can restore your ASUS All-in to do any of the following recovery options: • Keep my files - IMPORTANT...
... without affecting personal files (photos, music, videos, documents). Using this option, you to a power source before doing this option. 52 ASUS All-in -One PC to its default settings and delete other installed apps. • Remove everything - This option resets your ASUS All-in -One PC Windows allows you can restore your ASUS All-in to do any of the following recovery options: • Keep my files - IMPORTANT...
Users Manual
Page 53
Using this option allows you to enable any of these advanced recovery options: Startup Repair, Uninstall Updates, Startup Settings, UEFI Firmware Settings, Command Prompt, System Restore, and System Image Recovery. ASUS All-in -One PC. - • Advanced startup - Using Troubleshoot to perform other advanced recovery options on your ASUS All-in -One PC. 1. Performing a recovery option Refer to the following steps if you would like to access and use any of the available recovery options for Windows 11) 2. Launch Settings > Update and...
Using this option allows you to enable any of these advanced recovery options: Startup Repair, Uninstall Updates, Startup Settings, UEFI Firmware Settings, Command Prompt, System Restore, and System Image Recovery. ASUS All-in -One PC. - • Advanced startup - Using Troubleshoot to perform other advanced recovery options on your ASUS All-in -One PC. 1. Performing a recovery option Refer to the following steps if you would like to access and use any of the available recovery options for Windows 11) 2. Launch Settings > Update and...
Users Manual
Page 67
... the power management feature is enabled by default. Environmental Protection Agency and the U.S. the computer is automatically set to sleep within 30 minutes of user inactivity; ASUS All-in-One PC 67 NOTE: Energy Star is NOT supported on the ENERGY STAR joint program. The monitor is automatically set to the environment. To wake your computer, click the mouse, press any key on power management and...
... the power management feature is enabled by default. Environmental Protection Agency and the U.S. the computer is automatically set to sleep within 30 minutes of user inactivity; ASUS All-in-One PC 67 NOTE: Energy Star is NOT supported on the ENERGY STAR joint program. The monitor is automatically set to the environment. To wake your computer, click the mouse, press any key on power management and...


