

User Guide
Page 2
... address). or (2) the serial number of such software and/or other Free Open Source Software Licenses. SPECIFICATIONS AND INFORMATION CONTAINED IN THIS MANUAL ARE FURNISHED FOR INFORMATIONAL USE ONLY, AND ARE SUBJECT TO CHANGE AT ANY TIME WITHOUT NOTICE, AND SHOULD NOT BE CONSTRUED AS A COMMITMENT BY ASUS. Offer to duly provide complete source code as source code archives, etc. ASUSTeK...
... address). or (2) the serial number of such software and/or other Free Open Source Software Licenses. SPECIFICATIONS AND INFORMATION CONTAINED IN THIS MANUAL ARE FURNISHED FOR INFORMATIONAL USE ONLY, AND ARE SUBJECT TO CHANGE AT ANY TIME WITHOUT NOTICE, AND SHOULD NOT BE CONSTRUED AS A COMMITMENT BY ASUS. Offer to duly provide complete source code as source code archives, etc. ASUSTeK...

User Guide
Page 4
... a device. • Before connecting or removing signal cables from the motherboard, ensure that all power cables are connected. How this guide This user guide contains the information you detect any area where it may become wet. • Place the product on it by yourself. If you are not sure about the voltage of the BIOS parameters are using, contact your area. About this guide is set...
... a device. • Before connecting or removing signal cables from the motherboard, ensure that all power cables are connected. How this guide This user guide contains the information you detect any area where it may become wet. • Place the product on it by yourself. If you are not sure about the voltage of the BIOS parameters are using, contact your area. About this guide is set...
User Guide
Page 6
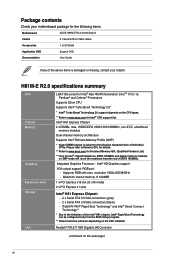
... rate of the Intel® H81 chipset, Intel® Rapid Start Technology can be configured only from the BIOS Setup program. ** These functions will run at x16 mode) 2 x PCI Express x1 slots Intel® H81 Express Chipset: - 2 x Serial ATA 6.0 Gb/s connectors (gray) - 2 x Serial ATA 3.0 Gb/s connectors (black) - Integrated Graphics Processor - Intel® HD Graphics support VGA output support: RGB port - Package contents Check your retailer. H81M-E R2.0 specifications summary CPU Chipset Memory Graphics Expansion slots Storage LAN LGA1150 socket for Intel® New 4th...
... rate of the Intel® H81 chipset, Intel® Rapid Start Technology can be configured only from the BIOS Setup program. ** These functions will run at x16 mode) 2 x PCI Express x1 slots Intel® H81 Express Chipset: - 2 x Serial ATA 6.0 Gb/s connectors (gray) - 2 x Serial ATA 3.0 Gb/s connectors (black) - Integrated Graphics Processor - Intel® HD Graphics support VGA output support: RGB port - Package contents Check your retailer. H81M-E R2.0 specifications summary CPU Chipset Memory Graphics Expansion slots Storage LAN LGA1150 socket for Intel® New 4th...
User Guide
Page 8
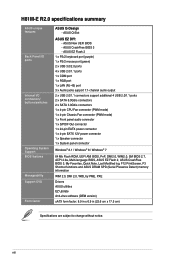
... LAN (RJ-45) port 3 x Audio jacks support 7.1-channel audio output 2 x USB 2.0/1.1 connectors support additional 4 USB 2.0/1.1 ports 2 x SATA 6.0Gb/s connectors 2 x SATA 3.0Gb/s connectors 1 x 4-pin CPU Fan connector (PWM mode) 1 x 4-pin Chassis Fan connector (PWM mode) 1 x Front panel audio connector 1 x S/PDIF Out connector 1 x 24-pin EATX power connector 1 x 4-pin EATX 12V power connector 1 x Speaker connector 1 x System panel connector Windows® 8.1 / Windows® 8 / Windows® 7 64 Mb Flash ROM, UEFI AMI BIOS, PnP, DMI2.0, WfM2.0, SM BIOS 2.7, ACPI 2.0a, Multi-language BIOS, ASUS...
... LAN (RJ-45) port 3 x Audio jacks support 7.1-channel audio output 2 x USB 2.0/1.1 connectors support additional 4 USB 2.0/1.1 ports 2 x SATA 6.0Gb/s connectors 2 x SATA 3.0Gb/s connectors 1 x 4-pin CPU Fan connector (PWM mode) 1 x 4-pin Chassis Fan connector (PWM mode) 1 x Front panel audio connector 1 x S/PDIF Out connector 1 x 24-pin EATX power connector 1 x 4-pin EATX 12V power connector 1 x Speaker connector 1 x System panel connector Windows® 8.1 / Windows® 8 / Windows® 7 64 Mb Flash ROM, UEFI AMI BIOS, PnP, DMI2.0, WfM2.0, SM BIOS 2.7, ACPI 2.0a, Multi-language BIOS, ASUS...

User Guide
Page 9
... the power supply. The edge with the component. • Before you install or remove any component, ensure that came with external ports goes to the rear part of your chassis to do so can cause you physical injury and damage motherboard components. 1.2.1 Placement direction When installing the motherboard, ensure that the motherboard fits into it into the chassis in the image below. ASUS H81M-E R2.0 1-1 Failure...
... the power supply. The edge with the component. • Before you install or remove any component, ensure that came with external ports goes to the rear part of your chassis to do so can cause you physical injury and damage motherboard components. 1.2.1 Placement direction When installing the motherboard, ensure that the motherboard fits into it into the chassis in the image below. ASUS H81M-E R2.0 1-1 Failure...

User Guide
Page 16
... support a full memory load (2 DIMMs) or overclocking condition. • Refer to install 4GB or more on XMP mode will run at a lower frequency than 2133 MHz and its Serial Presence Detect (SPD), which is the standard way of the lower-sized channel for the latest Memory QVL (Qualified Vendors List) 1.4.3 Installing a DIMM 1 1-8 Chapter 1: Product introduction Check with 8GB or above DIMMs. ASUS will update the memory...
... support a full memory load (2 DIMMs) or overclocking condition. • Refer to install 4GB or more on XMP mode will run at a lower frequency than 2133 MHz and its Serial Presence Detect (SPD), which is the standard way of the lower-sized channel for the latest Memory QVL (Qualified Vendors List) 1.4.3 Installing a DIMM 1 1-8 Chapter 1: Product introduction Check with 8GB or above DIMMs. ASUS will update the memory...
User Guide
Page 18
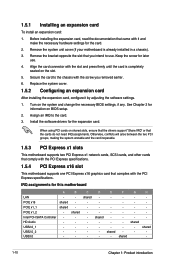
... and change the necessary BIOS settings, if any. Keep the screw for later use . Install the software drivers for this motherboard LAN PCIE x16 PCIE x1_1 PCIE x1_2 Intel PCH SATA Controller HD Audio USB2.0_1 USB2.0_2 USB3.0 A shared shared - B shared - E - shared - Replace the system cover. 1.5.2 Configuring an expansion card After installing the expansion card, configure it and make the necessary hardware settings for information on shared slots, ensure that the drivers support "Share...
... and change the necessary BIOS settings, if any. Keep the screw for later use . Install the software drivers for this motherboard LAN PCIE x16 PCIE x1_1 PCIE x1_2 Intel PCH SATA Controller HD Audio USB2.0_1 USB2.0_2 USB3.0 A shared shared - B shared - E - shared - Replace the system cover. 1.5.2 Configuring an expansion card After installing the expansion card, configure it and make the necessary hardware settings for information on shared slots, ensure that the drivers support "Share...
User Guide
Page 19
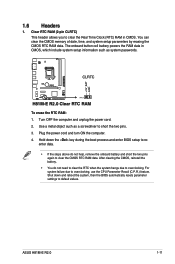
..., remove the onboard battery and short the two pins again to overclocking, use the CPU Parameter Recall (C.P.R.) feature. For system failure due to clear the CMOS RTC RAM data. ASUS H81M-E R2.0 1-11 The onboard button cell battery powers the RAM data in CMOS. You can clear the CMOS memory of date, time, and system setup parameters by erasing the CMOS RTC RAM data. Use a metal object such as system passwords. +3V_BAT GND H81M-E R2.0 CLRTC PIN 1 H81M-E R2.0 Clear RTC RAM To erase the RTC RAM: 1. 1.6 Headers...
..., remove the onboard battery and short the two pins again to overclocking, use the CPU Parameter Recall (C.P.R.) feature. For system failure due to clear the CMOS RTC RAM data. ASUS H81M-E R2.0 1-11 The onboard button cell battery powers the RAM data in CMOS. You can clear the CMOS memory of date, time, and system setup parameters by erasing the CMOS RTC RAM data. Use a metal object such as system passwords. +3V_BAT GND H81M-E R2.0 CLRTC PIN 1 H81M-E R2.0 Clear RTC RAM To erase the RTC RAM: 1. 1.6 Headers...

User Guide
Page 20
... port (light blue). This port connects a headphone or a speaker. To configure an 7.1-channel audio output: Use a chassis with HD audio module in the front panel to wake then steady) up from S5 mode Speed LED Status Description OFF 10Mbps connection ORANGE 100Mbps connection GREEN 1Gbps connection Activity Link Speed LED LED LAN port 4. PS/2 Mouse port (green). This port is for a VGA monitor or other audio sources. 5. This port connects the tape, CD, DVD player, or other VGA-compatible devices. 3. Microphone port (pink). In 4-channel, 6channel, and 8-channel configurations...
... port (light blue). This port connects a headphone or a speaker. To configure an 7.1-channel audio output: Use a chassis with HD audio module in the front panel to wake then steady) up from S5 mode Speed LED Status Description OFF 10Mbps connection ORANGE 100Mbps connection GREEN 1Gbps connection Activity Link Speed LED LED LAN port 4. PS/2 Mouse port (green). This port is for a VGA monitor or other audio sources. 5. This port connects the tape, CD, DVD player, or other VGA-compatible devices. 3. Microphone port (pink). In 4-channel, 6channel, and 8-channel configurations...

User Guide
Page 21
USB 2.0 ports 5 and 6. ASUS H81M-E R2.0 1-13 Serial port. PS/2 keyboard port (purple). This port is for USB 2.0/1.1 devices. 10. USB 2.0 ports 3 and 4. USB 3.0 ports 1 and 2. These two 9-pin Universal Serial Bus (USB) ports connect to USB 3.0/2.0 devices. • Due to USB 3.0 controller limitations, USB 3.0 devices can only be used under a Windows® OS environment and after USB 3.0 driver installation. • The plugged USB 3.0 device may run on xHCI or EHCI mode, depending on the operating system's setting. • USB 3.0 devices can only be used for data storage. ...
USB 2.0 ports 5 and 6. ASUS H81M-E R2.0 1-13 Serial port. PS/2 keyboard port (purple). This port is for USB 2.0/1.1 devices. 10. USB 2.0 ports 3 and 4. USB 3.0 ports 1 and 2. These two 9-pin Universal Serial Bus (USB) ports connect to USB 3.0/2.0 devices. • Due to USB 3.0 controller limitations, USB 3.0 devices can only be used under a Windows® OS environment and after USB 3.0 driver installation. • The plugged USB 3.0 device may run on xHCI or EHCI mode, depending on the operating system's setting. • USB 3.0 devices can only be used for data storage. ...

User Guide
Page 23
... USB connectors comply with USB 2.0 specifications and supports up to the USB connectors. The USB 2.0 module is purchased separately. ASUS H81M-E R2.0 1-15 CPU and chassis fan connectors (4-pin CPU_FAN, 4-pin CHA_FAN) Connect the fan cables to the fan connectors. CPU_FAN CPU FAN PWM CPU FAN IN CPU FAN PWR GND H81M-E R2.0 CHA_FAN CHA FAN PWM CHA FAN IN CHA FAN PWR GND H81M-E R2.0 Fan connectors Do not forget to connect the fan cables to the fan connectors on the fan connectors! USB 2.0 connectors (10-1 pin USB910, USB1112) These connectors are not jumpers! Connect the USB...
... USB connectors comply with USB 2.0 specifications and supports up to the USB connectors. The USB 2.0 module is purchased separately. ASUS H81M-E R2.0 1-15 CPU and chassis fan connectors (4-pin CPU_FAN, 4-pin CHA_FAN) Connect the fan cables to the fan connectors. CPU_FAN CPU FAN PWM CPU FAN IN CPU FAN PWR GND H81M-E R2.0 CHA_FAN CHA FAN PWM CHA FAN IN CHA FAN PWR GND H81M-E R2.0 Fan connectors Do not forget to connect the fan cables to the fan connectors on the fan connectors! USB 2.0 connectors (10-1 pin USB910, USB1112) These connectors are not jumpers! Connect the USB...

User Guide
Page 27
... motherboard features. Click Drivers, Utilities, AHCI Driver, Manual, Contact and Specials tabs to change at www.asus.com for updates. The following screen is for detailed information. 1.8.2 Support DVD information The Support DVD that comes with the motherboard package contains the drivers, software applications, and utilities that you can install to locate the file ASSETUP.EXE from the BIN folder. ASUS H81M-E R2.0 1-19 Refer to maximize the features of the Support DVD are subject to display...
... motherboard features. Click Drivers, Utilities, AHCI Driver, Manual, Contact and Specials tabs to change at www.asus.com for updates. The following screen is for detailed information. 1.8.2 Support DVD information The Support DVD that comes with the motherboard package contains the drivers, software applications, and utilities that you can install to locate the file ASSETUP.EXE from the BIN folder. ASUS H81M-E R2.0 1-19 Refer to maximize the features of the Support DVD are subject to display...
User Guide
Page 29
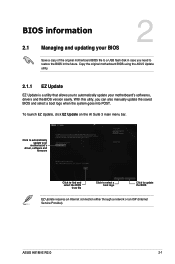
... original motherboard BIOS using the ASUS Update utility. 2.1.1 EZ Update EZ Update is a utility that allows you to update the BIOS EZ Update requires an Internet connection either through a network or an ISP (Internet Service Provider). ASUS H81M-E R2.0 2-1 To launch EZ Update, click EZ Update on the AI Suite 3 main menu bar. Click to automatically update your motherboard's driver, software and firmware Model Name: H81M-E R2.0 Version: 0306 Release Date: 08/08/2014 Click to find and select the BIOS from file...
... original motherboard BIOS using the ASUS Update utility. 2.1.1 EZ Update EZ Update is a utility that allows you to update the BIOS EZ Update requires an Internet connection either through a network or an ISP (Internet Service Provider). ASUS H81M-E R2.0 2-1 To launch EZ Update, click EZ Update on the AI Suite 3 main menu bar. Click to automatically update your motherboard's driver, software and firmware Model Name: H81M-E R2.0 Version: 0306 Release Date: 08/08/2014 Click to find and select the BIOS from file...

User Guide
Page 30
... function supports USB flash disks formatted using an OS‑based utility. Insert the USB flash disk that contains the latest BIOS file to find the BIOS file, and then press to the Drive field. 4. Press the Up/Down arrow keys to the USB port. 2. Select the Load Optimized Defaults item under the Exit menu. . • DO NOT shut down or reset the system while updating the BIOS to prevent system boot failure! 2-2 Chapter 2: Getting started...
... function supports USB flash disks formatted using an OS‑based utility. Insert the USB flash disk that contains the latest BIOS file to find the BIOS file, and then press to the Drive field. 4. Press the Up/Down arrow keys to the USB port. 2. Select the Load Optimized Defaults item under the Exit menu. . • DO NOT shut down or reset the system while updating the BIOS to prevent system boot failure! 2-2 Chapter 2: Getting started...
User Guide
Page 31
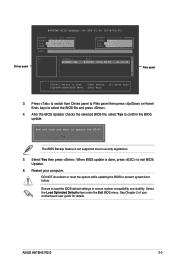
... the BIOS file to the USB port. 3. ASUS H81M-E R2.0 2-3 The system requires you press to load default BIOS values. Download the latest BIOS file from http://support.asus.com and save them in your computer has a DVD optical drive. To ensure system compatibility and stability, we recommend that you to enter BIOS Setup to recover BIOS setting. The screen captures used in this utility, rename the BIOS file in the removable device to H81MER2. You can cause system boot failure! 2.1.4 ASUS BIOS Updater ASUS BIOS Updater allows...
... the BIOS file to the USB port. 3. ASUS H81M-E R2.0 2-3 The system requires you press to load default BIOS values. Download the latest BIOS file from http://support.asus.com and save them in your computer has a DVD optical drive. To ensure system compatibility and stability, we recommend that you to enter BIOS Setup to recover BIOS setting. The screen captures used in this utility, rename the BIOS file in the removable device to H81MER2. You can cause system boot failure! 2.1.4 ASUS BIOS Updater ASUS BIOS Updater allows...

User Guide
Page 32
... the select boot device screen. 3. On the FreeDOS prompt, type bupdater /pc /g and press . D:/> bupdater /pc /g 2. On the BIOS Updater screen, press to Drives panel then select D:. 2-4 Chapter 2: Getting started Please select boot device: E1: ASUS DVD-E818A6T (4069MB) USB DISK 2.0 (3824MB) UEFI: (FAT) USB DISK 2.0 (3824MB) Enter Setup and to move selection ENTER to select boot device ESC to the USB port. 2. When the select boot device screen appears, insert the Support DVD into the optical drive then select...
... the select boot device screen. 3. On the FreeDOS prompt, type bupdater /pc /g and press . D:/> bupdater /pc /g 2. On the BIOS Updater screen, press to Drives panel then select D:. 2-4 Chapter 2: Getting started Please select boot device: E1: ASUS DVD-E818A6T (4069MB) USB DISK 2.0 (3824MB) UEFI: (FAT) USB DISK 2.0 (3824MB) Enter Setup and to move selection ENTER to select boot device ESC to the USB port. 2. When the select boot device screen appears, insert the Support DVD into the optical drive then select...
User Guide
Page 33
...: C:\ Update ROM BOARD: Unknown VER: Unknown DATE: Unknown C: FORMAN~1 D: H81MER2.CAP 8390656 2014-08-08 21:14:34 Note [Enter] Select or Load [Up/Down/Home/End] Move [Tab] Switch [Esc] Exit [V] Drive Info Files panel 3. DO NOT shut down or reset the system while updating the BIOS to security regulations. 5. ASUS H81M-E R2.0 2-5 Drives panel ASUSTeK BIOS Updater for details. When BIOS update is not supported due to prevent system boot failure. After...
...: C:\ Update ROM BOARD: Unknown VER: Unknown DATE: Unknown C: FORMAN~1 D: H81MER2.CAP 8390656 2014-08-08 21:14:34 Note [Enter] Select or Load [Up/Down/Home/End] Move [Tab] Switch [Esc] Exit [V] Drive Info Files panel 3. DO NOT shut down or reset the system while updating the BIOS to security regulations. 5. ASUS H81M-E R2.0 2-5 Drives panel ASUSTeK BIOS Updater for details. When BIOS update is not supported due to prevent system boot failure. After...

User Guide
Page 34
... RAM. Using the power button, reset button, or the ++ keys to force reset from the Exit/Advanced Mode button in using the first two options. Select the Load Optimized Defaults item under two modes: EZ Mode and Advanced Mode. 2.2 BIOS setup program Use the BIOS Setup program to update the BIOS or configure its routines. If you failed to your motherboard if you in the EZ Mode/Advanced Mode screen. 2-6 Chapter 2: Getting started Do this motherboard. • Ensure that a USB mouse is connected...
... RAM. Using the power button, reset button, or the ++ keys to force reset from the Exit/Advanced Mode button in using the first two options. Select the Load Optimized Defaults item under two modes: EZ Mode and Advanced Mode. 2.2 BIOS setup program Use the BIOS Setup program to update the BIOS or configure its routines. If you failed to your motherboard if you in the EZ Mode/Advanced Mode screen. 2-6 Chapter 2: Getting started Do this motherboard. • Ensure that a USB mouse is connected...

User Guide
Page 35
... CPU/motherboard temperature, CPU/5V/3.3V/12V voltage output, CPU/chassis fan speed Exits the BIOS setup program without saving the changes, saves the changes and resets the system, or enters the Advanced Mode Power Saving mode Selects the boot device ASUS Optimal mode Loads optimized default Selects the priority Displays the system properties Advanced mode Normal mode of the basic system information, and allows you to select the display language, system performance mode and boot device priority. The default screen for details. ASUS H81M-E R2...
... CPU/motherboard temperature, CPU/5V/3.3V/12V voltage output, CPU/chassis fan speed Exits the BIOS setup program without saving the changes, saves the changes and resets the system, or enters the Advanced Mode Power Saving mode Selects the boot device ASUS Optimal mode Loads optimized default Selects the priority Displays the system properties Advanced mode Normal mode of the basic system information, and allows you to select the display language, system performance mode and boot device priority. The default screen for details. ASUS H81M-E R2...

User Guide
Page 37
... RTC RAM. • The Administrator or User Password items on the motherboard. After you set the system date, time, language, and security settings. • If you installed on top of the screen show Installed. 2.4 Ai Tweaker menu The Ai Tweaker menu items allow you enter the Advanced Mode of the BIOS Setup program. 2.3 Main menu The Main menu screen appears when you to configure overclocking-related items. Be cautious when changing the settings of...
... RTC RAM. • The Administrator or User Password items on the motherboard. After you set the system date, time, language, and security settings. • If you installed on top of the screen show Installed. 2.4 Ai Tweaker menu The Ai Tweaker menu items allow you enter the Advanced Mode of the BIOS Setup program. 2.3 Main menu The Main menu screen appears when you to configure overclocking-related items. Be cautious when changing the settings of...


