
User Manual
Page 17
... panel; ASUS M3N-H/HDMI 1-1 The motherboard delivers a host of the above items is damaged or missing, contact your motherboard package for buying an ASUS® M3N-H/HDMI motherboard! Retail version only) 1 x D-Sub connector module 1 x HDMI to DVI converter Application DVD ASUS motherboard support DVD Documentation User guide If any of new features and latest technologies, making it , check the items in the long line of ASUS quality motherboards! Thank you start installing the motherboard, and hardware devices on...
... panel; ASUS M3N-H/HDMI 1-1 The motherboard delivers a host of the above items is damaged or missing, contact your motherboard package for buying an ASUS® M3N-H/HDMI motherboard! Retail version only) 1 x D-Sub connector module 1 x HDMI to DVI converter Application DVD ASUS motherboard support DVD Documentation User guide If any of new features and latest technologies, making it , check the items in the long line of ASUS quality motherboards! Thank you start installing the motherboard, and hardware devices on...

User Manual
Page 41
... support. Align the card connector with the slot and press firmly until the card is already installed in a chassis). 3. Secure the card to the card. Install the software drivers for information on the slot. 5. Assign an IRQ to the chassis with it by adjusting the software settings. 1. ASUS M3N-H/HDMI 2-17 Make sure to use . 4. Remove the system unit cover (if your motherboard is completely seated on BIOS setup. 2. See Chapter 4 for the expansion card...
... support. Align the card connector with the slot and press firmly until the card is already installed in a chassis). 3. Secure the card to the card. Install the software drivers for information on the slot. 5. Assign an IRQ to the chassis with it by adjusting the software settings. 1. ASUS M3N-H/HDMI 2-17 Make sure to use . 4. Remove the system unit cover (if your motherboard is completely seated on BIOS setup. 2. See Chapter 4 for the expansion card...

User Manual
Page 46
These 4-pin Universal Serial Bus (USB) ports are available for a high-definition multimedia interface (HDMI) connector. • This motherboard comes with the higher-version DVD player and drivers will affect the playback quality. This port is a configuration example for your display to use an HDCP compliant monitor. This port connects an external audio output device via a coaxial S/PDIF cable. 14. These 4-pin Universal Serial Bus (USB) ports are available for connecting USB 2.0 devices. 2-22 Chapter 2: Hardware information USB 2.0 ports 3 and 4. CPU: AMD K8 M2 Athlon64...
These 4-pin Universal Serial Bus (USB) ports are available for a high-definition multimedia interface (HDMI) connector. • This motherboard comes with the higher-version DVD player and drivers will affect the playback quality. This port is a configuration example for your display to use an HDCP compliant monitor. This port connects an external audio output device via a coaxial S/PDIF cable. 14. These 4-pin Universal Serial Bus (USB) ports are available for connecting USB 2.0 devices. 2-22 Chapter 2: Hardware information USB 2.0 ports 3 and 4. CPU: AMD K8 M2 Athlon64...
User Manual
Page 47
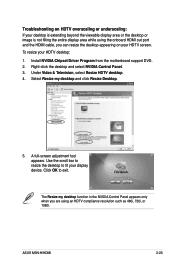
... HDTV desktop. 4. Install NVIDIA Chipset Driver Program from the motherboard support DVD. 2. Select Resize my desktop and click Resize Desktop. 5. A full-screen adjustment tool appears. Right-click the desktop and select NVIDIA Control Panel. 3. Use the scroll bar to resize the desktop to exit. ASUS M3N-H/HDMI 2-23 Click OK to fit your HDTV desktop: 1. The Resize my desktop function in the NVIDIA Control Panel appears only when you are using the onboard HDMI out port...
... HDTV desktop. 4. Install NVIDIA Chipset Driver Program from the motherboard support DVD. 2. Select Resize my desktop and click Resize Desktop. 5. A full-screen adjustment tool appears. Right-click the desktop and select NVIDIA Control Panel. 3. Use the scroll bar to resize the desktop to exit. ASUS M3N-H/HDMI 2-23 Click OK to fit your HDTV desktop: 1. The Resize my desktop function in the NVIDIA Control Panel appears only when you are using the onboard HDMI out port...
User Manual
Page 50
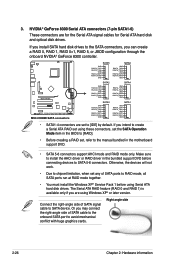
... SATA signal cable to RAID mode, all SATA ports run at RAID mode together. • You must install the Windows XP® Service Pack 1 before connecting devices to SATA 5-6 connectors. Otherwise, the devices will not work. • Due to chipset limitation, when set to install the AHCI driver or RAID driver in the motherboard support DVD. • SATA 5-6 connectors support AHCI mode and RAID mode only. Right angle side 2-26 Chapter 2: Hardware information Or you are for the Serial ATA signal cables for Serial ATA hard disk and optical disk drives...
... SATA signal cable to RAID mode, all SATA ports run at RAID mode together. • You must install the Windows XP® Service Pack 1 before connecting devices to SATA 5-6 connectors. Otherwise, the devices will not work. • Due to chipset limitation, when set to install the AHCI driver or RAID driver in the motherboard support DVD. • SATA 5-6 connectors support AHCI mode and RAID mode only. Right angle side 2-26 Chapter 2: Hardware information Or you are for the Serial ATA signal cables for Serial ATA hard disk and optical disk drives...
User Manual
Page 55
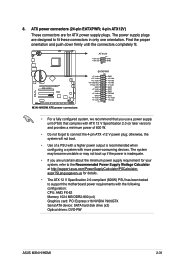
...://support.asus.com/PowerSupplyCalculator/PSCalculator. 8. ATX power connectors (24-pin EATXPWR; 4-pin ATX12V) These connectors are designed to support the motherboard power requirements with a higher power output is inadequate. • If you use a power supply unit (PSU) that complies with ATX 12 V Specification 2.0 (or later version) and provides a minimum power of a PSU with the following configuration: CPU: AMD FX-62 Memory 1024 MB DDR2-800 (x4) Graphics card: PCI Express x16 NVIDIA 7900GTX Serial ATA device: SATA hard disk drive (x2) Optical drives: DVD-RW ASUS M3N-H/HDMI...
...://support.asus.com/PowerSupplyCalculator/PSCalculator. 8. ATX power connectors (24-pin EATXPWR; 4-pin ATX12V) These connectors are designed to support the motherboard power requirements with a higher power output is inadequate. • If you use a power supply unit (PSU) that complies with ATX 12 V Specification 2.0 (or later version) and provides a minimum power of a PSU with the following configuration: CPU: AMD FX-62 Memory 1024 MB DDR2-800 (x4) Graphics card: PCI Express x16 NVIDIA 7900GTX Serial ATA device: SATA hard disk drive (x2) Optical drives: DVD-RW ASUS M3N-H/HDMI...

User Manual
Page 67
... motherboard BIOS file to a bootable floppy disk or USB flash disk in the support DVD that allows you to the corresponding sections for details on these utilities. ASUS Update requires an Internet connection either through a network or an Internet Service Provider (ISP). Installing ASUS Update To install ASUS Update: 1. 4.1 Managing and updating your system. The ASUS Update utility allows you to your BIOS The following utilities allow you to restore the BIOS in Windows® environment. The Drivers menu appears. 2. The ASUS Update utility is a utility...
... motherboard BIOS file to a bootable floppy disk or USB flash disk in the support DVD that allows you to the corresponding sections for details on these utilities. ASUS Update requires an Internet connection either through a network or an Internet Service Provider (ISP). Installing ASUS Update To install ASUS Update: 1. 4.1 Managing and updating your system. The ASUS Update utility allows you to your BIOS The following utilities allow you to restore the BIOS in Windows® environment. The Drivers menu appears. 2. The ASUS Update utility is a utility...
User Manual
Page 84
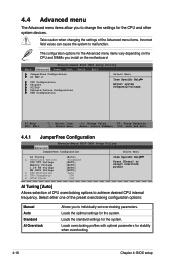
Loads the optimal settings for the system. Take caution when changing the settings of CPU overclocking options to achieve desired CPU internal frequency. Select either one of the preset overclocking configuration options: Manual Auto Standard AI Overclock Allows you to change the settings for the CPU and other system devices. Phoenix-Award BIOS CMOS Setup Utility Main Advanced Power Boot Tools Exit JumperFree Configuration AI NET 2 CPU Configuration Chipset PCIPnP Onboard Device Configuration USB Configuration Select Menu Item Specific Help Adjust system frequency/voltage...
Loads the optimal settings for the system. Take caution when changing the settings of CPU overclocking options to achieve desired CPU internal frequency. Select either one of the preset overclocking configuration options: Manual Auto Standard AI Overclock Allows you to change the settings for the CPU and other system devices. Phoenix-Award BIOS CMOS Setup Utility Main Advanced Power Boot Tools Exit JumperFree Configuration AI NET 2 CPU Configuration Chipset PCIPnP Onboard Device Configuration USB Configuration Select Menu Item Specific Help Adjust system frequency/voltage...
User Manual
Page 87
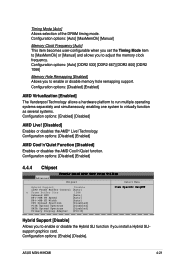
...Speed [Auto] K8NB HT Width [Auto] CPU Spread Spectrum [Disabled] PCIE Spread Spectrum [Disabled] SATA Spread Spectrum [Disabled] Primary Display Adapter [PCI-E] Item Specific Help Hybrid Support [Disable] Allows you to enable or disable the Hybrid SLI function if you to enable or disable memory hole remapping support. Configuration options: [Disabled] [Enabled] AMD Virtualization [Enabled] The Vanderpool Technology allows a hardware platform to run multiple operating systems separately and simultaneously, enabling one system to adjust the memory clock frequency. ASUS M3N-H/HDMI...
...Speed [Auto] K8NB HT Width [Auto] CPU Spread Spectrum [Disabled] PCIE Spread Spectrum [Disabled] SATA Spread Spectrum [Disabled] Primary Display Adapter [PCI-E] Item Specific Help Hybrid Support [Disable] Allows you to enable or disable the Hybrid SLI function if you to enable or disable memory hole remapping support. Configuration options: [Disabled] [Enabled] AMD Virtualization [Enabled] The Vanderpool Technology allows a hardware platform to run multiple operating systems separately and simultaneously, enabling one system to adjust the memory clock frequency. ASUS M3N-H/HDMI...
User Manual
Page 90
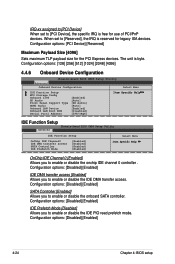
... BIOS CMOS Setup Utility Advanced Onboard Device Configuration Select Menu IDE Function Setup MCP Storage Config Onboard 1394 HD Audio Front Panel Support Type HDMI Audio Onboard LAN Device Onboard LAN Boot ROM Serial Port1 Address [Enabled] [Auto] [HD Audio] [Auto] [Enabled] [Disabled] [3F8/IRQ4] Item Specific Help IDE Function Setup Phoenix-Award BIOS CMOS Setup Utility Advanced IDE Function Setup OnChip IDE Channel0 IDE DMA transfer access SATA Controller IDE Prefetch Mode [Enabled] [Enabled] [Enabled] [Enabled] Select Menu Item Specific Help OnChip IDE Channel...
... BIOS CMOS Setup Utility Advanced Onboard Device Configuration Select Menu IDE Function Setup MCP Storage Config Onboard 1394 HD Audio Front Panel Support Type HDMI Audio Onboard LAN Device Onboard LAN Boot ROM Serial Port1 Address [Enabled] [Auto] [HD Audio] [Auto] [Enabled] [Disabled] [3F8/IRQ4] Item Specific Help IDE Function Setup Phoenix-Award BIOS CMOS Setup Utility Advanced IDE Function Setup OnChip IDE Channel0 IDE DMA transfer access SATA Controller IDE Prefetch Mode [Enabled] [Enabled] [Enabled] [Enabled] Select Menu Item Specific Help OnChip IDE Channel...
User Manual
Page 91
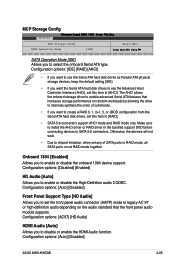
...the Serial ATA hard disk drives to use the Serial ATA hard disk drives as Parallel ATA physical storage devices, keep the default setting [IDE]. • If you to SATA 5-6 connectors. Configuration options: [Auto] [Disabled] ASUS M3N-H/HDMI 4-25 Make sure to install the AHCI driver or RAID driver in the bundled support DVD before connecting devices to enable or disable the onboard 1394 device support. Onboard 1394 [Enabled] Allows you want to create a RAID 0, 1, 0+1, 5, or JBOD configuration from the Serial ATA hard disk drives, set this item to RAID mode, all SATA ports run at RAID...
...the Serial ATA hard disk drives to use the Serial ATA hard disk drives as Parallel ATA physical storage devices, keep the default setting [IDE]. • If you to SATA 5-6 connectors. Configuration options: [Auto] [Disabled] ASUS M3N-H/HDMI 4-25 Make sure to install the AHCI driver or RAID driver in the bundled support DVD before connecting devices to enable or disable the onboard 1394 device support. Onboard 1394 [Enabled] Allows you want to create a RAID 0, 1, 0+1, 5, or JBOD configuration from the Serial ATA hard disk drives, set this item to RAID mode, all SATA ports run at RAID...
User Manual
Page 93
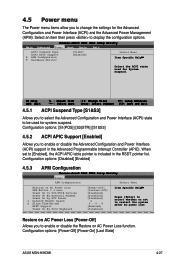
Phoenix-Award BIOS CMOS Setup Utility Main Advanced Power Boot Tools Exit ACPI Suspend Type ACPI APIC support APM Configuration Hardware Monitor [S1&S3] [Enabled] Select Menu Item Specific Help Select the ACPI state used for system suspend. Configuration options: [Power-Off] [Power-On] [Last State] ASUS M3N-H/HDMI 4-27 4.5 Power menu The Power menu items allow you to select the Advanced Configuration and Power Interface (ACPI) state to be used for the Advanced Configuration and Power Interface (ACPI) and the Advanced Power Management (APM). When set to display the...
Phoenix-Award BIOS CMOS Setup Utility Main Advanced Power Boot Tools Exit ACPI Suspend Type ACPI APIC support APM Configuration Hardware Monitor [S1&S3] [Enabled] Select Menu Item Specific Help Select the ACPI state used for system suspend. Configuration options: [Power-Off] [Power-On] [Last State] ASUS M3N-H/HDMI 4-27 4.5 Power menu The Power menu items allow you to select the Advanced Configuration and Power Interface (ACPI) state to be used for the Advanced Configuration and Power Interface (ACPI) and the Advanced Power Management (APM). When set to display the...
User Manual
Page 94
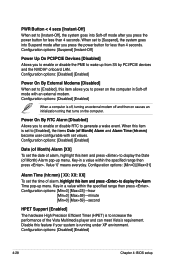
... allows you to enable or disable the PME to wake up from S5 by PCI/PCIE devices and the NVIDIA® onboard LAN. Configuration options: [Min=0] [Max=31] Alarm Time (hh:mm) [ XX: XX: XX] To set the time of Month) Alarm and Alarm Time (hh:mm) become user-configurable with an external modem. Configuration options: [Disabled] [Enabled] 4-28 Chapter 4: BIOS setup Configuration options: [Suspend] [Instant-Off] Power Up On PCI/PCIE Devices [Disabled] Allows you to...
... allows you to enable or disable the PME to wake up from S5 by PCI/PCIE devices and the NVIDIA® onboard LAN. Configuration options: [Min=0] [Max=31] Alarm Time (hh:mm) [ XX: XX: XX] To set the time of Month) Alarm and Alarm Time (hh:mm) become user-configurable with an external modem. Configuration options: [Disabled] [Enabled] 4-28 Chapter 4: BIOS setup Configuration options: [Suspend] [Instant-Off] Power Up On PCI/PCIE Devices [Disabled] Allows you to...
User Manual
Page 95
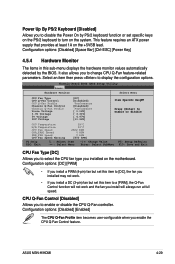
... specific keys on the PS/2 keyboard to turn on the system. This feature requires an ATX power supply that provides at full speed. It also allows you to enable or disable the CPU Q-Fan controller. ASUS M3N-H/HDMI 4-29 CPU Q-Fan Control [Disabled] Allows you to change CPU Q-Fan feature-related parameters. Configuration options: [Disabled] [Enabled] The CPU Q-Fan Profile item becomes user-configurable when you installed on the +5VSB lead. Phoenix-Award BIOS CMOS Setup Utility Power Hardware Monitor Select Menu CPU Fan Type CPU Q-Fan Control CPU Q-Fan Profile Chassis...
... specific keys on the PS/2 keyboard to turn on the system. This feature requires an ATX power supply that provides at full speed. It also allows you to enable or disable the CPU Q-Fan controller. ASUS M3N-H/HDMI 4-29 CPU Q-Fan Control [Disabled] Allows you to change CPU Q-Fan feature-related parameters. Configuration options: [Disabled] [Enabled] The CPU Q-Fan Profile item becomes user-configurable when you installed on the +5VSB lead. Phoenix-Award BIOS CMOS Setup Utility Power Hardware Monitor Select Menu CPU Fan Type CPU Q-Fan Control CPU Q-Fan Profile Chassis...
User Manual
Page 97
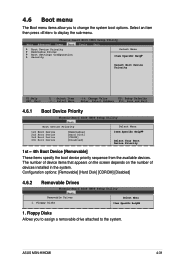
... Menu -/+: Change Value F5: Setup Defaults Enter: Select SubMenu F10: Save and Exit 4.6.1 Boot Device Priority Phoenix-Award BIOS CMOS Setup Utility Boot Boot Device Priority Select Menu 1st Boot Device 2nd Boot Device 3rd Boot Device 4th Boot Device [Removable] [Hard Disk] [CDROM] [Disabled] Item Specific Help Select Your Boot Device Priority 1st ~ 4th Boot Device [Removable] These items specify the boot device priority sequence from the available devices. Floppy Disks Item Specific Help 1. ASUS M3N-H/HDMI 4-31 Select an item then press to display the sub-menu. 4.6 Boot...
... Menu -/+: Change Value F5: Setup Defaults Enter: Select SubMenu F10: Save and Exit 4.6.1 Boot Device Priority Phoenix-Award BIOS CMOS Setup Utility Boot Boot Device Priority Select Menu 1st Boot Device 2nd Boot Device 3rd Boot Device 4th Boot Device [Removable] [Hard Disk] [CDROM] [Disabled] Item Specific Help Select Your Boot Device Priority 1st ~ 4th Boot Device [Removable] These items specify the boot device priority sequence from the available devices. Floppy Disks Item Specific Help 1. ASUS M3N-H/HDMI 4-31 Select an item then press to display the sub-menu. 4.6 Boot...
User Manual
Page 103
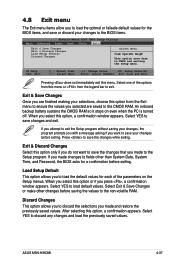
...-Award BIOS CMOS Setup Utility Main Advanced Power Boot Tools Exit Exit & Save Changes Exit & Discard Changes Load Setup Default Discard Changes Select Menu Item Specific Help This option save the changes that you want to the CMOS RAM. Select YES to load default values. Select YES to save or discard your changes before exiting. Select YES to the non-volatile RAM. Select Exit & Save Changes or make other than System Date, System Time, and Password...
...-Award BIOS CMOS Setup Utility Main Advanced Power Boot Tools Exit Exit & Save Changes Exit & Discard Changes Load Setup Default Discard Changes Select Menu Item Specific Help This option save the changes that you want to the CMOS RAM. Select YES to load default values. Select YES to save or discard your changes before exiting. Select YES to the non-volatile RAM. Select Exit & Save Changes or make other than System Date, System Time, and Password...
User Manual
Page 136
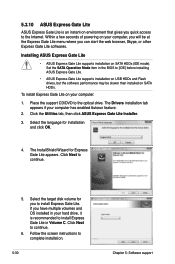
... of powering on your hard drive, it is an instant-on environment that gives you quick access to the Internet. The Drivers installation tab appears if your computer: 1. Click the Utilities tab, then click ASUS Express Gate Lite Installer. 3. Click Next to the optical drive. Set the SATA Operation Mode item in Volume C. Place the support CD/DVD to continue. 6. Follow the screen instructions to continue. 5. To install Express Gate...
... of powering on your hard drive, it is an instant-on environment that gives you quick access to the Internet. The Drivers installation tab appears if your computer: 1. Click the Utilities tab, then click ASUS Express Gate Lite Installer. 3. Click Next to the optical drive. Set the SATA Operation Mode item in Volume C. Place the support CD/DVD to continue. 6. Follow the screen instructions to continue. 5. To install Express Gate...

User Manual
Page 144
...after the CMOS is cleared; See section 5.2.5 Manuals menu. See section 4.4.6 Onboard Device Configuration > MCP Storage Config for detailed information on each drive. Installing Serial ATA (SATA) hard disks The motherboard supports Ultra DMA 133/100/66 and Serial ATA hard disk drives. Connect a SATA power cable to set the BIOS RAID items: 1. Setting the BIOS RAID items After installing the hard disk drives, make sure to re-enter your motherboard support DVD. • When using Windows® XP operating system, make sure to the power connector on RAID configurations. Boot the...
...after the CMOS is cleared; See section 5.2.5 Manuals menu. See section 4.4.6 Onboard Device Configuration > MCP Storage Config for detailed information on each drive. Installing Serial ATA (SATA) hard disks The motherboard supports Ultra DMA 133/100/66 and Serial ATA hard disk drives. Connect a SATA power cable to set the BIOS RAID items: 1. Setting the BIOS RAID items After installing the hard disk drives, make sure to re-enter your motherboard support DVD. • When using Windows® XP operating system, make sure to the power connector on RAID configurations. Boot the...

User Manual
Page 151
... a RAID/SATA driver disk in Windows® XP: 1. Save changes and exit BIOS. 6. Follow succeeding screen instructions to install third-party SCSI or RAID driver. 2. To install the RAID driver in Windows® 1. Set the optical drive as the primary boot device. 4. Start Windows®. 2. Go to the Make Disk menu, then click NVIDIA 32/64bit XP SATA RAID Driver to create a NVIDIA® 32/64 bit XP SATA RAID driver disk. 4. Insert the support DVD into the floppy disk drive or USB port. 5. Boot your computer. 2. Place the motherboard support CD/DVD...
... a RAID/SATA driver disk in Windows® XP: 1. Save changes and exit BIOS. 6. Follow succeeding screen instructions to install third-party SCSI or RAID driver. 2. To install the RAID driver in Windows® 1. Set the optical drive as the primary boot device. 4. Start Windows®. 2. Go to the Make Disk menu, then click NVIDIA 32/64bit XP SATA RAID Driver to create a NVIDIA® 32/64 bit XP SATA RAID driver disk. 4. Insert the support DVD into the floppy disk drive or USB port. 5. Boot your computer. 2. Place the motherboard support CD/DVD...

User Manual
Page 152
... motherboard support CD/DVD or USB device with RAID driver into the optical drive or USB port. Find RAID driver in the support CD/DVD through the path below : Drivers\Chipset\Disk\RAID Find AHCI driver in Windows® Vista™: 1. Due to complete the installation. To install the RAID driver in the support CD/DVD through the path below : Drivers\Chipset\Disk\AHCI 2. Follow the succeeding screen instructions to chipset limitation, the Serial ATA ports supported by the NVIDIA chipset doesn't support Serial Optical Disk Drives (Serial ODD) under DOS. 5-46 Chapter 5: Software...
... motherboard support CD/DVD or USB device with RAID driver into the optical drive or USB port. Find RAID driver in the support CD/DVD through the path below : Drivers\Chipset\Disk\RAID Find AHCI driver in Windows® Vista™: 1. Due to complete the installation. To install the RAID driver in the support CD/DVD through the path below : Drivers\Chipset\Disk\AHCI 2. Follow the succeeding screen instructions to chipset limitation, the Serial ATA ports supported by the NVIDIA chipset doesn't support Serial Optical Disk Drives (Serial ODD) under DOS. 5-46 Chapter 5: Software...


