
MG279Q Series User Guide for English Edition
Page 2
... Assembling the monitor 1-2 1.4 Connect cables 1-3 1.4.1 Rear of the LCD monitor 1-3 1.5 Monitor introduction 1-4 1.5.1 Using the Controls button 1-4 2.1 Detaching the Quick Release stand (for VESA wall mount 2-1 2.2 Adjusting the monitor 2-2 3.1 OSD (On-Screen Display) menu 3-1 3.1.1 How to infringe. or (2) the serial number of the product is authorized in any form or by any language in writing by the purchaser for backup purposes, without intent to reconfigure 3-1 3.1.2 OSD Function Introduction 3-2 3.2 Specifications 3-9 3.3 Troubleshooting (FAQ 3-10 3.4 Supported Timing...
... Assembling the monitor 1-2 1.4 Connect cables 1-3 1.4.1 Rear of the LCD monitor 1-3 1.5 Monitor introduction 1-4 1.5.1 Using the Controls button 1-4 2.1 Detaching the Quick Release stand (for VESA wall mount 2-1 2.2 Adjusting the monitor 2-2 3.1 OSD (On-Screen Display) menu 3-1 3.1.1 How to infringe. or (2) the serial number of the product is authorized in any form or by any language in writing by the purchaser for backup purposes, without intent to reconfigure 3-1 3.1.2 OSD Function Introduction 3-2 3.2 Specifications 3-9 3.3 Troubleshooting (FAQ 3-10 3.4 Supported Timing...

MG279Q Series User Guide for English Edition
Page 3
Operation is subject to which can radiate radio frequency energy and, if not installed and used in accordance with manufacturer's instructions, may cause undesired operation. As an Energy Star® Partner, our company has determined that interference will not occur in... Statement This device complies with Part 15 of Communications Statement This digital apparatus does not exceed the Class B limits for help. These limits are designed to radio communications. This equipment generates, uses and can be determined by turning the equipment off and on, the user is encouraged to try to ...
Operation is subject to which can radiate radio frequency energy and, if not installed and used in accordance with manufacturer's instructions, may cause undesired operation. As an Energy Star® Partner, our company has determined that interference will not occur in... Statement This device complies with Part 15 of Communications Statement This digital apparatus does not exceed the Class B limits for help. These limits are designed to radio communications. This equipment generates, uses and can be determined by turning the equipment off and on, the user is encouraged to try to ...

MG279Q Series User Guide for English Edition
Page 4
... fix it by yourself. Place the monitor on the monitor cabinet. • To ensure satisfactory operation, use the monitor only with UL listed computers which complies with the monitor, contact a qualified service technician or your dealer immediately. • Slots and openings on the label. iv Safety information • Before setting up the monitor, carefully read all cables are correctly connected and the power cables...
... fix it by yourself. Place the monitor on the monitor cabinet. • To ensure satisfactory operation, use the monitor only with UL listed computers which complies with the monitor, contact a qualified service technician or your dealer immediately. • Slots and openings on the label. iv Safety information • Before setting up the monitor, carefully read all cables are correctly connected and the power cables...
MG279Q Series User Guide for English Edition
Page 6
... uneven brightness on the screen depending on the screen, as it on again to complete a task. vi Never spray cleaner directly on the desktop pattern you can turn it may remain after switching the image. Do not repair the screen by the stand or the cord. • Cleaning. Clean the monitor surface with the monitor: • The screen may be removed with a cloth dampened with the LCD...
... uneven brightness on the screen depending on the screen, as it on again to complete a task. vi Never spray cleaner directly on the desktop pattern you can turn it may remain after switching the image. Do not repair the screen by the stand or the cord. • Cleaning. Clean the monitor surface with the monitor: • The screen may be removed with a cloth dampened with the LCD...
MG279Q Series User Guide for English Edition
Page 8
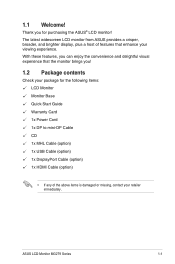
... immediately. ASUS LCD Monitor MG279 Series 1-1 Thank you ! 1.2 Package contents Check your package for the following items: LCD Monitor Monitor Base Quick Start Guide Warranty Card 1x Power Cord 1x DP to mini-DP Cable CD 1x MHL Cable (option) 1x USB Cable (option) 1x DisplayPort Cable (option) 1x HDMI Cable (option) • If any of features that the monitor brings you for purchasing the ASUS® LCD monitor! 1.1 Welcome! The latest widescreen LCD monitor from ASUS provides a crisper...
... immediately. ASUS LCD Monitor MG279 Series 1-1 Thank you ! 1.2 Package contents Check your package for the following items: LCD Monitor Monitor Base Quick Start Guide Warranty Card 1x Power Cord 1x DP to mini-DP Cable CD 1x MHL Cable (option) 1x USB Cable (option) 1x DisplayPort Cable (option) 1x HDMI Cable (option) • If any of features that the monitor brings you for purchasing the ASUS® LCD monitor! 1.1 Welcome! The latest widescreen LCD monitor from ASUS provides a crisper...
MG279Q Series User Guide for English Edition
Page 9
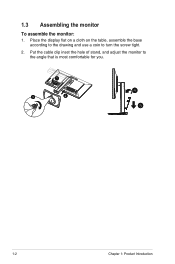
1.3 Assembling the monitor To assemble the monitor: 1. Put the cable clip inset the hole of stand, and adjust the monitor to turn the screw tight. 2. Place the display flat on a cloth on the table, assemble the base according to the drawing and use a coin to the angle that is most comfortable for you. 1 3 2 4 5 1-2 Chapter 1: Product Introduction
1.3 Assembling the monitor To assemble the monitor: 1. Put the cable clip inset the hole of stand, and adjust the monitor to turn the screw tight. 2. Place the display flat on a cloth on the table, assemble the base according to the drawing and use a coin to the angle that is most comfortable for you. 1 3 2 4 5 1-2 Chapter 1: Product Introduction
MG279Q Series User Guide for English Edition
Page 10
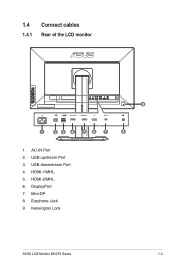
1.4 Connect cables 1.4.1 Rear of the LCD monitor HDMI-1/MHL HDMI-2/MHL DP Mini DP 9 1 23 4 5 6 7 8 1. USB downstream Port 4. HDMI-1/MHL 5. AC-IN Port 2. Kensington Lock ASUS LCD Monitor MG279 Series 1-3 DisplayPort 7. Mini-DP 8. USB upstream Port 3. Earphone Jack 9. HDMI-2/MHL 6.
1.4 Connect cables 1.4.1 Rear of the LCD monitor HDMI-1/MHL HDMI-2/MHL DP Mini DP 9 1 23 4 5 6 7 8 1. USB downstream Port 4. HDMI-1/MHL 5. AC-IN Port 2. Kensington Lock ASUS LCD Monitor MG279 Series 1-3 DisplayPort 7. Mini-DP 8. USB upstream Port 3. Earphone Jack 9. HDMI-2/MHL 6.
MG279Q Series User Guide for English Edition
Page 11
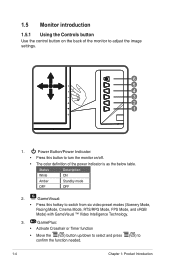
... to switch from six video preset modes (Scenery Mode, Racing Mode, Cinema Mode, RTS/RPG Mode, FPS Mode, and sRGB Mode) with GameVisual ™ Video Intelligence Technology. 3. 1.5 Monitor introduction 1.5.1 Using the Controls button Use the control button on /off. • The color definition of the monitor to adjust the image settings. 6 5 4 3 2 1 1. GamePlus: • Activate Crosshair or Timer function • Move the ( ) button up/down to select and press confirm the function needed. ( ) to turn the monitor...
... to switch from six video preset modes (Scenery Mode, Racing Mode, Cinema Mode, RTS/RPG Mode, FPS Mode, and sRGB Mode) with GameVisual ™ Video Intelligence Technology. 3. 1.5 Monitor introduction 1.5.1 Using the Controls button Use the control button on /off. • The color definition of the monitor to adjust the image settings. 6 5 4 3 2 1 1. GamePlus: • Activate Crosshair or Timer function • Move the ( ) button up/down to select and press confirm the function needed. ( ) to turn the monitor...
MG279Q Series User Guide for English Edition
Page 13
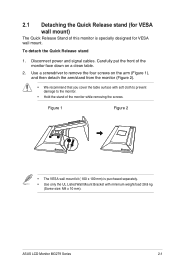
... a clean table. 2. To detach the Quick Release stand 1. ASUS LCD Monitor MG279 Series 2-1 Carefully put the front of this monitor is purchased separately. • Use only the UL Listed Wall Mount Bracket with soft cloth to prevent damage to the monitor. • Hold the stand of the monitor while removing the screws. Figure 1 Figure 2 2 1 1 • The VESA wall mount kit ( 100 x 100 mm) is specially designed for VESA wall mount. 2.1 Detaching the Quick...
... a clean table. 2. To detach the Quick Release stand 1. ASUS LCD Monitor MG279 Series 2-1 Carefully put the front of this monitor is purchased separately. • Use only the UL Listed Wall Mount Bracket with soft cloth to prevent damage to the monitor. • Hold the stand of the monitor while removing the screws. Figure 1 Figure 2 2 1 1 • The VESA wall mount kit ( 100 x 100 mm) is specially designed for VESA wall mount. 2.1 Detaching the Quick...
MG279Q Series User Guide for English Edition
Page 15
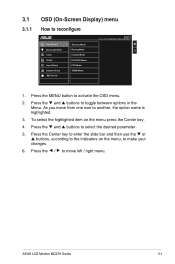
3.1 3.1.1 OSD (On-Screen Display) menu How to activate the OSD menu. 2. Press the MENU button to reconfigure G GameVisual Blue Light Filter Color Image Input Select System Setup MyFavorite Scenery Mode Racing Mode Cinema Mode RTS/RPG Mode FPS Mode sRGB Mode MG279 Racing Mode DisplayPort 2560x1440@60Hz 1. Press the and buttons to make your changes. 6. To select the highlighted item on the menu, to select the desired parameter. 5. Press the Center key to enter...
3.1 3.1.1 OSD (On-Screen Display) menu How to activate the OSD menu. 2. Press the MENU button to reconfigure G GameVisual Blue Light Filter Color Image Input Select System Setup MyFavorite Scenery Mode Racing Mode Cinema Mode RTS/RPG Mode FPS Mode sRGB Mode MG279 Racing Mode DisplayPort 2560x1440@60Hz 1. Press the and buttons to make your changes. 6. To select the highlighted item on the menu, to select the desired parameter. 5. Press the Center key to enter...
MG279Q Series User Guide for English Edition
Page 16
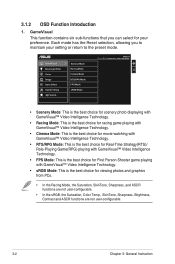
... the sRGB, the Saturation, Color Temp., SkinTone, Sharpness, Brightness, Contrast and ASCR functions are not user-configurable. 3-2 Chapter 3: General Instruction 3.1.2 OSD Function Introduction 1. G GameVisual Blue Light Filter Color Image Input Select System Setup MyFavorite Scenery Mode Racing Mode Cinema Mode RTS/RPG Mode FPS Mode sRGB Mode MG279 Racing Mode DisplayPort 2560x1440@60Hz • Scenery Mode: This is the best choice for scenery photo displaying with GameVisual™ Video Intelligence Technology. • Racing...
... the sRGB, the Saturation, Color Temp., SkinTone, Sharpness, Brightness, Contrast and ASCR functions are not user-configurable. 3-2 Chapter 3: General Instruction 3.1.2 OSD Function Introduction 1. G GameVisual Blue Light Filter Color Image Input Select System Setup MyFavorite Scenery Mode Racing Mode Cinema Mode RTS/RPG Mode FPS Mode sRGB Mode MG279 Racing Mode DisplayPort 2560x1440@60Hz • Scenery Mode: This is the best choice for scenery photo displaying with GameVisual™ Video Intelligence Technology. • Racing...

MG279Q Series User Guide for English Edition
Page 17
2. It is optimized setting. Blue Light Filter Adjust the energy level of blue light emitted from LED backlight G GameVisual Blue Light Filter Color Image Input Select System Setup MyFavorite Level 0 Level 1 Level 2 Level 3 Level 4 MG279 Racing Mode DisplayPort 2560x1440@60Hz • Level 0: No change. • Level 1~4: The higher the level,the more blue light will be reduced. • When Blue Light Filter is activated,the default settings of Racing Mode will be automatically imported. •...
2. It is optimized setting. Blue Light Filter Adjust the energy level of blue light emitted from LED backlight G GameVisual Blue Light Filter Color Image Input Select System Setup MyFavorite Level 0 Level 1 Level 2 Level 3 Level 4 MG279 Racing Mode DisplayPort 2560x1440@60Hz • Level 0: No change. • Level 1~4: The higher the level,the more blue light will be reduced. • When Blue Light Filter is activated,the default settings of Racing Mode will be automatically imported. •...
MG279Q Series User Guide for English Edition
Page 18
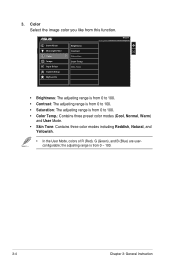
... color modes (Cool, Normal, Warm) and User Mode. • Skin Tone: Contains three color modes including Reddish, Natural, and Yellowish. • In the User Mode, colors of R (Red), G (Green), and B (Blue) are userconfigurable; the adjusting range is from 0 to 100. • Saturation: The adjusting range is from 0 ~ 100. 3-4 Chapter 3: General Instruction 3. G GameVisual Blue Light Filter Color Image Input Select System Setup MyFavorite Brightness Contrast Saturation Color Temp. Skin Tone MG279 Racing Mode DisplayPort 2560x1440@60Hz • Brightness: The adjusting range...
... color modes (Cool, Normal, Warm) and User Mode. • Skin Tone: Contains three color modes including Reddish, Natural, and Yellowish. • In the User Mode, colors of R (Red), G (Green), and B (Blue) are userconfigurable; the adjusting range is from 0 to 100. • Saturation: The adjusting range is from 0 ~ 100. 3-4 Chapter 3: General Instruction 3. G GameVisual Blue Light Filter Color Image Input Select System Setup MyFavorite Brightness Contrast Saturation Color Temp. Skin Tone MG279 Racing Mode DisplayPort 2560x1440@60Hz • Brightness: The adjusting range...
MG279Q Series User Guide for English Edition
Page 19
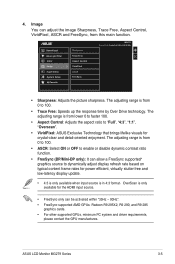
... cards. • For other supported GPUs, minimum PC system and driver requirements, please contact the GPU manufactures. G GameVisual Blue Light Filter Color Image Input Select System Setup MyFavorite Sharpness Trace Free Aspect Control VividPixel ASCR FreeSync MG279 Racing Mode DisplayPort 2560x1440 @ 60Hz • Sharpness: Adjusts the picture sharpness. ASUS LCD Monitor MG279 Series 3-5 The adjusting range is from 0 to 100. • ASCR: Select ON or OFF to enable or disable dynamic contrast...
... cards. • For other supported GPUs, minimum PC system and driver requirements, please contact the GPU manufactures. G GameVisual Blue Light Filter Color Image Input Select System Setup MyFavorite Sharpness Trace Free Aspect Control VividPixel ASCR FreeSync MG279 Racing Mode DisplayPort 2560x1440 @ 60Hz • Sharpness: Adjusts the picture sharpness. ASUS LCD Monitor MG279 Series 3-5 The adjusting range is from 0 to 100. • ASCR: Select ON or OFF to enable or disable dynamic contrast...

MG279Q Series User Guide for English Edition
Page 20
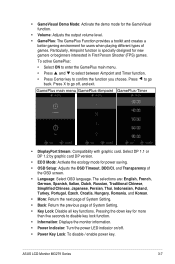
... DisplayPort Mini DisplayPort MG279 Racing Mode DisplayPort 2560x1440 @ 60Hz 6. System Setup Adjusts the system configuration. G GameVisual Blue Light Filter Color Image Input Select System Setup MyFavorite MG279 Racing Mode DisplayPort 2560x1440 @ 60Hz GameVisual Demo Mode Volume GamePlus DisplayPort Stream ECO Mode OSD Setup Language More G GameVisual Blue Light Filter Color Image Input Select System Setup MyFavorite Back Key Lock Information Power Indicator Power Key Lock USB Charging All Reset MG279 Racing Mode DisplayPort 2560x1440 @ 60Hz 3-6 Chapter 3: General Instruction
... DisplayPort Mini DisplayPort MG279 Racing Mode DisplayPort 2560x1440 @ 60Hz 6. System Setup Adjusts the system configuration. G GameVisual Blue Light Filter Color Image Input Select System Setup MyFavorite MG279 Racing Mode DisplayPort 2560x1440 @ 60Hz GameVisual Demo Mode Volume GamePlus DisplayPort Stream ECO Mode OSD Setup Language More G GameVisual Blue Light Filter Color Image Input Select System Setup MyFavorite Back Key Lock Information Power Indicator Power Key Lock USB Charging All Reset MG279 Racing Mode DisplayPort 2560x1440 @ 60Hz 3-6 Chapter 3: General Instruction
MG279Q Series User Guide for English Edition
Page 21
ASUS LCD Monitor MG279 Series 3-7 Pressing the down key for power saving. • OSD Setup: Adjusts the OSD Timeout, DDC/CI, and Transparency of the OSD screen. • Language: Select OSD language. Press X to disable key lock function. • Information: Displays the monitor information. • Power Indicator: Turn the power LED indicator on/off , and exit. Select DP 1.1 or DP 1.2 by graphic card DP version. • ECO Mode: Activate the ecology mode for more than five seconds...
ASUS LCD Monitor MG279 Series 3-7 Pressing the down key for power saving. • OSD Setup: Adjusts the OSD Timeout, DDC/CI, and Transparency of the OSD screen. • Language: Select OSD language. Press X to disable key lock function. • Information: Displays the monitor information. • Power Indicator: Turn the power LED indicator on/off , and exit. Select DP 1.1 or DP 1.2 by graphic card DP version. • ECO Mode: Activate the ecology mode for more than five seconds...
MG279Q Series User Guide for English Edition
Page 22
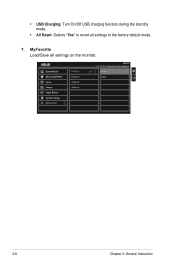
MyFavorite Load/Save all settings to the factory default mode. 7. • USB Charging: Turn On/Off USB charging function during the standby mode. • All Reset: Selects "Yes" to revert all settings on the monitor. G GameVisual Blue Light Filter Color Image Input Select System Setup MyFavorite Setting1 Setting 2 Setting 3 Setting 4 MG279 Racing Mode DisplayPort 2560x1440@60Hz Load Save 3-8 Chapter 3: General Instruction
MyFavorite Load/Save all settings to the factory default mode. 7. • USB Charging: Turn On/Off USB charging function during the standby mode. • All Reset: Selects "Yes" to revert all settings on the monitor. G GameVisual Blue Light Filter Color Image Input Select System Setup MyFavorite Setting1 Setting 2 Setting 3 Setting 4 MG279 Racing Mode DisplayPort 2560x1440@60Hz Load Save 3-8 Chapter 3: General Instruction
MG279Q Series User Guide for English Edition
Page 23
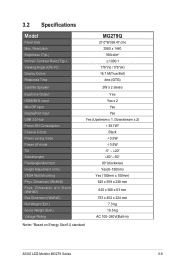
Dimension (WxHxD) Phys. Resolution Brightness (Typ.) Intrinsic Contrast Ratio (Typ.) Viewing Angle (CR>10) Display Colors Response Time Satellite Speaker Earphone Output HDMI/MHL input Mini-DP input DisplayPort input USB 3.0 Hub Power ON Consumption Chassis Colors Power saving mode Power off mode Tilt Swivel(angle) Pivot(angle/direction) Height Adjustment (mm) VESA Wall Mounting Phys. Dimension w/o Stand (WxHxD) Box Dimension (WxHxD) Net Weight (Esti.) Gross Weight (Esti.) Voltage Rating MG279Q 27.0"W (68.47 cm) 2560 x 1440 350cd/m2...
Dimension (WxHxD) Phys. Resolution Brightness (Typ.) Intrinsic Contrast Ratio (Typ.) Viewing Angle (CR>10) Display Colors Response Time Satellite Speaker Earphone Output HDMI/MHL input Mini-DP input DisplayPort input USB 3.0 Hub Power ON Consumption Chassis Colors Power saving mode Power off mode Tilt Swivel(angle) Pivot(angle/direction) Height Adjustment (mm) VESA Wall Mounting Phys. Dimension w/o Stand (WxHxD) Box Dimension (WxHxD) Net Weight (Esti.) Gross Weight (Esti.) Voltage Rating MG279Q 27.0"W (68.47 cm) 2560 x 1440 350cd/m2...

MG279Q Series User Guide for English Edition
Page 24
... sound is low • Adjust the volume settings of the pins are bent. • Perform Reset via OSD. • Adjust the R/G/B color settings or select the Color Temperature via OSD. Select "ON" to turn on power LED. Screen image bounces or a wave • Make sure the signal cable is properly connected to pattern is properly connected to the monitor and the power outlet. • Check Power Indicator function in main menu OSD. Screen image is properly working. 3.3 Troubleshooting (FAQ) Problem Possible Solution Power LED...
... sound is low • Adjust the volume settings of the pins are bent. • Perform Reset via OSD. • Adjust the R/G/B color settings or select the Color Temperature via OSD. Select "ON" to turn on power LED. Screen image bounces or a wave • Make sure the signal cable is properly connected to pattern is properly connected to the monitor and the power outlet. • Check Power Indicator function in main menu OSD. Screen image is properly working. 3.3 Troubleshooting (FAQ) Problem Possible Solution Power LED...
MG279Q Series User Guide for English Edition
Page 25
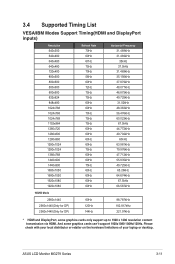
ASUS LCD Monitor MG279 Series 3-11 And some graphics cards only support up to 1920 x 1200 resolution content transmission via HDMI. Please check with your local distributor or retailer on the hardware limitations of your laptop or desktop. 3.4 Supported Timing List VESA/IBM Modes Support Timing(HDMI and DisplayPort inputs) Resolution 640x350 640x480... 1680x1050 1680x1050 1920x1080 1920x1080 Refresh Rate 70Hz 60Hz 67Hz 75Hz 70Hz 56Hz 60Hz 72Hz 75Hz 75Hz 60Hz 60Hz 70Hz 75Hz 75Hz 60Hz 60Hz 60Hz 60Hz 75Hz 60Hz 60Hz 75Hz 60Hz 60Hz 60Hz 60Hz Horizontal Frequency 31.469kHz 31.469kHz ...
ASUS LCD Monitor MG279 Series 3-11 And some graphics cards only support up to 1920 x 1200 resolution content transmission via HDMI. Please check with your local distributor or retailer on the hardware limitations of your laptop or desktop. 3.4 Supported Timing List VESA/IBM Modes Support Timing(HDMI and DisplayPort inputs) Resolution 640x350 640x480... 1680x1050 1680x1050 1920x1080 1920x1080 Refresh Rate 70Hz 60Hz 67Hz 75Hz 70Hz 56Hz 60Hz 72Hz 75Hz 75Hz 60Hz 60Hz 70Hz 75Hz 75Hz 60Hz 60Hz 60Hz 60Hz 75Hz 60Hz 60Hz 75Hz 60Hz 60Hz 60Hz 60Hz Horizontal Frequency 31.469kHz 31.469kHz ...


