
User Manual
Page 4
Contents 1.11 Software support 1-29 1.11.1 Installing an operating system 1-29 1.11.2 Support DVD information 1-29 Chapter 2: BIOS information 2.1 Managing and updating your BIOS 2-1 2.1.1 ASUS Update utility 2-1 2.1.2 ASUS EZ Flash 2 utility 2-2 2.1.3 ASUS CrashFree BIOS 3 utility 2-3 2.2 BIOS setup program 2-4 2.2.1 BIOS menu screen 2-5 2.2.2 Menu bar 2-5 2.2.3 Navigation keys 2-6 2.2.4 Menu items 2-6 2.2.5 Submenu items 2-6 2.2.6 Configuration fields 2-6 2.2.7 Pop-up window 2-6 2.2.8 Scroll bar 2-6 2.2.9 General help 2-6 2.3 Main...
Contents 1.11 Software support 1-29 1.11.1 Installing an operating system 1-29 1.11.2 Support DVD information 1-29 Chapter 2: BIOS information 2.1 Managing and updating your BIOS 2-1 2.1.1 ASUS Update utility 2-1 2.1.2 ASUS EZ Flash 2 utility 2-2 2.1.3 ASUS CrashFree BIOS 3 utility 2-3 2.2 BIOS setup program 2-4 2.2.1 BIOS menu screen 2-5 2.2.2 Menu bar 2-5 2.2.3 Navigation keys 2-6 2.2.4 Menu items 2-6 2.2.5 Submenu items 2-6 2.2.6 Configuration fields 2-6 2.2.7 Pop-up window 2-6 2.2.8 Scroll bar 2-6 2.2.9 General help 2-6 2.3 Main...

User Manual
Page 7
How this guide This user guide contains the information you need when installing and configuring the motherboard. Do not place the product in your area. Detailed descriptions of the BIOS parameters are not damaged. About this guide is organized This guide contains the following parts: • Chapter 1: Product introduction This chapter describes the...
How this guide This user guide contains the information you need when installing and configuring the motherboard. Do not place the product in your area. Detailed descriptions of the BIOS parameters are not damaged. About this guide is organized This guide contains the following parts: • Chapter 1: Product introduction This chapter describes the...

User Manual
Page 10
P5QPL-AM specifications summary ASUS Special Features Back Panel I/O Ports Internal I/O Connectors BIOS features Support DVD Contents Accessories Form factor ASUS CrashFree BIOS 3 ASUS Q-Fan ASUS EZ Flash 2 ASUS MyLogo 2 AI NET 2 ASUS Turbo Key 1 x PS/2 keyboard port 1 x PS/2 mouse port 1 x COM port 1 x LPT port 1 x VGA port 1 x LAN (...CPU fan connector 1 x 24-pin EATX power connector 1 x 4-pin ATX 12V power connector 8Mb Flash ROM, AMI BIOS, PnP, DMI v2.0, WfM 2.0, ACPI v2.0a, SM BIOS v2.5 Drivers ASUS PC Probe II ASUS LiveUpdate Utility Anti-virus software (OEM version) 1 x Serial ATA cable...
P5QPL-AM specifications summary ASUS Special Features Back Panel I/O Ports Internal I/O Connectors BIOS features Support DVD Contents Accessories Form factor ASUS CrashFree BIOS 3 ASUS Q-Fan ASUS EZ Flash 2 ASUS MyLogo 2 AI NET 2 ASUS Turbo Key 1 x PS/2 keyboard port 1 x PS/2 mouse port 1 x COM port 1 x LPT port 1 x VGA port 1 x LAN (...CPU fan connector 1 x 24-pin EATX power connector 1 x 4-pin ATX 12V power connector 8Mb Flash ROM, AMI BIOS, PnP, DMI v2.0, WfM 2.0, ACPI v2.0a, SM BIOS v2.5 Drivers ASUS PC Probe II ASUS LiveUpdate Utility Anti-virus software (OEM version) 1 x Serial ATA cable...
User Manual
Page 12
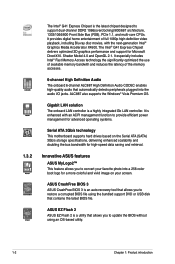
... tool that allows you to restore a corrupted BIOS file using an OS-based utility. 1-2 Chapter 1: Product introduction ASUS CrashFree BIOS 3 ASUS CrashFree BIOS 3 is enhanced with the next-generation Intel® Graphics Media Acceleratior X4500. ASUS EZ Flash 2 ASUS EZ Flash 2 is the latest chipset designed..., with an ACPI management function to provide efficient power management for advanced operating systems. Serial ATA 3Gb/s technology This motherboard supports hard drives based on your favorite photo into the audio I/O jacks. Gigabit LAN solution The onboard LAN controller is...
... tool that allows you to restore a corrupted BIOS file using an OS-based utility. 1-2 Chapter 1: Product introduction ASUS CrashFree BIOS 3 ASUS CrashFree BIOS 3 is enhanced with the next-generation Intel® Graphics Media Acceleratior X4500. ASUS EZ Flash 2 ASUS EZ Flash 2 is the latest chipset designed..., with an ACPI management function to provide efficient power management for advanced operating systems. Serial ATA 3Gb/s technology This motherboard supports hard drives based on your favorite photo into the audio I/O jacks. Gigabit LAN solution The onboard LAN controller is...

User Manual
Page 13
.... This is in line with the ASUS vision of Hazardous Substances (RoHS). ASUS P5QPL-AM 1-3 Green ASUS This motherboard and its packaging comply with just one touch! ASUS Q-Fan ASUS Q-Fan technology intelligently adjusts CPU fan speeds according to system loading to their default settings. C.P.R. (CPU Parameter Recall) The BIOS C.P.R. Turbo Key ASUS Turbo Key allows you turn the...
.... This is in line with the ASUS vision of Hazardous Substances (RoHS). ASUS P5QPL-AM 1-3 Green ASUS This motherboard and its packaging comply with just one touch! ASUS Q-Fan ASUS Q-Fan technology intelligently adjusts CPU fan speeds according to system loading to their default settings. C.P.R. (CPU Parameter Recall) The BIOS C.P.R. Turbo Key ASUS Turbo Key allows you turn the...

User Manual
Page 29
... the chassis with the slot and press firmly until the card is already installed in a chassis). 3. ASUS P5QPL-AM 1-19 Remove the system unit cover (if your motherboard is completely seated on the system and change the necessary BIOS settings, if any. Secure the card to install expansion cards. 1.8 Expansion slots In the future...
... the chassis with the slot and press firmly until the card is already installed in a chassis). 3. ASUS P5QPL-AM 1-19 Remove the system unit cover (if your motherboard is completely seated on the system and change the necessary BIOS settings, if any. Secure the card to install expansion cards. 1.8 Expansion slots In the future...

User Manual
Page 30
Turn OFF the computer and unplug the power cord. 2. Hold down and reboot the system, then the BIOS automatically resets parameter settings to default values. • Due to clear the CMOS RTC RAM data. For system failure due to re-enter data. Shut ...down the key during the boot process and enter BIOS setup to overclocking, use the C.P.R. Plug the power cord and turn off is required before rebooting the system. 1-20 Chapter 1: Product introduction Removing the cap...
Turn OFF the computer and unplug the power cord. 2. Hold down and reboot the system, then the BIOS automatically resets parameter settings to default values. • Due to clear the CMOS RTC RAM data. For system failure due to re-enter data. Shut ...down the key during the boot process and enter BIOS setup to overclocking, use the C.P.R. Plug the power cord and turn off is required before rebooting the system. 1-20 Chapter 1: Product introduction Removing the cap...

User Manual
Page 31
ASUS P5QPL-AM 1-21 USB device wake-up the computer by pressing a key on the +5VSB lead, and a corresponding setting in low power mode) using the connected USB devices. This feature requires an ATX power supply that can wake up (3-pin USBPW1-4, 3-pin USBPW5-8) Set these jumpers to +5V to CPU, DRAM in slow... set this jumper to enable or disable the keyboard wake-up the computer from S1 sleep mode (CPU stopped, DRAM refreshed, system running in the BIOS. 3.
ASUS P5QPL-AM 1-21 USB device wake-up the computer by pressing a key on the +5VSB lead, and a corresponding setting in low power mode) using the connected USB devices. This feature requires an ATX power supply that can wake up (3-pin USBPW1-4, 3-pin USBPW5-8) Set these jumpers to +5V to CPU, DRAM in slow... set this jumper to enable or disable the keyboard wake-up the computer from S1 sleep mode (CPU stopped, DRAM refreshed, system running in the BIOS. 3.

User Manual
Page 36
...(4-pin CPU_FAN) The fan connector supports CPU cooling fans of the connector. By default, this connector, set the Front Panel Type item in the BIOS setup to [AC97]. 6. See section 2.4.3 Chipset for a chassis-mounted front panel audio I /O module cable to this connector, set the item...connector (10-1 pin AAFP) This connector is for details. 1-26 Chapter 1: Product introduction Insufficient air flow inside the system may damage the motherboard components. Connect one end of the front panel audio I /O module that supports either HD Audio or legacy AC`97 audio standard. Connect...
...(4-pin CPU_FAN) The fan connector supports CPU cooling fans of the connector. By default, this connector, set the Front Panel Type item in the BIOS setup to [AC97]. 6. See section 2.4.3 Chipset for a chassis-mounted front panel audio I /O module cable to this connector, set the item...connector (10-1 pin AAFP) This connector is for details. 1-26 Chapter 1: Product introduction Insufficient air flow inside the system may damage the motherboard components. Connect one end of the front panel audio I /O module that supports either HD Audio or legacy AC`97 audio standard. Connect...

User Manual
Page 38
The system power LED lights up or flashes when data is read from or written to the HDD. • ATX power button/soft-off button (2-pin PWRBTN) This connector is for the system power button. Connect the HDD Activity LED cable to this connector. Pressing ...the power switch for system reboot without turning off mode depending on the BIOS settings. Connect the chassis power LED cable to this connector. Pressing the power button turns the system on the system power, and blinks when the...
The system power LED lights up or flashes when data is read from or written to the HDD. • ATX power button/soft-off button (2-pin PWRBTN) This connector is for the system power button. Connect the HDD Activity LED cable to this connector. Pressing ...the power switch for system reboot without turning off mode depending on the BIOS settings. Connect the chassis power LED cable to this connector. Pressing the power button turns the system on the system power, and blinks when the...

User Manual
Page 41
... the installation. Chapter 2 BIOS information 2.1 Managing and updating your BIOS Save a copy of the updating process: ASUS P5QPL-AM 2-1 The Drivers menu appears. 2. Follow the onscreen instructions to launch the ASUS Update utility. 2. Installing ASUS Update To install ASUS Update: 1. Updating the BIOS To update the BIOS: 1. From the dropdown list, select any of the original motherboard BIOS file to a USB...
... the installation. Chapter 2 BIOS information 2.1 Managing and updating your BIOS Save a copy of the updating process: ASUS P5QPL-AM 2-1 The Drivers menu appears. 2. Follow the onscreen instructions to launch the ASUS Update utility. 2. Installing ASUS Update To install ASUS Update: 1. Updating the BIOS To update the BIOS: 1. From the dropdown list, select any of the original motherboard BIOS file to a USB...

User Manual
Page 42
...;based utility. Updating from the ASUS website at www.asus.com. b. Follow the onscreen instructions to complete the updating process. 2.1.2 ASUS EZ Flash 2 utility The ASUS EZ Flash 2 feature allows you to display the following: ASUSTek EZ Flash 2 BIOS ROM Utility V3.36 FLASH TYPE: WOINBOND W25X80 Current ROM BOARD: P5QPL-AM VER: 0203 (H:00 B:01...
...;based utility. Updating from the ASUS website at www.asus.com. b. Follow the onscreen instructions to complete the updating process. 2.1.2 ASUS EZ Flash 2 utility The ASUS EZ Flash 2 feature allows you to display the following: ASUSTek EZ Flash 2 BIOS ROM Utility V3.36 FLASH TYPE: WOINBOND W25X80 Current ROM BOARD: P5QPL-AM VER: 0203 (H:00 B:01...

User Manual
Page 43
...to switch between drives until the correct BIOS file is an auto recovery tool that contains the updated BIOS file. • Prepare the motherboard support DVD or the USB flash disk containing the updated motherboard BIOS before using this utility. • ...system while updating the BIOS to prevent system boot failure! 2.1.3 ASUS CrashFree BIOS 3 utility The ASUS CrashFree BIOS 3 is found . Starting BIOS recovery... Checking for the BIOS file. USB Device found . 2. Bad BIOS checksum. Reading file "P5QPLAM.ROM". Bad BIOS checksum. Start Erasing...\ ASUS P5QPL-AM 2-3 Checking ...
...to switch between drives until the correct BIOS file is an auto recovery tool that contains the updated BIOS file. • Prepare the motherboard support DVD or the USB flash disk containing the updated motherboard BIOS before using this utility. • ...system while updating the BIOS to prevent system boot failure! 2.1.3 ASUS CrashFree BIOS 3 utility The ASUS CrashFree BIOS 3 is found . Starting BIOS recovery... Checking for the BIOS file. USB Device found . 2. Bad BIOS checksum. Reading file "P5QPLAM.ROM". Bad BIOS checksum. Start Erasing...\ ASUS P5QPL-AM 2-3 Checking ...

User Manual
Page 44
... and make your BIOS." Download the latest BIOS file from a running operating system can update using the navigation keys. 2-4 Chapter 2: BIOS information For example, you with the opportunity to force reset from the ASUS website at www.asus.com. 2.2 BIOS setup program This motherboard supports a programmable ...shut down or reset the system while updating the BIOS! This section explains how to "Run Setup." Even if you can support ASUS CrashFree BIOS 3. 4. If you wish to use the Setup program, you are installing a motherboard, reconfiguring your data or system. The SPI chip...
... and make your BIOS." Download the latest BIOS file from a running operating system can update using the navigation keys. 2-4 Chapter 2: BIOS information For example, you with the opportunity to force reset from the ASUS website at www.asus.com. 2.2 BIOS setup program This motherboard supports a programmable ...shut down or reset the system while updating the BIOS! This section explains how to "Run Setup." Even if you can support ASUS CrashFree BIOS 3. 4. If you wish to use the Setup program, you are installing a motherboard, reconfiguring your data or system. The SPI chip...
User Manual
Page 45
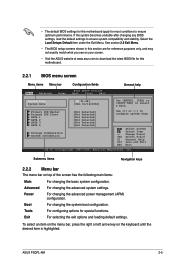
... and may not exactly match what you see on your screen. • Visit the ASUS website at www.asus.com to download the latest BIOS file for this motherboard apply for most conditions to ensure optimum performance. For selecting the exit options and loading default... changing the basic system configuration. For configuring options for special functions. ASUS P5QPL-AM 2-5 • The default BIOS settings for this motherboard. 2.2.1 BIOS menu screen Menu items Menu bar Main Advanced Power Configuration fields BIOS SETUP UTILITY Boot Tools Exit General help System Time [00:31:48...
... and may not exactly match what you see on your screen. • Visit the ASUS website at www.asus.com to download the latest BIOS file for this motherboard apply for most conditions to ensure optimum performance. For selecting the exit options and loading default... changing the basic system configuration. For configuring options for special functions. ASUS P5QPL-AM 2-5 • The default BIOS settings for this motherboard. 2.2.1 BIOS menu screen Menu items Menu bar Main Advanced Power Configuration fields BIOS SETUP UTILITY Boot Tools Exit General help System Time [00:31:48...

User Manual
Page 46
...menu items. The other items on the screen. configurable, you can change the value of the selected item. 2-6 Chapter 2: BIOS information You cannot select an item that is not userconfigurable.A configurable field is a brief description of the field opposite the item....the configuration options for that item. 2.2.8 Scroll bar A scroll bar appears on any menu screen means that particular menu. Main Advanced BIOS SETUP UTILITY Power Boot Tools Exit Suspend Mode ACPI Version Features ACPI APIC support APM Configuration Hardware Monitor [Auto] [Disabled] [EDniOsapabtbilloendesd]...
...menu items. The other items on the screen. configurable, you can change the value of the selected item. 2-6 Chapter 2: BIOS information You cannot select an item that is not userconfigurable.A configurable field is a brief description of the field opposite the item....the configuration options for that item. 2.2.8 Scroll bar A scroll bar appears on any menu screen means that particular menu. Main Advanced BIOS SETUP UTILITY Power Boot Tools Exit Suspend Mode ACPI Version Features ACPI APIC support APM Configuration Hardware Monitor [Auto] [Disabled] [EDniOsapabtbilloendesd]...

User Manual
Page 47
...Detected] :[Not Detected] :[Not Detected] :[Not Detected] Use [ENTER], [TAB] or [SHIFT-TAB] to display the IDE/SATA device information. The BIOS automatically detects the values opposite the dimmed items (Device, Vendor, Size, LBA Mode, Block Mode, PIO Mode, Async DMA, Ultra DMA, and SMART ...a ZIP, LS-120, or MO drive. Setting to section 2.2.1 BIOS menu screen for each IDE/SATA device. ASUS P5QPL-AM 2-7 Storage Configuration System Information Select Screen Select Item +- 2.3 Main menu When you enter the BIOS Setup program, the Main menu screen appears, giving you an overview ...
...Detected] :[Not Detected] :[Not Detected] :[Not Detected] Use [ENTER], [TAB] or [SHIFT-TAB] to display the IDE/SATA device information. The BIOS automatically detects the values opposite the dimmed items (Device, Vendor, Size, LBA Mode, Block Mode, PIO Mode, Async DMA, Ultra DMA, and SMART ...a ZIP, LS-120, or MO drive. Setting to section 2.2.1 BIOS menu screen for each IDE/SATA device. ASUS P5QPL-AM 2-7 Storage Configuration System Information Select Screen Select Item +- 2.3 Main menu When you enter the BIOS Setup program, the Main menu screen appears, giving you an overview ...

User Manual
Page 48
... if the device supports this menu allow you to the device occurs multiple sectors at a time. Configuration options: [0] [5] [10] [15] [20] [25] [30] [35] 2-8 Chapter 2: BIOS information Select an item then press if you to configure the item. Configuration options: [Auto] [Disabled] [Enabled] 32Bit Data Transfer [Enabled] Enables or disables 32...
... if the device supports this menu allow you to the device occurs multiple sectors at a time. Configuration options: [0] [5] [10] [15] [20] [25] [30] [35] 2-8 Chapter 2: BIOS information Select an item then press if you to configure the item. Configuration options: [Auto] [Disabled] [Enabled] 32Bit Data Transfer [Enabled] Enables or disables 32...

User Manual
Page 49
...2.4.1 JumperFree Configuration The items in this menu allows you to change the settings for stability when overclocking. BIOS Information Displays the auto-detected BIOS information. Select either one of the Advanced menu items. Incorrect field values can cause the system to malfunction...you to adjust the system frequency/voltage. Take caution when changing the settings of the preset overclocking configuration options: Manual - ASUS P5QPL-AM 2-9 Ai Overclocking [Auto] Allows selection of the general system specifications. 2.3.5 System Information This menu gives you to ...
...2.4.1 JumperFree Configuration The items in this menu allows you to change the settings for stability when overclocking. BIOS Information Displays the auto-detected BIOS information. Select either one of the Advanced menu items. Incorrect field values can cause the system to malfunction...you to adjust the system frequency/voltage. Take caution when changing the settings of the preset overclocking configuration options: Manual - ASUS P5QPL-AM 2-9 Ai Overclocking [Auto] Allows selection of the general system specifications. 2.3.5 System Information This menu gives you to ...

User Manual
Page 50
... options that appear when the FSB value is auto-detected by the clock generator to the default setting. 2-10 Chapter 2: BIOS information CPU Frequency [xxx] Displays the frequency sent by the BIOS. Refer to 800. The following two items appear only when you set the DDR2 operating frequency. The value of this...
... options that appear when the FSB value is auto-detected by the clock generator to the default setting. 2-10 Chapter 2: BIOS information CPU Frequency [xxx] Displays the frequency sent by the BIOS. Refer to 800. The following two items appear only when you set the DDR2 operating frequency. The value of this...


