P8H61-M LX R2 User's Manual
Page 2
... source code archives, etc. No part of this manual, including the products and software described in it shipped to the email address gpl@asus.com, stating the product and describing the problem (please DO NOT send large attachments such as the corresponding binary/object code. or (2) the serial number of the product for backup purposes, without the express written...
... source code archives, etc. No part of this manual, including the products and software described in it shipped to the email address gpl@asus.com, stating the product and describing the problem (please DO NOT send large attachments such as the corresponding binary/object code. or (2) the serial number of the product for backup purposes, without the express written...

P8H61-M LX R2 User's Manual
Page 3
... CPU heatsink and fan 1-7 1.3.3 Uninstalling the CPU heatsink and fan 1-8 1.4 System memory 1-9 1.4.1 Overview 1-9 1.4.2 Memory configurations 1-10 1.4.3 Installing a DIMM 1-17 1.4.4 Removing a DIMM 1-17 1.5 Expansion slots 1-18 1.5.1 Installing an expansion card 1-18 1.5.2 Configuring an expansion card 1-18 1.5.3 PCI slot 1-18 1.5.4 PCI Express x1 slot 1-18 1.5.5 PCI Express x16 slot 1-18 1.6 Jumpers 1-19 1.7 Connectors 1-20 1.7.1 Rear panel connectors 1-20 1.7.2 Internal connectors 1-21 1.8 Software support 1-27 1.8.1 Installing an operating system 1-27 1.8.2 Support DVD...
... CPU heatsink and fan 1-7 1.3.3 Uninstalling the CPU heatsink and fan 1-8 1.4 System memory 1-9 1.4.1 Overview 1-9 1.4.2 Memory configurations 1-10 1.4.3 Installing a DIMM 1-17 1.4.4 Removing a DIMM 1-17 1.5 Expansion slots 1-18 1.5.1 Installing an expansion card 1-18 1.5.2 Configuring an expansion card 1-18 1.5.3 PCI slot 1-18 1.5.4 PCI Express x1 slot 1-18 1.5.5 PCI Express x16 slot 1-18 1.6 Jumpers 1-19 1.7 Connectors 1-20 1.7.1 Rear panel connectors 1-20 1.7.2 Internal connectors 1-21 1.8 Software support 1-27 1.8.1 Installing an operating system 1-27 1.8.2 Support DVD...
P8H61-M LX R2 User's Manual
Page 9
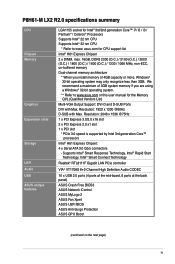
...ports at the back panel) ASUS Crash Free BIOS3 ASUS Network iControl ASUS MyLogo 2 ASUS Fan Xpert ASUS UEFI BIOS ASUS Anti-Surge Protection ASUS GPU Boost (continued on the next page) ix Resolution: 2048 x 1536 @75Hz 1 x PCI Express 3.0/2.0 x16 slot 2 x PCI Express 2.0 x1 slot 1 x PCI slot * PCIe 3.0 speed is supported by Intel 3rd generation Core™ processors Intel® H61 Express Chipset: 4 x Serial ATA 3.0 Gb/s connectors - Resolution: 1920 x 1200 @60Hz D-SUB with Max. P8H61-M LX2 R2.0 specifications summary CPU Chipset Memory Graphics Expansion slots Storage LAN Audio USB...
...ports at the back panel) ASUS Crash Free BIOS3 ASUS Network iControl ASUS MyLogo 2 ASUS Fan Xpert ASUS UEFI BIOS ASUS Anti-Surge Protection ASUS GPU Boost (continued on the next page) ix Resolution: 2048 x 1536 @75Hz 1 x PCI Express 3.0/2.0 x16 slot 2 x PCI Express 2.0 x1 slot 1 x PCI slot * PCIe 3.0 speed is supported by Intel 3rd generation Core™ processors Intel® H61 Express Chipset: 4 x Serial ATA 3.0 Gb/s connectors - Resolution: 1920 x 1200 @60Hz D-SUB with Max. P8H61-M LX2 R2.0 specifications summary CPU Chipset Memory Graphics Expansion slots Storage LAN Audio USB...
P8H61-M LX R2 User's Manual
Page 20
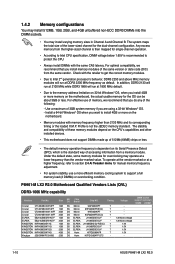
... overclocking may install varying memory sizes in Channel A and Channel B. Under the default state, some memory modules for single-channel operation. • According to Intel CPU specification, DIMM voltage below 1.65V is dependent on the motherboard. • Memory modules with the same CAS latency. Timing Voltage DIMM socket support (optional) 1DIMM 2DIMM Crucial CT12864BA1067.8FF 1GB SS Micron 9GF22D9KPT 7 - Crucial CT25672BA1067.18FF 2GB DS Micron 9GF22D9KPT(ECC) 7 - Install a 64-bit Windows...
... overclocking may install varying memory sizes in Channel A and Channel B. Under the default state, some memory modules for single-channel operation. • According to Intel CPU specification, DIMM voltage below 1.65V is dependent on the motherboard. • Memory modules with the same CAS latency. Timing Voltage DIMM socket support (optional) 1DIMM 2DIMM Crucial CT12864BA1067.8FF 1GB SS Micron 9GF22D9KPT 7 - Crucial CT25672BA1067.18FF 2GB DS Micron 9GF22D9KPT(ECC) 7 - Install a 64-bit Windows...
P8H61-M LX R2 User's Manual
Page 28
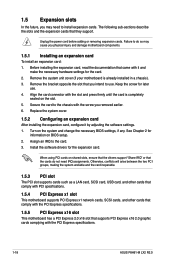
... cards. Turn on BIOS setup. 2. Install the software drivers for information on the system and change the necessary BIOS settings, if any. Failure to do not need to the chassis with the PCI Express specifications. 1-18 ASUS P8H61-M LX2 R2.0 Otherwise, conflicts will arise between the two PCI groups, making the system unstable and the card inoperable. 1.5.3 PCI slot The PCI slot supports cards such as a LAN card, SCSI card, USB card, and other cards that comply with PCI specifications. 1.5.4 PCI Express x1 slot This motherboard supports PCI Express x1 network cards, SCSI cards...
... cards. Turn on BIOS setup. 2. Install the software drivers for information on the system and change the necessary BIOS settings, if any. Failure to do not need to the chassis with the PCI Express specifications. 1-18 ASUS P8H61-M LX2 R2.0 Otherwise, conflicts will arise between the two PCI groups, making the system unstable and the card inoperable. 1.5.3 PCI slot The PCI slot supports cards such as a LAN card, SCSI card, USB card, and other cards that comply with PCI specifications. 1.5.4 PCI Express x1 slot This motherboard supports PCI Express x1 network cards, SCSI cards...

P8H61-M LX R2 User's Manual
Page 32
... power output when configuring a system with ATX 12 V Specification 2.0 (or later version) and provides a minimum power of the system chassis. Serial port connector (10-1 pin COM1) This connector is for ATX power supply plugs. Connect the serial port module cable to this connector, then install the module to a slot opening at http://support.asus. COM1 RXD DTR DSR CTS PIN 1 DCD TXD GND RTS RI P8H61-M LX2 R2.0 P8H61-M LX2 R2.0 Serial port (COM1) connector The COM module is inadequate. • If you use a power supply...
... power output when configuring a system with ATX 12 V Specification 2.0 (or later version) and provides a minimum power of the system chassis. Serial port connector (10-1 pin COM1) This connector is for ATX power supply plugs. Connect the serial port module cable to this connector, then install the module to a slot opening at http://support.asus. COM1 RXD DTR DSR CTS PIN 1 DCD TXD GND RTS RI P8H61-M LX2 R2.0 P8H61-M LX2 R2.0 Serial port (COM1) connector The COM module is inadequate. • If you use a power supply...

P8H61-M LX R2 User's Manual
Page 33
... P8H61-M LX2 R2.0 CHA_FAN GND +12V Rotation P8H61-M LX2 R2.0 CPU connectors Do not forget to connect the fan cables to the USB connectors. USB connectors (10-1 pin USB78, USB910) These connectors are not jumpers! Doing so will damage the motherboard! Do not place jumper caps on the motherboard, ensuring that supports up to the fan connectors on the fan connectors! CPU and chassis fan connectors (4-pin CPU_FAN, 3-pin CHA_FAN) Connect the fan cables to 480 Mbps connection speed. The CPU_FAN connector supports a CPU fan of maximum 2A (24 W) fan power...
... P8H61-M LX2 R2.0 CHA_FAN GND +12V Rotation P8H61-M LX2 R2.0 CPU connectors Do not forget to connect the fan cables to the USB connectors. USB connectors (10-1 pin USB78, USB910) These connectors are not jumpers! Doing so will damage the motherboard! Do not place jumper caps on the motherboard, ensuring that supports up to the fan connectors on the fan connectors! CPU and chassis fan connectors (4-pin CPU_FAN, 3-pin CHA_FAN) Connect the fan cables to 480 Mbps connection speed. The CPU_FAN connector supports a CPU fan of maximum 2A (24 W) fan power...

P8H61-M LX R2 User's Manual
Page 34
Under Windows® XP, there is no need to change the SATA type. • To configure the SATA type in the BIOS to a slot opening at the back of the system chassis. +5V SPDIFOUT GND P8H61-M LX2 R2.0 SPDIF_OUT P8H61-M LX2 R2.0 Digital audio connector The S/PDIF module is purchased separately. 1-24 ASUS P8H61-M LX2 R2.0 Connect the S/PDIF Out module cable to this connector, then install the module to [AHCI Mode]. Digital audio connector (4-1 pin SPDIF_OUT) This connector is...
Under Windows® XP, there is no need to change the SATA type. • To configure the SATA type in the BIOS to a slot opening at the back of the system chassis. +5V SPDIFOUT GND P8H61-M LX2 R2.0 SPDIF_OUT P8H61-M LX2 R2.0 Digital audio connector The S/PDIF module is purchased separately. 1-24 ASUS P8H61-M LX2 R2.0 Connect the S/PDIF Out module cable to this connector, then install the module to [AHCI Mode]. Digital audio connector (4-1 pin SPDIF_OUT) This connector is...

P8H61-M LX R2 User's Manual
Page 37
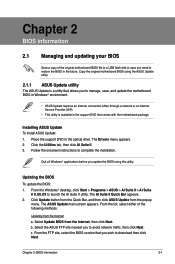
... your computer, browse the contents of the Support DVD are subject to change at www.asus.com for better compatibility and system stability. 1.8.2 Support DVD information The Support DVD that comes with the motherboard package contains the drivers, software applications, and utilities that you install Windows® XP Service Pack 3 or later versions / Windows® Vista Service Pack 1 or later versions before installing the drivers for updates. Double-click the ASSETUP.EXE to...
... your computer, browse the contents of the Support DVD are subject to change at www.asus.com for better compatibility and system stability. 1.8.2 Support DVD information The Support DVD that comes with the motherboard package contains the drivers, software applications, and utilities that you install Windows® XP Service Pack 3 or later versions / Windows® Vista Service Pack 1 or later versions before installing the drivers for updates. Double-click the ASSETUP.EXE to...
P8H61-M LX R2 User's Manual
Page 39
..., save, and update the motherboard BIOS in Windows® environment. • ASUS Update requires an Internet connection either of the original motherboard BIOS file to a USB flash disk in the future. b. Copy the original motherboard BIOS using the ASUS Update utility. 2.1.1 ASUS Update utility The ASUS Update is a utility that allows you to download then click Next. From the list, select either through a network or an Internet Service Provider (ISP). • This utility is available in the optical drive. c. Installing ASUS Update To install ASUS Update: 1. The...
..., save, and update the motherboard BIOS in Windows® environment. • ASUS Update requires an Internet connection either of the original motherboard BIOS file to a USB flash disk in the future. b. Copy the original motherboard BIOS using the ASUS Update utility. 2.1.1 ASUS Update utility The ASUS Update is a utility that allows you to download then click Next. From the list, select either through a network or an Internet Service Provider (ISP). • This utility is available in the optical drive. c. Installing ASUS Update To install ASUS Update: 1. The...
P8H61-M LX R2 User's Manual
Page 40
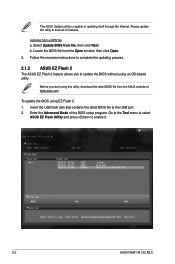
... BIOS using this utility, download the latest BIOS file from the Open window, then click Open. 3. Enter the Advanced Mode of updating itself through the Internet. Go to the Tool menu to select ASUS EZ Flash Utility and press to update the BIOS without using an OS‑based utility. Select Update BIOS from a BIOS file a. Follow the onscreen instructions to complete the updating process. 2.1.2 ASUS EZ Flash 2 The ASUS EZ Flash 2 feature allows you start using EZ Flash 2: 1. Insert the USB flash disk...
... BIOS using this utility, download the latest BIOS file from the Open window, then click Open. 3. Enter the Advanced Mode of updating itself through the Internet. Go to the Tool menu to select ASUS EZ Flash Utility and press to update the BIOS without using an OS‑based utility. Select Update BIOS from a BIOS file a. Follow the onscreen instructions to complete the updating process. 2.1.2 ASUS EZ Flash 2 The ASUS EZ Flash 2 feature allows you start using EZ Flash 2: 1. Insert the USB flash disk...

P8H61-M LX R2 User's Manual
Page 41
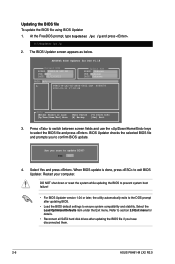
..., we recommend that contains the updated BIOS file. • Before using the motherboard support DVD or a USB flash drive that you to P8H61-M-LX2-R2-ASUS-0402.CAP. • The BIOS file in the removable device to restore the BIOS file when it fails or gets corrupted during the updating process. When found, the utility reads the BIOS file and enters ASUS EZ Flash 2 utility automatically. 4. You can cause system boot failure! Press the Up/Down arrow keys to load default BIOS values.
..., we recommend that contains the updated BIOS file. • Before using the motherboard support DVD or a USB flash drive that you to P8H61-M-LX2-R2-ASUS-0402.CAP. • The BIOS file in the removable device to restore the BIOS file when it fails or gets corrupted during the updating process. When found, the utility reads the BIOS file and enters ASUS EZ Flash 2 utility automatically. 4. You can cause system boot failure! Press the Up/Down arrow keys to load default BIOS values.
P8H61-M LX R2 User's Manual
Page 42
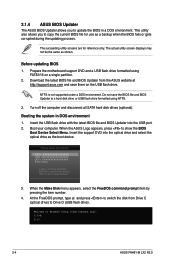
...Prepare the motherboard support DVD and a USB flash drive formatted using NTFS. 3. When the ASUS Logo appears, press to update the BIOS in DOS environment 1. NTFS is not supported under a DOS environment. C:\>d: D:\> 2-4 ASUS P8H61-M LX2 R2.0 2.1.4 ASUS BIOS Updater The ASUS BIOS Updater allows you to copy the current BIOS file for reference only. Boot your computer. Please select boot device: SATA: XXXXXXXXXXXXXXXX USB XXXXXXXXXXXXXXXXX UEFI: XXXXXXXXXXXXXXXX Enter Setup ↑ and ↓ to move selection ENTER to select boot device ESC to Drive D (USB flash drive). At...
...Prepare the motherboard support DVD and a USB flash drive formatted using NTFS. 3. When the ASUS Logo appears, press to update the BIOS in DOS environment 1. NTFS is not supported under a DOS environment. C:\>d: D:\> 2-4 ASUS P8H61-M LX2 R2.0 2.1.4 ASUS BIOS Updater The ASUS BIOS Updater allows you to copy the current BIOS file for reference only. Boot your computer. Please select boot device: SATA: XXXXXXXXXXXXXXXX USB XXXXXXXXXXXXXXXXX UEFI: XXXXXXXXXXXXXXXX Enter Setup ↑ and ↓ to move selection ENTER to select boot device ESC to Drive D (USB flash drive). At...
P8H61-M LX R2 User's Manual
Page 44
... SATA hard disk drives after updating BIOS. • Load the BIOS default settings to ensure system compatibility and stability. Press to switch between screen fields and use the keys to confirm BIOS update. Yes No 4. BIOS Updater checks the selected BIOS file and prompts you to select the BIOS file and press . When BIOS update is done, press to update BIOS? The BIOS Updater screen appears as below. Restart your computer. DO NOT shut down or reset the system while updating the BIOS...
... SATA hard disk drives after updating BIOS. • Load the BIOS default settings to ensure system compatibility and stability. Press to switch between screen fields and use the keys to confirm BIOS update. Yes No 4. BIOS Updater checks the selected BIOS file and prompts you to select the BIOS file and press . When BIOS update is done, press to update BIOS? The BIOS Updater screen appears as below. Restart your computer. DO NOT shut down or reset the system while updating the BIOS...

P8H61-M LX R2 User's Manual
Page 53
... value. Turbo Mode [Enabled] This item appears only when you to [Enabled]. Short Duration Power Limit [Auto] Use / to your CPU model. To restore the default setting, type [auto] using the keyboard and press . CPU Ratio [Auto] Allows you set both the Enhanced Intel® SpeedStep Technology and Turbo Mode items to manually adjust the maximum non-turbo CPU ratio. 2.4.3 OC Tuner OC Tuner automatically overclocks the frequency and voltage of CPU and DRAM for enhancing the...
... value. Turbo Mode [Enabled] This item appears only when you to [Enabled]. Short Duration Power Limit [Auto] Use / to your CPU model. To restore the default setting, type [auto] using the keyboard and press . CPU Ratio [Auto] Allows you set both the Enhanced Intel® SpeedStep Technology and Turbo Mode items to manually adjust the maximum non-turbo CPU ratio. 2.4.3 OC Tuner OC Tuner automatically overclocks the frequency and voltage of CPU and DRAM for enhancing the...

P8H61-M LX R2 User's Manual
Page 56
... State. [Disabled] Disables this function. 2-18 ASUS P8H61-M LX2 R2.0 Hardware Prefetcher [Enabled] [Enabled] Allows a hardware platform to run faster than marked frequency in order to virtually function as several systems. [Disabled] Disables this function. CPU C1E [Auto] [Enabled] Enables the C1E support function. CPU Power Management Configuration CPU Ratio [Auto] Allows you to set the Enhanced Intel SpeedStep Technology item to [Enabled] and allows you to enable or disable the Intel® Turbo Mode Technology. [Enabled] Allows processor cores to...
... State. [Disabled] Disables this function. 2-18 ASUS P8H61-M LX2 R2.0 Hardware Prefetcher [Enabled] [Enabled] Allows a hardware platform to run faster than marked frequency in order to virtually function as several systems. [Disabled] Disables this function. CPU C1E [Auto] [Enabled] Enables the C1E support function. CPU Power Management Configuration CPU Ratio [Auto] Allows you to set the Enhanced Intel SpeedStep Technology item to [Enabled] and allows you to enable or disable the Intel® Turbo Mode Technology. [Enabled] Allows processor cores to...

P8H61-M LX R2 User's Manual
Page 58
... Mode] Set to [AHCI Mode] when you want to use the AHCI (Advanced Host Controller Interface). Configuration options: [Enabled] [Disabled] Entry After [10 Minutes] This item appears only when you to internally optimize the order of SATA devices. Configuration options: [Enabled] [Disabled] Active Memory Threshold [x] This item appears only when you to enable or disable the Active Page Threshold Support. S.M.A.R.T. Configuration options: [Enabled] [Disabled] 2-20 ASUS P8H61-M LX2 R2.0 Status Check [Enabled] S.M.A.R.T. (Self-Monitoring, Analysis and Reporting Technology...
... Mode] Set to [AHCI Mode] when you want to use the AHCI (Advanced Host Controller Interface). Configuration options: [Enabled] [Disabled] Entry After [10 Minutes] This item appears only when you to internally optimize the order of SATA devices. Configuration options: [Enabled] [Disabled] Active Memory Threshold [x] This item appears only when you to enable or disable the Active Page Threshold Support. S.M.A.R.T. Configuration options: [Enabled] [Disabled] 2-20 ASUS P8H61-M LX2 R2.0 Status Check [Enabled] S.M.A.R.T. (Self-Monitoring, Analysis and Reporting Technology...

P8H61-M LX R2 User's Manual
Page 59
... Agent Configuration Memory Remap Feature [Enabled] [Enabled] Allow you to change the USB-related features. Please use as the primary boot device. Configuration options: [Auto] [Gen1] [Gen2] [Gen3] 2.5.5 USB Configuration The items in this function. And the memory size for add-on VGA devices. Configuration options: [Auto] [iGPU] [PCIE] [PCI] iGPU Memory [64M] Allows you to configure the PCIE X16 link speed. Chapter 2: BIOS information 2-21 • Due to H61 Chipset limitation, AHCI Mode only works on Windows® XP. • [IDE] is the default SATA type.
... Agent Configuration Memory Remap Feature [Enabled] [Enabled] Allow you to change the USB-related features. Please use as the primary boot device. Configuration options: [Auto] [Gen1] [Gen2] [Gen3] 2.5.5 USB Configuration The items in this function. And the memory size for add-on VGA devices. Configuration options: [Auto] [iGPU] [PCIE] [PCI] iGPU Memory [64M] Allows you to configure the PCIE X16 link speed. Chapter 2: BIOS information 2-21 • Due to H61 Chipset limitation, AHCI Mode only works on Windows® XP. • [IDE] is the default SATA type.

P8H61-M LX R2 User's Manual
Page 60
... you to set the front panel audio connector (AAFP) mode to legacy AC'97 or highdefinition audio depending on legacy operating systems (OS). [Disabled] The USB devices can be used only for operating systems without an EHCI hand‑off feature. [Disabled] Disables the function. 2.5.6 Onboard Devices Configuration HD Audio Controller [Enabled] [Enabled] Enables the High Definition Audio Controller. [Disabled] Disables the controller. Configuration options: [Enabled] [Disabled] Change Settings [IO=3F8h; Serial Port [Enabled] Allows you to enable or disable the serial port (COM...
... you to set the front panel audio connector (AAFP) mode to legacy AC'97 or highdefinition audio depending on legacy operating systems (OS). [Disabled] The USB devices can be used only for operating systems without an EHCI hand‑off feature. [Disabled] Disables the function. 2.5.6 Onboard Devices Configuration HD Audio Controller [Enabled] [Enabled] Enables the High Definition Audio Controller. [Disabled] Disables the controller. Configuration options: [Enabled] [Disabled] Change Settings [IO=3F8h; Serial Port [Enabled] Allows you to enable or disable the serial port (COM...

P8H61-M LX R2 User's Manual
Page 64
...;C to [Manual]. Chassis Lower Temperature [40] Displays the lower limit of the CPU temperature. The values range from 60% to 100%. The values range from 60% to 100%. Configuration options: [Disabled] [Enabled] 2-26 ASUS P8H61-M LX2 R2.0 Duty Cycle(%) [100] Use the and keys to disable or set the appropriate performance level of the chassis fan. [Standard] Sets to [Standard] to make the chassis fan automatically adjust depending on the chassis temperature. [Silent] Sets to...
...;C to [Manual]. Chassis Lower Temperature [40] Displays the lower limit of the CPU temperature. The values range from 60% to 100%. The values range from 60% to 100%. Configuration options: [Disabled] [Enabled] 2-26 ASUS P8H61-M LX2 R2.0 Duty Cycle(%) [100] Use the and keys to disable or set the appropriate performance level of the chassis fan. [Standard] Sets to [Standard] to make the chassis fan automatically adjust depending on the chassis temperature. [Silent] Sets to...


