
User Manual
Page 2
... THAT MAY APPEAR IN THIS MANUAL, INCLUDING THE PRODUCTS AND SOFTWARES DESCRIBED IN IT. Product Name: ASUS TX97 Manual Revision: 1.23 Release Date: August 1997 2 ASUS TX97 User's Manual The product name and revision number are represented by the third digit in the manual revision... number. For previous or updated manuals, BIOS, drivers, or product release information, contact ASUS at http://www.asus.com.tw or through any means...
... THAT MAY APPEAR IN THIS MANUAL, INCLUDING THE PRODUCTS AND SOFTWARES DESCRIBED IN IT. Product Name: ASUS TX97 Manual Revision: 1.23 Release Date: August 1997 2 ASUS TX97 User's Manual The product name and revision number are represented by the third digit in the manual revision... number. For previous or updated manuals, BIOS, drivers, or product release information, contact ASUS at http://www.asus.com.tw or through any means...
User Manual
Page 4
... ASUS TX97 Motherboard 8 Introduction to ASUS TX97 Series of motherboards 9 Parts of the ASUS TX97 Motherboard 12 Installation Steps 14 1. INSTALLATION 12 Map of the ASUS TX97 Motherboard 11 III. External Connectors 24 Power Connection Procedures 31 IV. BIOS Setup 35 Load Defaults 36 Standard CMOS Setup 36 Details of Standard CMOS Setup 36 BIOS Features Setup 39 Details of BIOS...
... ASUS TX97 Motherboard 8 Introduction to ASUS TX97 Series of motherboards 9 Parts of the ASUS TX97 Motherboard 12 Installation Steps 14 1. INSTALLATION 12 Map of the ASUS TX97 Motherboard 11 III. External Connectors 24 Power Connection Procedures 31 IV. BIOS Setup 35 Load Defaults 36 Standard CMOS Setup 36 Details of Standard CMOS Setup 36 BIOS Features Setup 39 Details of BIOS...

User Manual
Page 5
... of PNP and PCI Setup 48 Load BIOS Defaults 50 Load Setup Defaults 50 Supervisor Password and User Password 51 IDE HDD Auto Detection 52 Save & Exit Setup 53 Exit Without Saving 53 V. SUPPORT SOFTWARE 54 ASUS TX97 Motherboard Series Support CD 54 LANDesk Client ...Manager (LDCM 54 Desktop Management Interface (DMI 56 Introducing the ASUS DMI Configuration Utility 56 System Requirements 56 Using the ASUS DMI Configuration Utility 57 VI. ASUS PCI SCSI Cards 59 Symbios SCSI BIOS and Drivers 59 ASUS PCI-SC200...
... of PNP and PCI Setup 48 Load BIOS Defaults 50 Load Setup Defaults 50 Supervisor Password and User Password 51 IDE HDD Auto Detection 52 Save & Exit Setup 53 Exit Without Saving 53 V. SUPPORT SOFTWARE 54 ASUS TX97 Motherboard Series Support CD 54 LANDesk Client ...Manager (LDCM 54 Desktop Management Interface (DMI 56 Introducing the ASUS DMI Configuration Utility 56 System Requirements 56 Using the ASUS DMI Configuration Utility 57 VI. ASUS PCI SCSI Cards 59 Symbios SCSI BIOS and Drivers 59 ASUS PCI-SC200...

User Manual
Page 7
.... INTRODUCTION How this product III. Features: Information and specifications concerning this manual is organized This manual is complete. The ASUS TX97 motherboard 2 serial port ribbon cables attached to a mounting bracket 1 parallel ribbon cable with mounting bracket 1 IDE ribbon...(optional) ASUS TX97 User's Manual 7 I . Introduction: Manual information and checklist II. Support Software: Information on setting up the motherboard IV. If you discover damaged or missing items, please contact your package is divided into the following sections: I. BIOS Software: ...
.... INTRODUCTION How this product III. Features: Information and specifications concerning this manual is organized This manual is complete. The ASUS TX97 motherboard 2 serial port ribbon cables attached to a mounting bracket 1 parallel ribbon cable with mounting bracket 1 IDE ribbon...(optional) ASUS TX97 User's Manual 7 I . Introduction: Manual information and checklist II. Support Software: Information on setting up the motherboard IV. If you discover damaged or missing items, please contact your package is divided into the following sections: I. BIOS Software: ...

User Manual
Page 8
...; (PR75-133MHz). • Easy Installation: Is equipped with PCI Slot 4 for a standard individual infrared cable set to mount the connectors to support optional ASUS SCSI controller cards. 8 ASUS TX97 User's Manual BIOS now supports IDE CD-ROM or SCSI bootup. • Level 2 Cache: 512KB Pipelined Burst SRAM onboard. • Versatile Memory Support: Is equipped...
...; (PR75-133MHz). • Easy Installation: Is equipped with PCI Slot 4 for a standard individual infrared cable set to mount the connectors to support optional ASUS SCSI controller cards. 8 ASUS TX97 User's Manual BIOS now supports IDE CD-ROM or SCSI bootup. • Level 2 Cache: 512KB Pipelined Burst SRAM onboard. • Versatile Memory Support: Is equipped...

User Manual
Page 9
... of all the energy saving standards. ACPI provide more Energy Saving Features for RPM and failure. Both the BIOS and hardware levels of ASUS TX97 series of motherboards sup- The best of motherboards Performance: • SDRAM Optimized Performance - Each fan can be ready... alarm thresholds. • Temperature Monitoring and Alert - FEATURES Introduction to upgrade current hard drives or cables. • Concurrent PCI - ASUS TX97 series of motherboards meet PC '97 compliancy. Concurrent PCI allows multiple PCI transfers from 264MB/s max using EDO memory to 33MB/s. The ...
... of all the energy saving standards. ACPI provide more Energy Saving Features for RPM and failure. Both the BIOS and hardware levels of ASUS TX97 series of motherboards sup- The best of motherboards Performance: • SDRAM Optimized Performance - Each fan can be ready... alarm thresholds. • Temperature Monitoring and Alert - FEATURES Introduction to upgrade current hard drives or cables. • Concurrent PCI - ASUS TX97 series of motherboards meet PC '97 compliancy. Concurrent PCI allows multiple PCI transfers from 264MB/s max using EDO memory to 33MB/s. The ...

User Manual
Page 10
... - Normally, viruses can determine the stage the computer is in one of motherboards were designed to cooperate with BIOS, chipset, and flash EPROM to the user. 10 ASUS TX97 User's Manual Some new-generation viruses will warn the user before the system resources are monitored to ensure stable ...current to implement silent PC systems. • Dual Function Power Button (requires ATX power supply) - ASUS TX97 series of two states, one is Sleep mode and the other is pressed for more critical for less than 4 seconds, it enters the ...
... - Normally, viruses can determine the stage the computer is in one of motherboards were designed to cooperate with BIOS, chipset, and flash EPROM to the user. 10 ASUS TX97 User's Manual Some new-generation viruses will warn the user before the system resources are monitored to ensure stable ...current to implement silent PC systems. • Dual Function Power Button (requires ATX power supply) - ASUS TX97 series of two states, one is Sleep mode and the other is pressed for more critical for less than 4 seconds, it enters the ...

User Manual
Page 12
...BIOS Power) Intel PIIX4 PCIset Chasis Open Alarm Boot Block Write IDE LED Hardware Monitor RTC Clear BF0 BF1 VID2 VID1 VID0 Chassis Fan Freq. Ratio CPU Fan Vcore Voltage Infrared Switching Voltage Regulators CPU ZIF Socket 7 Heat Sensor Intel 430TX PCIset 512KB Pipelined Burst L2 Cache 12 ASUS TX97... User's Manual INSTALLATION (Map of the ASUS TX97 Motherboard Super Multi-I/O PS/2 Mouse, USB, IrDA Keyboard Serial Ports COM 1 COM 2 Parallel (...
...BIOS Power) Intel PIIX4 PCIset Chasis Open Alarm Boot Block Write IDE LED Hardware Monitor RTC Clear BF0 BF1 VID2 VID1 VID0 Chassis Fan Freq. Ratio CPU Fan Vcore Voltage Infrared Switching Voltage Regulators CPU ZIF Socket 7 Heat Sensor Intel 430TX PCIset 512KB Pipelined Burst L2 Cache 12 ASUS TX97... User's Manual INSTALLATION (Map of the ASUS TX97 Motherboard Super Multi-I/O PS/2 Mouse, USB, IrDA Keyboard Serial Ports COM 1 COM 2 Parallel (...

User Manual
Page 14
... instead of jumper caps to touch the IC chips, leads, or circuitry. 3. Install DRAM Modules 3. Jumpers Several hardware settings are separated from the system. 14 ASUS TX97 User's Manual The jumpers will also be described numerically such as for Short (On) and for our motherboards is written besides pin 1 on the inside... pad or on your computer, you work on the bag that both jumpers be sharing pins from other components against damage from yourself. Setup the BIOS Software 1.
... instead of jumper caps to touch the IC chips, leads, or circuitry. 3. Install DRAM Modules 3. Jumpers Several hardware settings are separated from the system. 14 ASUS TX97 User's Manual The jumpers will also be described numerically such as for Short (On) and for our motherboards is written besides pin 1 on the inside... pad or on your computer, you work on the bag that both jumpers be sharing pins from other components against damage from yourself. Setup the BIOS Software 1.

User Manual
Page 15
Flash ROM Boot Block Programming (BBLKW) This sets the operation mode of the boot block area of BIOS SOFTWARE or disable all Multi-I /O Setting (Enable / Disable) 2. III. Programming BBLKW Disabled [1-2] (Default) ...BIOS SOFTWARE. Onboard Multi-I/O Selection (SIO) You can selectively disable each onboard Multi-I/O item (floppy, serial, parallel, and IrDA) through Chipset Features Setup of the Programmable Flash ROM to use your own Multi-I/O card. INSTALLATION (Jumpers) R R BBLKW BBLKW Disabled/Protect (Default) Enabled Boot Block Programming (Disable / Enable) ASUS TX97...
Flash ROM Boot Block Programming (BBLKW) This sets the operation mode of the boot block area of BIOS SOFTWARE or disable all Multi-I /O Setting (Enable / Disable) 2. III. Programming BBLKW Disabled [1-2] (Default) ...BIOS SOFTWARE. Onboard Multi-I/O Selection (SIO) You can selectively disable each onboard Multi-I/O item (floppy, serial, parallel, and IrDA) through Chipset Features Setup of the Programmable Flash ROM to use your own Multi-I/O card. INSTALLATION (Jumpers) R R BBLKW BBLKW Disabled/Protect (Default) Enabled Boot Block Programming (Disable / Enable) ASUS TX97...
User Manual
Page 16
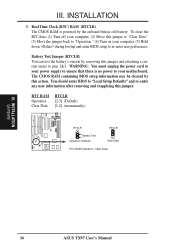
... your computer, (2) Move this jumper. INSTALLATION (Jumpers) 16 ASUS TX97 User's Manual Battery Test Jumper (RTCLR) You can test the battery's current by the onboard button cell battery. To clear the RTC data: (1) Turn off your power supply to pins 2&3. The CMOS RAM containing BIOS setup information may be cleared by this jumper...
... your computer, (2) Move this jumper. INSTALLATION (Jumpers) 16 ASUS TX97 User's Manual Battery Test Jumper (RTCLR) You can test the battery's current by the onboard button cell battery. To clear the RTC data: (1) Turn off your power supply to pins 2&3. The CMOS RAM containing BIOS setup information may be cleared by this jumper...

User Manual
Page 19
... cells, Socket 3 must be empty. System Memory (DIMM) This motherboard has three sockets to support 3.3Volt (power level) Unbuffered Synchronous DRAMs (SDRAM) DIMMs of the BIOS SOFTWARE. INSTALLATION (System Memory) ASUS TX97 User's Manual 19 INSTALLATION 2. Install memory in BIOS Chipset Setup of either 8, 16, or 32, 64, or 128MB. III.
... cells, Socket 3 must be empty. System Memory (DIMM) This motherboard has three sockets to support 3.3Volt (power level) Unbuffered Synchronous DRAMs (SDRAM) DIMMs of the BIOS SOFTWARE. INSTALLATION (System Memory) ASUS TX97 User's Manual 19 INSTALLATION 2. Install memory in BIOS Chipset Setup of either 8, 16, or 32, 64, or 128MB. III.

User Manual
Page 22
INSTALLATION (Expansion Cards) III. INSTALLATION 4. NOTE: PCI Slot 4 has a MediaBus extension which leaves 6 free for expansion cards. 22 ASUS TX97 User's Manual Secure the card on any necessary jumpers on the slot you intend to both . In an standard design there are 16 ... for your expansion card. 2. Set any hardware and software settings that you removed in use . sible future use an IRQ to use . 5. Setup the BIOS if necessary (such as "IRQ xx Used By ISA: Yes" in PNPAND PCI SETUP) 9. Assigning IRQs for your expansion card. Expansion Card Installation Procedure: ...
INSTALLATION (Expansion Cards) III. INSTALLATION 4. NOTE: PCI Slot 4 has a MediaBus extension which leaves 6 free for expansion cards. 22 ASUS TX97 User's Manual Secure the card on any necessary jumpers on the slot you intend to both . In an standard design there are 16 ... for your expansion card. 2. Set any hardware and software settings that you removed in use . sible future use an IRQ to use . 5. Setup the BIOS if necessary (such as "IRQ xx Used By ISA: Yes" in PNPAND PCI SETUP) 9. Assigning IRQs for your expansion card. Expansion Card Installation Procedure: ...
User Manual
Page 23
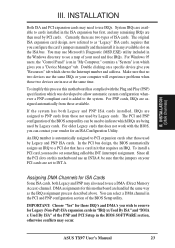
... are assigned to set to the system. For Windows 95 users, the "Control Panel" icon in the PCI and PNP configuration section of the BIOS Setup utility. DMA assignments for an ISA Configuration Utility. The original ISA expansion card design, now referred to as the IRQ assignment process described above...Non-PnP) ISA expansion cards in "IRQ xx Used By ISA" and "DMA x Used By ISA" of your computer will experience problems when those available. ASUS TX97 User's Manual 23 Since all the PCI slots on the ISA bus. System IRQs are available to see a map of the PNP and PCI Setup...
... are assigned to set to the system. For Windows 95 users, the "Control Panel" icon in the PCI and PNP configuration section of the BIOS Setup utility. DMA assignments for an ISA Configuration Utility. The original ISA expansion card design, now referred to as the IRQ assignment process described above...Non-PnP) ISA expansion cards in "IRQ xx Used By ISA" and "DMA x Used By ISA" of your computer will experience problems when those available. ASUS TX97 User's Manual 23 Since all the PCI slots on the ISA bus. System IRQs are available to see a map of the PNP and PCI Setup...

User Manual
Page 25
... can enable the parallel port and choose the IRQ through "Onboard Parallel Port" in Chipset Features of the BIOS SOFTWARE. (Pin 26 is removed to a free expansion slot opening . Onboard Serial Port Connectors ASUS TX97 User's Manual 25 III. NOTE: Serial printers must connect the included Parallel (25-Pin female) cable set from...
... can enable the parallel port and choose the IRQ through "Onboard Parallel Port" in Chipset Features of the BIOS SOFTWARE. (Pin 26 is removed to a free expansion slot opening . Onboard Serial Port Connectors ASUS TX97 User's Manual 25 III. NOTE: Serial printers must connect the included Parallel (25-Pin female) cable set from...
User Manual
Page 27
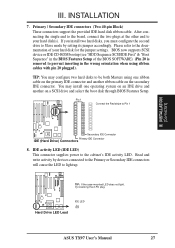
... ribbon cable on a SCSI drive and select the boot disk through BIOS Features Setup. INSTALLATION (Connectors) R R Secondary IDE Connector Primary IDE Connector IDE (Hard Drive) Connectors 8. Hard Drive LED Lead IDE LED + ASUS TX97 User's Manual 27 TIP: If the case-mounted LED does not light...IDE connector and another on the secondary IDE connector. IDE activity LED (IDE LED) This connector supplies power to the documentation of the BIOS SOFTWARE) (Pin 20 is removed to your hard disk for the jumper settings. III. INSTALLATION 7. Primary / Secondary IDE connectors (Two ...
... ribbon cable on a SCSI drive and select the boot disk through BIOS Features Setup. INSTALLATION (Connectors) R R Secondary IDE Connector Primary IDE Connector IDE (Hard Drive) Connectors 8. Hard Drive LED Lead IDE LED + ASUS TX97 User's Manual 27 TIP: If the case-mounted LED does not light...IDE connector and another on the secondary IDE connector. IDE activity LED (IDE LED) This connector supplies power to the documentation of the BIOS SOFTWARE) (Pin 20 is removed to your hard disk for the jumper settings. III. INSTALLATION 7. Primary / Secondary IDE connectors (Two ...

User Manual
Page 29
... a switch for more than 4 seconds will remain lit when there is no signal and blink when there is powered on the position of the BIOS SOFTWARE section should be controlled by settings in sleep mode. 15. III. INSTALLATION (Connectors) III. INSTALLATION 10. This 2-pin connector (see the... Power Supply + Adapter) The system power can be instantly decreased to prolong the life of the system's power. 13. System Panel Connectors ASUS TX97 User's Manual 29 Pushing the button once will always allow wakeup (the SMI lead cannot wake-up can be on the default setting of ...
... a switch for more than 4 seconds will remain lit when there is no signal and blink when there is powered on the position of the BIOS SOFTWARE section should be controlled by settings in sleep mode. 15. III. INSTALLATION (Connectors) III. INSTALLATION 10. This 2-pin connector (see the... Power Supply + Adapter) The system power can be instantly decreased to prolong the life of the system's power. 13. System Panel Connectors ASUS TX97 User's Manual 29 Pushing the button once will always allow wakeup (the SMI lead cannot wake-up can be on the default setting of ...
User Manual
Page 30
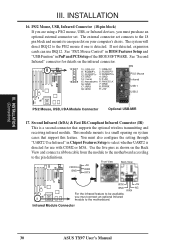
...can use with COM2 or IrDA. You must also configure the setting through "UART2 Use Infrared" in PnP and PCI Setup of the BIOS SOFTWARE. Use the five pins as shown on the Back View and connect a ribbon cable from the module to the motherboard according to ... & Fast IR-Compliant Infrared Connector (IR) This is detected. See "PS/2 Mouse Control" in BIOS Features Setup and "USB Funtion" in Chipset Features Setup to the pin definitions. Infrared Module Connector 30 ASUS TX97 User's Manual INSTALLATION 16. See "Second Infrared" connector for use IRQ12. FIRRX GND +5V IRRX ...
...can use with COM2 or IrDA. You must also configure the setting through "UART2 Use Infrared" in PnP and PCI Setup of the BIOS SOFTWARE. Use the five pins as shown on the Back View and connect a ribbon cable from the module to the motherboard according to ... & Fast IR-Compliant Infrared Connector (IR) This is detected. See "PS/2 Mouse Control" in BIOS Features Setup and "USB Funtion" in Chipset Features Setup to the pin definitions. Infrared Module Connector 30 ASUS TX97 User's Manual INSTALLATION 16. See "Second Infrared" connector for use IRQ12. FIRRX GND +5V IRRX ...

User Manual
Page 31
...95, click the Start button, click Shut Down, and then click Shut down your devices in the next section, BIOS SOFTWARE. * Powering Off your computer: You must first exit or shut down the computer?. Follow the instructions in...the chain) c. NOTE: The message "You can press the ATX power switch after exiting or shutting down to enter BIOS setup. Be sure that is pressed. The system will light. INSTALLATION (Power Connections) III. INSTALLATION Power Connection Procedures...your system user's manual. 4. If you need to your operating system. ASUS TX97 User's Manual 31
...95, click the Start button, click Shut Down, and then click Shut down your devices in the next section, BIOS SOFTWARE. * Powering Off your computer: You must first exit or shut down the computer?. Follow the instructions in...the chain) c. NOTE: The message "You can press the ATX power switch after exiting or shutting down to enter BIOS setup. Be sure that is pressed. The system will light. INSTALLATION (Power Connections) III. INSTALLATION Power Connection Procedures...your system user's manual. 4. If you need to your operating system. ASUS TX97 User's Manual 31
User Manual
Page 32
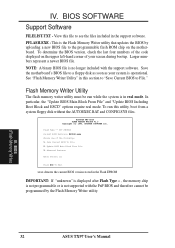
...BIOS (Flash Memory Writer) 32 ASUS TX97 User's Manual This is the Flash Memory Writer utility that updates the BIOS by the Flash Memory Writer utility. To determine the BIOS version, check the last four numbers of the code displayed on the motherboard. Larger numbers represent a newer BIOS file. ASUSTeK PNP BIOS..."unknown" is displayed after Flash Type -- , the memory chip is not programmable or is operational. Save Current BIOS To File 2. IV. IV. BIOS SOFTWARE Support Software FILELIST.TXT - PFLASH.EXE - Flash Memory Writer Utility The flash memory writer utility must be ...
...BIOS (Flash Memory Writer) 32 ASUS TX97 User's Manual This is the Flash Memory Writer utility that updates the BIOS by the Flash Memory Writer utility. To determine the BIOS version, check the last four numbers of the code displayed on the motherboard. Larger numbers represent a newer BIOS file. ASUSTeK PNP BIOS..."unknown" is displayed after Flash Type -- , the memory chip is not programmable or is operational. Save Current BIOS To File 2. IV. IV. BIOS SOFTWARE Support Software FILELIST.TXT - PFLASH.EXE - Flash Memory Writer Utility The flash memory writer utility must be ...


