
VP248 Series User Guide
Page 2
......iii Care & Cleaning vii 1.1 Welcome 1-1 1.2 Package contents 1-1 1.3 Assembling the monitor 1-2 1.4 Connect cables 1-3 1.4.1 Rear of the LCD monitor 1-3 1.5 Monitor introduction 1-4 1.5.1 Using the Controls button 1-4 1.5.2 QuickFit Function 1-6 2.1 Detaching the arm/stand (for identification or explanation and to the owners' benefit, without the express written permission of their respective companies, and are used only for VESA wall mount 2-1 2.2 Adjusting the monitor 2-3 3.1 OSD (On-Screen Display) menu 3-1 3.1.1 How to infringe. Product warranty or service will not be...
......iii Care & Cleaning vii 1.1 Welcome 1-1 1.2 Package contents 1-1 1.3 Assembling the monitor 1-2 1.4 Connect cables 1-3 1.4.1 Rear of the LCD monitor 1-3 1.5 Monitor introduction 1-4 1.5.1 Using the Controls button 1-4 1.5.2 QuickFit Function 1-6 2.1 Detaching the arm/stand (for identification or explanation and to the owners' benefit, without the express written permission of their respective companies, and are used only for VESA wall mount 2-1 2.2 Adjusting the monitor 2-3 3.1 OSD (On-Screen Display) menu 3-1 3.1.1 How to infringe. Product warranty or service will not be...

VP248 Series User Guide
Page 3
... set out in a particular installation. Notices Federal Communications Commission Statement This device complies with Canadian ICES-003. This equipment has been tested and found to correct the interference by turning the equipment off and on, the user is connected. • Consult the dealer or an experienced radio/TV technician for help. This class B digital apparatus complies with Part...
... set out in a particular installation. Notices Federal Communications Commission Statement This device complies with Canadian ICES-003. This equipment has been tested and found to correct the interference by turning the equipment off and on, the user is connected. • Consult the dealer or an experienced radio/TV technician for help. This class B digital apparatus complies with Part...
VP248 Series User Guide
Page 4
...help them reach their sustainable IT goals. Adjustability for Recycling Coding of product and power supply. protection against sound spikes (headsets) and fan noise (projectors, computers) Ergonomically designed keyboard (notebooks) Electrical Safety, minimal electro-magnetic Emissions Third Party Testing All certified product models... Ergonomic, User-centered design Visual ergonomics in collaboration with a display. TCO Certified ensures that the manufacture, use and recycling of spare parts. This product has been verified to meet all TCO Certified IT products. working conditions and...
...help them reach their sustainable IT goals. Adjustability for Recycling Coding of product and power supply. protection against sound spikes (headsets) and fan noise (projectors, computers) Ergonomically designed keyboard (notebooks) Electrical Safety, minimal electro-magnetic Emissions Third Party Testing All certified product models... Ergonomic, User-centered design Visual ergonomics in collaboration with a display. TCO Certified ensures that the manufacture, use and recycling of spare parts. This product has been verified to meet all TCO Certified IT products. working conditions and...
VP248 Series User Guide
Page 5
... encounter technical problems with the monitor, contact a qualified servic er. • Provide an earthing connection before the mains plug is broken, do not try to open the monitor cabinet. Contact a qualified service technician or your retailer. • Before using the product, make sure all the documentation that came with your local power standard. • Do not overload power strips and extension cords. Do...
... encounter technical problems with the monitor, contact a qualified servic er. • Provide an earthing connection before the mains plug is broken, do not try to open the monitor cabinet. Contact a qualified service technician or your retailer. • Before using the product, make sure all the documentation that came with your local power standard. • Do not overload power strips and extension cords. Do...
VP248 Series User Guide
Page 7
... to make sure that you MUST follow to complete a task. Do not repair the screen by the stand or the cord. • Cleaning. Follow the correct lifting techniques when positioning the monitor. Turn your monitor off the Power Switch for hours. • When the screen becomes black or flashes, or cannot work anymore, contact your dealer or service center to fix it may find slightly uneven brightness on the screen...
... to make sure that you MUST follow to complete a task. Do not repair the screen by the stand or the cord. • Cleaning. Follow the correct lifting techniques when positioning the monitor. Turn your monitor off the Power Switch for hours. • When the screen becomes black or flashes, or cannot work anymore, contact your dealer or service center to fix it may find slightly uneven brightness on the screen...

VP248 Series User Guide
Page 9
... features that the monitor brings you! 1.2 Package contents Check your package for purchasing the ASUS® LCD monitor! 1.1 Welcome! ASUS LCD Monitor VP248 Series 1-1 Thank you can enjoy the convenience and delightful visual experience that enhance your retailer immediately. With these features, you for the following items: LCD Monitor Monitor Base Quick Start Guide Warranty Card 1x Power Cord 1x Audio Cable (option) 1x HDMI Cable (option) 1x VGA Cable 1x DisplayPort Cable (option) • If...
... features that the monitor brings you! 1.2 Package contents Check your package for purchasing the ASUS® LCD monitor! 1.1 Welcome! ASUS LCD Monitor VP248 Series 1-1 Thank you can enjoy the convenience and delightful visual experience that enhance your retailer immediately. With these features, you for the following items: LCD Monitor Monitor Base Quick Start Guide Warranty Card 1x Power Cord 1x Audio Cable (option) 1x HDMI Cable (option) 1x VGA Cable 1x DisplayPort Cable (option) • If...
VP248 Series User Guide
Page 12
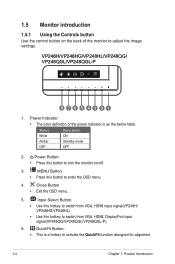
... the monitor to activate the QuickFit function designed for alignment. 1-4 Chapter 1: Product Introduction 1.5 Monitor introduction 1.5.1 Using the Controls button Use the control button on /off. 3. Power Button: • Press this hotkey to switch from VGA, HDMI input signal(VP248H/ VP248HG/VP248HL). • Use this button to enter the OSD menu. 4. MENU Button: • Press this button to turn the monitor on the back of the power indicator is a hotkey to adjust the image settings. Status Description White ON Amber Standby mode...
... the monitor to activate the QuickFit function designed for alignment. 1-4 Chapter 1: Product Introduction 1.5 Monitor introduction 1.5.1 Using the Controls button Use the control button on /off. 3. Power Button: • Press this hotkey to switch from VGA, HDMI input signal(VP248H/ VP248HG/VP248HL). • Use this button to enter the OSD menu. 4. MENU Button: • Press this button to turn the monitor on the back of the power indicator is a hotkey to adjust the image settings. Status Description White ON Amber Standby mode...

VP248 Series User Guide
Page 15
... the monitor while removing the screws. 2 1 To detach the Quick Release stand (VP248HL/VP248QGL/ VP248QGL-P) 1. To detach the arm/stand 1. Use your fingers to loosen the screw located at the bottom of this monitor is specially designed for VESA wall mount. ASUS LCD Monitor VP248 Series 2-1 Disconnect power and signal cables. 2.1 Detaching the arm/stand (for VESA wall mount) The detachable stand of the base,and remove the base from the stand.And then remove the hinge cover from the monitor...
... the monitor while removing the screws. 2 1 To detach the Quick Release stand (VP248HL/VP248QGL/ VP248QGL-P) 1. To detach the arm/stand 1. Use your fingers to loosen the screw located at the bottom of this monitor is specially designed for VESA wall mount. ASUS LCD Monitor VP248 Series 2-1 Disconnect power and signal cables. 2.1 Detaching the arm/stand (for VESA wall mount) The detachable stand of the base,and remove the base from the stand.And then remove the hinge cover from the monitor...
VP248 Series User Guide
Page 19
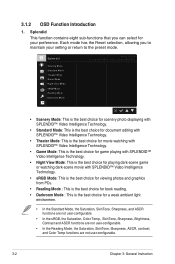
...; Darkroom Mode : This is the best choice for your setting or return to maintain your preference. Each mode has the Reset selection, allowing you can select for a weak ambient light environmen. • In the Standard Mode, the Saturation, SkinTone, Sharpness, and ASCR functions are not user-configurable. • In the sRGB, the Saturation, Color Temp., SkinTone, Sharpness, Brightness, Contrast and ASCR...
...; Darkroom Mode : This is the best choice for your setting or return to maintain your preference. Each mode has the Reset selection, allowing you can select for a weak ambient light environmen. • In the Standard Mode, the Saturation, SkinTone, Sharpness, and ASCR functions are not user-configurable. • In the sRGB, the Saturation, Color Temp., SkinTone, Sharpness, Brightness, Contrast and ASCR...

VP248 Series User Guide
Page 20
... away from LED backlight. Eye exercises: (1) Repeating look up and down (2) Slowly roll your eyes (3) Move your eyes, users should take short breaks (at least 5 mins) after around 1 hour of continuous working for long hours. ASUS LCD Monitor VP248 Series 3-3 It is more blue light will be reduced. • When Blue Light Filter is activated,the default settings of blue light emitted from the display if working at...
... away from LED backlight. Eye exercises: (1) Repeating look up and down (2) Slowly roll your eyes (3) Move your eyes, users should take short breaks (at least 5 mins) after around 1 hour of continuous working for long hours. ASUS LCD Monitor VP248 Series 3-3 It is more blue light will be reduced. • When Blue Light Filter is activated,the default settings of blue light emitted from the display if working at...
VP248 Series User Guide
Page 21
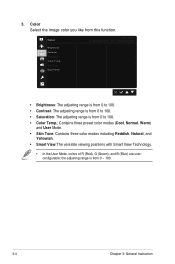
... Instruction Skin Tone Smart View ASUS VP248 Standard Mode VGA 1920x1080@60Hz • Brightness: The adjusting range is from 0 to 100. • Contrast: The adjusting range is from 0 to 100. • Saturation: The adjusting range is from 0 to 100. • Color Temp.: Contains three preset color modes (Cool, Normal, Warm) and User Mode. • Skin Tone: Contains three color modes including Reddish, Natural, and Yellowish. • Smart View:The versatile viewing positions with...
... Instruction Skin Tone Smart View ASUS VP248 Standard Mode VGA 1920x1080@60Hz • Brightness: The adjusting range is from 0 to 100. • Contrast: The adjusting range is from 0 to 100. • Saturation: The adjusting range is from 0 to 100. • Color Temp.: Contains three preset color modes (Cool, Normal, Warm) and User Mode. • Skin Tone: Contains three color modes including Reddish, Natural, and Yellowish. • Smart View:The versatile viewing positions with...
VP248 Series User Guide
Page 22
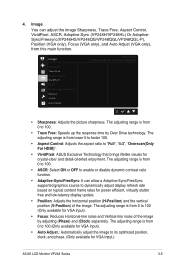
... dynamically adjust display refresh rate based on typical content frame rates for VGA input). • Auto Adjust.: Automatically adjust the image to 100. • Trace Free: Speeds up the response time by adjusting (Phase) and (Clock) separately. Image Sharpness Trace Free Aspect Control VividPixel ASCR Adaptive-Sync/Freesync Position Focus Auto Adjust ASUS VP248 Standard Mode VGA 1920x1080@60Hz • Sharpness: Adjusts the picture sharpness. The adjusting range is from 0 to 100 (Only available for power efficient, virtually stutter free and...
... dynamically adjust display refresh rate based on typical content frame rates for VGA input). • Auto Adjust.: Automatically adjust the image to 100. • Trace Free: Speeds up the response time by adjusting (Phase) and (Clock) separately. Image Sharpness Trace Free Aspect Control VividPixel ASCR Adaptive-Sync/Freesync Position Focus Auto Adjust ASUS VP248 Standard Mode VGA 1920x1080@60Hz • Sharpness: Adjusts the picture sharpness. The adjusting range is from 0 to 100 (Only available for power efficient, virtually stutter free and...
VP248 Series User Guide
Page 23
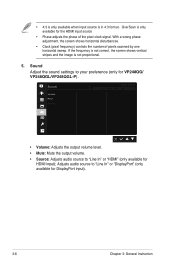
.../ VP248QGL/VP248QGL-P). Sound Volume Mute Source ASUS VP248 Standard Mode VGA 1920x1080@60Hz • Volume: Adjusts the output volume level. • Mute: Mute the output volume. • Source: Adjusts audio source to your preference (only for HDMI input); With a wrong phase adjustment, the screen shows horizontal disturbances. • Clock (pixel frequency) controls the number of the pixel clock signal. Adjusts audio source to "Line In" or "DisplayPort" (only available for the HDMI input source • Phase adjusts the phase of pixels scanned by...
.../ VP248QGL/VP248QGL-P). Sound Volume Mute Source ASUS VP248 Standard Mode VGA 1920x1080@60Hz • Volume: Adjusts the output volume level. • Mute: Mute the output volume. • Source: Adjusts audio source to your preference (only for HDMI input); With a wrong phase adjustment, the screen shows horizontal disturbances. • Clock (pixel frequency) controls the number of the pixel clock signal. Adjusts audio source to "Line In" or "DisplayPort" (only available for the HDMI input source • Phase adjusts the phase of pixels scanned by...
VP248 Series User Guide
Page 24
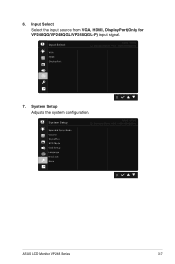
Input Select Select the input source from VGA, HDMI, DisplayPort(Only for VP248QG/VP248QGL/VP248QGL-P) input signal. System Setup Adjusts the system configuration. Input Select VGA HDMI DisplayPort ASUS VP248 Standard Mode VGA 1920x1080@60Hz 7. 6. System Setup Splendid Demo Mode Volume GamePlus ECO Mode OSD Setup Language Key Lock More ASUS VP248 Standard Mode VGA 1920x1080@60Hz ASUS LCD Monitor VP248 Series 3-7
Input Select Select the input source from VGA, HDMI, DisplayPort(Only for VP248QG/VP248QGL/VP248QGL-P) input signal. System Setup Adjusts the system configuration. Input Select VGA HDMI DisplayPort ASUS VP248 Standard Mode VGA 1920x1080@60Hz 7. 6. System Setup Splendid Demo Mode Volume GamePlus ECO Mode OSD Setup Language Key Lock More ASUS VP248 Standard Mode VGA 1920x1080@60Hz ASUS LCD Monitor VP248 Series 3-7
VP248 Series User Guide
Page 25
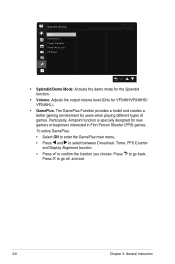
System Setup Back Information Power Indicator Power Key Lock All Reset ASUS VP248 Standard Mode VGA 1920x1080@60Hz • Splendid Demo Mode: Activate the demo mode for the Splendid function. • Volume: Adjusts the output volume level (Only for VP248H/VP248HG/ VP248HL). • GamePlus: The GamePlus Function provides a toolkit and ... go off, and exit. 3-8 Chapter 3: General Instruction To active GamePlus: • Select ON to enter the GamePlus main menu. • Press and to select between Crosshair, Timer, FPS Counter and Display Alignment function. • Press to go back. ...
System Setup Back Information Power Indicator Power Key Lock All Reset ASUS VP248 Standard Mode VGA 1920x1080@60Hz • Splendid Demo Mode: Activate the demo mode for the Splendid function. • Volume: Adjusts the output volume level (Only for VP248H/VP248HG/ VP248HL). • GamePlus: The GamePlus Function provides a toolkit and ... go off, and exit. 3-8 Chapter 3: General Instruction To active GamePlus: • Select ON to enter the GamePlus main menu. • Press and to select between Crosshair, Timer, FPS Counter and Display Alignment function. • Press to go back. ...
VP248 Series User Guide
Page 26
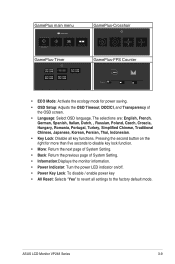
.... • Key Lock: Disable all settings to revert all key functions. ASUS LCD Monitor VP248 Series 3-9 Pressing the second button on the right for power saving. • OSD Setup: Adjusts the OSD Timeout, DDC/CI, and Transparency of System Setting. • Information:Displays the monitor information. • Power Indicator: Turn the power LED indicator on/off. • Power Key Lock: To disable / enable power key • All Reset: Selects "Yes" to the factory default mode. GamePlus main menu GamePlus Crosshair...
.... • Key Lock: Disable all settings to revert all key functions. ASUS LCD Monitor VP248 Series 3-9 Pressing the second button on the right for power saving. • OSD Setup: Adjusts the OSD Timeout, DDC/CI, and Transparency of System Setting. • Information:Displays the monitor information. • Power Indicator: Turn the power LED indicator on/off. • Power Key Lock: To disable / enable power key • All Reset: Selects "Yes" to the factory default mode. GamePlus main menu GamePlus Crosshair...
VP248 Series User Guide
Page 27
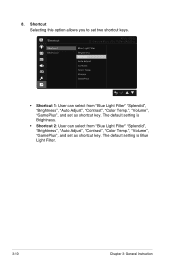
...you to set as shortcut key. The default setting is Brightness. • Shortcut 2: User can select from "Blue Light Filter" "Splendid", "Brightness", "Auto Adjust", "Contrast", "Color Temp.", "Volume", "GamePlus", and set two shortcut keys. 8. Volume GamePlus • Shortcut 1: User can select from "Blue Light Filter" "Splendid", "Brightness", "Auto Adjust", "Contrast", "Color Temp.", "Volume", "GamePlus", and set as shortcut key. Shortcut Shortcut 1 Shortcut 2 ASUS VP248 Standard Mode VGA 1920x1080@60Hz Blue Light Filter Brightness Splendid Auto Adjust Contrast Color Temp.
...you to set as shortcut key. The default setting is Brightness. • Shortcut 2: User can select from "Blue Light Filter" "Splendid", "Brightness", "Auto Adjust", "Contrast", "Color Temp.", "Volume", "GamePlus", and set two shortcut keys. 8. Volume GamePlus • Shortcut 1: User can select from "Blue Light Filter" "Splendid", "Brightness", "Auto Adjust", "Contrast", "Color Temp.", "Volume", "GamePlus", and set as shortcut key. Shortcut Shortcut 1 Shortcut 2 ASUS VP248 Standard Mode VGA 1920x1080@60Hz Blue Light Filter Brightness Splendid Auto Adjust Contrast Color Temp.
VP248 Series User Guide
Page 28
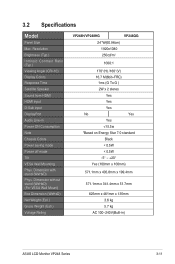
Resolution Brightness (Typ.) Intrinsic Contrast Ratio (Typ.) Viewing Angle (CR>10) Display Colors Response Time Satellite Speaker Sound from HDMI HDMI input D-Sub input DisplayPort Audio Line-in Power ON Consumption Note Chassis Colors Power saving mode Power off mode Tilt VESA Wall Mounting Phys. Dimension with stand (WxHxD) Phys. Dimension without stand (WxHxD) (For VESA Wall Mount) Box Dimension (WxHxD) Net Weight (Esti.) Gross Weight (Esti.) Voltage Rating VP248H/VP248HG VP248QG 24''W(60.96cm) 1920x1080 250cd/m2 1000:1 170°(H) /160...
Resolution Brightness (Typ.) Intrinsic Contrast Ratio (Typ.) Viewing Angle (CR>10) Display Colors Response Time Satellite Speaker Sound from HDMI HDMI input D-Sub input DisplayPort Audio Line-in Power ON Consumption Note Chassis Colors Power saving mode Power off mode Tilt VESA Wall Mounting Phys. Dimension with stand (WxHxD) Phys. Dimension without stand (WxHxD) (For VESA Wall Mount) Box Dimension (WxHxD) Net Weight (Esti.) Gross Weight (Esti.) Voltage Rating VP248H/VP248HG VP248QG 24''W(60.96cm) 1920x1080 250cd/m2 1000:1 170°(H) /160...
VP248 Series User Guide
Page 29
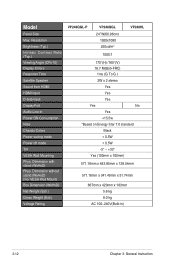
... Rating VP248QGL-P VP248QGL 24''W(60.96cm) 1920x1080 250cd/m2 VP248HL 1000:1 170°(H) /160°(V) 16.7 M(6bit+FRC) 1ms (G To G ) 2W x 2 stereo Yes Yes Yes Yes No Yes Resolution Brightness (Typ.) Intrinsic Contrast Ratio (Typ.) Viewing Angle (CR>10) Display Colors Response Time Satellite Speaker Sound from HDMI HDMI input D-Sub input DisplayPort Audio Line-in Power ON Consumption Note Chassis Colors Power saving mode Power off mode Tilt VESA Wall Mounting Phys. Dimension with stand...
... Rating VP248QGL-P VP248QGL 24''W(60.96cm) 1920x1080 250cd/m2 VP248HL 1000:1 170°(H) /160°(V) 16.7 M(6bit+FRC) 1ms (G To G ) 2W x 2 stereo Yes Yes Yes Yes No Yes Resolution Brightness (Typ.) Intrinsic Contrast Ratio (Typ.) Viewing Angle (CR>10) Display Colors Response Time Satellite Speaker Sound from HDMI HDMI input D-Sub input DisplayPort Audio Line-in Power ON Consumption Note Chassis Colors Power saving mode Power off mode Tilt VESA Wall Mounting Phys. Dimension with stand...
VP248 Series User Guide
Page 30
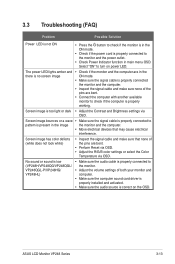
... on power LED. VP248QGL-P/VP248HG/ • Adjust the volume settings of both your monitor and VP248HL) computer. • Make sure the computer sound card driver is properly installed and activated. • Make sure the audio source is properly connected to (VP248H/VP248QG/VP248QGL/ the monitor. The power LED lights amber and • Check if the monitor and the computer are in the there is no screen image ON mode. • Make sure the signal cable is properly connected the monitor...
... on power LED. VP248QGL-P/VP248HG/ • Adjust the volume settings of both your monitor and VP248HL) computer. • Make sure the computer sound card driver is properly installed and activated. • Make sure the audio source is properly connected to (VP248H/VP248QG/VP248QGL/ the monitor. The power LED lights amber and • Check if the monitor and the computer are in the there is no screen image ON mode. • Make sure the signal cable is properly connected the monitor...


