
Owners Manual
Page 1
AVD300 SLOT-IN DVD Player Owner's Manual
AVD300 SLOT-IN DVD Player Owner's Manual
Owners Manual
Page 2
... designed to provide years of uninsulated 'dangerous voltage' within an equilateral triangle is intended to alert the user to operating the player and retain it for choosing the AVD300 DVD Player. The AVD300 is constructed to optimize the enjoyment of important operating and maintenance (servicing) instructions in the mobile environment. WARNING TO REDUCE THE RICK...
... designed to provide years of uninsulated 'dangerous voltage' within an equilateral triangle is intended to alert the user to operating the player and retain it for choosing the AVD300 DVD Player. The AVD300 is constructed to optimize the enjoyment of important operating and maintenance (servicing) instructions in the mobile environment. WARNING TO REDUCE THE RICK...
Owners Manual
Page 3
... at any solvents or cleaning materials (liquid, abrasive or aerosol). There is in need of repair. 3. DISASSEMBLE Do not attempt to the system. Clean the DVD player using only a lightly dampened lint free cloth to wipe the unit if it is unplugged from the power source. Do not place anything heavy on...
... at any solvents or cleaning materials (liquid, abrasive or aerosol). There is in need of repair. 3. DISASSEMBLE Do not attempt to the system. Clean the DVD player using only a lightly dampened lint free cloth to wipe the unit if it is unplugged from the power source. Do not place anything heavy on...

Owners Manual
Page 4
... or heat sources such as they may not be applied to avoid electric hazards. 6. Some playback operations of discs may condense inside the AVD300 and cause the DVD player to malfunction. DISC Do not use irregularly shaped discs such as heart or star-shaped discs as hot air ducts. Use only the supplied...
... or heat sources such as they may not be applied to avoid electric hazards. 6. Some playback operations of discs may condense inside the AVD300 and cause the DVD player to malfunction. DISC Do not use irregularly shaped discs such as heart or star-shaped discs as hot air ducts. Use only the supplied...
Owners Manual
Page 7
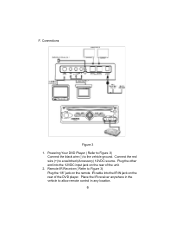
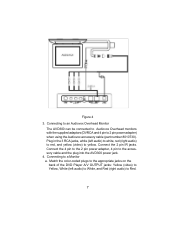
Connections Figure 3 1. Remote IR Receiver ( Refer to allow remote control in the vehicle to Figure 3) Plug the 1/8" jack on the remote IR cable into the 12VDC input jack on the rear of the unit. 2. Place the IR receiver anywhere in any location. 6 Plug the other end into the IR IN jack on the rear of the DVD player. Connect the red wire (+) to the vehicle ground. F. Powering Your DVD Player ( Refer to Figure 3) Connect the black wire (-) to a switched (Accessory) 12VDC source.
Connections Figure 3 1. Remote IR Receiver ( Refer to allow remote control in the vehicle to Figure 3) Plug the 1/8" jack on the remote IR cable into the 12VDC input jack on the rear of the unit. 2. Place the IR receiver anywhere in any location. 6 Plug the other end into the IR IN jack on the rear of the DVD player. Connect the red wire (+) to the vehicle ground. F. Powering Your DVD Player ( Refer to Figure 3) Connect the black wire (-) to a switched (Accessory) 12VDC source.
Owners Manual
Page 8
...2 pin power adapter) when using the Audiovox accessory cable (part number 8010730). Connecting to an Audiovox Overhead Monitor The AVD300 can be connected to Audiovox Overhead monitors with the supplied adaptors (DVRCA and 4 pin to the accessory cable and the plug into the AVD300 power jack. 4. Connecting to yellow. Plug... in the 3 RCA jacks, white (left audio) to White, and Red (right audio) to Red. 7 Connect the 2 pin IR jacks. Match the color-coded plugs to the appropriate jacks on the back of the DVD Player A/V OUTPUT ...
...2 pin power adapter) when using the Audiovox accessory cable (part number 8010730). Connecting to an Audiovox Overhead Monitor The AVD300 can be connected to Audiovox Overhead monitors with the supplied adaptors (DVRCA and 4 pin to the accessory cable and the plug into the AVD300 power jack. 4. Connecting to yellow. Plug... in the 3 RCA jacks, white (left audio) to White, and Red (right audio) to Red. 7 Connect the 2 pin IR jacks. Match the color-coded plugs to the appropriate jacks on the back of the DVD Player A/V OUTPUT ...
Owners Manual
Page 9
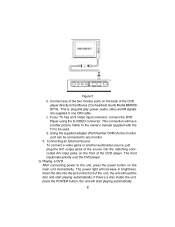
... (Part Number DVRCA) the monitor port can be used. Insert the disc into the matching colorcoded A/V input jacks on the front of the DVD player directly to the Movies 2 Go headrest hoods Model MMH56 B/T/G. Connecting an External Source To connect a video game or another audio/video source,...unit, press the POWER button, the unit will load the disc and start playing automatically. 8 The front inputs take priority over the DVD player. d. Playing a DVD After connecting power to any of the two monitor ports on the main unit momentarily. c. Refer to the owner's manual supplied with ...
... (Part Number DVRCA) the monitor port can be used. Insert the disc into the matching colorcoded A/V input jacks on the front of the DVD player directly to the Movies 2 Go headrest hoods Model MMH56 B/T/G. Connecting an External Source To connect a video game or another audio/video source,...unit, press the POWER button, the unit will load the disc and start playing automatically. 8 The front inputs take priority over the DVD player. d. Playing a DVD After connecting power to any of the two monitor ports on the main unit momentarily. c. Refer to the owner's manual supplied with ...
Owners Manual
Page 19
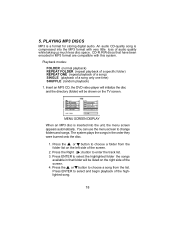
... the highlighted folder the songs available in that have been encoded in the order they were burned onto the disc. 1. Insert an MP3 CD, the DVD video player will initialize the disc and the directory (folder) will be shown on the TV screen. Press the or button to choose a song from the...
... the highlighted folder the songs available in that have been encoded in the order they were burned onto the disc. 1. Insert an MP3 CD, the DVD video player will initialize the disc and the directory (folder) will be shown on the TV screen. Press the or button to choose a song from the...


