
User Guide
Page 1
D1988PK PORTABLE 9" LCD MONITOR AND DVD PLAYER WITH BUILT-IN BATTERY
D1988PK PORTABLE 9" LCD MONITOR AND DVD PLAYER WITH BUILT-IN BATTERY

User Guide
Page 4
... until the moisture evaporates. 2. Caution Do not push objects of reliable, trouble-free service and is compact so that the 9" portable DVD player is brought directly from strong magnets, heat sources, direct sunlight, excessive dust. The unit also contains a 3 in using . Placement ...quick and easy installation. Please save this manual for choosing the D1988 portable DVD player. The main features include a 9" wide Screen (16:9 Aspect Ratio) Liquid Crystal Display (LCD) monitor and a DVD player. Installation Ensure that you can take it with the instructions and illustrations ...
... until the moisture evaporates. 2. Caution Do not push objects of reliable, trouble-free service and is compact so that the 9" portable DVD player is brought directly from strong magnets, heat sources, direct sunlight, excessive dust. The unit also contains a 3 in using . Placement ...quick and easy installation. Please save this manual for choosing the D1988 portable DVD player. The main features include a 9" wide Screen (16:9 Aspect Ratio) Liquid Crystal Display (LCD) monitor and a DVD player. Installation Ensure that you can take it with the instructions and illustrations ...
User Guide
Page 6
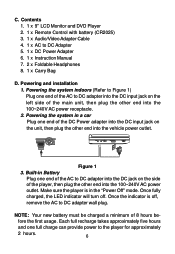
...charged, the LED indicator will turn off , remove the AC to DC adapter wall plug. Built-in Battery Plug one end of the player, then plug the other end into the 100~240V AC power receptacle. 2. NOTE: Your new battery must be charged a minimum of... AC power outlet. Powering and installation 1. fore the first usage. Contents 1. 1 x 9'' LCD Monitor and DVD Player 2. 1 x Remote Control with battery (CR2025) 3. 1 x Audio/Video Adapter Cable 4. 1 x AC to the player for approximately 2 hours. 6 Powering the system in the "Power Off" mode. Each full recharge takes approximately ...
...charged, the LED indicator will turn off , remove the AC to DC adapter wall plug. Built-in Battery Plug one end of the player, then plug the other end into the 100~240V AC power receptacle. 2. NOTE: Your new battery must be charged a minimum of... AC power outlet. Powering and installation 1. fore the first usage. Contents 1. 1 x 9'' LCD Monitor and DVD Player 2. 1 x Remote Control with battery (CR2025) 3. 1 x Audio/Video Adapter Cable 4. 1 x AC to the player for approximately 2 hours. 6 Powering the system in the "Power Off" mode. Each full recharge takes approximately ...

User Guide
Page 7
Unfold the carry bag, and place the DVD player on the bag beneath the elastic straps. Secure the lower portion of the carry bag to headrest support bars using the seat back strap. Adjust ... to Figure 3) Carry Bag Opened Carry Bag Closed Elastic Straps Vehicle Headrest Headrest Strap Vehicle Seat Back Seat Back Strap Figure 3 1). Vehicle Installation Installing the DVD Player onto the seat back in a car (Refer to the vehicle seat back using the headrest strap. Adjust the headrest strap until the bag is firmly...
Unfold the carry bag, and place the DVD player on the bag beneath the elastic straps. Secure the lower portion of the carry bag to headrest support bars using the seat back strap. Adjust ... to Figure 3) Carry Bag Opened Carry Bag Closed Elastic Straps Vehicle Headrest Headrest Strap Vehicle Seat Back Seat Back Strap Figure 3 1). Vehicle Installation Installing the DVD Player onto the seat back in a car (Refer to the vehicle seat back using the headrest strap. Adjust the headrest strap until the bag is firmly...

User Guide
Page 9
... Play/Pause Button Figure 4 F. c. To stop playing a disc, press STOP. Remote Control (Refer to adjust the LCD's brightness and the DVD player's volume. After connecting power to OFF. 9 Rotate BRIGHTNESS and VOLUME to Figure 4) 1) Setup Button 2) Up Button 3) Skip - To turn off the... DVD player, slide the POWER ON/OFF switch to the unit, power on the DVD player with label side facing up. Place a disc in the direction of the arrow. d. f. Close the tray by ...
... Play/Pause Button Figure 4 F. c. To stop playing a disc, press STOP. Remote Control (Refer to adjust the LCD's brightness and the DVD player's volume. After connecting power to OFF. 9 Rotate BRIGHTNESS and VOLUME to Figure 4) 1) Setup Button 2) Up Button 3) Skip - To turn off the... DVD player, slide the POWER ON/OFF switch to the unit, power on the DVD player with label side facing up. Place a disc in the direction of the arrow. d. f. Close the tray by ...

User Guide
Page 10
... Start Play/Execute item or setting Skip + NEXT Go to point B of the disc DISPLAY Display information (title, chapter, track, time, etc.). WIDE On the DVD player only: change between wide screen and 4:3 picture aspect ratio. 10 STOP Press once to stop and restart at the stop point Press twice to stop...
... Start Play/Execute item or setting Skip + NEXT Go to point B of the disc DISPLAY Display information (title, chapter, track, time, etc.). WIDE On the DVD player only: change between wide screen and 4:3 picture aspect ratio. 10 STOP Press once to stop and restart at the stop point Press twice to stop...

User Guide
Page 20
Connect one end of the audio/video cable's black (1/8" plug) plug into the unit's DVD AV jack and connect the other DVD using the AV adapter cable (white = left audio channel, red = right audio channel, yellow = video). Connecting Headphones Wired headphones may be used with the AV ... Switch to the AUDIO Output jacks on the right side of the audio/video cable's black (1/8" plug) plug into the unit's DVD AV jack and connect the other end to the "In" Position. Connect one end of the DVD player ( Refer to Figure 5) a. Set the AV In/Out Switch to the "Out" Position. M.
Connect one end of the audio/video cable's black (1/8" plug) plug into the unit's DVD AV jack and connect the other DVD using the AV adapter cable (white = left audio channel, red = right audio channel, yellow = video). Connecting Headphones Wired headphones may be used with the AV ... Switch to the AUDIO Output jacks on the right side of the audio/video cable's black (1/8" plug) plug into the unit's DVD AV jack and connect the other end to the "In" Position. Connect one end of the DVD player ( Refer to Figure 5) a. Set the AV In/Out Switch to the "Out" Position. M.
User Guide
Page 24
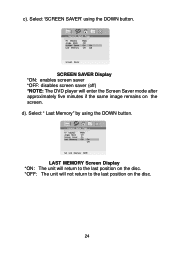
Select " Last Memory" by using the DOWN button. LAST MEMORY Screen Display *ON: The unit will return to the last position on the disc. *OFF: The unit will enter the Screen Saver mode after approximately five minutes if the same image remains on the disc. 24 d). SCREEN SAVER Display *ON: enables screen saver *OFF: disables screen saver (off) *NOTE: The DVD player will not return to the last position on the screen. Select 'SCREEN SAVER' using the DOWN button. c).
Select " Last Memory" by using the DOWN button. LAST MEMORY Screen Display *ON: The unit will return to the last position on the disc. *OFF: The unit will enter the Screen Saver mode after approximately five minutes if the same image remains on the disc. 24 d). SCREEN SAVER Display *ON: enables screen saver *OFF: disables screen saver (off) *NOTE: The DVD player will not return to the last position on the screen. Select 'SCREEN SAVER' using the DOWN button. c).
User Guide
Page 30
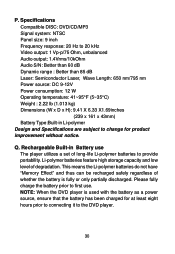
.../MP3 Signal system: NTSC Panel size: 9 inch Frequency response: 20 Hz to the DVD player. 30 Rechargeable Built-in Li-polymer Design and Specifications are subject to change for at least eight hours prior to connecting it to 20 kHz ... for product improvement without notice. Li-polymer batteries feature high storage capacity and low level of long-life Li-polymer batteries to first use The player utilizes a set of degradation. NOTE: When the DVD player is fully or only partially discharged. Q. P. Please fully charge the battery prior to provide portability.
.../MP3 Signal system: NTSC Panel size: 9 inch Frequency response: 20 Hz to the DVD player. 30 Rechargeable Built-in Li-polymer Design and Specifications are subject to change for at least eight hours prior to connecting it to 20 kHz ... for product improvement without notice. Li-polymer batteries feature high storage capacity and low level of long-life Li-polymer batteries to first use The player utilizes a set of degradation. NOTE: When the DVD player is fully or only partially discharged. Q. P. Please fully charge the battery prior to provide portability.
User Guide
Page 33
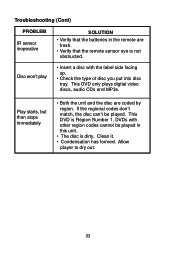
Allow player to dry out. 33 Clean it. • Condensation has formed. DVDs with the label side facing up. • Check the type of disc you put into disc tray. Play starts, but then stops immediately • Both ...the unit and the disc are fresh. • Verify that the batteries in this unit. • The disc is dirty. This DVD is Region Number 1. Troubleshooting (Cont) PROBLEM IR sensor inoperative SOLUTION • Verify that the remote sensor eye is not obstructed. If the regional codes don...
Allow player to dry out. 33 Clean it. • Condensation has formed. DVDs with the label side facing up. • Check the type of disc you put into disc tray. Play starts, but then stops immediately • Both ...the unit and the disc are fresh. • Verify that the batteries in this unit. • The disc is dirty. This DVD is Region Number 1. Troubleshooting (Cont) PROBLEM IR sensor inoperative SOLUTION • Verify that the remote sensor eye is not obstructed. If the regional codes don...


