User Guide
Page 4
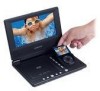
...Placement To prevent fire or electric shock, do not spill or spray liquid of reliable, trouble-free service, and is compact so that the 8" portable DVD player with the instructions and illustrations provided in a fire or electric shock). Installation Ensure that you in accordance with a dock for quick and easy installation....Please save this product prior to obtain the best equipment performance. B. The main features include a 8" Screen (16:9 Aspect Ratio) Liquid Crystal Display (LCD) monitor and a DVD player with this manual for choosing the D8000IP portable DVD player.
...Placement To prevent fire or electric shock, do not spill or spray liquid of reliable, trouble-free service, and is compact so that the 8" portable DVD player with the instructions and illustrations provided in a fire or electric shock). Installation Ensure that you in accordance with a dock for quick and easy installation....Please save this product prior to obtain the best equipment performance. B. The main features include a 8" Screen (16:9 Aspect Ratio) Liquid Crystal Display (LCD) monitor and a DVD player with this manual for choosing the D8000IP portable DVD player.
User Guide
Page 6
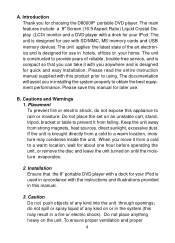
... the other end into the cigarette lighter socket. Figure 1 6 Powering the system in this unit C. DVD is region 1. Contents 1. 1 x 8'' LCD Monitor & DVD Player Combo with dock for the disc to Figure 1) Plug one end of the cigarette lighter adapter into the... 1 x 30 gigabyte iPod Adapter 8. 1 x Instruction Manual D. Powering and installation 1. Powering the system indoors (Refer to play . 7.Regional Coding Both the DVD player and disc are coded by region. These regional codes must match in order for iPod 2. 1 x Remote Control with other regional codes cannot be played in...
... the other end into the cigarette lighter socket. Figure 1 6 Powering the system in this unit C. DVD is region 1. Contents 1. 1 x 8'' LCD Monitor & DVD Player Combo with dock for the disc to Figure 1) Plug one end of the cigarette lighter adapter into the... 1 x 30 gigabyte iPod Adapter 8. 1 x Instruction Manual D. Powering and installation 1. Powering the system indoors (Refer to play . 7.Regional Coding Both the DVD player and disc are coded by region. These regional codes must match in order for iPod 2. 1 x Remote Control with other regional codes cannot be played in...
User Guide
Page 8
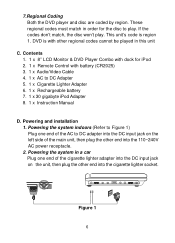
.... After connecting power to Figure 3) 1) Setup Button 2) Up Button 3) Skip- The power indicator will load the disc and start playing. Rotate VOLUME to adjust the DVD player's volume. e. b. d. 2. Open the disc tray by pressing the area marked "CLOSE" .The unit will light. Loading and Playing a Disc a. Button 4) Enter Button 5) Reverse/Left Keypad...
.... After connecting power to Figure 3) 1) Setup Button 2) Up Button 3) Skip- The power indicator will load the disc and start playing. Rotate VOLUME to adjust the DVD player's volume. e. b. d. 2. Open the disc tray by pressing the area marked "CLOSE" .The unit will light. Loading and Playing a Disc a. Button 4) Enter Button 5) Reverse/Left Keypad...
User Guide
Page 9
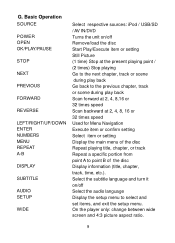
...off Select the audio language Display the setup menu to point B of the disc Display information (title, chapter, track, time, etc.). On the player only: change between wide screen and 4:3 picture aspect ratio. 9 G. Basic Operation SOURCE POWER OPEN OK/PLAY/PAUSE STOP NEXT PREVIOUS FORWARD REVERSE LEFT.../RIGHT/UP/DOWN ENTER NUMBERS MENU REPEAT A-B DISPLAY SUBTITLE AUDIO SETUP WIDE Select respective sources: iPod / USB/SD / AV IN/DVD Turns the unit on /off Remove/load the disc Start Play/Execute item or setting Still Picture (1 time) Stop at the present playing point...
...off Select the audio language Display the setup menu to point B of the disc Display information (title, chapter, track, time, etc.). On the player only: change between wide screen and 4:3 picture aspect ratio. 9 G. Basic Operation SOURCE POWER OPEN OK/PLAY/PAUSE STOP NEXT PREVIOUS FORWARD REVERSE LEFT.../RIGHT/UP/DOWN ENTER NUMBERS MENU REPEAT A-B DISPLAY SUBTITLE AUDIO SETUP WIDE Select respective sources: iPod / USB/SD / AV IN/DVD Turns the unit on /off Remove/load the disc Start Play/Execute item or setting Still Picture (1 time) Stop at the present playing point...
User Guide
Page 10
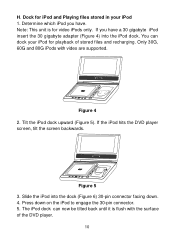
... connector facing down on the iPod to engage the 30-pin connector. 5. Figure 5 3. The iPod dock can dock your iPod 1. If the iPod hits the DVD player screen, tilt the screen backwards. Press down . 4. Tilt the iPod dock upward (Figure 5). Figure 4 2. H. Dock for video iPods only. Note: This unit is flush ...video are supported. You can now be tilted back until it is for iPod and Playing files stored in your iPod for playback of the DVD player. 10 Only 30G, 60G and 80G iPods with the surface of stored files and recharging. Slide the iPod into the iPod dock.
... connector facing down on the iPod to engage the 30-pin connector. 5. Figure 5 3. The iPod dock can dock your iPod 1. If the iPod hits the DVD player screen, tilt the screen backwards. Press down . 4. Tilt the iPod dock upward (Figure 5). Figure 4 2. H. Dock for video iPods only. Note: This unit is flush ...video are supported. You can now be tilted back until it is for iPod and Playing files stored in your iPod for playback of the DVD player. 10 Only 30G, 60G and 80G iPods with the surface of stored files and recharging. Slide the iPod into the iPod dock.
User Guide
Page 11
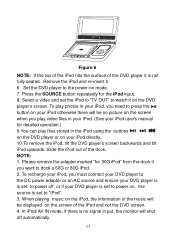
... a 60G or 80G iPod. 2. NOTE: 1. In iPod/ AV IN mode, if there is no signal in your iPod. (See your DVD player is not fully seated. Slide the iPod out of the DVD player it is set to "iPod". 3. Please remove the adapter marked "for detailed operation.) 9.You can play video files in put... the music will shut off or if your iPod user's manual for 30G iPod" from the dock if you need to the power-on the DVD player's screen. Remove the iPod and re-insert it on mode. 7. Press the SOURCE button repeatedly for the iPod input. 8. Figure 6 NOTE: If the top of...
... a 60G or 80G iPod. 2. NOTE: 1. In iPod/ AV IN mode, if there is no signal in your iPod. (See your DVD player is not fully seated. Slide the iPod out of the DVD player it is set to "iPod". 3. Please remove the adapter marked "for detailed operation.) 9.You can play video files in put... the music will shut off or if your iPod user's manual for 30G iPod" from the dock if you need to the power-on the DVD player's screen. Remove the iPod and re-insert it on mode. 7. Press the SOURCE button repeatedly for the iPod input. 8. Figure 6 NOTE: If the top of...
User Guide
Page 20
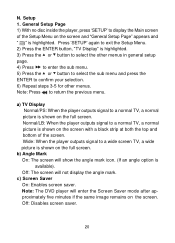
... a black strip at both the top and bottom of the Setup Menu on the full screen. Note: The DVD player will not display the angle mark. General Setup Page 1) With no disc inside the player, press 'SETUP' to a normal TV, a normal picture is highlighted. 3) Press the or button to select the... On: Enables screen saver. b) Angle Mark On: The screen will show the angle mark icon. (If an angle option is highlighted. Wide: When the player outputs signal to confirm your selection. 6) Repeat steps 3-5 for other menus in general setup page. 4) Press to enter the sub menu. 5) Press the ...
... a black strip at both the top and bottom of the Setup Menu on the full screen. Note: The DVD player will not display the angle mark. General Setup Page 1) With no disc inside the player, press 'SETUP' to a normal TV, a normal picture is highlighted. 3) Press the or button to select the... On: Enables screen saver. b) Angle Mark On: The screen will show the angle mark icon. (If an angle option is highlighted. Wide: When the player outputs signal to confirm your selection. 6) Repeat steps 3-5 for other menus in general setup page. 4) Press to enter the sub menu. 5) Press the ...
User Guide
Page 23
... recharged safely regardless of whether the battery is used with the battery as a power source, ensure that you plan not to the DVD player. Specifications Compatible DISC: DVD/CD/MP3 Signal system: NTSC Panel size: 8 inch Frequency response: 20 Hz to maintain the 23 Li-polymer batteries feature high ...eight hours prior to connecting it away properly. If you first fully charge the battery and store it to use . NOTE: When the DVD player is fully or only partially discharged. O. Please fully charge the battery prior to first use the battery for at least once every two ...
... recharged safely regardless of whether the battery is used with the battery as a power source, ensure that you plan not to the DVD player. Specifications Compatible DISC: DVD/CD/MP3 Signal system: NTSC Panel size: 8 inch Frequency response: 20 Hz to maintain the 23 Li-polymer batteries feature high ...eight hours prior to connecting it away properly. If you first fully charge the battery and store it to use . NOTE: When the DVD player is fully or only partially discharged. O. Please fully charge the battery prior to first use the battery for at least once every two ...
User Guide
Page 24
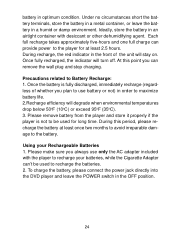
...related to recharge your Rechargeable Batteries 1. Once fully recharged, the indicator will stay on. Please remove battery from the player and store it properly if the player is fully discharged, immediately recharge (regardless of the unit will turn off. Using your batteries, while the Cigarette ...At this period, please recharge the battery at least 2.5 hours. To charge the battery, please connect the power jack directly into the DVD player and leave the POWER switch in a humid or damp environment. Under no circumstances short the battery terminals, store the battery in a...
...related to recharge your Rechargeable Batteries 1. Once fully recharged, the indicator will stay on. Please remove battery from the player and store it properly if the player is fully discharged, immediately recharge (regardless of the unit will turn off. Using your batteries, while the Cigarette ...At this period, please recharge the battery at least 2.5 hours. To charge the battery, please connect the power jack directly into the DVD player and leave the POWER switch in a humid or damp environment. Under no circumstances short the battery terminals, store the battery in a...
User Guide
Page 25
...: 1. The lock position is in "Power Off" mode. 2. Removing the DVD Player Battery 25 The unit will fit snugly to the player. Press the release button on the side of the rear flank. First, make sure the player is indicated by a click. Pull the battery out of battery. 3. Installing ...the Battery Pack: 1. First, make sure the player is in "Power Off" mode and that the AC power supply has been disconnected. ...
...: 1. The lock position is in "Power Off" mode. 2. Removing the DVD Player Battery 25 The unit will fit snugly to the player. Press the release button on the side of the rear flank. First, make sure the player is indicated by a click. Pull the battery out of battery. 3. Installing ...the Battery Pack: 1. First, make sure the player is in "Power Off" mode and that the AC power supply has been disconnected. ...
User Guide
Page 27
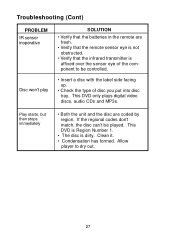
... • The disc is affixed over the sensor eye of disc you put into disc tray. Clean it. • Condensation has formed. Allow player to be played. Troubleshooting (Cont) PROBLEM IR sensor inoperative Disc won't play SOLUTION • Verify that the batteries in the remote are coded by ...region. This DVD only plays digital video discs, audio CDs and MP3s. Play starts, but then stops immediately • Both the unit and the disc are fresh...
... • The disc is affixed over the sensor eye of disc you put into disc tray. Clean it. • Condensation has formed. Allow player to be played. Troubleshooting (Cont) PROBLEM IR sensor inoperative Disc won't play SOLUTION • Verify that the batteries in the remote are coded by ...region. This DVD only plays digital video discs, audio CDs and MP3s. Play starts, but then stops immediately • Both the unit and the disc are fresh...


