User Guide
Page 6
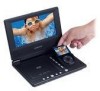
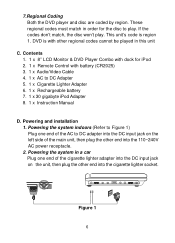
...the 110~240V AC power receptacle. 2. DVD is region 1. Powering and installation 1. Powering the system in a car Plug one end of the main unit, then plug the other regional codes cannot be played in order for iPod 2. 1 x Remote Control with other end into the DC input ...jack on the unit, then plug the other end into the cigarette lighter socket. Contents 1. 1 x 8'' LCD Monitor & DVD Player Combo with dock for the disc to DC Adapter 5. 1 x Cigarette Lighter ...
...the 110~240V AC power receptacle. 2. DVD is region 1. Powering and installation 1. Powering the system in a car Plug one end of the main unit, then plug the other regional codes cannot be played in order for iPod 2. 1 x Remote Control with other end into the DC input ...jack on the unit, then plug the other end into the cigarette lighter socket. Contents 1. 1 x 8'' LCD Monitor & DVD Player Combo with dock for the disc to DC Adapter 5. 1 x Cigarette Lighter ...
User Guide
Page 7
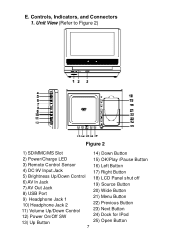
E. Controls, Indicators, and Connectors 1. Unit View (Refer to Figure 2) Figure 2 1) SD/MMC/MS Slot 2) Power/Charge LED 3) Remote Control Sensor 4) DC 9V Input Jack 5) Brightness Up/Down Control 6) AV In Jack 7) AV Out Jack 8) USB Port 9) Headphone Jack 1 10) Headphone Jack 2 11) Volume Up/Down Control 12) Power On/Off SW 13) Up Button 7 14) Down Button 15) OK/Play /Pause Button 16) Left Button 17) Right Button 18) LCD Panel shut off 19) Source Button 20) Wide Button 21) Menu Button 22) Previous Button 23) Next Button 24) Dock for IPod 25) Open Button
E. Controls, Indicators, and Connectors 1. Unit View (Refer to Figure 2) Figure 2 1) SD/MMC/MS Slot 2) Power/Charge LED 3) Remote Control Sensor 4) DC 9V Input Jack 5) Brightness Up/Down Control 6) AV In Jack 7) AV Out Jack 8) USB Port 9) Headphone Jack 1 10) Headphone Jack 2 11) Volume Up/Down Control 12) Power On/Off SW 13) Up Button 7 14) Down Button 15) OK/Play /Pause Button 16) Left Button 17) Right Button 18) LCD Panel shut off 19) Source Button 20) Wide Button 21) Menu Button 22) Previous Button 23) Next Button 24) Dock for IPod 25) Open Button
User Guide
Page 8
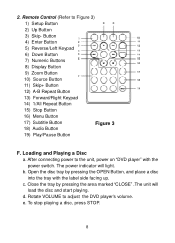
... to Figure 3) 1) Setup Button 2) Up Button 3) Skip- c. Close the tray by pressing the OPEN Button, and place a disc into the tray with the power switch. e. Remote Control (Refer to adjust the DVD player's volume. After connecting power to the unit, power on "DVD player" with the label side facing up. d. b.
... to Figure 3) 1) Setup Button 2) Up Button 3) Skip- c. Close the tray by pressing the OPEN Button, and place a disc into the tray with the power switch. e. Remote Control (Refer to adjust the DVD player's volume. After connecting power to the unit, power on "DVD player" with the label side facing up. d. b.
User Guide
Page 19
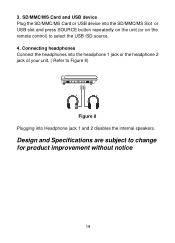
Connecting headphones Connect the headphones into the headphone 1 jack or the headphone 2 jack of your unit. ( Refer to Figure 8) * * Figure 8 Plugging into the SD/MMC/MS Slot or USB slot and press SOURCE button repeatedly on the unit (or on the remote control) to change for product improvement without notice 19 SD/MMC/MS Card and USB device Plug the SD/MMC/MS Card or USB device into Headphone jack 1 and 2 disables the internal speakers. Design and Specifications are subject to select the USB /SD source. 4. 3.
Connecting headphones Connect the headphones into the headphone 1 jack or the headphone 2 jack of your unit. ( Refer to Figure 8) * * Figure 8 Plugging into the SD/MMC/MS Slot or USB slot and press SOURCE button repeatedly on the unit (or on the remote control) to change for product improvement without notice 19 SD/MMC/MS Card and USB device Plug the SD/MMC/MS Card or USB device into Headphone jack 1 and 2 disables the internal speakers. Design and Specifications are subject to select the USB /SD source. 4. 3.
User Guide
Page 27
...Both the unit and the disc are fresh. • Verify that the remote sensor eye is not obstructed. • Verify that the infrared transmitter is dirty. Allow player to be played. If the regional codes don't match, the disc can't be controlled. • Insert a disc with the label side facing up. &#...8226; Check the type of the component to dry out. 27 This DVD only plays digital video discs, audio CDs and MP3s. This DVD is Region Number 1. • The disc is affixed...
...Both the unit and the disc are fresh. • Verify that the remote sensor eye is not obstructed. • Verify that the infrared transmitter is dirty. Allow player to be played. If the regional codes don't match, the disc can't be controlled. • Insert a disc with the label side facing up. &#...8226; Check the type of the component to dry out. 27 This DVD only plays digital video discs, audio CDs and MP3s. This DVD is Region Number 1. • The disc is affixed...


