Owners Manual
Page 2
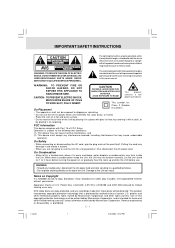
... symbol for home and other rights owners. Apparatus Claims of FCC Rules. DVD video discs are not going to use . Use of this owner manual. Damage to copy, broadcast, show, broadcast on Copyright It is forbidden by law to the Unit can result. This product incorporates copyright protection technology that is protected by Macrovision Corporation. IMPORTANT SAFETY INSTRUCTIONS WCAAURTNIIONNG The lightning flash with...
... symbol for home and other rights owners. Apparatus Claims of FCC Rules. DVD video discs are not going to use . Use of this owner manual. Damage to copy, broadcast, show, broadcast on Copyright It is forbidden by law to the Unit can result. This product incorporates copyright protection technology that is protected by Macrovision Corporation. IMPORTANT SAFETY INSTRUCTIONS WCAAURTNIIONNG The lightning flash with...

Owners Manual
Page 3
... performance; Grounding or Polarization - Power-Cord Protection - The appliance should be connected to . 4. Outdoor Antenna Grounding - The power cord of air through openings. 18. The appliance should be moved with a cart or stand that may block the ventilation openings; Quick stops, excessive force, and uneven surfaces may impede the flow of the appliance should be used near a swimming pool, and the...
... performance; Grounding or Polarization - Power-Cord Protection - The appliance should be connected to . 4. Outdoor Antenna Grounding - The power cord of air through openings. 18. The appliance should be moved with a cart or stand that may block the ventilation openings; Quick stops, excessive force, and uneven surfaces may impede the flow of the appliance should be used near a swimming pool, and the...
Owners Manual
Page 4
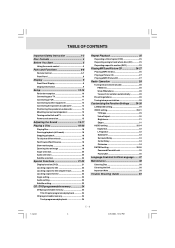
... Safety Instruction 1-2 Disc Formats 4 Before You Start 5 Using the remote control 5 Parts and Functions 6-8 Remote Control 6-7 Front Panel 8 Display 9 Front Panel Display 9 Display Information 9 Setup 10-15 For better reception 10 Connecting your TV 10 Connecting a VCR 11 Connecting to other equipment 12 Connecting the speakers & subwoofer 13 Positioning the speakers & subwoofer 14 Mounting rear surround speakers 15 Turning on the Unit and TV 15 Power cord connection 15 Adjusting the Sound 16-17 Playing a Disc 18-20 Playing Disc 18 Pausing playback (still mode 18...
... Safety Instruction 1-2 Disc Formats 4 Before You Start 5 Using the remote control 5 Parts and Functions 6-8 Remote Control 6-7 Front Panel 8 Display 9 Front Panel Display 9 Display Information 9 Setup 10-15 For better reception 10 Connecting your TV 10 Connecting a VCR 11 Connecting to other equipment 12 Connecting the speakers & subwoofer 13 Positioning the speakers & subwoofer 14 Mounting rear surround speakers 15 Turning on the Unit and TV 15 Power cord connection 15 Adjusting the Sound 16-17 Playing a Disc 18-20 Playing Disc 18 Pausing playback (still mode 18...
Owners Manual
Page 7
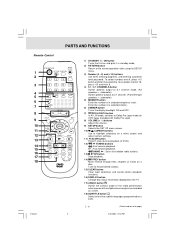
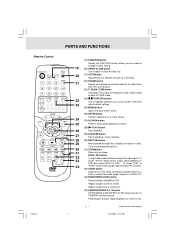
... on a disc. PARTS AND FUNCTIONS Remote Control STANDBY/ON OPEN/ CLOSE 1 RETURN FUNCTION 2 GOTO 3 4 5 6 7 8 9 10 11 12 13 14 15 16 17 18 MEMORY DIMMER PRO LOGIC II P. To select numbers over 9, press +10 button and then the second no. SCAN/ CVBS SOUND VOLUME SETUP MENU SLOW ENTER SLOW STOP PLAY PAUSE PREV TUNING NEXT CLEAR DISPLAY AUDIO ZOOM/ TV MODE ANGLE SUBTITLE FM MODE BAND A-B DISC REPEAT 5-9.pmd 6 1) STANDBY / ON button Turns the Unit...
... on a disc. PARTS AND FUNCTIONS Remote Control STANDBY/ON OPEN/ CLOSE 1 RETURN FUNCTION 2 GOTO 3 4 5 6 7 8 9 10 11 12 13 14 15 16 17 18 MEMORY DIMMER PRO LOGIC II P. To select numbers over 9, press +10 button and then the second no. SCAN/ CVBS SOUND VOLUME SETUP MENU SLOW ENTER SLOW STOP PLAY PAUSE PREV TUNING NEXT CLEAR DISPLAY AUDIO ZOOM/ TV MODE ANGLE SUBTITLE FM MODE BAND A-B DISC REPEAT 5-9.pmd 6 1) STANDBY / ON button Turns the Unit...
Owners Manual
Page 8
... programmed on a DVD or selects the audio output mode on a DVD disc. 22) SOUND button Selects sound balance and tone controls for FM stereo sound or to the presetted stations. 31) ZOOM button Zoom into an image. Perform point-to output the video signal. SCAN / CVBS button Changing YUV output to Progressive Scan Video mode or back to CVBS mode. 24) / CURSOR buttons Use to highlight selections on a menu screen and make adjust certain settings. 25) MENU button Open and close the disc tray. 21) GOTO button Skip directly to open or close DVD's menu...
... programmed on a DVD or selects the audio output mode on a DVD disc. 22) SOUND button Selects sound balance and tone controls for FM stereo sound or to the presetted stations. 31) ZOOM button Zoom into an image. Perform point-to output the video signal. SCAN / CVBS button Changing YUV output to Progressive Scan Video mode or back to CVBS mode. 24) / CURSOR buttons Use to highlight selections on a menu screen and make adjust certain settings. 25) MENU button Open and close the disc tray. 21) GOTO button Skip directly to open or close DVD's menu...
Owners Manual
Page 9
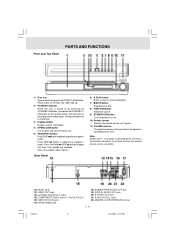
.... 2) STANDBY indicator When the Unit is pressed within 2 minutes, the function will turn off . 10) Remote sensor Receive the remote control unit signals. 11) VOLUME controls Change the loudness of the sound from the speakers connected to return the normal screen, press any button. 12) Power cord 13) VIDEO OUT jack 14) Left/Right AUDIO OUT jacks 15) COMPONENT VIDEO jacks (Y, PB/CB, PR/CR) 16) VIDEO IN (VCR) jack 17) FM ANTENNA jack 18) SUBWOOFER AUDIO OUT jack 19) DIGITAL AUDIO OUT jack 20) S-VIDEO...
.... 2) STANDBY indicator When the Unit is pressed within 2 minutes, the function will turn off . 10) Remote sensor Receive the remote control unit signals. 11) VOLUME controls Change the loudness of the sound from the speakers connected to return the normal screen, press any button. 12) Power cord 13) VIDEO OUT jack 14) Left/Right AUDIO OUT jacks 15) COMPONENT VIDEO jacks (Y, PB/CB, PR/CR) 16) VIDEO IN (VCR) jack 17) FM ANTENNA jack 18) SUBWOOFER AUDIO OUT jack 19) DIGITAL AUDIO OUT jack 20) S-VIDEO...
Owners Manual
Page 10
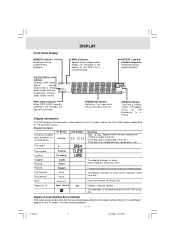
...-IN mode, the light will appear when an FM broadcast is currently playing. The display changes to show other indicators (total time, etc.) Does not function for Audio CDs. The operation is selected in the section of the disc and Unit. "Invalid Region" appears on the operation status. Rep A-B A-B The display changes to play differs from the region number of the Unit. STEREO indicator Tune into a station. Stop Play Pause x 2 x 2 / x 1/2 Rep A- OPERATION...
...-IN mode, the light will appear when an FM broadcast is currently playing. The display changes to show other indicators (total time, etc.) Does not function for Audio CDs. The operation is selected in the section of the disc and Unit. "Invalid Region" appears on the operation status. Rep A-B A-B The display changes to play differs from the region number of the Unit. STEREO indicator Tune into a station. Stop Play Pause x 2 x 2 / x 1/2 Rep A- OPERATION...

Owners Manual
Page 12
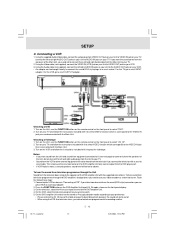
... instruction manual of the connected equipment as well. SCAN button repeatedly until "CVBS" display for better picture quality. "P. Connecting another source Analogue connection Using the Audio cable (not supplied), connect the left/right AUDIO OUT jack on your TV to TV, press the P. Turn on your TV directly. E - 11 (continued to YUV (see page 28). SETUP or Component video outputs (DVD) Some TVs or monitors are capable of reproducing a progressively scanned video signal. Progressive outputs (DVD...
... instruction manual of the connected equipment as well. SCAN button repeatedly until "CVBS" display for better picture quality. "P. Connecting another source Analogue connection Using the Audio cable (not supplied), connect the left/right AUDIO OUT jack on your TV to TV, press the P. Turn on your TV directly. E - 11 (continued to YUV (see page 28). SETUP or Component video outputs (DVD) Some TVs or monitors are capable of reproducing a progressively scanned video signal. Progressive outputs (DVD...
Owners Manual
Page 13
... scart input channel for the DVD amplifier Unit. 4. Using the Video cable (not supplied), connect the VIDEO IN (VCR) jack on the remote control or the front panel to scart cable. SETUP C. Turn on the VCR and follow the instructions included with it to select VIDEO function which corresponds to the speakers of the Main Unit, you want sound from the Unit and sound from the DVD player part. • If VCR Audio is because the scart connector...
... scart input channel for the DVD amplifier Unit. 4. Using the Video cable (not supplied), connect the VIDEO IN (VCR) jack on the remote control or the front panel to scart cable. SETUP C. Turn on the VCR and follow the instructions included with it to select VIDEO function which corresponds to the speakers of the Main Unit, you want sound from the Unit and sound from the DVD player part. • If VCR Audio is because the scart connector...
Owners Manual
Page 16
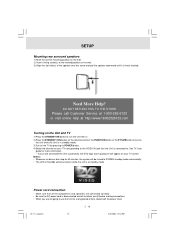
... the PLAY button to turn on the Unit while the Unit is in standby mode. 3)Turn on the TV by pressing its POWER button. 4)Select the channel on your TV screen. Need More Help? E - 15 10-17_ssq2.pmd 15 4/26/2004, 12:54 PM See TV User guide for a long period of the speaker over the screw and pull the speaker downward until it is firmly hooked. Power cord connection • Make...
... the PLAY button to turn on the Unit while the Unit is in standby mode. 3)Turn on the TV by pressing its POWER button. 4)Select the channel on your TV screen. Need More Help? E - 15 10-17_ssq2.pmd 15 4/26/2004, 12:54 PM See TV User guide for a long period of the speaker over the screw and pull the speaker downward until it is firmly hooked. Power cord connection • Make...

Owners Manual
Page 17
... recognizes DVDs that gives movie theatre ambience to audio output when the Unit is connected to that Music mode be used with 6 channels. Look for all Dolby Digital sources are recorded with THX audio processing mode. E - 16 (continued to display the sound level. ADJUSTINGTHE SOUND To adjust the surround sound balance while Dolby Digital and Pro Logic II decoding is in effect Use the remote control to make the following changes to speaker balance: Front speaker (left) • Press the SOUND button...
... recognizes DVDs that gives movie theatre ambience to audio output when the Unit is connected to that Music mode be used with 6 channels. Look for all Dolby Digital sources are recorded with THX audio processing mode. E - 16 (continued to display the sound level. ADJUSTINGTHE SOUND To adjust the surround sound balance while Dolby Digital and Pro Logic II decoding is in effect Use the remote control to make the following changes to speaker balance: Front speaker (left) • Press the SOUND button...
Owners Manual
Page 18
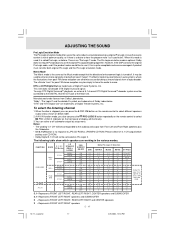
... Right speakers plus the Subwoofer. • 5.1/2.1 CH button is used to mono. FUNCTION DISCS 5.1 / 2.1 CH Button L/R SPEAKER (SMALL/ LARGE) SUBWOOFER ON/OFF EMU Dolby Pro Logic II Selection MATRIX MUSIC MOVIE BY PASS SMALL ON 5.1 5.1 5.1 CH LARGE ON 5.1 5.1 DVD / CD --SMALL OFF 5 5 ON 2.1 2.1 2.1 CH LARGE ON 2 2 --- The Pro Logic emulation mode is turned off subwoofer output by making them seem "larger". This Unit does not decode DTS Digital Surround signal. Notes...
... Right speakers plus the Subwoofer. • 5.1/2.1 CH button is used to mono. FUNCTION DISCS 5.1 / 2.1 CH Button L/R SPEAKER (SMALL/ LARGE) SUBWOOFER ON/OFF EMU Dolby Pro Logic II Selection MATRIX MUSIC MOVIE BY PASS SMALL ON 5.1 5.1 5.1 CH LARGE ON 5.1 5.1 DVD / CD --SMALL OFF 5 5 ON 2.1 2.1 2.1 CH LARGE ON 2 2 --- The Pro Logic emulation mode is turned off subwoofer output by making them seem "larger". This Unit does not decode DTS Digital Surround signal. Notes...
Owners Manual
Page 19
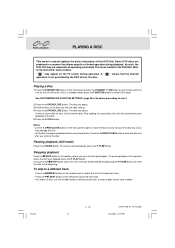
... operating commands. DVD CD Basic playback PLAYING A DISC This owner's manual explains the basic instructions of discs. A " operation is not a defect in standby mode, press the FUNCTION button to the start playback of the previous track. • Press the NEXT button on the remote to skip to the next track. • For audio CD disc, use the number buttons (remote control only) to jump straight to that the desired Playing a Disc 1.Press the STANDBY/ON button...
... operating commands. DVD CD Basic playback PLAYING A DISC This owner's manual explains the basic instructions of discs. A " operation is not a defect in standby mode, press the FUNCTION button to the start playback of the previous track. • Press the NEXT button on the remote to skip to the next track. • For audio CD disc, use the number buttons (remote control only) to jump straight to that the desired Playing a Disc 1.Press the STANDBY/ON button...
Owners Manual
Page 22
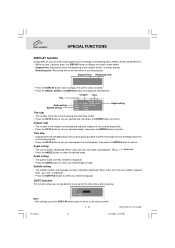
.... • Press the GOTO button to set your desired type of the disc while a disc is playing. Elapsed Time Remaining Time • Press the DISPLAY button twice to display the screen shown as below . DVD Basic playback SPECIAL FUNCTIONS DISPLAY function Using DISPLAY, you to skip directly to any part of audio. When a disc with only one angle is played back, " • Press the ANGLE button to select the desired angle. Elapsed...
.... • Press the GOTO button to set your desired type of the disc while a disc is playing. Elapsed Time Remaining Time • Press the DISPLAY button twice to display the screen shown as below . DVD Basic playback SPECIAL FUNCTIONS DISPLAY function Using DISPLAY, you to skip directly to any part of audio. When a disc with only one angle is played back, " • Press the ANGLE button to select the desired angle. Elapsed...
Owners Manual
Page 25
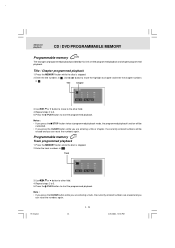
... memoDryVD CD Track programmed playback 1.Press the MEMORY button while the disc is stopped. 2. Track 3.Use , , or button to other field. 4.Repeat steps 2 to 3. 5.Press the PLAY button to start the programmed playback. Advanced playback CD / DVD PROGRAMMABLE MEMORY Programmable memory DVD The two types of programmed playback provided by this Unit are erased and you can reset the numbers again. 19-25...
... memoDryVD CD Track programmed playback 1.Press the MEMORY button while the disc is stopped. 2. Track 3.Use , , or button to other field. 4.Repeat steps 2 to 3. 5.Press the PLAY button to start the programmed playback. Advanced playback CD / DVD PROGRAMMABLE MEMORY Programmable memory DVD The two types of programmed playback provided by this Unit are erased and you can reset the numbers again. 19-25...
Owners Manual
Page 29
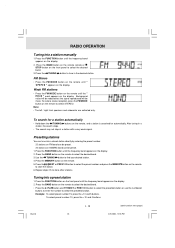
... the remote to select STEREO. To restore stereo reception, press the FM MODE button on the display. Note: • The left / right front speakers and subwoofer are activated only. Press the FUNCTION button until the frequency band appears on the remote 6. Use the TUNING button to store the station. button to select the preset number and press the MEMORY button on the display. 2. Press the BAND button on the remote, and a station is searched for a station automatically...
... the remote to select STEREO. To restore stereo reception, press the FM MODE button on the display. Note: • The left / right front speakers and subwoofer are activated only. Press the FUNCTION button until the frequency band appears on the remote 6. Use the TUNING button to store the station. button to select the preset number and press the MEMORY button on the display. 2. Press the BAND button on the remote, and a station is searched for a station automatically...
Owners Manual
Page 31
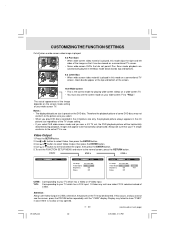
... and select the signal, then press the ENTER button. 5.To exit the FUNCTION SETUP MENU and return to the normal screen, press the RETURN button. YUV : Corresponding to your TV which has a Video or S-Video input. S-Video may failed to show "CVBS" in case there is no disc or tray opened. RGB : ONLY useful for playing wide-screen videos on a wide-screen TV. • You must also set , the DVD playback picture...
... and select the signal, then press the ENTER button. 5.To exit the FUNCTION SETUP MENU and return to the normal screen, press the RETURN button. YUV : Corresponding to your TV which has a Video or S-Video input. S-Video may failed to show "CVBS" in case there is no disc or tray opened. RGB : ONLY useful for playing wide-screen videos on a wide-screen TV. • You must also set , the DVD playback picture...
Owners Manual
Page 35
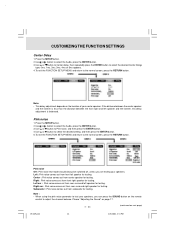
... button. 4.Use or button to select the desired setting, and then press the ENTER button. 5.To exit the FUNCTION SETUP MENU and return to adjust the channel balance. Subwoofer : Pink noise comes out from front right speaker for testing. Left : Pink noise comes out from rear surround left speaker for testing. CUSTOMIZING THE FUNCTION SETTINGS Center Delay 1.Press the SETUP button. 2.Use or button to select the Audio, press the ENTER button. 3.Use or button to Center delay, then repeatedly press the ENTER button...
... button. 4.Use or button to select the desired setting, and then press the ENTER button. 5.To exit the FUNCTION SETUP MENU and return to adjust the channel balance. Subwoofer : Pink noise comes out from front right speaker for testing. Left : Pink noise comes out from rear surround left speaker for testing. CUSTOMIZING THE FUNCTION SETTINGS Center Delay 1.Press the SETUP button. 2.Use or button to select the Audio, press the ENTER button. 3.Use or button to Center delay, then repeatedly press the ENTER button...
Owners Manual
Page 39
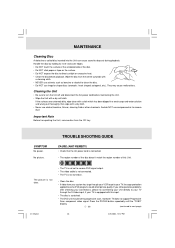
... be set to receive DVD signal output. • The video cable is not connected. • The TV is not turned on the surface. • Do NOT expose the disc to drop out during playback. TROUBLE SHOOTING GUIDE SYMPTOM No power. Press the P.SCAN button repeatedly until the "CVBS" display. CAUSE (AND REMEDY) • Check that the AC power cord is connected. • The region number of the disc doesn't match the region number...
... be set to receive DVD signal output. • The video cable is not connected. • The TV is not turned on the surface. • Do NOT expose the disc to drop out during playback. TROUBLE SHOOTING GUIDE SYMPTOM No power. Press the P.SCAN button repeatedly until the "CVBS" display. CAUSE (AND REMEDY) • Check that the AC power cord is connected. • The region number of the disc doesn't match the region number...
Owners Manual
Page 40
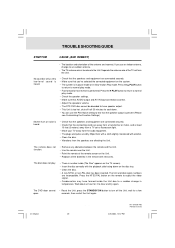
... 811-ST8291-492 Printed in Slow-motion Play mode. The Unit and disc region numbers are dirty. Wait about an hour for a few open. Press the PLAY button to return to normal play mode. • Check the speaker settings. • Make sure that AUDIO output and AV IN input connections correct. • Adjust the speakers volume. • The DTS DVD disc cannot be decoded to normal play mode. • Fast forward or fast reverse...
... 811-ST8291-492 Printed in Slow-motion Play mode. The Unit and disc region numbers are dirty. Wait about an hour for a few open. Press the PLAY button to return to normal play mode. • Check the speaker settings. • Make sure that AUDIO output and AV IN input connections correct. • Adjust the speakers volume. • The DTS DVD disc cannot be decoded to normal play mode. • Fast forward or fast reverse...


