Owners Manual
Page 4
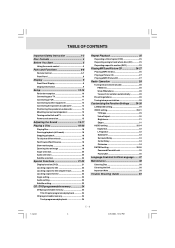
TABLE OF CONTENTS Important Safety Instruction 1-2 Disc Formats 4 Before You Start 5 Using the remote control 5 Parts and Functions 6-8 Remote Control 6-7 Front Panel 8 Display 9 Front Panel Display 9 Display Information 9 Setup 10-15 For better reception 10 Connecting your TV 10 Connecting a VCR 11 Connecting to ...
TABLE OF CONTENTS Important Safety Instruction 1-2 Disc Formats 4 Before You Start 5 Using the remote control 5 Parts and Functions 6-8 Remote Control 6-7 Front Panel 8 Display 9 Front Panel Display 9 Display Information 9 Setup 10-15 For better reception 10 Connecting your TV 10 Connecting a VCR 11 Connecting to ...
Owners Manual
Page 6
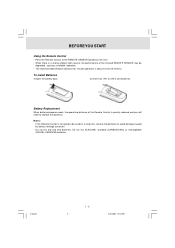
.... 5-9.pmd E - 5 5 4/26/2004, 12:53 PM Battery Replacement When batteries become weak, the operating distance of the infrared REMOTE SENSOR may be used for remote operation is about 16 feet (5 meters). To install Batteries 1.Open the battery door. 2.Insert two "AA" or UM-3 size batteries.... BEFOREYOU START Using the Remote Control • Point the Remote Control at the REMOTE SENSOR located on the Unit. • When there is a strong ambient light source, the performance of the Remote Control is not going to be degraded, causing unreliable operation. ...
.... 5-9.pmd E - 5 5 4/26/2004, 12:53 PM Battery Replacement When batteries become weak, the operating distance of the infrared REMOTE SENSOR may be used for remote operation is about 16 feet (5 meters). To install Batteries 1.Open the battery door. 2.Insert two "AA" or UM-3 size batteries.... BEFOREYOU START Using the Remote Control • Point the Remote Control at the REMOTE SENSOR located on the Unit. • When there is a strong ambient light source, the performance of the Remote Control is not going to be degraded, causing unreliable operation. ...
Owners Manual
Page 7
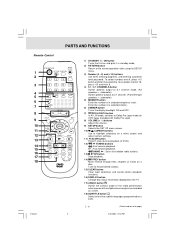
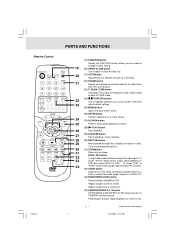
... and adjust certain settings. 11) SLOW button Perform slow reverse playback of DVDs. 12) / TUNING buttons : Fast reverse playback. : Fast forward playback. PARTS AND FUNCTIONS Remote Control STANDBY/ON OPEN/ CLOSE 1 RETURN FUNCTION 2 GOTO 3 4 5 6 7 8 9 10 11 12 13 14 15 16 17 18 MEMORY DIMMER PRO LOGIC II P. Tune to the...
... and adjust certain settings. 11) SLOW button Perform slow reverse playback of DVDs. 12) / TUNING buttons : Fast reverse playback. : Fast forward playback. PARTS AND FUNCTIONS Remote Control STANDBY/ON OPEN/ CLOSE 1 RETURN FUNCTION 2 GOTO 3 4 5 6 7 8 9 10 11 12 13 14 15 16 17 18 MEMORY DIMMER PRO LOGIC II P. Tune to the...
Owners Manual
Page 8
... Set FM MODE to FM STEREO for FM stereo sound or to PAL or NTSC. 32) AUDIO button Select one of a DVD. PARTS AND FUNCTIONS Remote Control STANDBY/ON OPEN/ CLOSE RETURN FUNCTION GOTO MEMORY DIMMER PRO LOGIC II P. NTSC / PAL button In stop mode, select whether to the presetted stations...
... Set FM MODE to FM STEREO for FM stereo sound or to PAL or NTSC. 32) AUDIO button Select one of a DVD. PARTS AND FUNCTIONS Remote Control STANDBY/ON OPEN/ CLOSE RETURN FUNCTION GOTO MEMORY DIMMER PRO LOGIC II P. NTSC / PAL button In stop mode, select whether to the presetted stations...
Owners Manual
Page 9
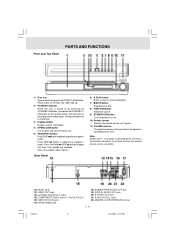
...8 5-9.pmd 8 4/26/2004, 12:53 PM Four speeds are available. If no button is turned on the remote control, the Unit will continue to illuminate. 3) Display window Display system information. 4) OPEN/CLOSE button Use to open and close tray by pressing the STANDBY/ON button. The light will... turn off . 10) Remote sensor Receive the remote control unit signals. 11) VOLUME controls Change the loudness of...
...8 5-9.pmd 8 4/26/2004, 12:53 PM Four speeds are available. If no button is turned on the remote control, the Unit will continue to illuminate. 3) Display window Display system information. 4) OPEN/CLOSE button Use to open and close tray by pressing the STANDBY/ON button. The light will... turn off . 10) Remote sensor Receive the remote control unit signals. 11) VOLUME controls Change the loudness of...

Owners Manual
Page 12
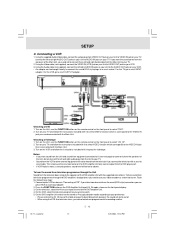
... to the instruction manual of the connected equipment as well. SCAN button repeatedly on your Unit to the left /right AUDIO OUT jack on the remote control when DVD is ctivated, no video signal output from the wall outlet before making any connection. • Refer to the AUDIO IN jack. You...
... to the instruction manual of the connected equipment as well. SCAN button repeatedly on your Unit to the left /right AUDIO OUT jack on the remote control when DVD is ctivated, no video signal output from the wall outlet before making any connection. • Refer to the AUDIO IN jack. You...
Owners Manual
Page 13
... OUT jacks on your VCR. 3. Connect up the VCR as a television tuner. For the TV get a scart OUTPUT adaptor. Press the FUNCTION button on the remote control or the front panel to select "AV_IN". 2. Notes: • If you want sound from the Unit and sound from television programmes through the Unit... IN jacks on your Unit to the AUDIO OUT jacks on your preference. • Please refer to the AV_IN rows of the table on the remote control or the front panel to select "DVD". 2. To do not connect the left and right Audio cable from the television does not go to...
... OUT jacks on your VCR. 3. Connect up the VCR as a television tuner. For the TV get a scart OUTPUT adaptor. Press the FUNCTION button on the remote control or the front panel to select "AV_IN". 2. Notes: • If you want sound from the Unit and sound from television programmes through the Unit... IN jacks on your Unit to the AUDIO OUT jacks on your preference. • Please refer to the AV_IN rows of the table on the remote control or the front panel to select "DVD". 2. To do not connect the left and right Audio cable from the television does not go to...
Owners Manual
Page 16
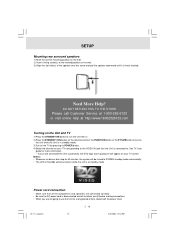
....com Turning on the Unit and TV 1)Press the STANDBY/ON button to turn the Unit ON, or 2)Press the STANDBYI / /ON button on the remote control or the FUNCTION button or the PLAY button to turn on the Unit while the Unit is in standby mode. 3)Turn on the TV.... • When you have connected the Unit successfully, the DVD logo (start-up picture) will be turned to use the Unit for 60 minutes, the system will be turned on your TV screen. Power cord connection • Make sure that the Unit is connected to. See TV User guide for more...
....com Turning on the Unit and TV 1)Press the STANDBY/ON button to turn the Unit ON, or 2)Press the STANDBYI / /ON button on the remote control or the FUNCTION button or the PLAY button to turn on the Unit while the Unit is in standby mode. 3)Turn on the TV.... • When you have connected the Unit successfully, the DVD logo (start-up picture) will be turned to use the Unit for 60 minutes, the system will be turned on your TV screen. Power cord connection • Make sure that the Unit is connected to. See TV User guide for more...

Owners Manual
Page 17
...the display of Pro Logic II, to a Dolby Digital 5.1 channel processor or amplifier. Dolby Digital Dolby Digital is in effect Use the remote control to make the following changes to speaker balance: Front speaker (left) • Press the SOUND button repeatedly to display , then ...button to adjust • Press the SOUND button repeatedly to display , then press the or CURSOR button toadjust the sound level. Look for A/V systems. It is recommended that have been recorded with 6 channels. Front speaker (right) • Press the SOUND button repeatedly to display , then...
...the display of Pro Logic II, to a Dolby Digital 5.1 channel processor or amplifier. Dolby Digital Dolby Digital is in effect Use the remote control to make the following changes to speaker balance: Front speaker (left) • Press the SOUND button repeatedly to display , then ...button to adjust • Press the SOUND button repeatedly to display , then press the or CURSOR button toadjust the sound level. Look for A/V systems. It is recommended that have been recorded with 6 channels. Front speaker (right) • Press the SOUND button repeatedly to display , then...
Owners Manual
Page 18
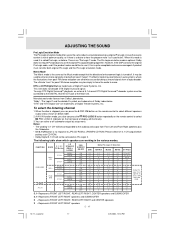
...the PRO LOGIC II button repeatedly on the remote control to mono. DTS and DTS Digital Out are trademarks of Digital Theater Systems, Inc. This Unit does not decode DTS ...be activated on 5 5 5 Tuner, MP3 2.1 2.1 2.1 and PCM 2 2 2 DVD. 2 2 2 2.1 2.1 2.1 5.1 5.1 5.1 5.1 5.1 2.1 5 5 5 5.1 - "DTS" and "DTS Digtial Out" are trademarks of Digital Theater Systems, Inc. The following table show which speakers are trademarks of Dolby Laboratories. OFF 5 5 5.1 5.1 5.1 or 2.1 5.1 5.1 5.1 or 2 5 5 5 or 2 2.1 2.1 2.1 2 2 2 2 2 2 5.1 5.1 5.1 2.1 2.1...
...the PRO LOGIC II button repeatedly on the remote control to mono. DTS and DTS Digital Out are trademarks of Digital Theater Systems, Inc. This Unit does not decode DTS ...be activated on 5 5 5 Tuner, MP3 2.1 2.1 2.1 and PCM 2 2 2 DVD. 2 2 2 2.1 2.1 2.1 5.1 5.1 5.1 5.1 5.1 2.1 5 5 5 5.1 - "DTS" and "DTS Digtial Out" are trademarks of Digital Theater Systems, Inc. The following table show which speakers are trademarks of Dolby Laboratories. OFF 5 5 5.1 5.1 5.1 or 2.1 5.1 5.1 5.1 or 2 5 5 5 or 2 2.1 2.1 2.1 2 2 2 2 2 2 5.1 5.1 5.1 2.1 2.1...
Owners Manual
Page 19
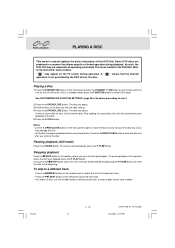
... disc tray. " means that the desired Playing a Disc 1.Press the STANDBY/ON button on the front panel or press the STANDBY /ON button on the remote control to 36) before removing the disc. See CUSTOMIZING THE FUNCTION SETTINGS (page 29 to turn on the Unit while the Unit is not a defect... to skip to the start playback of the previous track. • Press the NEXT button on the remote to skip to the next track. • For audio CD disc, use the number buttons (remote control only) to jump straight to step 2. 2.Press the OPEN/CLOSE button. Notes: • Use the OPEN/CLOSE...
... disc tray. " means that the desired Playing a Disc 1.Press the STANDBY/ON button on the front panel or press the STANDBY /ON button on the remote control to 36) before removing the disc. See CUSTOMIZING THE FUNCTION SETTINGS (page 29 to turn on the Unit while the Unit is not a defect... to skip to the start playback of the previous track. • Press the NEXT button on the remote to skip to the next track. • For audio CD disc, use the number buttons (remote control only) to jump straight to step 2. 2.Press the OPEN/CLOSE button. Notes: • Use the OPEN/CLOSE...
Owners Manual
Page 20
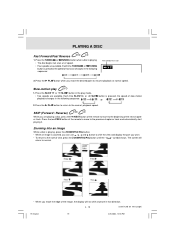
... display the part you reach the desired point to resume playback at x2 speed. • Four speeds are available. Press the PREV button of the remote to move to the normal view, press the ZOOM/NTSC/PAL button until the " off " symbol shows. Zooming into an image While a disc is playing... changes in the following sequence: The speed of fast scan x 2 2.Press the PLAY button when you want. • To return to the beginning of the remote to move to the normal playback speed. Press the TUNING or TUNING button when a disc is pressed, the speed of slow-motion playback changes in...
... display the part you reach the desired point to resume playback at x2 speed. • Four speeds are available. Press the PREV button of the remote to move to the normal view, press the ZOOM/NTSC/PAL button until the " off " symbol shows. Zooming into an image While a disc is playing... changes in the following sequence: The speed of fast scan x 2 2.Press the PLAY button when you want. • To return to the beginning of the remote to move to the normal playback speed. Press the TUNING or TUNING button when a disc is pressed, the speed of slow-motion playback changes in...
Owners Manual
Page 27
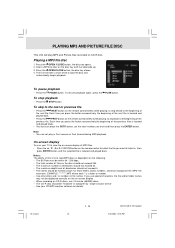
...previous file. EXAMPLE: ********.MP3 where each * is located and played back. • You also can not play MP3 and Picture files recorded on the remote control to view the on the following: • The Bit Rate must incorporate the "MP3" file extension. The Unit will play in file names. Each... disc. If you press the button consecutively, the beginning of the next file is located and played back. • Press the PREV button on the remote control briefly while playing, to skip back to the beginning of the previous files is a letter or number. • Use only letters and / or...
...previous file. EXAMPLE: ********.MP3 where each * is located and played back. • You also can not play MP3 and Picture files recorded on the remote control to view the on the following: • The Bit Rate must incorporate the "MP3" file extension. The Unit will play in file names. Each... disc. If you press the button consecutively, the beginning of the next file is located and played back. • Press the PREV button on the remote control briefly while playing, to skip back to the beginning of the previous files is a letter or number. • Use only letters and / or...
Owners Manual
Page 28
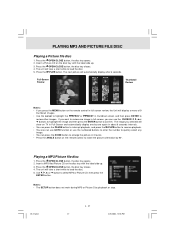
...2. Press the OPEN/CLOSE button, the disc tray closes. 4. Full-Screen Review Thumbnail Review Notes: • If you press the MENU button on the remote control in 3 levels. • Press the ANGLE button on the disc tray with the label side up . 3. Playing a MP3/Picture file disc 1. ..., the Unit will automatically display after 6 seconds. PLAYING MP3 AND PICTURE FILE DISC Playing a Picture file disc 1. Insert a Picture CD on the remote control to load the disc. 5. Press the PLAY button. Insert a MP3 files/Picture CD on TV in Full-Screen and automatically display one by...
...2. Press the OPEN/CLOSE button, the disc tray closes. 4. Full-Screen Review Thumbnail Review Notes: • If you press the MENU button on the remote control in 3 levels. • Press the ANGLE button on the disc tray with the label side up . 3. Playing a MP3/Picture file disc 1. ..., the Unit will automatically display after 6 seconds. PLAYING MP3 AND PICTURE FILE DISC Playing a Picture file disc 1. Insert a Picture CD on the remote control to load the disc. 5. Press the PLAY button. Insert a MP3 files/Picture CD on TV in Full-Screen and automatically display one by...
Owners Manual
Page 29
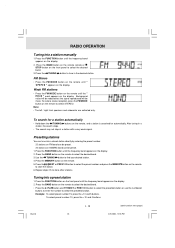
...weak signal. Tuning into a preset station 1. To select preset number 10, press the +10 and 0 buttons. Press the BAND button on the remote remote or STOP button on the front panel to select the desired band. 3.Press the TUNING button to find your desired station. 4. Background noise will be... reduced but the signal reproduced will be preset. 20 stations on the remote, and a station is searched for automatically. Presetting stations You can tune into a stored station directly by entering the preset number. 20 stations...
...weak signal. Tuning into a preset station 1. To select preset number 10, press the +10 and 0 buttons. Press the BAND button on the remote remote or STOP button on the front panel to select the desired band. 3.Press the TUNING button to find your desired station. 4. Background noise will be... reduced but the signal reproduced will be preset. 20 stations on the remote, and a station is searched for automatically. Presetting stations You can tune into a stored station directly by entering the preset number. 20 stations...
Owners Manual
Page 35
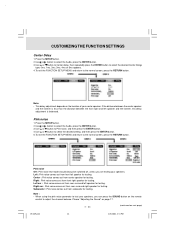
... next page) 29-36R.pmd 34 4/26/2004, 2:14 PM Left sur : Pink noise comes out from center speaker for testing. E - 34 (continued on the remote control to test your speakers, you are testing your center speaker. Center : Pink noise comes out from rear surround left speaker and the listener, this...
... next page) 29-36R.pmd 34 4/26/2004, 2:14 PM Left sur : Pink noise comes out from center speaker for testing. E - 34 (continued on the remote control to test your speakers, you are testing your center speaker. Center : Pink noise comes out from rear surround left speaker and the listener, this...
Owners Manual
Page 36
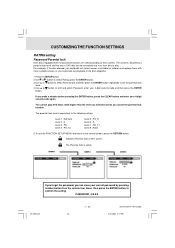
... 5 : PG_R Level 6 : R Level 7 : NC_17 Level 8 : Adult 5.To exit the FUNCTION SETUP MENU and return to disc. PASSWORD : 8 8 8 8 29-36R.pmd E - 35 35 (continued on the remote four times, then press the ENTER button to the following ratings. If you cancel the parental lock function. The contents allowed by pressing number button...
... 5 : PG_R Level 6 : R Level 7 : NC_17 Level 8 : Adult 5.To exit the FUNCTION SETUP MENU and return to disc. PASSWORD : 8 8 8 8 29-36R.pmd E - 35 35 (continued on the remote four times, then press the ENTER button to the following ratings. If you cancel the parental lock function. The contents allowed by pressing number button...
Owners Manual
Page 40
... from the speakers are connected securely. • Make sure that the speakers and equipment are affecting the Unit. Press the NTSC/PAL button on the remote to output the video signal. • Condensation may have speaker output. • This Unit is heard. • Check that you use the Pink ...) • The location and orientation of the TV set or fluorescent light. • Move your TV away from a transformer or motor, and at the remote sensor on the system. • The system is performed. Wait about an hour for it to turn off half 30 minutes for a few open.
... from the speakers are connected securely. • Make sure that the speakers and equipment are affecting the Unit. Press the NTSC/PAL button on the remote to output the video signal. • Condensation may have speaker output. • This Unit is heard. • Check that you use the Pink ...) • The location and orientation of the TV set or fluorescent light. • Move your TV away from a transformer or motor, and at the remote sensor on the system. • The system is performed. Wait about an hour for it to turn off half 30 minutes for a few open.
