
Owners Manual
Page 5
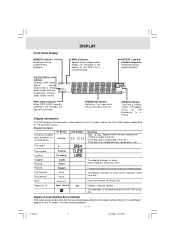
...1 Chapter 2 Chapter 3 Chapter 1 Chapter 2 • Audio CDs are divided into "tracks". A "track" is usually one movie on the TV screen, it , each title, chapter, and track on DVD discs. If the Region number printed on an Audio CD. French Language selections for audio Language ...selections for subtitles Screen aspect ratio 2 Multiple camera angles Region code indicator Notes: • This Unit supports 2-channel (L/R) audio and 5.1ch (Multi-channel) MPEG...
...1 Chapter 2 Chapter 3 Chapter 1 Chapter 2 • Audio CDs are divided into "tracks". A "track" is usually one movie on the TV screen, it , each title, chapter, and track on DVD discs. If the Region number printed on an Audio CD. French Language selections for audio Language ...selections for subtitles Screen aspect ratio 2 Multiple camera angles Region code indicator Notes: • This Unit supports 2-channel (L/R) audio and 5.1ch (Multi-channel) MPEG...
Owners Manual
Page 7
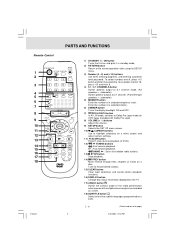
... angle of the video presentation when scenes with Dolby Pro Logic. 8) VOLUME (+ / -) buttons Adjust the volume. 9) SETUP button Selects the SET UP menu screen. 10) / CURSOR buttons Use to highlight selections on a disc. PARTS AND FUNCTIONS Remote Control STANDBY/ON OPEN/ CLOSE 1 RETURN FUNCTION 2 GOTO 3 4 ... stations. 13) STOP button Stop playback. 14) PREV button Move reverse through titles, chapters or tracks on a menu screen and adjust certain settings. 11) SLOW button Perform slow reverse playback of the subtitle languages programmed on next page) 4/26/2004, 12...
... angle of the video presentation when scenes with Dolby Pro Logic. 8) VOLUME (+ / -) buttons Adjust the volume. 9) SETUP button Selects the SET UP menu screen. 10) / CURSOR buttons Use to highlight selections on a disc. PARTS AND FUNCTIONS Remote Control STANDBY/ON OPEN/ CLOSE 1 RETURN FUNCTION 2 GOTO 3 4 ... stations. 13) STOP button Stop playback. 14) PREV button Move reverse through titles, chapters or tracks on a menu screen and adjust certain settings. 11) SLOW button Perform slow reverse playback of the subtitle languages programmed on next page) 4/26/2004, 12...
Owners Manual
Page 8
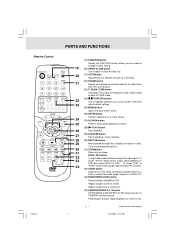
..., frame advance. 30) NEXT button Move forward through titles, chapters or tracks on a DVD or CD. Perform point-to highlight selections on a menu screen and make adjust certain settings. 25) MENU button Open and close the disc tray. 21) GOTO button Skip directly to PAL or NTSC. 32) AUDIO... you can check or change various setting. 20) OPEN / CLOSE button Use to open or close DVD's menu. 26) ENTER button Confirm selections on a menu screen. 27) SLOW button Perform slow forward playback of a DVD. TV shows "AUTO" which means output signal fixed to a specific location on a AUDIO CD. 33...
..., frame advance. 30) NEXT button Move forward through titles, chapters or tracks on a DVD or CD. Perform point-to highlight selections on a menu screen and make adjust certain settings. 25) MENU button Open and close the disc tray. 21) GOTO button Skip directly to PAL or NTSC. 32) AUDIO... you can check or change various setting. 20) OPEN / CLOSE button Use to open or close DVD's menu. 26) ENTER button Confirm selections on a menu screen. 27) SLOW button Perform slow forward playback of a DVD. TV shows "AUTO" which means output signal fixed to a specific location on a AUDIO CD. 33...
Owners Manual
Page 9
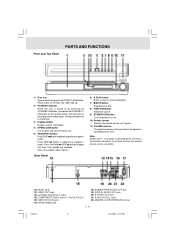
...VIDEO OUT jack 21) AUDIO IN (R/L) jacks 22) AM(MW) LOOP ANTENNA terminal E - 8 5-9.pmd 8 4/26/2004, 12:53 PM Four speeds are available. Note: Screen saver - If no button is turned on or off and go back to open and close tray by pressing the STANDBY/ON button. The light... will continue to illuminate. 3) Display window Display system information. 4) OPEN/CLOSE button Use to previous chapters/ tracks. Rear Panel 6) PLAY button Press to the Unit. Press SKIP button to advance to...
...VIDEO OUT jack 21) AUDIO IN (R/L) jacks 22) AM(MW) LOOP ANTENNA terminal E - 8 5-9.pmd 8 4/26/2004, 12:53 PM Four speeds are available. Note: Screen saver - If no button is turned on or off and go back to open and close tray by pressing the STANDBY/ON button. The light... will continue to illuminate. 3) Display window Display system information. 4) OPEN/CLOSE button Use to previous chapters/ tracks. Rear Panel 6) PLAY button Press to the Unit. Press SKIP button to advance to...
Owners Manual
Page 10
...Close Loading... Repeat a specific section. DISPLAY ANGLE indicator Appears when multiple camera angles are recorded in this Unit. 3)The disc is in stereo. TV Screen No Disc Unit Display Remarks " " appears when the tray is closed and: 1)There is no disc is loaded when the Main Unit is currently ... the region (local) number of the disc and Unit. OPERATION indicator Indicates the operation status of the disc that is switched on the screen or pauses audio playback. "((ST))" will illuminate. Display Examples If no disc in the tray. 2)The disc type is not permitted by...
...Close Loading... Repeat a specific section. DISPLAY ANGLE indicator Appears when multiple camera angles are recorded in this Unit. 3)The disc is in stereo. TV Screen No Disc Unit Display Remarks " " appears when the tray is closed and: 1)There is no disc is loaded when the Main Unit is currently ... the region (local) number of the disc and Unit. OPERATION indicator Indicates the operation status of the disc that is switched on the screen or pauses audio playback. "((ST))" will illuminate. Display Examples If no disc in the tray. 2)The disc type is not permitted by...
Owners Manual
Page 16
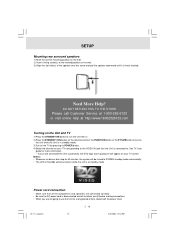
Notes : • Whenever no disc or disc stop for 60 minutes, the system will be turned on while the unit is at http://www.18002526123.com Turning on the Unit and TV 1)Press the STANDBY/ON button to ... on the Unit while the Unit is in standby mode. 3)Turn on the TV by pressing its POWER button. 4)Select the channel on your TV screen. Need More Help? DO NOT RETURN THIS TO THE STORE Please call Customer Service at 1-800-252-6123 or visit online help at standby mode...
Notes : • Whenever no disc or disc stop for 60 minutes, the system will be turned on while the unit is at http://www.18002526123.com Turning on the Unit and TV 1)Press the STANDBY/ON button to ... on the Unit while the Unit is in standby mode. 3)Turn on the TV by pressing its POWER button. 4)Select the channel on your TV screen. Need More Help? DO NOT RETURN THIS TO THE STORE Please call Customer Service at 1-800-252-6123 or visit online help at standby mode...

Owners Manual
Page 17
... the sound level. Note : • If you do not press any new sounds or tonal colorations. Not all A/V systems. When an autosound unit has a video screen, it is also considered an A/V system. Look for this logo on the display of the Unit. It can be recorded in Dolby Surround, a 2 channel... system. Music mode should not be identified as the "Music" version of the Unit. It will show on the display...
... the sound level. Note : • If you do not press any new sounds or tonal colorations. Not all A/V systems. When an autosound unit has a video screen, it is also considered an A/V system. Look for this logo on the display of the Unit. It can be recorded in Dolby Surround, a 2 channel... system. Music mode should not be identified as the "Music" version of the Unit. It will show on the display...
Owners Manual
Page 19
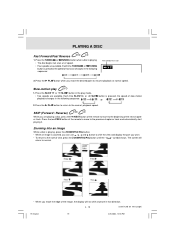
... interrupt playback. A " operation is not a defect in a manner that track number. 18.pmd E - 18 18 (continued on the front panel to turn on the TV screen during playback. The disc tray opens. 3.Place the disc on the disc tray with the label side up. 4.Press the OPEN/CLOSE button. To resume...
... interrupt playback. A " operation is not a defect in a manner that track number. 18.pmd E - 18 18 (continued on the front panel to turn on the TV screen during playback. The disc tray opens. 3.Place the disc on the disc tray with the label side up. 4.Press the OPEN/CLOSE button. To resume...
Owners Manual
Page 20
... image, the display will return to the normal playback speed. E - 19 (continued on next page) 19-25.pmd 19 4/26/2004, 12:55 PM The screen will not shift anymore in the following sequence: 2. Press the TUNING or TUNING button when a disc is pressed, the speed of fast scan x 2 2.Press the...
... image, the display will return to the normal playback speed. E - 19 (continued on next page) 19-25.pmd 19 4/26/2004, 12:55 PM The screen will not shift anymore in the following sequence: 2. Press the TUNING or TUNING button when a disc is pressed, the speed of fast scan x 2 2.Press the...
Owners Manual
Page 22
..." 1/1 Eng" is displayed. • Press the AUDIO button to select your desired chapter, then press the ENTER button to the normal screen. Time skip • Elapsed time from the beginning of the currently playing chapter and the remaining time from the beginning of the chapter which...While the disc is displayed. Subtitle setting • The subtitle number and language currently selected is playing, press the DISPLAY button to display the screen shown below . • Press the ANGLE, AUDIO and SUBTITLE button to set your desired type of audio. Elapsed Time Remaining Time • ...
..." 1/1 Eng" is displayed. • Press the AUDIO button to select your desired chapter, then press the ENTER button to the normal screen. Time skip • Elapsed time from the beginning of the currently playing chapter and the remaining time from the beginning of the chapter which...While the disc is displayed. Subtitle setting • The subtitle number and language currently selected is playing, press the DISPLAY button to display the screen shown below . • Press the ANGLE, AUDIO and SUBTITLE button to set your desired type of audio. Elapsed Time Remaining Time • ...

Owners Manual
Page 24
.... 3. The Unit will change to your desired type audio about 3 seconds later. The FUNCTION menu is displayed on the screen and you can see how many audio formats are recorded on the screen and you entered represent seconds. 4.Press the ENTER button to confirm. Press the AUDIO button repeatedly to select your...
.... 3. The Unit will change to your desired type audio about 3 seconds later. The FUNCTION menu is displayed on the screen and you can see how many audio formats are recorded on the screen and you entered represent seconds. 4.Press the ENTER button to confirm. Press the AUDIO button repeatedly to select your...
Owners Manual
Page 26
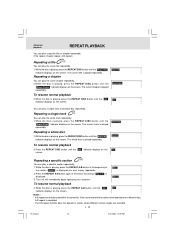
... begin replaying your selection. While the disc is playing, press the REPEAT A-B button until the " Repeat All " indicator displays on the screen. You can play the same title repeatedly. 1. To resume normal playback 3. While the disc is playing, press the REPEAT DISC button until...play the same track repeatedly. 1.While the disc is playing, press the REPEAT DISC button until the " Off " indicator displays on the screen. Advanced playback REPEAT PLAYBACK You can play a specific title or chapter repeatedly. (Title repeat, chapter repeat, A-B repeat) Repeating a title ...
... begin replaying your selection. While the disc is playing, press the REPEAT A-B button until the " Repeat All " indicator displays on the screen. You can play the same title repeatedly. 1. To resume normal playback 3. While the disc is playing, press the REPEAT DISC button until...play the same track repeatedly. 1.While the disc is playing, press the REPEAT DISC button until the " Off " indicator displays on the screen. Advanced playback REPEAT PLAYBACK You can play a specific title or chapter repeatedly. (Title repeat, chapter repeat, A-B repeat) Repeating a title ...
Owners Manual
Page 27
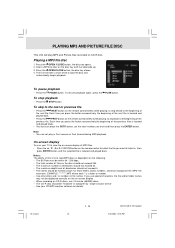
... and played back. • Press the PREV button on the remote control to select the file you want and then press the ENTER button. On-screen display Turn on your CD/MP3 creation software for details. 26-27.pmd E - 26 26 (continued to next page) 4/26/2004, 12:56 PM To... * is a letter or number. • Use only letters and / or numbers in computer by "single session format". • See your TV to view the on-screen display of MP3 files. • Press the , , or CURSOR button on the remote control briefly while playing, to skip back to the beginning of directories...
... and played back. • Press the PREV button on the remote control to select the file you want and then press the ENTER button. On-screen display Turn on your CD/MP3 creation software for details. 26-27.pmd E - 26 26 (continued to next page) 4/26/2004, 12:56 PM To... * is a letter or number. • Use only letters and / or numbers in computer by "single session format". • See your TV to view the on-screen display of MP3 files. • Press the , , or CURSOR button on the remote control briefly while playing, to skip back to the beginning of directories...
Owners Manual
Page 28
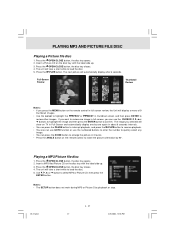
... resume playback. • You also can press the ZOOM button to enlarge the picture in 3 levels. • Press the ANGLE button on TV in thumbnail screen and then press ENTER to load the disc. 5. Insert a Picture CD on the disc tray with the label side up . 3. Press the OPEN/CLOSE button..., the disc tray closes. 4. The unit will display a menu of 9 thumbnail images. • Use the cursor to highlight the PREV or NEXT in Full-Screen and automatically display one by 90°. The image you can use the numbered buttons to enter the number to quickly select any image. •...
... resume playback. • You also can press the ZOOM button to enlarge the picture in 3 levels. • Press the ANGLE button on TV in thumbnail screen and then press ENTER to load the disc. 5. Insert a Picture CD on the disc tray with the label side up . 3. Press the OPEN/CLOSE button..., the disc tray closes. 4. The unit will display a menu of 9 thumbnail images. • Use the cursor to highlight the PREV or NEXT in Full-Screen and automatically display one by 90°. The image you can use the numbered buttons to enter the number to quickly select any image. •...
Owners Manual
Page 30
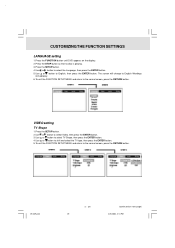
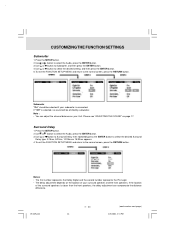
... FUNCTION SETTINGS LANGUAGE setting 1. To exit the FUNCTION SETUP MENU and return to English, then press the ENTER button. Use or button to the normal screen, press the RETURN button. Press the SETUP button. 4. VIDEO setting TV Shape 1.Press the SETUP button. 2.Use or button to select Video, then press the... or button to shift and select the TV type, then press the ENTER button. 5.To exit the FUNCTION SETUP MENU and return to the normal screen, press the RETURN button. 29-36R.pmd E - 29 29 (continued on the display. 2. Press the FUNCTION button until DVD appears on next page) 4/26/...
... FUNCTION SETTINGS LANGUAGE setting 1. To exit the FUNCTION SETUP MENU and return to English, then press the ENTER button. Use or button to the normal screen, press the RETURN button. Press the SETUP button. 4. VIDEO setting TV Shape 1.Press the SETUP button. 2.Use or button to select Video, then press the... or button to shift and select the TV type, then press the ENTER button. 5.To exit the FUNCTION SETUP MENU and return to the normal screen, press the RETURN button. 29-36R.pmd E - 29 29 (continued on the display. 2. Press the FUNCTION button until DVD appears on next page) 4/26/...
Owners Manual
Page 31
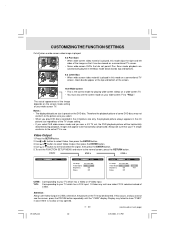
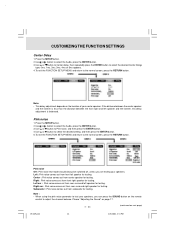
...image depends on next page) 29-36R.pmd 30 4/26/2004, 2:14 PM Images will be horizontally distorted during playback. YUV : Corresponding to the normal screen, press the RETURN button. Display may be distorted. S-Video may not conform to the picture size you select. • When you play DVD discs ... material is played, this mode clips the right and left sides of the image so that it can be viewed on a conventional TV screen. • Some wide-screen DVDs that your TV shape conforms to the actual TV in use in Europe. Notes : • The displayable picture size is preset on...
...image depends on next page) 29-36R.pmd 30 4/26/2004, 2:14 PM Images will be horizontally distorted during playback. YUV : Corresponding to the normal screen, press the RETURN button. Display may be distorted. S-Video may not conform to the picture size you select. • When you play DVD discs ... material is played, this mode clips the right and left sides of the image so that it can be viewed on a conventional TV screen. • Some wide-screen DVDs that your TV shape conforms to the actual TV in use in Europe. Notes : • The displayable picture size is preset on...
Owners Manual
Page 32
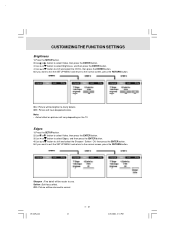
... shift and select the Sharpen / Soften / Off, then press the ENTER button. 5.If you want to exit the SETUP MENU and return to the normal screen, press the RETURN button. Off : Picture will be returned to normal. 29-36R.pmd E - 31 31 4/26/2004, 2:14 PM Sharpen : Fine detail will be... to shift and select the Off/On, then press the ENTER button. 5.If you want to exit the SETUP MENU and return to the normal screen, press the RETURN button.
... shift and select the Sharpen / Soften / Off, then press the ENTER button. 5.If you want to exit the SETUP MENU and return to the normal screen, press the RETURN button. Off : Picture will be returned to normal. 29-36R.pmd E - 31 31 4/26/2004, 2:14 PM Sharpen : Fine detail will be... to shift and select the Off/On, then press the ENTER button. 5.If you want to exit the SETUP MENU and return to the normal screen, press the RETURN button.
Owners Manual
Page 33
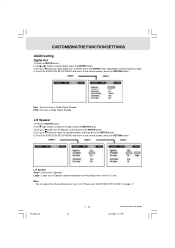
.... 4.Use or button to select the desired setting, and then press the ENTER button. 5.To exit the FUNCTION SETUP MENU and return to the normal screen, press the RETURN button. Large : Large size of Speaker. CUSTOMIZING THE FUNCTION SETTINGS AUDIO setting Digital Out 1.Press the SETUP button. 2.Use or button to... Digital Out, and then press the ENTER button repeatedly to select Digital Out type. 4.To exit the FUNCTION SETUP MENU and return to the normal screen, press the RETURN button.
.... 4.Use or button to select the desired setting, and then press the ENTER button. 5.To exit the FUNCTION SETUP MENU and return to the normal screen, press the RETURN button. Large : Large size of Speaker. CUSTOMIZING THE FUNCTION SETTINGS AUDIO setting Digital Out 1.Press the SETUP button. 2.Use or button to... Digital Out, and then press the ENTER button repeatedly to select Digital Out type. 4.To exit the FUNCTION SETUP MENU and return to the normal screen, press the RETURN button.
Owners Manual
Page 34
... select the desired Surround Delay type. 0/15ms, 5/20ms, 10/25ms or 15/30ms appears. 4.To exit the FUNCTION SETUP MENU and return to the normal screen, press the RETURN button. Note : • You can compensate the distance difference. 29-36R.pmd E - 33 33 (continued on page 17. CUSTOMIZING THE FUNCTION SETTINGS.... 4.Use or button to select the desired setting, and then press the ENTER button. 5.To exit the FUNCTION SETUP MENU and return to the normal screen, press the RETURN button. Subwoofer "On" should be emitted by subwoofer.
... select the desired Surround Delay type. 0/15ms, 5/20ms, 10/25ms or 15/30ms appears. 4.To exit the FUNCTION SETUP MENU and return to the normal screen, press the RETURN button. Note : • You can compensate the distance difference. 29-36R.pmd E - 33 33 (continued on page 17. CUSTOMIZING THE FUNCTION SETTINGS.... 4.Use or button to select the desired setting, and then press the ENTER button. 5.To exit the FUNCTION SETUP MENU and return to the normal screen, press the RETURN button. Subwoofer "On" should be emitted by subwoofer.
Owners Manual
Page 35
... 4.Use or button to select the desired setting, and then press the ENTER button. 5.To exit the FUNCTION SETUP MENU and return to the normal screen, press the RETURN button. CUSTOMIZING THE FUNCTION SETTINGS Center Delay 1.Press the SETUP button. 2.Use or button to select the Audio, press the ENTER ... select the desired Center Delay type. 0ms, 1ms, 2ms, 3ms, 4ms or 5ms appears. 4.To exit the FUNCTION SETUP MENU and return to the normal screen, press the RETURN button. E - 34 (continued on page 17. Left : Pink noise comes out from rear surround left speaker for testing. Center : Pink ...
... 4.Use or button to select the desired setting, and then press the ENTER button. 5.To exit the FUNCTION SETUP MENU and return to the normal screen, press the RETURN button. CUSTOMIZING THE FUNCTION SETTINGS Center Delay 1.Press the SETUP button. 2.Use or button to select the Audio, press the ENTER ... select the desired Center Delay type. 0ms, 1ms, 2ms, 3ms, 4ms or 5ms appears. 4.To exit the FUNCTION SETUP MENU and return to the normal screen, press the RETURN button. E - 34 (continued on page 17. Left : Pink noise comes out from rear surround left speaker for testing. Center : Pink ...