Operating Instructions
Page 1
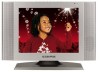
Please keep this product, please read these instructions completely. FP1500 For assistance, please call: 1-800-645-4994 Or visit us at Before connecting, operating or adjusting this manual for future reference 128-6729 15" LCD TV Operating Instructions Model No.
Please keep this product, please read these instructions completely. FP1500 For assistance, please call: 1-800-645-4994 Or visit us at Before connecting, operating or adjusting this manual for future reference 128-6729 15" LCD TV Operating Instructions Model No.

Operating Instructions
Page 4
...by one of the following measures: Reorient or relocate the TV antenna Increase the separation between TV and other equipment Connect TV into separate outlet from equipment Consult the dealer or an experienced raido/TV technician for help FCC Caution: Any changes or modifications not... expressly approved by the party responsible for a TV Broadcast Receiver, pursuant to Part 15 of important operating and maintenance (servicing instructions in a residential installation. 0 0 1 Important Safety Instructions Important Safety Instructions ...
...by one of the following measures: Reorient or relocate the TV antenna Increase the separation between TV and other equipment Connect TV into separate outlet from equipment Consult the dealer or an experienced raido/TV technician for help FCC Caution: Any changes or modifications not... expressly approved by the party responsible for a TV Broadcast Receiver, pursuant to Part 15 of important operating and maintenance (servicing instructions in a residential installation. 0 0 1 Important Safety Instructions Important Safety Instructions ...
Operating Instructions
Page 5
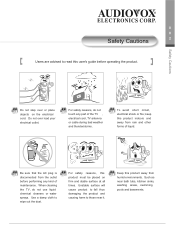
... placed on the electrical cord. For safety reasons, this user's guide before performing any part of maintenance. When cleaning the TV, do not touch any kind of the TV , electrical cord, TV antenna or cable during bad weather and thunderstorms. To avoid short circuit, electrical shock or fire; Be sure that the AC...
... placed on the electrical cord. For safety reasons, this user's guide before performing any part of maintenance. When cleaning the TV, do not touch any kind of the TV , electrical cord, TV antenna or cable during bad weather and thunderstorms. To avoid short circuit, electrical shock or fire; Be sure that the AC...

Operating Instructions
Page 6
... for repair. If liquid or foreign objects accidentally drops into the TV, be sure to repair the TV yourself at any time. This is essential to have qualified serviceman check the product, before operating the product. This LCD TV will break if drop or hit; should such incident occur, please ...send the product back to read this user's guide before turn the TV power on book shelf or enclosed cabinets. Such as your cord from...
... for repair. If liquid or foreign objects accidentally drops into the TV, be sure to repair the TV yourself at any time. This is essential to have qualified serviceman check the product, before operating the product. This LCD TV will break if drop or hit; should such incident occur, please ...send the product back to read this user's guide before turn the TV power on book shelf or enclosed cabinets. Such as your cord from...

Operating Instructions
Page 8
...flat connectors system. Use VHF/UHF mixed outdoor antenna. 2. Avoid installing your TV antenna cabling to the minimum required length to constant weather wear and tear. When poor reception occurs, please consult your TV antenna. (i.e. Avoid sharing your dealers or qualified service personnel. Installing the outdoor antenna to LCD TV reception. Install your TV... antenna on the market: below are subjected to avoid unnecessary interference viewing TV. of the following methods: 1. using one...
...flat connectors system. Use VHF/UHF mixed outdoor antenna. 2. Avoid installing your TV antenna cabling to the minimum required length to constant weather wear and tear. When poor reception occurs, please consult your TV antenna. (i.e. Avoid sharing your dealers or qualified service personnel. Installing the outdoor antenna to LCD TV reception. Install your TV... antenna on the market: below are subjected to avoid unnecessary interference viewing TV. of the following methods: 1. using one...

Operating Instructions
Page 9
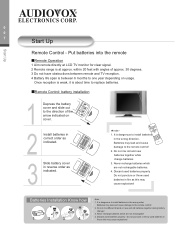
Please refer to diagram instructions. 2.Take out the power cord and connect the flat end to the rear of the power cord into the wall outlet and the installation is complete. Plug the other end of the LCD TV monitor. Start Up 0 0 Start Up 6 Power Connection Power Connection 1. Connect the round end of power adapter to the power adapter. 3. Keep babies away from electrical outlets at all timesto prevent accidents from package. Remove power adapter from happening!
Please refer to diagram instructions. 2.Take out the power cord and connect the flat end to the rear of the power cord into the wall outlet and the installation is complete. Plug the other end of the LCD TV monitor. Start Up 0 0 Start Up 6 Power Connection Power Connection 1. Connect the round end of power adapter to the power adapter. 3. Keep babies away from electrical outlets at all timesto prevent accidents from package. Remove power adapter from happening!
Operating Instructions
Page 10
... is dangerous to the direction of approx. 30 degrees. 3 Do not have obstructions between remote and TV reception. 4 Battery life span is at approx. Put batteries into the remote Remote Operation 1 Aim remote directly at LCD TV monitor for clear signal. 2 Remote range is between 6 months to one year depending on cover. 2 Install...
... is dangerous to the direction of approx. 30 degrees. 3 Do not have obstructions between remote and TV reception. 4 Battery life span is at approx. Put batteries into the remote Remote Operation 1 Aim remote directly at LCD TV monitor for clear signal. 2 Remote range is between 6 months to one year depending on cover. 2 Install...
Operating Instructions
Page 11
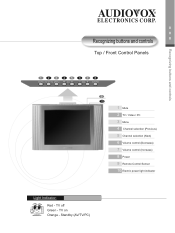
TV on Orange - Standby (AV/TV/PC) Recognizing buttons and controls 0 0 Recognizing buttons and controls 8 Top / Front Control Panels 123 456 78 9 10 1 Mute 2 TV / Video / PC 3 Menu 4 Channel selection (Previous) 5 Channel selection (Next) 6 Volume control (Decrease) 7 Volume control (Increase) 8 Power 9 Remote Control Sensor 10 Electric power light indicator Light Indicator: Red - TV off Green -
TV on Orange - Standby (AV/TV/PC) Recognizing buttons and controls 0 0 Recognizing buttons and controls 8 Top / Front Control Panels 123 456 78 9 10 1 Mute 2 TV / Video / PC 3 Menu 4 Channel selection (Previous) 5 Channel selection (Next) 6 Volume control (Decrease) 7 Volume control (Increase) 8 Power 9 Remote Control Sensor 10 Electric power light indicator Light Indicator: Red - TV off Green -
Operating Instructions
Page 12
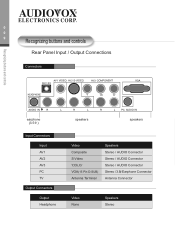
0 0 9 Recognizing buttons and controls Rear Panel Input / Output Connections Connectors Recognizing buttons and controls earphone (3.5 ) Input Connectors Input AV1 AV2 AV3 PC TV Output Connectors Output Headphone speakers speakers Video Composite S-Video Y,Cb,Cr VGA(15 Pin D-SUB) Antenna Terminal Speakers Stereo / AUDIO Connector Stereo / AUDIO Connector Stereo / AUDIO Connector Stereo /3.5 Earphone Connector Antenna Connector Video None Speakers Stereo
0 0 9 Recognizing buttons and controls Rear Panel Input / Output Connections Connectors Recognizing buttons and controls earphone (3.5 ) Input Connectors Input AV1 AV2 AV3 PC TV Output Connectors Output Headphone speakers speakers Video Composite S-Video Y,Cb,Cr VGA(15 Pin D-SUB) Antenna Terminal Speakers Stereo / AUDIO Connector Stereo / AUDIO Connector Stereo / AUDIO Connector Stereo /3.5 Earphone Connector Antenna Connector Video None Speakers Stereo

Operating Instructions
Page 13
0 1 Recognizing buttons and controls 0 Remote Control Buttons Recognizing buttons and controls 1 1 POWER 2 6 3 7 2 TV 4 8 3 AV 5 9 4 BRIGHTNESS 1 1 5 AUDIO 6 MUTE 7 PC 10 8 MTS 9 SLEEP 10 VOL( +/ - ) 12 13 11 CH( / ) 14 12 CHANNEL SELECT 15 13 DISPLAY 16 14 SKIP ON/OFF 17 15 ZOOM 16 CLOSED CAPTION 17 RECALL
0 1 Recognizing buttons and controls 0 Remote Control Buttons Recognizing buttons and controls 1 1 POWER 2 6 3 7 2 TV 4 8 3 AV 5 9 4 BRIGHTNESS 1 1 5 AUDIO 6 MUTE 7 PC 10 8 MTS 9 SLEEP 10 VOL( +/ - ) 12 13 11 CH( / ) 14 12 CHANNEL SELECT 15 13 DISPLAY 16 14 SKIP ON/OFF 17 15 ZOOM 16 CLOSED CAPTION 17 RECALL
Operating Instructions
Page 14
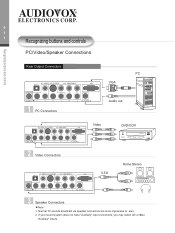
Recognizing buttons and controls 0 1 1 Recognizing buttons and controls PC/Video/Speaker Connections Rear Output Connectors PC VGA 1 PC Connectors Audio out Video DVD/VCR 2 Video Connectors Home Stereo 3.5 3 Speaker Connectors Note 1. If your sound system does not have "Auxiliary" input connectors, you may select CD or Video "Auxiliary" inputs. Normal TV sounds broadcast via speaker connectors are more impressive to ears. 2.
Recognizing buttons and controls 0 1 1 Recognizing buttons and controls PC/Video/Speaker Connections Rear Output Connectors PC VGA 1 PC Connectors Audio out Video DVD/VCR 2 Video Connectors Home Stereo 3.5 3 Speaker Connectors Note 1. If your sound system does not have "Auxiliary" input connectors, you may select CD or Video "Auxiliary" inputs. Normal TV sounds broadcast via speaker connectors are more impressive to ears. 2.

Operating Instructions
Page 15
TV monitor is connected properly. 2. Make sure all equipment is now OFF. Basic Control 0 1 Basic Control 2 TV Control PC Control Press Power button once, light indicator changes from green to green. TV monitor is now ON. Press your desired setting (TV/AV/PC) and the selected mode will show on the upper left screen of the monitor indicating your present mode. Changing between TV/AV/PC Settings 1. Press power button again, light indicator changes from red to red.
TV monitor is connected properly. 2. Make sure all equipment is now OFF. Basic Control 0 1 Basic Control 2 TV Control PC Control Press Power button once, light indicator changes from green to green. TV monitor is now ON. Press your desired setting (TV/AV/PC) and the selected mode will show on the upper left screen of the monitor indicating your present mode. Changing between TV/AV/PC Settings 1. Press power button again, light indicator changes from red to red.

Operating Instructions
Page 17
0 1 Menu Setting List (Diagram) 4 Menu: Picture / Volume / TV / Other fuction Menu Setting List (Diagram) Picture Setting Volume Seting TV Setting Other fuction Setting To locate the above settings do the following: 1.Press MENU to display the menu setting list 2.Press VOL (-/+) to select the desired item 3.Press CH( / ) to scroll up or down to decide the selection 4.Press VOL (-/+) to change the setting 5.Press MENU to exit
0 1 Menu Setting List (Diagram) 4 Menu: Picture / Volume / TV / Other fuction Menu Setting List (Diagram) Picture Setting Volume Seting TV Setting Other fuction Setting To locate the above settings do the following: 1.Press MENU to display the menu setting list 2.Press VOL (-/+) to select the desired item 3.Press CH( / ) to scroll up or down to decide the selection 4.Press VOL (-/+) to change the setting 5.Press MENU to exit

Operating Instructions
Page 18
... on the remote control, press "BRIGHT" to chose. You have finished adjusting your desired adjustments such as adjust the contrast, brightness or sharpness of the TV screen. You may press on CH( / ) button to scroll either up or down to find the function you have 3 selections to adjust the desired brightness...
... on the remote control, press "BRIGHT" to chose. You have finished adjusting your desired adjustments such as adjust the contrast, brightness or sharpness of the TV screen. You may press on CH( / ) button to scroll either up or down to find the function you have 3 selections to adjust the desired brightness...
Operating Instructions
Page 20
... stereo sounds will give you change the CLOSED CAPTION setting 4. The (TEXT) mode display various information over the picture ( such as TV program schedule and weather forecasts, etc.) that is independent of the picture. Press MENU to exit Note: The closed caption broadcasts can view... Press "VOL(-/+) to CLOSED CAPTION 3. Press "CH ( / ) to change a channel selection ,or if there is a break in electrical circuit, the TV screen will not be viewed in Componet mode. Simply press the select 1.Stereo 2.Mts 3.Mono and setting buttons to finalize your selection. 3.When you better...
... stereo sounds will give you change the CLOSED CAPTION setting 4. The (TEXT) mode display various information over the picture ( such as TV program schedule and weather forecasts, etc.) that is independent of the picture. Press MENU to exit Note: The closed caption broadcasts can view... Press "VOL(-/+) to CLOSED CAPTION 3. Press "CH ( / ) to change a channel selection ,or if there is a break in electrical circuit, the TV screen will not be viewed in Componet mode. Simply press the select 1.Stereo 2.Mts 3.Mono and setting buttons to finalize your selection. 3.When you better...

Operating Instructions
Page 21
... simultaneously until the message INPUT SECRET NO. X is an older rating that is restricted by age and contect. TV Parental Guidelines are automatically block. 6.Press MENU to return the main screen Upper ontrol panel of older movies 1.Press MENU to display the MENU screen 2.Press VOL(-/+) and CH ( / ) to V-CHIP 3.INPUT SECRET...
... simultaneously until the message INPUT SECRET NO. X is an older rating that is restricted by age and contect. TV Parental Guidelines are automatically block. 6.Press MENU to return the main screen Upper ontrol panel of older movies 1.Press MENU to display the MENU screen 2.Press VOL(-/+) and CH ( / ) to V-CHIP 3.INPUT SECRET...
Operating Instructions
Page 22
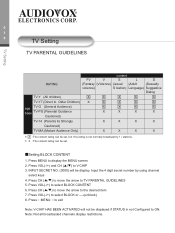
... desired item 7. Input the 4 digit secret number by 1 / stations. Press CH ( / ) to move the arrow to Older Children) X X X X X age TV-G (General Audience) base TV-PG (Parental Guidance Cautioned) X X X X X X X X TV-14 (Parents its Strongly X X X X Cautioned) TV-MA (Mature Audience Only) X X X X X : The content rating can be displayed if STATUS in not Configured to display the MENU...
... desired item 7. Input the 4 digit secret number by 1 / stations. Press CH ( / ) to move the arrow to Older Children) X X X X X age TV-G (General Audience) base TV-PG (Parental Guidance Cautioned) X X X X X X X X TV-14 (Parents its Strongly X X X X Cautioned) TV-MA (Mature Audience Only) X X X X X : The content rating can be displayed if STATUS in not Configured to display the MENU...
Operating Instructions
Page 23
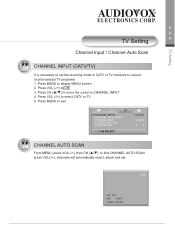
Press CH ( / ) to move the cursor to CH 3. Press VOL (-/+) to CHANNEL INPUT 4. Press VOL (-/+) to find CHANNEL AUTO SCAN press VOL(-/+), channels will automatically select, adjust and set the receiving mode to CATV or TV channels to display MENU screen 2. Press MENU to exit CHANNEL AUTO SCAN From MENU, press VOL(-/+), then CH ( / ) to select CATV or TV 5. TV Setting 0 2 TV Setting 0 Channel Input / Channel Auto Scan CHANNEL INPUT (CATV/TV) It is necessary to set . Press MENU to receive local broadcast TV programs 1.
Press CH ( / ) to move the cursor to CH 3. Press VOL (-/+) to CHANNEL INPUT 4. Press VOL (-/+) to find CHANNEL AUTO SCAN press VOL(-/+), channels will automatically select, adjust and set the receiving mode to CATV or TV channels to display MENU screen 2. Press MENU to exit CHANNEL AUTO SCAN From MENU, press VOL(-/+), then CH ( / ) to select CATV or TV 5. TV Setting 0 2 TV Setting 0 Channel Input / Channel Auto Scan CHANNEL INPUT (CATV/TV) It is necessary to set . Press MENU to receive local broadcast TV programs 1.

Operating Instructions
Page 24
TV Setting 0 2 1 TV Setting Channel Memory (Enable/Disable) CHANNEL MEMORY (Disable Channel) If you do not want . Press "SKIP ON/OFF" to add the channel you wish to ... lettering will delete the channnel from that the lettering color for added channels are green and the lettering for deleted channels are red From your TV. You may also directly input the channel number you can delete it from green to replace a channel, proceed as follows: 1. This action will also change...
TV Setting 0 2 1 TV Setting Channel Memory (Enable/Disable) CHANNEL MEMORY (Disable Channel) If you do not want . Press "SKIP ON/OFF" to add the channel you wish to ... lettering will delete the channnel from that the lettering color for added channels are green and the lettering for deleted channels are red From your TV. You may also directly input the channel number you can delete it from green to replace a channel, proceed as follows: 1. This action will also change...
Operating Instructions
Page 25
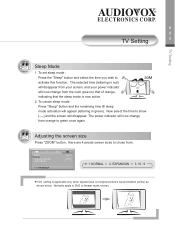
... appear (lettering in red) will disappear from your screen, and your power indicator will now change from : 1. EXPANSION 3. 16 : 9 16:9 setting is now active. 2. 0 2 TV Setting 2 TV Setting Sleep Mode 1. To set sleep mode : Press the "Sleep" button and select the time you wish to DVD or theater mode movies. The selected...
... appear (lettering in red) will disappear from your screen, and your power indicator will now change from : 1. EXPANSION 3. 16 : 9 16:9 setting is now active. 2. 0 2 TV Setting 2 TV Setting Sleep Mode 1. To set sleep mode : Press the "Sleep" button and select the time you wish to DVD or theater mode movies. The selected...


