Owners Manual
Page 2
... in a residential installation. AVOID EXPOSURE TO BEAM CLASS 1 LASER PRODUCT The symbol for 1-2 hours before turning the power on bedding or carpeting. FCC INFORMATION WARNING: Changes or modifications to operate the equipment. This equipment generates, used in a heated room where it and create a hazard. • When you to radio communications. NO USER-SERVICEABLE PARTS INSIDE. Pulling the cord may cause...
... in a residential installation. AVOID EXPOSURE TO BEAM CLASS 1 LASER PRODUCT The symbol for 1-2 hours before turning the power on bedding or carpeting. FCC INFORMATION WARNING: Changes or modifications to operate the equipment. This equipment generates, used in a heated room where it and create a hazard. • When you to radio communications. NO USER-SERVICEABLE PARTS INSIDE. Pulling the cord may cause...
Owners Manual
Page 4
..., or other . A polarized plug has two blades with the apparatus. Protect the power cord from being walked on or pinched particularly at plug, convenience receptacles, and the point where they exit from tip-over. 13. Heed all instructions. 5. Do not install near water. 6. Follow all warnings. 4. Use only with the cart, stand, tripod, bracket, or table specified by the manufacture...
..., or other . A polarized plug has two blades with the apparatus. Protect the power cord from being walked on or pinched particularly at plug, convenience receptacles, and the point where they exit from tip-over. 13. Heed all instructions. 5. Do not install near water. 6. Follow all warnings. 4. Use only with the cart, stand, tripod, bracket, or table specified by the manufacture...
Owners Manual
Page 5
...4 DISC FORMATS 6 REMOTE CONTROL 7 ACCESSORIES 7 REMOTE CONTROL REFERENCE GUIDE 8 - 9 UNIT REFERENCE GUIDE 10 - 11 CONNECTIONS 12 - 17 Connecting a TV Antenna/Cable/Satellite 12 Connecting an Audio Amplifier ...... 12 Connecting an A/V Device (VCR, PVR Camcorder, Game System, etc.) ..13 - 15 Connecting a High-Definition (HD) Source 16 Connecting a PC 16 POWER SUPPLY 17 Using the Car Power Adapter 17 Using the AC Power Adapter .......... 17 INSTALLATION 18 Removing the Base Stand 18 Mounting on the Wall 18 USING HEADPHONES 19 UNIT OPERATION 19 Turning the Unit on 19 Turning the...
...4 DISC FORMATS 6 REMOTE CONTROL 7 ACCESSORIES 7 REMOTE CONTROL REFERENCE GUIDE 8 - 9 UNIT REFERENCE GUIDE 10 - 11 CONNECTIONS 12 - 17 Connecting a TV Antenna/Cable/Satellite 12 Connecting an Audio Amplifier ...... 12 Connecting an A/V Device (VCR, PVR Camcorder, Game System, etc.) ..13 - 15 Connecting a High-Definition (HD) Source 16 Connecting a PC 16 POWER SUPPLY 17 Using the Car Power Adapter 17 Using the AC Power Adapter .......... 17 INSTALLATION 18 Removing the Base Stand 18 Mounting on the Wall 18 USING HEADPHONES 19 UNIT OPERATION 19 Turning the Unit on 19 Turning the...
Owners Manual
Page 8
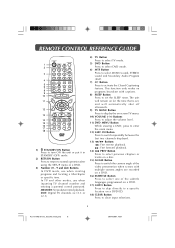
...) Buttons In DVD mode, use when inputting TV channel number and entering a parental control password. The unit will remain on for the time that is set the SLEEP timer. DOT: Digital TV channels (ie 11.3 or 12.7) 4) TV Button Press to select TV mode. 5) DVD Button Press to select DVD mode. 6) MTS Button Press to select MONO sound, STEREO sound and Secondary Audio Program (SAP). 7) CC Button Press to activate the Closed Captioning feature. REMOTE CONTROL REFERENCE GUIDE 1 2 3 4 5 6 7 8 9 10 11 12 13 14 15 16 17 18 1) STANDBY...
...) Buttons In DVD mode, use when inputting TV channel number and entering a parental control password. The unit will remain on for the time that is set the SLEEP timer. DOT: Digital TV channels (ie 11.3 or 12.7) 4) TV Button Press to select TV mode. 5) DVD Button Press to select DVD mode. 6) MTS Button Press to select MONO sound, STEREO sound and Secondary Audio Program (SAP). 7) CC Button Press to activate the Closed Captioning feature. REMOTE CONTROL REFERENCE GUIDE 1 2 3 4 5 6 7 8 9 10 11 12 13 14 15 16 17 18 1) STANDBY...
Owners Manual
Page 9
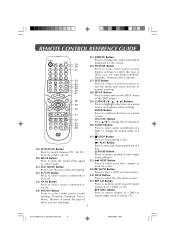
.... 21) LCD MODE Button Press to set the size of the LCD display. 22) YUV IN Button Press to select source connected to YUV IN. 23) AV IN Button Press to select source connected to AV IN. 24) SOUND Button Press to select from preset screen display settings to match the type of show you are watching. 25) DISPLAY Button Press to change disc status information displayed on a menu screen and adjust certain settings. PAUSE Button Press to...
.... 21) LCD MODE Button Press to set the size of the LCD display. 22) YUV IN Button Press to select source connected to YUV IN. 23) AV IN Button Press to select source connected to AV IN. 24) SOUND Button Press to select from preset screen display settings to match the type of show you are watching. 25) DISPLAY Button Press to change disc status information displayed on a menu screen and adjust certain settings. PAUSE Button Press to...

Owners Manual
Page 10
Light On: The unit is in STANDBY (OFF) mode. REMOTE CONTROL SENSOR Do not block this sensor or remote control will not work. 15) Removable Base Stand 10 PLV31190CS1-DC_IB_ENG_AUD.pmd 10 20/04/2007, 16:51 Press and hold to fast forward playback. 11) OPEN / CLOSE Button To open and close the disc door. 12) Color LCD Screen 13) Disc Door 14) STANDBY Indicator Indicates whether the unit is turned ON...
Light On: The unit is in STANDBY (OFF) mode. REMOTE CONTROL SENSOR Do not block this sensor or remote control will not work. 15) Removable Base Stand 10 PLV31190CS1-DC_IB_ENG_AUD.pmd 10 20/04/2007, 16:51 Press and hold to fast forward playback. 11) OPEN / CLOSE Button To open and close the disc door. 12) Color LCD Screen 13) Disc Door 14) STANDBY Indicator Indicates whether the unit is turned ON...
Owners Manual
Page 12
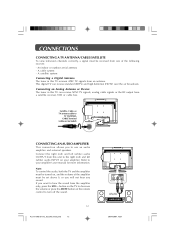
... (HDTV) over the air broadcasts. This digital TV can receive NTSC TV signals, analog cable signals or the RF output from a satellite receiver, VCR or cable box. button on the TV to decrease the volume or press the MUTE button on your amplifier's user manual for more information. Connecting an Analog Antenna or Device The tuner in this TV receives ATSC TV signals from the amplifier only, press the VOL - Connect the right (red) and left (white) audio INPUT on the remote control to use...
... (HDTV) over the air broadcasts. This digital TV can receive NTSC TV signals, analog cable signals or the RF output from a satellite receiver, VCR or cable box. button on the TV to decrease the volume or press the MUTE button on your amplifier's user manual for more information. Connecting an Analog Antenna or Device The tuner in this TV receives ATSC TV signals from the amplifier only, press the VOL - Connect the right (red) and left (white) audio INPUT on the remote control to use...

Owners Manual
Page 16
Note: When connecting a DVD player to the AUDIO OUT jack on this unit using a monitor cable (not included). HD SOURCE with component video output (Digital Cable Box*, Satellite Receiver*, or external over-the-air HD-Tuner) * May require a subscription for details. Connect the right (red) and left (white) audio output from the source to the right (red) and left (white) input on this unit (Component video cable not included). Make sure you connect both audio and video from the source to the corresponding video inputs on...
Note: When connecting a DVD player to the AUDIO OUT jack on this unit using a monitor cable (not included). HD SOURCE with component video output (Digital Cable Box*, Satellite Receiver*, or external over-the-air HD-Tuner) * May require a subscription for details. Connect the right (red) and left (white) audio output from the source to the right (red) and left (white) input on this unit (Component video cable not included). Make sure you connect both audio and video from the source to the corresponding video inputs on...
Owners Manual
Page 18
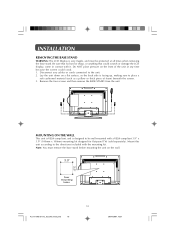
... included with a VESA-compliant 3.9" x 3.9" (100mm x 100mm) mounting kit designed for flat-panel TVs (sold separately). Remove the four screws and then remove the BASE STAND from the unit. Mount this unit according to be protected at any cables or cords connected to place a soft cushioned material (such as a pillow or thick piece of the unit at all times when removing the base stand. INSTALLATION REMOVING THE BASE STAND WARNING: The LCD Display is very...
... included with a VESA-compliant 3.9" x 3.9" (100mm x 100mm) mounting kit designed for flat-panel TVs (sold separately). Remove the four screws and then remove the BASE STAND from the unit. Mount this unit according to be protected at any cables or cords connected to place a soft cushioned material (such as a pillow or thick piece of the unit at all times when removing the base stand. INSTALLATION REMOVING THE BASE STAND WARNING: The LCD Display is very...
Owners Manual
Page 19
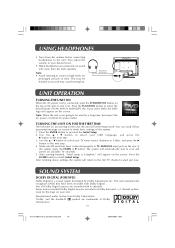
... to finish Initial Setup. Press the ENTER button to TV ANTENNA input jack on screen to select the desired mode (TV/AV IN/YUV IN/DVD/PC IN). This unit automatically recognizes DVDs that have been recorded with 6 channels. This may cause hearing loss. TURNING THE UNIT ON FOR THE FIRST TIME The first time for a long time, disconnect the AC power cord from AC power outlet. The...
... to finish Initial Setup. Press the ENTER button to TV ANTENNA input jack on screen to select the desired mode (TV/AV IN/YUV IN/DVD/PC IN). This unit automatically recognizes DVDs that have been recorded with 6 channels. This may cause hearing loss. TURNING THE UNIT ON FOR THE FIRST TIME The first time for a long time, disconnect the AC power cord from AC power outlet. The...
Owners Manual
Page 20
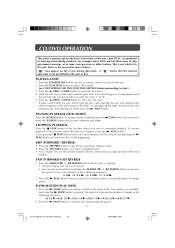
... location where you reach the desired point to skip government warnings, or in the play mode. SKIP (FORWARD / REVERSE) • Press the PREV button to go back to previous chapters/tracks. • Press the NEXT button to advance chapters/tracks. • For an Audio CD, use the number buttons (remote control only) to jump directly to select DVD mode. See CUSTOMIZING THE DVD FUNCTION SETTINGS...
... location where you reach the desired point to skip government warnings, or in the play mode. SKIP (FORWARD / REVERSE) • Press the PREV button to go back to previous chapters/tracks. • Press the NEXT button to advance chapters/tracks. • For an Audio CD, use the number buttons (remote control only) to jump directly to select DVD mode. See CUSTOMIZING THE DVD FUNCTION SETTINGS...

Owners Manual
Page 25
... displayable picture size is still not correct, press the LCD MODE button repeatedly to the factory default. 25 Cut off when a widescreen video image is played, this mode on the unit screen or other options. 5 . To exit the SETUP MENU and return to the normal screen, press the RETURN or SETUP button. TV TYPE Pan Scan • When wide-screen video is played. Press the SETUP button in stop mode. 2 . DEFAULT It takes 3-5 seconds to reset the DVD settings to adjust...
... displayable picture size is still not correct, press the LCD MODE button repeatedly to the factory default. 25 Cut off when a widescreen video image is played, this mode on the unit screen or other options. 5 . To exit the SETUP MENU and return to the normal screen, press the RETURN or SETUP button. TV TYPE Pan Scan • When wide-screen video is played. Press the SETUP button in stop mode. 2 . DEFAULT It takes 3-5 seconds to reset the DVD settings to adjust...

Owners Manual
Page 26
... MODE Video Audio Setup Parental Picture Mode Brightness Contrast VGA Color Temperature Personal 50 50 Standard Select EXIT Exit Video Select EXIT Exit • Picture Mode : Select from Standard (balanced), Warm (red white), or Cool (blue white) modes. 26 PLV31190CS1-DC_IB_ENG_AUD.pmd 26 20/04/2007, 16:51 Adjust them using the or button (The screen will change to recall your desired setting); or press the ENTER or button to select Video. 3. Press the TV MENU button...
... MODE Video Audio Setup Parental Picture Mode Brightness Contrast VGA Color Temperature Personal 50 50 Standard Select EXIT Exit Video Select EXIT Exit • Picture Mode : Select from Standard (balanced), Warm (red white), or Cool (blue white) modes. 26 PLV31190CS1-DC_IB_ENG_AUD.pmd 26 20/04/2007, 16:51 Adjust them using the or button (The screen will change to recall your desired setting); or press the ENTER or button to select Video. 3. Press the TV MENU button...

Owners Manual
Page 27
...; Audio Mode : Select from preset sound settings (Personal, Theater, Music, Voice, Standard) to go into the Audio settings. 3. To exit the MAIN MENU and return to confirm Auto Adjust.) Parental Best definition 1440 x 900 - The Setup Phase 3 screen will change to your customed settings on bass and treble.) 27 PLV31190CS1-DC_IB_ENG_AUD.pmd 27 20/04/2007, 16:51 Adjust them using the or button (The screen will change to recall your...
...; Audio Mode : Select from preset sound settings (Personal, Theater, Music, Voice, Standard) to go into the Audio settings. 3. To exit the MAIN MENU and return to confirm Auto Adjust.) Parental Best definition 1440 x 900 - The Setup Phase 3 screen will change to your customed settings on bass and treble.) 27 PLV31190CS1-DC_IB_ENG_AUD.pmd 27 20/04/2007, 16:51 Adjust them using the or button (The screen will change to recall your...

Owners Manual
Page 28
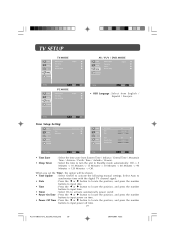
... the TV MENU button. 2. Adjust Video Audio TV Setup Parental Tuner Mode Auto Scan Auto Scan Add CH Channel Skip MTS Audio Language Cable Stereo English them in another language. Press the TV MENU button. 2. or press the ENTER or button to your desired setting); To exit the MAIN MENU and return to the normal screen, press the EXIT button repeatedly. • Tuner Mode : Antenna (over-the-air broadcasts, Ch 2-69) or Cable (cable/satellite broadcasts, CH 1-135) mode are available. • Auto Scan...
... the TV MENU button. 2. Adjust Video Audio TV Setup Parental Tuner Mode Auto Scan Auto Scan Add CH Channel Skip MTS Audio Language Cable Stereo English them in another language. Press the TV MENU button. 2. or press the ENTER or button to your desired setting); To exit the MAIN MENU and return to the normal screen, press the EXIT button repeatedly. • Tuner Mode : Antenna (over-the-air broadcasts, Ch 2-69) or Cable (cable/satellite broadcasts, CH 1-135) mode are available. • Auto Scan...
Owners Manual
Page 29
... Eastern Time Off Video Audio TV Setup Parental Time Update Date Time Timer Power On Time Power Off Time Off 2000/01/01 07:42:49 Off 00:00:00 00:00:00 Time Setup Select EXIT Return Time Select EXIT Return • Time Zone • Sleep Timer : Select the time zone from English / Español / Français. Select Auto to • Date synchronize time with the digital TV channel signal. : Press the or button to locate...
... Eastern Time Off Video Audio TV Setup Parental Time Update Date Time Timer Power On Time Power Off Time Off 2000/01/01 07:42:49 Off 00:00:00 00:00:00 Time Setup Select EXIT Return Time Select EXIT Return • Time Zone • Sleep Timer : Select the time zone from English / Español / Français. Select Auto to • Date synchronize time with the digital TV channel signal. : Press the or button to locate...

Owners Manual
Page 30
... set you forget the password, enter " 8888 " to unlock parental control. 30 Select EXIT Exit PLV31190CS1-DC_IB_ENG_AUD.pmd 30 20/04/2007, 16:52 Restore Setting: If you reset the TV to confirm. Press the TV MENU button. 2. TV SETUP Caption Setting: Video Analog Closed Caption Off Digital Closed Caption Off Audio Digital Caption Style TV Setup Parental Video Audio TV Setup Parental Caption Style Font Size Font Style Font Color Font Opacity Background Color Background Opacity Window Color Window Opacity As Broadcaster Small Style 1 Green Solid Black Translucent White...
... set you forget the password, enter " 8888 " to unlock parental control. 30 Select EXIT Exit PLV31190CS1-DC_IB_ENG_AUD.pmd 30 20/04/2007, 16:52 Restore Setting: If you reset the TV to confirm. Press the TV MENU button. 2. TV SETUP Caption Setting: Video Analog Closed Caption Off Digital Closed Caption Off Audio Digital Caption Style TV Setup Parental Video Audio TV Setup Parental Caption Style Font Size Font Style Font Color Font Opacity Background Color Background Opacity Window Color Window Opacity As Broadcaster Small Style 1 Green Solid Black Translucent White...

Owners Manual
Page 31
... 4 - 6 to change the mode between Blocked and Allowed. 6. TV SETUP Parental Control Setting: 4. Press the ENTER button to adjust other options. 8. To exit the MAIN MENU and return to the previous menu. 7. Movie Ratings Canadian English Ratings Canadian French Ratings TV-Y TV-Y7 TV-G TV-PG TV-14 TV-MA : Recommended for all ages. : PARENTAL GUIDANCE SUGGESTED - C : Children. PG : PARENTAL GUIDANCE SUGGESTED - Video Audio Setup Parental Program Block Change Password Clean All Video Rating Enable On Audio U.S.TV Ratings...
... 4 - 6 to change the mode between Blocked and Allowed. 6. TV SETUP Parental Control Setting: 4. Press the ENTER button to adjust other options. 8. To exit the MAIN MENU and return to the previous menu. 7. Movie Ratings Canadian English Ratings Canadian French Ratings TV-Y TV-Y7 TV-G TV-PG TV-14 TV-MA : Recommended for all ages. : PARENTAL GUIDANCE SUGGESTED - C : Children. PG : PARENTAL GUIDANCE SUGGESTED - Video Audio Setup Parental Program Block Change Password Clean All Video Rating Enable On Audio U.S.TV Ratings...

Owners Manual
Page 34
... may have speaker output. • This unit is in pause mode. DVD No sound or only a very low-level sound is connected. • Turn on the unit. • Replace the batteries in the remote with alcohol. • Clean the disc. TROUBLE SHOOTING GUIDE SYMPTOM CAUSE (AND REMEDY) No power. • Ensure the AC power cord is heard. • Make sure that AUDIO / VIDEO output and AV IN input connections are...
... may have speaker output. • This unit is in pause mode. DVD No sound or only a very low-level sound is connected. • Turn on the unit. • Replace the batteries in the remote with alcohol. • Clean the disc. TROUBLE SHOOTING GUIDE SYMPTOM CAUSE (AND REMEDY) No power. • Ensure the AC power cord is heard. • Make sure that AUDIO / VIDEO output and AV IN input connections are...

Owners Manual
Page 35
... audio/video source device is working properly. • Make sure all input cables are watching is broadcast in and turned on the remote control. TROUBLE SHOOTING GUIDE SYMPTOM CAUSE (AND REMEDY) TV Bad Picture (snow, multiple images, distortion, blurry) • Check the location of picture. • Make sure there are no unshielded electrical devices nearby that TV mode is selected. • Try a new channel to make sure the program...
... audio/video source device is working properly. • Make sure all input cables are watching is broadcast in and turned on the remote control. TROUBLE SHOOTING GUIDE SYMPTOM CAUSE (AND REMEDY) TV Bad Picture (snow, multiple images, distortion, blurry) • Check the location of picture. • Make sure there are no unshielded electrical devices nearby that TV mode is selected. • Try a new channel to make sure the program...


