Owners Manual
Page 1
AUDIOVOX.COM PLV31190S1-W-DC / AUDIOVOX I/B 811-311991W310 SIZE : 148 X 210MM MATERIAL : 80g WOODSFREE PAPER 128-8058 FPE1907DV 19" HD FLAT PANEL LCD TV WITH BUILT-IN DVD PLAYER OWNER'S MANUAL FOR ASSISTANCE CALL CUSTOMER SERVICE AT 1-800-645-4994 OR VISIT US AT WWW.
AUDIOVOX.COM PLV31190S1-W-DC / AUDIOVOX I/B 811-311991W310 SIZE : 148 X 210MM MATERIAL : 80g WOODSFREE PAPER 128-8058 FPE1907DV 19" HD FLAT PANEL LCD TV WITH BUILT-IN DVD PLAYER OWNER'S MANUAL FOR ASSISTANCE CALL CUSTOMER SERVICE AT 1-800-645-4994 OR VISIT US AT WWW.
Owners Manual
Page 9
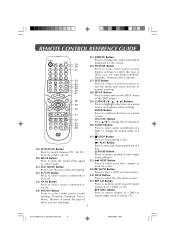
Button Press / to change the TV channels. 30) AUDIO Button Press to select audio soundtracks of a DVD or change disc status information displayed... STOP Button Press to confirm selections on a DVD or CD. Press again to cancel mute. 21) LCD MODE Button Press to set the size of the LCD display. 22) YUV IN Button Press to select source connected to YUV IN. 23) AV IN Button ...PLV31190CS1-DC_IB_ENG_AUD.pmd 9 20/04/2007, 16:51 REMOTE CONTROL REFERENCE GUIDE 19 20 21 22 23 24 25 26 27 28 29 30 31 32 33 34 35 19) FUNCTION Button Press to switch between TV / AV IN / YUV IN / DVD / PC IN. 20) ...
Button Press / to change the TV channels. 30) AUDIO Button Press to select audio soundtracks of a DVD or change disc status information displayed... STOP Button Press to confirm selections on a DVD or CD. Press again to cancel mute. 21) LCD MODE Button Press to set the size of the LCD display. 22) YUV IN Button Press to select source connected to YUV IN. 23) AV IN Button ...PLV31190CS1-DC_IB_ENG_AUD.pmd 9 20/04/2007, 16:51 REMOTE CONTROL REFERENCE GUIDE 19 20 21 22 23 24 25 26 27 28 29 30 31 32 33 34 35 19) FUNCTION Button Press to switch between TV / AV IN / YUV IN / DVD / PC IN. 20) ...

Owners Manual
Page 10
Press and hold to fast forward playback. 11) OPEN / CLOSE Button To open and close the disc door. 12) Color LCD Screen 13) Disc Door 14) STANDBY Indicator Indicates whether the unit is ON or in STANDBY. UNIT REFERENCE GUIDE TOP, FRONT & SIDE VIEW 6 7 8 9 1 10 2 4 3 5 11 ...-DC_IB_ENG_AUD.pmd 10 20/04/2007, 16:51 VOL + Controls Adjusts the volume level and highlight selections (Left & Right) on the menu screen. 5) / Buttons Selects a TV channel and highlight selections (Up & Down) on and off. 2) MENU Button Enters and exits the...
Press and hold to fast forward playback. 11) OPEN / CLOSE Button To open and close the disc door. 12) Color LCD Screen 13) Disc Door 14) STANDBY Indicator Indicates whether the unit is ON or in STANDBY. UNIT REFERENCE GUIDE TOP, FRONT & SIDE VIEW 6 7 8 9 1 10 2 4 3 5 11 ...-DC_IB_ENG_AUD.pmd 10 20/04/2007, 16:51 VOL + Controls Adjusts the volume level and highlight selections (Left & Right) on the menu screen. 5) / Buttons Selects a TV channel and highlight selections (Up & Down) on and off. 2) MENU Button Enters and exits the...
Owners Manual
Page 18
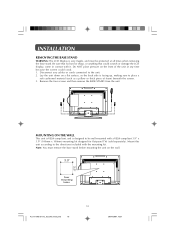
... the screen. 3. Mount this unit according to the directions included with a VESA-compliant 3.9" x 3.9" (100mm x 100mm) mounting kit designed for flat-panel TVs (sold separately). Remove the four screws and then remove the BASE STAND from the unit. MOUNTING ON THE WALL This unit is VESA-compliant, and...or anything that could crack. 1. Note: You must be wall-mounted with the mounting kit. INSTALLATION REMOVING THE BASE STAND WARNING: The LCD Display is very fragile, and must remove the base stand before mounting the unit on the wall. 18 PLV31190CS1-DC_IB_ENG_AUD.pmd 18 20/04/...
... the screen. 3. Mount this unit according to the directions included with a VESA-compliant 3.9" x 3.9" (100mm x 100mm) mounting kit designed for flat-panel TVs (sold separately). Remove the four screws and then remove the BASE STAND from the unit. MOUNTING ON THE WALL This unit is VESA-compliant, and...or anything that could crack. 1. Note: You must be wall-mounted with the mounting kit. INSTALLATION REMOVING THE BASE STAND WARNING: The LCD Display is very fragile, and must remove the base stand before mounting the unit on the wall. 18 PLV31190CS1-DC_IB_ENG_AUD.pmd 18 20/04/...

Owners Manual
Page 25
...select a language, then press the ENTER button. Use the or button to select the option (BRIGHTNESS, CONTRAST or VIDEO), then press the button. TV TYPE Pan Scan • When wide-screen video is preset on the unit screen or other external wide-screens. Note: • The displayable ... It takes 3-5 seconds to reset the DVD settings to the factory default. 25 Cut off when a widescreen video image is still not correct, press the LCD MODE button repeatedly to adjust other options. 5 . VIDEO SETUP 1. SYSTEM SETUP 1. Repeat steps 2 and 3 above to adjust it can be viewed on a...
...select a language, then press the ENTER button. Use the or button to select the option (BRIGHTNESS, CONTRAST or VIDEO), then press the button. TV TYPE Pan Scan • When wide-screen video is preset on the unit screen or other external wide-screens. Note: • The displayable ... It takes 3-5 seconds to reset the DVD settings to the factory default. 25 Cut off when a widescreen video image is still not correct, press the LCD MODE button repeatedly to adjust other options. 5 . VIDEO SETUP 1. SYSTEM SETUP 1. Repeat steps 2 and 3 above to adjust it can be viewed on a...

