Owners Manual
Page 1
FPE1908DV 19" HD FLAT PANEL LCD TV/DVD COMBO OWNER'S MANUAL 1 FOR ASSISTANCE CALL CUSTOMER SERVICE AT 1-800-645-4994 OR VISIT US AT WWW.AUDIOVOX.COM E - 1 English P1-32.indd 1 128-8329 6/11/2008 12:22:10 PM
FPE1908DV 19" HD FLAT PANEL LCD TV/DVD COMBO OWNER'S MANUAL 1 FOR ASSISTANCE CALL CUSTOMER SERVICE AT 1-800-645-4994 OR VISIT US AT WWW.AUDIOVOX.COM E - 1 English P1-32.indd 1 128-8329 6/11/2008 12:22:10 PM

Owners Manual
Page 2
... dry before turning the power on a circuit different from that are designed to part 15 of time, disconnect the AC power cord. REPLACE ONLY WITH THE SAME OR EQUIVALENT TYPE. • TO PREVENT ELECTRIC SHOCK, MATCH WIDE BLADE OF PLUG TO WIDE SLOT OF WALL OUTLET, THEN FULLY INSERT. • Use of controls or adjustments or performance of important operating and maintenance (servicing) instructions in hazardous...
... dry before turning the power on a circuit different from that are designed to part 15 of time, disconnect the AC power cord. REPLACE ONLY WITH THE SAME OR EQUIVALENT TYPE. • TO PREVENT ELECTRIC SHOCK, MATCH WIDE BLADE OF PLUG TO WIDE SLOT OF WALL OUTLET, THEN FULLY INSERT. • Use of controls or adjustments or performance of important operating and maintenance (servicing) instructions in hazardous...
Owners Manual
Page 4
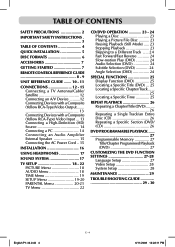
...a TV Antenna/Cable/ Satellite 12 Connecting an A/V Device ..........12 Connecting Devices with a Composite (Yellow RCA-Type) Video Output 13 Connecting Devices with a Composite (Yellow RCA-Type) Video Input ... 13 Connecting a High-Definition (HD) Source 14 Connecting a PC 14 Connecting an Audio Amplifier External Speaker 15 Connecting the AC Power Cord .. 15 INSTALLATION 16 USING HEADPHONES 17 SOUND SYSTEM 17 TV SETUP 18 - 22 PICTURE Menu 18 AUDIO Menu 18 TIME Menu 19 Setup Menu 19-20 Parental Menu 20-21 TV Menu 22 CD/DVD OPERATION 23 - 24 Playing a Disc 23 Playing a Picture...
...a TV Antenna/Cable/ Satellite 12 Connecting an A/V Device ..........12 Connecting Devices with a Composite (Yellow RCA-Type) Video Output 13 Connecting Devices with a Composite (Yellow RCA-Type) Video Input ... 13 Connecting a High-Definition (HD) Source 14 Connecting a PC 14 Connecting an Audio Amplifier External Speaker 15 Connecting the AC Power Cord .. 15 INSTALLATION 16 USING HEADPHONES 17 SOUND SYSTEM 17 TV SETUP 18 - 22 PICTURE Menu 18 AUDIO Menu 18 TIME Menu 19 Setup Menu 19-20 Parental Menu 20-21 TV Menu 22 CD/DVD OPERATION 23 - 24 Playing a Disc 23 Playing a Picture...
Owners Manual
Page 5
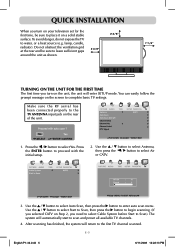
... place it on a solid stable surface. Turning On the Unit for the first time, be sure to select Yes. Press the ENTER button to complete basic TV settings. The system will return to the first TV channel scanned. Quick Installation When you turn on your television set for the first time The first time you need to select Cable System before Start to Scan). You can easily follow the prompt...
... place it on a solid stable surface. Turning On the Unit for the first time, be sure to select Yes. Press the ENTER button to complete basic TV settings. The system will return to the first TV channel scanned. Quick Installation When you turn on your television set for the first time The first time you need to select Cable System before Start to Scan). You can easily follow the prompt...

Owners Manual
Page 7
... instructions included with the universal remote control. They may not work properly. • The recommended effective distance for assistance, or refer to programming a universal remote control, you must contact the customer service department of the remote control will need to program the remote control. We recommend you will be used for a long time, remove the batteries to change without notice. Open the battery door. 2. Note: • If the remote control is incorrectly replaced...
... instructions included with the universal remote control. They may not work properly. • The recommended effective distance for assistance, or refer to programming a universal remote control, you must contact the customer service department of the remote control will need to program the remote control. We recommend you will be used for a long time, remove the batteries to change without notice. Open the battery door. 2. Note: • If the remote control is incorrectly replaced...
Owners Manual
Page 8
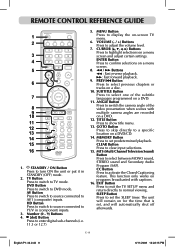
... sound and Secondary Audio Program (SAP). remote CONTROL REFERENCE GUIDE 1. MTS (Multi Channel Television Sound) Button Press to DVD mode. This function only works on programs broadcasted with multiple camera angles are recorded on for the time that is set predetermined playback. STANDBY / ON Button Press to TV mode. TV Button Press to switch to turn ON the unit or put it in (component) inputs. 3. TITLE Button Press to normal viewing. EXIT Button Press to exit the TV SETUP menu and return directly...
... sound and Secondary Audio Program (SAP). remote CONTROL REFERENCE GUIDE 1. MTS (Multi Channel Television Sound) Button Press to DVD mode. This function only works on programs broadcasted with multiple camera angles are recorded on for the time that is set predetermined playback. STANDBY / ON Button Press to TV mode. TV Button Press to switch to turn ON the unit or put it in (component) inputs. 3. TITLE Button Press to normal viewing. EXIT Button Press to exit the TV SETUP menu and return directly...

Owners Manual
Page 9
... and exit the SETUP menu of the DVD. 27. SETUP Button Press to perform slow forward playback of a disc. DISPLAY Button Press to select the next title, chapter or track on a disc. 22. E - 9 English P1-32.indd 9 6/11/2008 12:22:15 PM NEXT Button Press to change the output mode of the DVD. 26. PLAY Button Press to switch between the last two channels displayed. 19. FUNCTION Button Press to...
... and exit the SETUP menu of the DVD. 27. SETUP Button Press to perform slow forward playback of a disc. DISPLAY Button Press to select the next title, chapter or track on a disc. 22. E - 9 English P1-32.indd 9 6/11/2008 12:22:15 PM NEXT Button Press to change the output mode of the DVD. 26. PLAY Button Press to switch between the last two channels displayed. 19. FUNCTION Button Press to...

Owners Manual
Page 13
... you connect the cable from the other equipment for more information. • After connection, please operate in TV/AV mode. • For the reason of copyright protection, the resulting copy may have bad picture and/or sound. Note: • Please refer to the user manual for the other equipment for the other equipment (AUDIO and VIDEO IN) to a VCR / Video Game System / Camcorder Connect the AUDIO / VIDEO cable (not...
... you connect the cable from the other equipment for more information. • After connection, please operate in TV/AV mode. • For the reason of copyright protection, the resulting copy may have bad picture and/or sound. Note: • Please refer to the user manual for the other equipment for the other equipment (AUDIO and VIDEO IN) to a VCR / Video Game System / Camcorder Connect the AUDIO / VIDEO cable (not...
Owners Manual
Page 14
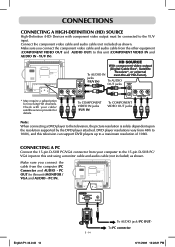
... cable/ satellite service provider for receiving HD channels. PC OUT) to a maximum resolution of 1080i. Connect the component video cable and audio cable (not included) as shown. To COMPONENT VIDEO IN jacks (YUV IN) To COMPONENT VIDEO OUT jacks Note: When connecting a DVD player to the YUV input. PC IN). Connecting a pc Connect the 15-pin D-SUB PC/VGA connector from 480i to 1080i, and this television can support DVD players up to this unit (MONITOR / VGA and AUDIO - To AUDIO...
... cable/ satellite service provider for receiving HD channels. PC OUT) to a maximum resolution of 1080i. Connect the component video cable and audio cable (not included) as shown. To COMPONENT VIDEO IN jacks (YUV IN) To COMPONENT VIDEO OUT jacks Note: When connecting a DVD player to the YUV input. PC IN). Connecting a pc Connect the 15-pin D-SUB PC/VGA connector from 480i to 1080i, and this television can support DVD players up to this unit (MONITOR / VGA and AUDIO - To AUDIO...

Owners Manual
Page 16
... thick piece of the unit at all times when removing the base stand. Note: You must be wall-mounted with the mounting kit. MOUNTING ON THE WALL This unit is VESA-compliant, and is designed to the directions included with a VESA-compliant 3 15/16" x 3 15/16" (100mm x 100mm) mounting kit designed for flat-panel TVs (sold separately). INSTALLATION REMOVING THE BASE STAND WARNING: The LCD Display is facing up, making sure to...
... thick piece of the unit at all times when removing the base stand. Note: You must be wall-mounted with the mounting kit. MOUNTING ON THE WALL This unit is VESA-compliant, and is designed to the directions included with a VESA-compliant 3 15/16" x 3 15/16" (100mm x 100mm) mounting kit designed for flat-panel TVs (sold separately). INSTALLATION REMOVING THE BASE STAND WARNING: The LCD Display is facing up, making sure to...
Owners Manual
Page 18
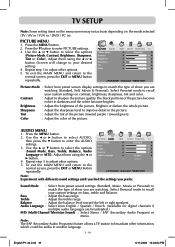
... range. Audio Language : Select from preset screen display settings to match the type of the picture (toward purple / toward the left or right speakers. Use the or button to enter the Audio settings. 3. Tint : Adjust the tint of show you are broadcasted.) MTS (Multi Channel Television Sound) : Select Stereo / SAP (Secondary Audio Program) or Mono. Color : Adjust the color of the picture. Press the MENU button. 2. Use the or button to select Audio, then press the button to select the options (Picture Mode, Contrast...
... range. Audio Language : Select from preset screen display settings to match the type of the picture (toward purple / toward the left or right speakers. Use the or button to enter the Audio settings. 3. Tint : Adjust the tint of show you are broadcasted.) MTS (Multi Channel Television Sound) : Select Stereo / SAP (Secondary Audio Program) or Mono. Color : Adjust the color of the picture. Press the MENU button. 2. Use the or button to select Audio, then press the button to select the options (Picture Mode, Contrast...
Owners Manual
Page 19
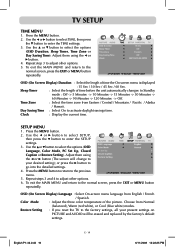
.... Sleep Timer : Select the length of time the On screen menu is displayed : 15 Sec / 30 Sec / 45 Sec / 60 Sec. Use the or button to the previous menu. 5. Adjust them using the or button (The screen will change to the normal screen, press the EXIT or MENU button repeatedly. To exit the MAIN MENU and return to your present settings on PICTURE and Audio will be erased and replaced by the factory's default settings. Color Mode : Adjust the...
.... Sleep Timer : Select the length of time the On screen menu is displayed : 15 Sec / 30 Sec / 45 Sec / 60 Sec. Use the or button to the previous menu. 5. Adjust them using the or button (The screen will change to the normal screen, press the EXIT or MENU button repeatedly. To exit the MAIN MENU and return to your present settings on PICTURE and Audio will be erased and replaced by the factory's default settings. Color Mode : Adjust the...

Owners Manual
Page 20
... enter the PARENTAL settings. Use the or button to select PARENTAL, then press the button to use the default digital caption style of screen letters, color misalignment, or blurring. Parental MENU Password 1. Enter a 4-digit password. Refresh Frequency : 60Hz max H - TV SETUP PC Set Up (in PC mode only) - Pos V - Closed Caption Note: This function only works on Mute. : Select the analog closed caption or turn it off. : Select the digital closed caption On, Off or CC on ATSC programs broadcast with captions. The menu locked screen will enter the Parental menu.
... enter the PARENTAL settings. Use the or button to select PARENTAL, then press the button to use the default digital caption style of screen letters, color misalignment, or blurring. Parental MENU Password 1. Enter a 4-digit password. Refresh Frequency : 60Hz max H - TV SETUP PC Set Up (in PC mode only) - Pos V - Closed Caption Note: This function only works on Mute. : Select the analog closed caption or turn it off. : Select the digital closed caption On, Off or CC on ATSC programs broadcast with captions. The menu locked screen will enter the Parental menu.

Owners Manual
Page 21
...+ : Adult Programming. G : GENERAL AUDIENCES, Suitable for all children age 7 and above. Adjust them using the or button, or press the button to the previous menu. 3. Press the MENU button to return to go into the detailed settings. 2. TV SETUP Parental 1. E : Exempt. Rating Enable US Canada RRT Setting Reset RRT : Select On to edit the following parental items. Select Off to disable parental control. : Set TV and MPAA ratings. : Set Canada English and Canada...
...+ : Adult Programming. G : GENERAL AUDIENCES, Suitable for all children age 7 and above. Adjust them using the or button, or press the button to the previous menu. 3. Press the MENU button to return to go into the detailed settings. 2. TV SETUP Parental 1. E : Exempt. Rating Enable US Canada RRT Setting Reset RRT : Select On to edit the following parental items. Select Off to disable parental control. : Set TV and MPAA ratings. : Set Canada English and Canada...
Owners Manual
Page 23
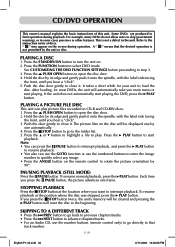
... want to quickly select any image. • Press the ANGLE button on the screen during playback. The picture files on the disc will reset the disc to start playing the DVD, press the PLAY button. Press the STOP button to go directly to close it . CD/DVD OPERATION This owner's manual explains the basic instructions of discs. For example, many DVDs do not allow users to step 3. 3. See CUSTOMIZING THE DVD FUNCTION SETTINGS before...
... want to quickly select any image. • Press the ANGLE button on the screen during playback. The picture files on the disc will reset the disc to start playing the DVD, press the PLAY button. Press the STOP button to go directly to close it . CD/DVD OPERATION This owner's manual explains the basic instructions of discs. For example, many DVDs do not allow users to step 3. 3. See CUSTOMIZING THE DVD FUNCTION SETTINGS before...

Owners Manual
Page 24
... be used for discs on the remote control. Audio selection (DVD) On some DVDs, subtitles are playing a DVD with the new subtitle selected. • The number of the DVD. Press the SUBTITLE button repeatedly to select the desired audio format. Note: • If only one language is recorded, the language does not change. • About two seconds later, playback continues with different angles recorded, press the ANGLE button to view the number of...
... be used for discs on the remote control. Audio selection (DVD) On some DVDs, subtitles are playing a DVD with the new subtitle selected. • The number of the DVD. Press the SUBTITLE button repeatedly to select the desired audio format. Note: • If only one language is recorded, the language does not change. • About two seconds later, playback continues with different angles recorded, press the ANGLE button to view the number of...
Owners Manual
Page 27
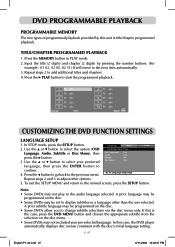
... play in PLAY mode. 2. Title/Chapter programmed playback 1. Repeat steps 2 to change subtitle selections via the disc menu only. DVD PROGRAMMABLE PLAYBACK Programmable memory The two types of programmed playback provided by pressing the number buttons. (For example : 01 02, 02 05, 02 11) It will move to the next item automatically. 3. Press the MEMORY button in the audio language selected. Note: • Some DVDs may be programmed...
... play in PLAY mode. 2. Title/Chapter programmed playback 1. Repeat steps 2 to change subtitle selections via the disc menu only. DVD PROGRAMMABLE PLAYBACK Programmable memory The two types of programmed playback provided by pressing the number buttons. (For example : 01 02, 02 05, 02 11) It will move to the next item automatically. 3. Press the MEMORY button in the audio language selected. Note: • Some DVDs may be programmed...
Owners Manual
Page 28
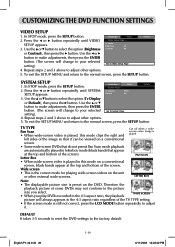
... mode, press the SETUP button. 2. Letter Box PAN SCAN • When wide-screen video is played in the 4:3 aspect ratio regardless of the TV TYPE setting. • If the screen mode is the correct mode for playing wide-screen videos on a conventional screen, black bands appear at the top and bottom of some DVDs may not conform to adjust it can be viewed on the DVD. Wide screen • This is still not correct, press the LCD MODE button...
... mode, press the SETUP button. 2. Letter Box PAN SCAN • When wide-screen video is played in the 4:3 aspect ratio regardless of the TV TYPE setting. • If the screen mode is the correct mode for playing wide-screen videos on a conventional screen, black bands appear at the top and bottom of some DVDs may not conform to adjust it can be viewed on the DVD. Wide screen • This is still not correct, press the LCD MODE button...

Owners Manual
Page 29
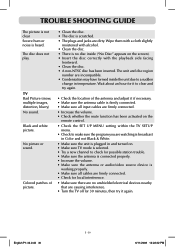
... speaker output. • This unit is connected. • Turn on the surface. • Do NOT expose the disc to direct sunlight or excessive heat. • Clean the disc before maintaining the unit. • Wipe the unit with a cleaning cloth. • NEVER use irregular shaped discs (example : heart shaped, octagonal, etc.). Trouble Shooting Guide SYMPTOM CAUSE (AND REMEDY) No power...
... speaker output. • This unit is connected. • Turn on the surface. • Do NOT expose the disc to direct sunlight or excessive heat. • Clean the disc before maintaining the unit. • Wipe the unit with a cleaning cloth. • NEVER use irregular shaped discs (example : heart shaped, octagonal, etc.). Trouble Shooting Guide SYMPTOM CAUSE (AND REMEDY) No power...
Owners Manual
Page 30
...antenna cable is firmly connected. • Make sure all input cables are firmly connected. • Increase the volume. • Check whether the mute function has been activated on the remote control. • Check the SET UP MENU setting within the TV SETUP menu. • Check to make sure the program you are watching is broadcast in Color and not Black... TV mode is selected. • Try a new channel to check for possible station trouble. • Make sure the antenna is connected properly. • Increase the volume. • Make sure the antenna or audio/video source device is plugged in...
...antenna cable is firmly connected. • Make sure all input cables are firmly connected. • Increase the volume. • Check whether the mute function has been activated on the remote control. • Check the SET UP MENU setting within the TV SETUP menu. • Check to make sure the program you are watching is broadcast in Color and not Black... TV mode is selected. • Try a new channel to check for possible station trouble. • Make sure the antenna is connected properly. • Increase the volume. • Make sure the antenna or audio/video source device is plugged in...


