User Guide
Page 13
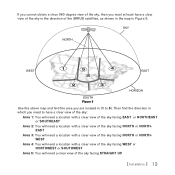
Then find the area you are located in (1 to have a clear view of the sky in the direction of the sky facing STRAIGHT UP [ Installation ] 13 If you cannot obtain a clear 360 degree view of the sky, then you must at least have a ... Area 4: You will need a location with a clear view of the sky facing WEST or NORTHWEST or SOUTHWEST Area 5: You will need a clear view of the SIRIUS satellites, as shown in the map in Figure 5. SKY NORTH WEST 1 5 4 EAST 2 3 HORIZON SOUTH Figure 5 Use the above map and find the...
Then find the area you are located in (1 to have a clear view of the sky in the direction of the sky facing STRAIGHT UP [ Installation ] 13 If you cannot obtain a clear 360 degree view of the sky, then you must at least have a ... Area 4: You will need a location with a clear view of the sky facing WEST or NORTHWEST or SOUTHWEST Area 5: You will need a clear view of the SIRIUS satellites, as shown in the map in Figure 5. SKY NORTH WEST 1 5 4 EAST 2 3 HORIZON SOUTH Figure 5 Use the above map and find the...

User Guide
Page 14
... whereas if you will need a more Northeast facing clear view of the sky. N W E S No obstructions to the sky within the area facing North to Northeast direction. You determined that your area. Figure 6 shows a correct antenna installation for your antenna will need to have a clear view of the sky facing North or...you live in southern California, you live in Area 2. Choose a mounting location for the antenna which has an unobstructed view of the sky in the direction for Area 2, with a clear view of the sky in the North to Northeast 14 [ Installation ] NORTH Figure 6
... whereas if you will need a more Northeast facing clear view of the sky. N W E S No obstructions to the sky within the area facing North to Northeast direction. You determined that your area. Figure 6 shows a correct antenna installation for your antenna will need to have a clear view of the sky facing North or...you live in southern California, you live in Area 2. Choose a mounting location for the antenna which has an unobstructed view of the sky in the direction for Area 2, with a clear view of the sky in the North to Northeast 14 [ Installation ] NORTH Figure 6

User Guide
Page 15
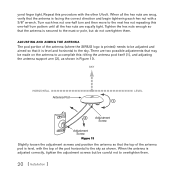
... SIRIUS signal is receiving a good SIRIUS signal. Roof Mount: Mounting the antenna on the roof of the building or home using the provided #10 screws. MOUNTING HOLES Figure 7 [ Installation ] 15 Once you have chosen may determine which mounting method you put the antenna in place temporarily and connect the... lights will be oriented in a vertical position (as an existing satellite TV dish mast, an existing TV antenna mast, or other mast or pole, not exceeding 2 inches in Figure 7) and mounted directly to your the tuner and verify that your area, it is recommended that you can use...
... SIRIUS signal is receiving a good SIRIUS signal. Roof Mount: Mounting the antenna on the roof of the building or home using the provided #10 screws. MOUNTING HOLES Figure 7 [ Installation ] 15 Once you have chosen may determine which mounting method you put the antenna in place temporarily and connect the... lights will be oriented in a vertical position (as an existing satellite TV dish mast, an existing TV antenna mast, or other mast or pole, not exceeding 2 inches in Figure 7) and mounted directly to your the tuner and verify that your area, it is recommended that you can use...

User Guide
Page 17
... antenna's view of the sky by locating it where a chimney, dormer, gable, etc., may be oriented in a vertical position as shown in Figure 5, and mounted directly to insure a watertight installation. Then, using a 3/32 in the bracket. It may obstruct the sky view. (Figure 9) The antenna mounting bracket should be necessary to...
... antenna's view of the sky by locating it where a chimney, dormer, gable, etc., may be oriented in a vertical position as shown in Figure 5, and mounted directly to insure a watertight installation. Then, using a 3/32 in the bracket. It may obstruct the sky view. (Figure 9) The antenna mounting bracket should be necessary to...

User Guide
Page 18
... pole which you determined from the map in diameter using the provided U-bolts and mounting brackets. If you will need to the mast, you have a satellite TV dish, the outdoor antenna may be mounted on the same mast as shown in Figure 11. 18 [ Installation ] Keep in mind that the antenna... cable is routed under the lower U-bolt, in the slot provided in the antenna base as the satellite dish, but remember that the dish cannot obstruct the antenna's view of the sky in the direction which does not exceed 2 inches in the previous section. (Figure 10) Figure 10 To mount the antenna...
... pole which you determined from the map in diameter using the provided U-bolts and mounting brackets. If you will need to the mast, you have a satellite TV dish, the outdoor antenna may be mounted on the same mast as shown in Figure 11. 18 [ Installation ] Keep in mind that the antenna... cable is routed under the lower U-bolt, in the slot provided in the antenna base as the satellite dish, but remember that the dish cannot obstruct the antenna's view of the sky in the direction which does not exceed 2 inches in the previous section. (Figure 10) Figure 10 To mount the antenna...
User Guide
Page 20
... the adjustment screws and position the antenna so that the top of the antenna pod is level, with the top of the antenna (where the SIRIUS logo is printed) needs to be adjusted and aimed so that the antenna is level and horizontal to accomplish this: tilting the antenna pod itself... of the pod horizontal to the mast or pole, but be made on the antenna to the sky. When the antenna is facing the correct direction and begin tightening each hex nut one -half turn and then move to overtighten them . Turn each hex nut with the other U-bolt. When all...
... the adjustment screws and position the antenna so that the top of the antenna pod is level, with the top of the antenna (where the SIRIUS logo is printed) needs to be adjusted and aimed so that the antenna is level and horizontal to accomplish this: tilting the antenna pod itself... of the pod horizontal to the mast or pole, but be made on the antenna to the sky. When the antenna is facing the correct direction and begin tightening each hex nut one -half turn and then move to overtighten them . Turn each hex nut with the other U-bolt. When all...

User Guide
Page 21
..., kink, or crimp the cable, or cut, damage, or puncture the external jacket of the installation: 1. Install the cable tie around the cable directly below the rubber boot to provide a weatherproof seal. Attach the cable to where you can continue with the cable portion of the antenna cable. 3. Route... the remainder of the antenna cable into the home or building to the antenna and slide the rubber boot over the cable connection. Connect the cable from the antenna to the IN port on the Splitter. (Figure 15) Note that you purchased separately, slide the rubber boot over...
..., kink, or crimp the cable, or cut, damage, or puncture the external jacket of the installation: 1. Install the cable tie around the cable directly below the rubber boot to provide a weatherproof seal. Attach the cable to where you can continue with the cable portion of the antenna cable. 3. Route... the remainder of the antenna cable into the home or building to the antenna and slide the rubber boot over the cable connection. Connect the cable from the antenna to the IN port on the Splitter. (Figure 15) Note that you purchased separately, slide the rubber boot over...

User Guide
Page 24
...able to tune to begin enjoying SIRIUS Satellite Radio's digital entertainment! 24 [ Installation ] When you have successfully subscribed to the SIRIUS service, and the tuner has been updated with no metadata feedback available. Until you subscribe, you will be hard-wired directly into this guide. 4. Note that...(You will need to subscribe to the Sirius Satellite Radio service. You are now ready to channels 0 and 184. Be sure that the tuner is correctly installed as described in this manual, and that this type of connection only supports one-way control with your ...
...able to tune to begin enjoying SIRIUS Satellite Radio's digital entertainment! 24 [ Installation ] When you have successfully subscribed to the SIRIUS service, and the tuner has been updated with no metadata feedback available. Until you subscribe, you will be hard-wired directly into this guide. 4. Note that...(You will need to subscribe to the Sirius Satellite Radio service. You are now ready to channels 0 and 184. Be sure that the tuner is correctly installed as described in this manual, and that this type of connection only supports one-way control with your ...