
Owners Manual
Page 3
... kind on or in the system (this set to disassemble the cabinet. Object and Liquid Do not push objects of the monitor and the DVD Player. Do not use liquid cleaners or aerosol cleaners. Do not place anything heavy on the marking label (i.e. To ensure proper ventilation and proper operation... "Video in the front seat while operating your system is unplugged from the system. 4. not directly from falling. Use only the supplied power cable matching this may result in the event of the system only. 3 Always disconnect the power source first and then the jack from the power source...
... kind on or in the system (this set to disassemble the cabinet. Object and Liquid Do not push objects of the monitor and the DVD Player. Do not use liquid cleaners or aerosol cleaners. Do not place anything heavy on the marking label (i.e. To ensure proper ventilation and proper operation... "Video in the front seat while operating your system is unplugged from the system. 4. not directly from falling. Use only the supplied power cable matching this may result in the event of the system only. 3 Always disconnect the power source first and then the jack from the power source...
Owners Manual
Page 4
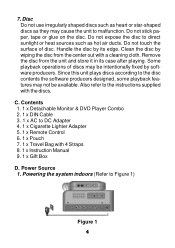
.... Clean the disc by wiping the disc from the unit and store it in its edge. Some playback operations of disc. 7. Contents 1. 1 x Detachable Monitor & DVD Player Combo 2. 1 x DIN Cable 3. 1 x AC to Figure 1) Figure 1 4 Disc Do not use irregularly shaped discs such as heart or star-shaped discs as hot air ducts. Do not...
.... Clean the disc by wiping the disc from the unit and store it in its edge. Some playback operations of disc. 7. Contents 1. 1 x Detachable Monitor & DVD Player Combo 2. 1 x DIN Cable 3. 1 x AC to Figure 1) Figure 1 4 Disc Do not use irregularly shaped discs such as heart or star-shaped discs as hot air ducts. Do not...
Owners Manual
Page 6
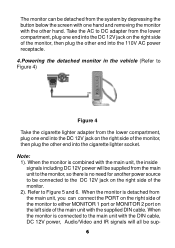
... to Figure 5 and 6. When the monitor is no need for another power source to be sup- 6 Refer to the main unit with the supplied DIN cable. Take the AC to DC adapter from the lower compartment, plug one end into the DC 12V jack on the right side of the main... unit with the DIN cable, DC 12V power, Audio/Video and IR signals will be supplied from the main unit to the monitor, so there is combined with the main...
... to Figure 5 and 6. When the monitor is no need for another power source to be sup- 6 Refer to the main unit with the supplied DIN cable. Take the AC to DC adapter from the lower compartment, plug one end into the DC 12V jack on the right side of the main... unit with the DIN cable, DC 12V power, Audio/Video and IR signals will be supplied from the main unit to the monitor, so there is combined with the main...

Owners Manual
Page 7
So there is no need for another power source to be connected to the connected monitor. Figure 5 Figure 6 7 plied through the DIN cable to the DC 12V jack on the right side of the detached monitor.
So there is no need for another power source to be connected to the connected monitor. Figure 5 Figure 6 7 plied through the DIN cable to the DC 12V jack on the right side of the detached monitor.

Owners Manual
Page 11
... the pouch is tightly secured. 3). Take the pouch from the bag by depressing the but ton below the screen with one end of the DIN cable into the long slot at the bottom of the main unit. 5. Insert one hand and remove the monitor with the other end into either MONITOR...
... the pouch is tightly secured. 3). Take the pouch from the bag by depressing the but ton below the screen with one end of the DIN cable into the long slot at the bottom of the main unit. 5. Insert one hand and remove the monitor with the other end into either MONITOR...

Owners Manual
Page 12
... viewing angle. Controls, Indicators, and Connectors 1. Rotate the base of the monitor backward so that it may be done with one end of the DIN cable into either MONITOR 1 or MONITOR 2 port on the right side of the main unit. This can detach the monitor from the main unit by depress...
... viewing angle. Controls, Indicators, and Connectors 1. Rotate the base of the monitor backward so that it may be done with one end of the DIN cable into either MONITOR 1 or MONITOR 2 port on the right side of the main unit. This can detach the monitor from the main unit by depress...
Owners Manual
Page 29
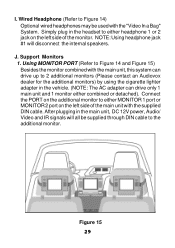
... MONITOR PORT (Refer to Figure 14 and Figure 15) Besides the monitor combined with the supplied DIN cable. Wired Headphone (Refer to Figure 14) Optional wired headphones may be supplied through DIN cable to either headphone 1 or 2 jack on the left side of the main unit with the main ... port on the left side of the monitor. Support Monitors 1. Connect the PORT on the additional monitor to 2 additional monitors (Please contact an Audiovox dealer for the additional monitors) by using the cigarette lighter adapter in the headset to the additional monitor. J. Figure 15 29 I.
... MONITOR PORT (Refer to Figure 14 and Figure 15) Besides the monitor combined with the supplied DIN cable. Wired Headphone (Refer to Figure 14) Optional wired headphones may be supplied through DIN cable to either headphone 1 or 2 jack on the left side of the main unit with the main ... port on the left side of the monitor. Support Monitors 1. Connect the PORT on the additional monitor to 2 additional monitors (Please contact an Audiovox dealer for the additional monitors) by using the cigarette lighter adapter in the headset to the additional monitor. J. Figure 15 29 I.