Owners Manual
Page 3
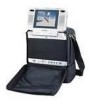
...power source. Contact qualified service personnel if your vehicle. 3. To prevent battery discharge, disconnect the "Video in a Bag" System jack from the inside laser beam to eyes, and to reduce the risk...set to disassemble the cabinet. Object and Liquid Do not push objects of the monitor and the DVD Player. Do not use . Power should be mounted for cleaning the exterior of switched (Accessory) ...a Bag" System with a cloth or other material. 5. Use only the supplied power cable matching this may result in the Run and/or Accessory positions. The "S" hooks and all straps ...
...power source. Contact qualified service personnel if your vehicle. 3. To prevent battery discharge, disconnect the "Video in a Bag" System jack from the inside laser beam to eyes, and to reduce the risk...set to disassemble the cabinet. Object and Liquid Do not push objects of the monitor and the DVD Player. Do not use . Power should be mounted for cleaning the exterior of switched (Accessory) ...a Bag" System with a cloth or other material. 5. Use only the supplied power cable matching this may result in the Run and/or Accessory positions. The "S" hooks and all straps ...
Owners Manual
Page 6
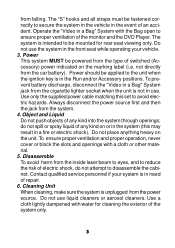
... the monitor is detached from the lower compartment, plug one hand and removing the monitor with the DIN cable, DC 12V power, Audio/Video and IR signals will be supplied from the main unit to the monitor, so there is connected to the main unit with the other hand. ...
... the monitor is detached from the lower compartment, plug one hand and removing the monitor with the DIN cable, DC 12V power, Audio/Video and IR signals will be supplied from the main unit to the monitor, so there is connected to the main unit with the other hand. ...
Owners Manual
Page 29
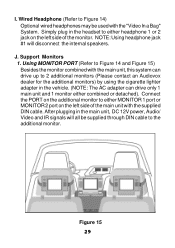
After plugging in the main unit, DC 12V power, Audio/ Video and IR signals will disconnect the internal speakers. Support Monitors 1. Wired Headphone (Refer to Figure 14) Optional wired headphones may be supplied through DIN cable to either MONITOR 1 port or MONITOR 2 port on the left side... of the monitor. Figure 15 29 J. Connect the PORT on the additional monitor to the additional monitor. Using MONITOR PORT (Refer to 2 additional monitors (Please contact an Audiovox dealer for the ...
After plugging in the main unit, DC 12V power, Audio/ Video and IR signals will disconnect the internal speakers. Support Monitors 1. Wired Headphone (Refer to Figure 14) Optional wired headphones may be supplied through DIN cable to either MONITOR 1 port or MONITOR 2 port on the left side... of the monitor. Figure 15 29 J. Connect the PORT on the additional monitor to the additional monitor. Using MONITOR PORT (Refer to 2 additional monitors (Please contact an Audiovox dealer for the ...