
Owners Manual
Page 1
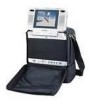
VBP4000 VIDEO IN A BAG SYSTEM WITH DETACHABLE 5.6" LCD MONITOR & DVD PLAYER
VBP4000 VIDEO IN A BAG SYSTEM WITH DETACHABLE 5.6" LCD MONITOR & DVD PLAYER

Owners Manual
Page 2
... you move it from strong magnets, heat sources, direct sunlight, excessive dust. The system's main features include a 5.6" Liquid Crystal Display (LCD) Monitor and a DVD Player. Keep the unit away from falling. When the main unit is in a Bag" System is plug and play. Please read the entire instruction manual...and illustrations provided in this "Video in vehicles, hotels, offices or your home. The system is compact so that the LCD Monitor, DVD Player, Bag and Pouch are fastened to prevent it from the main unit. B. When you can be stored for about one attached).
... you move it from strong magnets, heat sources, direct sunlight, excessive dust. The system's main features include a 5.6" Liquid Crystal Display (LCD) Monitor and a DVD Player. Keep the unit away from falling. When the main unit is in a Bag" System is plug and play. Please read the entire instruction manual...and illustrations provided in this "Video in vehicles, hotels, offices or your home. The system is compact so that the LCD Monitor, DVD Player, Bag and Pouch are fastened to prevent it from the main unit. B. When you can be stored for about one attached).
Owners Manual
Page 3
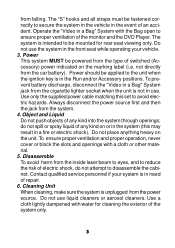
... risk of electric shock, do not spill or spray liquid of any kind on or in a Bag" System jack from the type of the monitor and the DVD Player. Power This system MUST be fastened correctly to ensure proper ventilation of switched (Accessory) power indicated on the unit. To prevent battery discharge, disconnect...
... risk of electric shock, do not spill or spray liquid of any kind on or in a Bag" System jack from the type of the monitor and the DVD Player. Power This system MUST be fastened correctly to ensure proper ventilation of switched (Accessory) power indicated on the unit. To prevent battery discharge, disconnect...
Owners Manual
Page 4
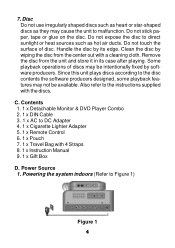
... disc from the unit and store it in its edge. Since this unit plays discs according to the instructions supplied with a cleaning cloth. Contents 1. 1 x Detachable Monitor & DVD Player Combo 2. 1 x DIN Cable 3. 1 x AC to Figure 1) Figure 1 4 Powering the system indoors (Refer to DC Adapter 4. 1 x Cigarette Lighter Adapter 5. 1 x Remote Control 6. 1 x Pouch 7. 1 x Travel Bag with 4 Straps...
... disc from the unit and store it in its edge. Since this unit plays discs according to the instructions supplied with a cleaning cloth. Contents 1. 1 x Detachable Monitor & DVD Player Combo 2. 1 x DIN Cable 3. 1 x AC to Figure 1) Figure 1 4 Powering the system indoors (Refer to DC Adapter 4. 1 x Cigarette Lighter Adapter 5. 1 x Remote Control 6. 1 x Pouch 7. 1 x Travel Bag with 4 Straps...

Owners Manual
Page 5
Powering the system in the vehicle (Refer to DC adapter. Unzip the lower compartment of the bag and take out the AC to Figure 2) Figure 2 Unzip the lower compartment of the bag and take the cigarette lighter adapter. Powering the detached monitor indoors (Refer to DC adapter into the DC 12V jack on the left side of the main unit, then plug other end into the cigarette lighter socket. 3. Plug one end of the main unit, then plug other end into the DC 12V jack on the left side of the AC to Figure 3) Figure 3 5 Plug one end into the 110V AC power receptacle. 2.
Powering the system in the vehicle (Refer to DC adapter. Unzip the lower compartment of the bag and take out the AC to Figure 2) Figure 2 Unzip the lower compartment of the bag and take the cigarette lighter adapter. Powering the detached monitor indoors (Refer to DC adapter into the DC 12V jack on the left side of the main unit, then plug other end into the cigarette lighter socket. 3. Plug one end of the main unit, then plug other end into the DC 12V jack on the left side of the AC to Figure 3) Figure 3 5 Plug one end into the 110V AC power receptacle. 2.
Owners Manual
Page 6
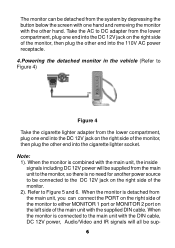
... combined with the DIN cable, DC 12V power, Audio/Video and IR signals will be supplied from the main unit to the monitor, so there is detached from the main unit, you can be detached from the system by depressing the button below the screen with one end ... 4 Take the cigarette lighter adapter from the lower compartment, plug one hand and removing the monitor with the supplied DIN cable. The monitor can connect the PORT on the right side of the monitor to either MONITOR 1 port or MONITOR 2 port on the left side of the main unit with the other hand. Note: 1). Refer...
... combined with the DIN cable, DC 12V power, Audio/Video and IR signals will be supplied from the main unit to the monitor, so there is detached from the main unit, you can be detached from the system by depressing the button below the screen with one end ... 4 Take the cigarette lighter adapter from the lower compartment, plug one hand and removing the monitor with the supplied DIN cable. The monitor can connect the PORT on the right side of the monitor to either MONITOR 1 port or MONITOR 2 port on the left side of the main unit with the other hand. Note: 1). Refer...

Owners Manual
Page 7
plied through the DIN cable to the DC 12V jack on the right side of the detached monitor. So there is no need for another power source to be connected to the connected monitor. Figure 5 Figure 6 7
plied through the DIN cable to the DC 12V jack on the right side of the detached monitor. So there is no need for another power source to be connected to the connected monitor. Figure 5 Figure 6 7

Owners Manual
Page 8
... the straps tightly so that the bag is fastened to the same ring after looping the strap around the headrest of the bag. Swing the monitor upwards and adjust the screen for the right side. Fold inwards the rear piece of the bag and attach its end velcro strap to the...
... the straps tightly so that the bag is fastened to the same ring after looping the strap around the headrest of the bag. Swing the monitor upwards and adjust the screen for the right side. Fold inwards the rear piece of the bag and attach its end velcro strap to the...

Owners Manual
Page 9
.... Adjust the straps tightly so that the bag is fastened to the upper metal ring on the left side of the driver's seat. Swing the monitor upwards and adjust the screen for the right side. 2. Installing the system between the driver/passenger seat (Refer to Figure 8) Figure 8 1).Take one of the...
.... Adjust the straps tightly so that the bag is fastened to the upper metal ring on the left side of the driver's seat. Swing the monitor upwards and adjust the screen for the right side. 2. Installing the system between the driver/passenger seat (Refer to Figure 8) Figure 8 1).Take one of the...

Owners Manual
Page 10
Then secure and adjust the safety belt so that the system is no need to move around. Installing the detached monitor onto the seat back in a car (Refer to prevent the unit from the bag as they are not used in a car (Refer to Figure 9) There ... back seat in this installation. Guide the vehicles safety belt through the short strap sewn on the back seat. Finally uncover the bag, swing the monitor upward and adjust the screen for a desired viewing angle. 3. Figure 9 Carefully place the system (front facing up) on the back of the bag is fastened...
Then secure and adjust the safety belt so that the system is no need to move around. Installing the detached monitor onto the seat back in a car (Refer to prevent the unit from the bag as they are not used in a car (Refer to Figure 9) There ... back seat in this installation. Guide the vehicles safety belt through the short strap sewn on the back seat. Finally uncover the bag, swing the monitor upward and adjust the screen for a desired viewing angle. 3. Figure 9 Carefully place the system (front facing up) on the back of the bag is fastened...

Owners Manual
Page 11
.... 11 You can be done with the system bottom facing down. Follow the installation instruction shown in the pouch. Insert one hand and remove the monitor with the other level surface with or without the unit inside Velcro strap of the bag. Take the pouch from the main unit by unfastening... side of the strap while holding the buckle until the pouch is tightly secured. 3). Placing the system in a hotel/office/home (Refer to fasten the monitor in Item 1, 2 or 3. 2). Then loop the strap of the pouch around the headrest and pull the end of the main unit. 5.
.... 11 You can be done with the system bottom facing down. Follow the installation instruction shown in the pouch. Insert one hand and remove the monitor with the other level surface with or without the unit inside Velcro strap of the bag. Take the pouch from the main unit by unfastening... side of the strap while holding the buckle until the pouch is tightly secured. 3). Placing the system in a hotel/office/home (Refer to fasten the monitor in Item 1, 2 or 3. 2). Then loop the strap of the pouch around the headrest and pull the end of the main unit. 5.

Owners Manual
Page 12
... that it may be done with one end of the DIN cable into the PORT on the right side of the detached monitor, and the other end into either MONITOR 1 or MONITOR 2 port on a table or other hand. Adjust the screen for the proper viewing angle. F. 2). Controls, Indicators, and Connectors ...1. This can detach the monitor from the main unit by depress ing the button below the screen with or without the monitor inside its pouch. Unit View (Refer to Figure 12) 31 Figure 12 12 Rotate the base of...
... that it may be done with one end of the DIN cable into the PORT on the right side of the detached monitor, and the other end into either MONITOR 1 or MONITOR 2 port on a table or other hand. Adjust the screen for the proper viewing angle. F. 2). Controls, Indicators, and Connectors ...1. This can detach the monitor from the main unit by depress ing the button below the screen with or without the monitor inside its pouch. Unit View (Refer to Figure 12) 31 Figure 12 12 Rotate the base of...
Owners Manual
Page 13
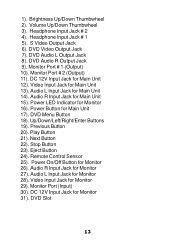
... Jack for Main Unit 17). Volume Up/Down Thumbwheel 3). DVD Video Output Jack 7). DVD Audio R Output Jack 9). Power Button for Monitor 29). Next Button 22). Eject Button 24). Audio L Input Jack for Main Unit 15). DVD Slot 13 1). DVD Audio L Output Jack 8). Audio R Input Jack for Monitor 28). Remote Control Sensor 25). Audio R Input Jack for...
... Jack for Main Unit 17). Volume Up/Down Thumbwheel 3). DVD Video Output Jack 7). DVD Audio R Output Jack 9). Power Button for Monitor 29). Next Button 22). Eject Button 24). Audio L Input Jack for Main Unit 15). DVD Slot 13 1). DVD Audio L Output Jack 8). Audio R Input Jack for Monitor 28). Remote Control Sensor 25). Audio R Input Jack for...
Owners Manual
Page 14
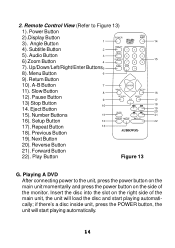
.../Enter Buttons 8). Previous Button 19). Next Button 20). 2. Audio Button 6) Zoom Button 7). Forward Button 22). Play Button Figure 13 G. Return Button 10). A-B Button 11). Playing A DVD After connecting power to Figure 13) 1). Number Buttons 16). Remote Control View (Refer to the unit, press the power button on the main unit momentarily...
.../Enter Buttons 8). Previous Button 19). Next Button 20). 2. Audio Button 6) Zoom Button 7). Forward Button 22). Play Button Figure 13 G. Return Button 10). A-B Button 11). Playing A DVD After connecting power to Figure 13) 1). Number Buttons 16). Remote Control View (Refer to the unit, press the power button on the main unit momentarily...

Owners Manual
Page 16
...DISPLAY again to disc. Press MENU during playing to display the menu, and press ENTER or PLAY to disc.) 1). During play a DVD, a root menu of your TV or Monitor. The heading will disappear automatically in about 3 seconds. (Menu 1) b. The heading will appear on the screen of the disc will ...chapters (4), and the playing time for the title. Display (The contents vary from disc to display the remaining time for the title (5). Some DVDs allow you play back press DISPLAY to display the current title number (1), the total number of titles (2), the current chapter number (3), the ...
...DISPLAY again to disc. Press MENU during playing to display the menu, and press ENTER or PLAY to disc.) 1). During play a DVD, a root menu of your TV or Monitor. The heading will disappear automatically in about 3 seconds. (Menu 1) b. The heading will appear on the screen of the disc will ...chapters (4), and the playing time for the title. Display (The contents vary from disc to display the remaining time for the title (5). Some DVDs allow you play back press DISPLAY to display the current title number (1), the total number of titles (2), the current chapter number (3), the ...
Owners Manual
Page 28
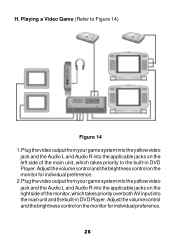
Adjust the volume control and the brightness control on the monitor for individual preference. 2.Plug the video output from your game system into the ...monitor for individual preference. 28 Playing a Video Game (Refer to Figure 14) Figure 14 1.Plug the video output from your game system into the yellow video jack and the Audio L and Audio R into the main unit and the built-in DVD Player.... Adjust the volume control and the brightness control on the left side of the monitor, which takes priority to the built-in...
Adjust the volume control and the brightness control on the monitor for individual preference. 2.Plug the video output from your game system into the ...monitor for individual preference. 28 Playing a Video Game (Refer to Figure 14) Figure 14 1.Plug the video output from your game system into the yellow video jack and the Audio L and Audio R into the main unit and the built-in DVD Player.... Adjust the volume control and the brightness control on the left side of the monitor, which takes priority to the built-in...
Owners Manual
Page 29
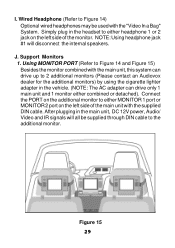
... through DIN cable to the additional monitor. After plugging in the headset to 2 additional monitors (Please contact an Audiovox dealer for the additional monitors) by using the cigarette lighter adapter in the vehicle. (NOTE: The AC adapter can drive up to either MONITOR 1 port or MONITOR 2 port on the additional monitor to Figure 14 and Figure 15...
... through DIN cable to the additional monitor. After plugging in the headset to 2 additional monitors (Please contact an Audiovox dealer for the additional monitors) by using the cigarette lighter adapter in the vehicle. (NOTE: The AC adapter can drive up to either MONITOR 1 port or MONITOR 2 port on the additional monitor to Figure 14 and Figure 15...