Operation Manual
Page 3
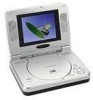
... obtain the best equipment performance. The unit is constructed to provide years of the art electronics and is designed for selecting the VBP500 portable DVD player in hotels, offices or your system is in a fire or electric shock). Placement To prevent fire or electric shock, do...Contact qualified service personnel if your home. A. The main features include a 5" Screen (4:3 Aspect Ratio) Liquid Crystal Display (LCD) monitor and a DVD player. The documentation will assist you anywhere and is a risk of any kind on the unit. B. Keep the unit away from a cold to rain ...
... obtain the best equipment performance. The unit is constructed to provide years of the art electronics and is designed for selecting the VBP500 portable DVD player in hotels, offices or your system is in a fire or electric shock). Placement To prevent fire or electric shock, do...Contact qualified service personnel if your home. A. The main features include a 5" Screen (4:3 Aspect Ratio) Liquid Crystal Display (LCD) monitor and a DVD player. The documentation will assist you anywhere and is a risk of any kind on the unit. B. Keep the unit away from a cold to rain ...
Operation Manual
Page 4
... ducts. Do not expose the disc to malfunction. Clean the disc by wiping the disc from the center out with the discs. Contents 1. 1 x 5'' LCD Monitor & DVD Player Combo 2. 1 x AC to the disc contents the software producers designed, some playback features may be available. Do not touch the surface of discs may not...
... ducts. Do not expose the disc to malfunction. Clean the disc by wiping the disc from the center out with the discs. Contents 1. 1 x 5'' LCD Monitor & DVD Player Combo 2. 1 x AC to the disc contents the software producers designed, some playback features may be available. Do not touch the surface of discs may not...
Operation Manual
Page 10
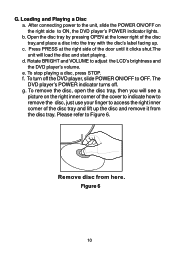
... facing up the disc and remove it clicks shut.The unit will see a picture on the right side to adjust the LCD's brightness and the DVD player's volume. d. b. Rotate BRIGHT and VOLUME to ON, the DVD player's POWER indicator lights. f. The DVD player's POWER indicator turns off the DVD player, slide POWER ON/OFF to Figure 6. Figure 6 10 G.
... facing up the disc and remove it clicks shut.The unit will see a picture on the right side to adjust the LCD's brightness and the DVD player's volume. d. b. Rotate BRIGHT and VOLUME to ON, the DVD player's POWER indicator lights. f. The DVD player's POWER indicator turns off the DVD player, slide POWER ON/OFF to Figure 6. Figure 6 10 G.
Operation Manual
Page 13
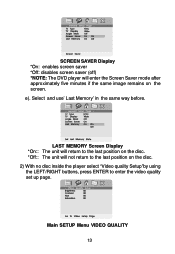
...:: The unit will enter the Screen Saver mode after approximately five minutes if the same image remains on the disc. 2) With no disc inside the player select "Video quality Setup"by using the LEFT/RIGHT buttons, press ENTER to enter the video quality set up page. e). Select and use' Last Memory...' in the same way before. Main SETUP Menu VIDEO QUALITY 13 SCREEN SAVER Display *On: enables screen saver *Off: disables screen saver (off) *NOTE: The DVD player will not return to the last position on the screen.
...:: The unit will enter the Screen Saver mode after approximately five minutes if the same image remains on the disc. 2) With no disc inside the player select "Video quality Setup"by using the LEFT/RIGHT buttons, press ENTER to enter the video quality set up page. e). Select and use' Last Memory...' in the same way before. Main SETUP Menu VIDEO QUALITY 13 SCREEN SAVER Display *On: enables screen saver *Off: disables screen saver (off) *NOTE: The DVD player will not return to the last position on the screen.
Operation Manual
Page 28
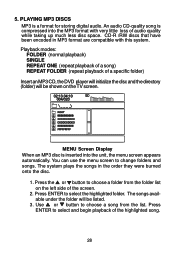
... the TV screen. The system plays the songs in MP3 format are compatible with very little loss of a specific folder) Insert an MP3 CD, the DVD player will initialize the disc and the directory (folder) will be shown on the left side of the highlighted song. 28 You can use the menu...
... the TV screen. The system plays the songs in MP3 format are compatible with very little loss of a specific folder) Insert an MP3 CD, the DVD player will initialize the disc and the directory (folder) will be shown on the left side of the highlighted song. 28 You can use the menu...
Operation Manual
Page 32
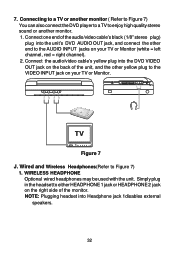
Connecting to a TV or another monitor. 1. Connect one end of the audio/video cable's black (1/8" stereo plug) plug into the unit's DVD AUDIO OUT jack, and connect the other end to the AUDIO INPUT jacks on the right side of the unit, and the other yellow plug...'s yellow plug into Headphone jack 1disables external speakers. 32 WIRELESS HEADPHONE Optional wired headphones may be used with the unit. NOTE: Plugging headset into the DVD VIDEO OUT jack on the back of the monitor. 7. Figure 7 J. Wired and Wireless Headphones(Refer to enjoy high quality stereo sound or another monitor ( ...
Connecting to a TV or another monitor. 1. Connect one end of the audio/video cable's black (1/8" stereo plug) plug into the unit's DVD AUDIO OUT jack, and connect the other end to the AUDIO INPUT jacks on the right side of the unit, and the other yellow plug...'s yellow plug into Headphone jack 1disables external speakers. 32 WIRELESS HEADPHONE Optional wired headphones may be used with the unit. NOTE: Plugging headset into the DVD VIDEO OUT jack on the back of the monitor. 7. Figure 7 J. Wired and Wireless Headphones(Refer to enjoy high quality stereo sound or another monitor ( ...
Operation Manual
Page 33
...'.Certainly,if you don't need this function,just put the switch to conserve battery life. Rechargeable Battery Installation and Use(optional) The player utilizes a set to the off position to 'Off'. This means the NiMH batteries doesn't have "Memory Effect" and thus can... humidity: 10~75% Dimensions (W x H x D):8.07 X 5.92 X1.98inches 205 x 150.5 x 50.5mm Battery Type: NiMH L. Specifications Disc format: DVD/CD/MP3 Color system: NTSC Screen size: 5'' DVD video format: Horizontal 720 pixel, vertical 480 pixel (NTSC) Horizontal 720 pixel,vertical 576 pixel(PAL) Frequency response...
...'.Certainly,if you don't need this function,just put the switch to conserve battery life. Rechargeable Battery Installation and Use(optional) The player utilizes a set to the off position to 'Off'. This means the NiMH batteries doesn't have "Memory Effect" and thus can... humidity: 10~75% Dimensions (W x H x D):8.07 X 5.92 X1.98inches 205 x 150.5 x 50.5mm Battery Type: NiMH L. Specifications Disc format: DVD/CD/MP3 Color system: NTSC Screen size: 5'' DVD video format: Horizontal 720 pixel, vertical 480 pixel (NTSC) Horizontal 720 pixel,vertical 576 pixel(PAL) Frequency response...

Operation Manual
Page 34
... in order to maximize battery life. 2.To charge the battery, please connect the power jack directly into the VBP500 and leave the POWER switch in its best condition. NOTE: When the DVD player is not to be used with the battery as a power source, ensure that you first fully charge the ...battery and store it to the DVD player. Precautions related to Battery Recharge: 1.Once the battery has been fully spent, please immediately recharge the battery (regardless of storage, please recharge the ...
... in order to maximize battery life. 2.To charge the battery, please connect the power jack directly into the VBP500 and leave the POWER switch in its best condition. NOTE: When the DVD player is not to be used with the battery as a power source, ensure that you first fully charge the ...battery and store it to the DVD player. Precautions related to Battery Recharge: 1.Once the battery has been fully spent, please immediately recharge the battery (regardless of storage, please recharge the ...
Operation Manual
Page 35
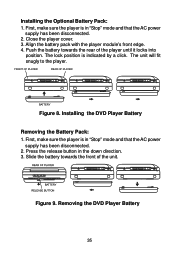
... towards the front of the player until it locks into position. Installing the DVD Player Battery Removing the Battery Pack: 1. Removing the DVD Player Battery 35 First, make sure the player is in "Stop" mode and that the AC power supply has been disconnected. 2. Close the player cover. 3. The lock position.... 2. Figure 8. Slide the battery towards the rear of the unit. Figure 9. Align the battery pack with the player module's front edge. 4. First, make sure the player is indicated by a click. Installing the Optional Battery Pack: 1. The unit will fit snugly to the...
... towards the front of the player until it locks into position. Installing the DVD Player Battery Removing the Battery Pack: 1. Removing the DVD Player Battery 35 First, make sure the player is in "Stop" mode and that the AC power supply has been disconnected. 2. Close the player cover. 3. The lock position.... 2. Figure 8. Slide the battery towards the rear of the unit. Figure 9. Align the battery pack with the player module's front edge. 4. First, make sure the player is indicated by a click. Installing the Optional Battery Pack: 1. The unit will fit snugly to the...
Operation Manual
Page 36
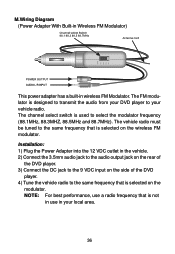
...-in the vehicle. 2) Connect the 3.5mm audio jack to the audio output jack on the rear of the DVD player. 3) Connect the DC jack to the 9 VDC input on the side of the DVD player. 4) Tune the vehicle radio to the same frequency that is selected on the wireless FM modulator. The channel select.... 36 The vehicle radio must be tuned to the same frequency that is used to your vehicle radio. NOTE: For best performance, use in your DVD player to select the modulator frequency (88.1MHz, 88.3MHZ, 88.5MHz and 88.7MHz). The FM modulator is selected on the modulator.
...-in the vehicle. 2) Connect the 3.5mm audio jack to the audio output jack on the rear of the DVD player. 3) Connect the DC jack to the 9 VDC input on the side of the DVD player. 4) Tune the vehicle radio to the same frequency that is selected on the wireless FM modulator. The channel select.... 36 The vehicle radio must be tuned to the same frequency that is used to your vehicle radio. NOTE: For best performance, use in your DVD player to select the modulator frequency (88.1MHz, 88.3MHZ, 88.5MHz and 88.7MHz). The FM modulator is selected on the modulator.


