Operation Manual
Page 4
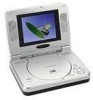
...on the right side of discs may not be intentionally fixed by software producers. Also refer to DC Adapter 3. 1 x Remote Control w/Battery 4. 1 x Instruction Manual 5. 1 x Audio/Video Input Cable 6. 1 x Audio/Video output Cable 7. 1 x Power Adapter w/Built-...Battery Pack (Part Number VBB5058) OPTIONAL: Wireless IR headphones (Part Number IRHSCS) D. Powering and installation 1. Disc Do not use liquid cleaners or aerosol cleaners. 5. Cleaning Unit When cleaning, make sure the system is unplugged from the unit and store it in its edge. Contents 1. 1 x 5'' LCD Monitor & DVD Player...
...on the right side of discs may not be intentionally fixed by software producers. Also refer to DC Adapter 3. 1 x Remote Control w/Battery 4. 1 x Instruction Manual 5. 1 x Audio/Video Input Cable 6. 1 x Audio/Video output Cable 7. 1 x Power Adapter w/Built-...Battery Pack (Part Number VBB5058) OPTIONAL: Wireless IR headphones (Part Number IRHSCS) D. Powering and installation 1. Disc Do not use liquid cleaners or aerosol cleaners. 5. Cleaning Unit When cleaning, make sure the system is unplugged from the unit and store it in its edge. Contents 1. 1 x 5'' LCD Monitor & DVD Player...
Operation Manual
Page 5
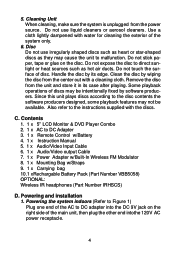
...DVD compartment and then fasten the Velcro strap accross the top portion of the unit. 2. Figure 1 3. Powering the system in a car Plug one end of the mounting bag with the Velcro bands to obtain the proper viewing angle as shown in Figure 5 Installation Prior to page 35). * Rechargable Battery... lighter adapter into the DC 9V jack on the unit, then plug the other end into the bag with optional rechargeable Battery Please refer to L. * Rechargeable Battery Installation and Use (Page 33 to installation Make sure that the unit is OPTIONAL E. VBB5058 is placed into the cigarette ...
...DVD compartment and then fasten the Velcro strap accross the top portion of the unit. 2. Figure 1 3. Powering the system in a car Plug one end of the mounting bag with the Velcro bands to obtain the proper viewing angle as shown in Figure 5 Installation Prior to page 35). * Rechargable Battery... lighter adapter into the DC 9V jack on the unit, then plug the other end into the bag with optional rechargeable Battery Please refer to L. * Rechargeable Battery Installation and Use (Page 33 to installation Make sure that the unit is OPTIONAL E. VBB5058 is placed into the cigarette ...
Operation Manual
Page 33
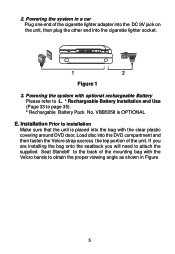
... -20~60°C (4~140°F) Operating humidity: 10~75% Dimensions (W x H x D):8.07 X 5.92 X1.98inches 205 x 150.5 x 50.5mm Battery Type: NiMH L. Rechargeable Battery Installation and Use(optional) The player utilizes a set to the off position to 'Off'. 2. WIRELESS HEADPHONE This unit has an 'IR Sensor',which can radiate the audio... format: Horizontal 720 pixel, vertical 480 pixel (NTSC) Horizontal 720 pixel,vertical 576 pixel(PAL) Frequency response: DVD (PCM 96 kHz/24 bits ): 20 Hz to 44 kHz DVD (PCM 48 kHz): 20 Hz to 22 kHz CD: 20 Hz to 20 kHz Video output: 1.0 Vp-p/75 Ohm, ...
... -20~60°C (4~140°F) Operating humidity: 10~75% Dimensions (W x H x D):8.07 X 5.92 X1.98inches 205 x 150.5 x 50.5mm Battery Type: NiMH L. Rechargeable Battery Installation and Use(optional) The player utilizes a set to the off position to 'Off'. 2. WIRELESS HEADPHONE This unit has an 'IR Sensor',which can radiate the audio... format: Horizontal 720 pixel, vertical 480 pixel (NTSC) Horizontal 720 pixel,vertical 576 pixel(PAL) Frequency response: DVD (PCM 96 kHz/24 bits ): 20 Hz to 44 kHz DVD (PCM 48 kHz): 20 Hz to 22 kHz CD: 20 Hz to 20 kHz Video output: 1.0 Vp-p/75 Ohm, ...

Operation Manual
Page 34
...player for approximately 3 hours.During recharge, the light next to be used with the battery as a power source, ensure that you always use battery power again soon) in order to maximize battery life. 2.To charge the battery, please connect the power jack directly into the VBP500...out the battery, store the battery in a metal container, or leave the battery in an airtight container with the player to recharge your Rechargeable Batteries 1.Please make sure you first fully charge the battery and store it to the DVD player. Avoid unnecessarily recharging fully charged batteries. 34...
...player for approximately 3 hours.During recharge, the light next to be used with the battery as a power source, ensure that you always use battery power again soon) in order to maximize battery life. 2.To charge the battery, please connect the power jack directly into the VBP500...out the battery, store the battery in a metal container, or leave the battery in an airtight container with the player to recharge your Rechargeable Batteries 1.Please make sure you first fully charge the battery and store it to the DVD player. Avoid unnecessarily recharging fully charged batteries. 34...
Operation Manual
Page 35
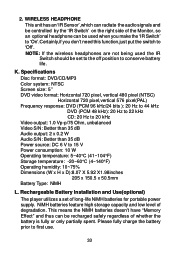
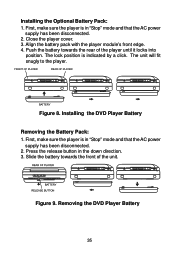
... release button in "Stop" mode and that the AC power supply has been disconnected. 2. The lock position is in the down direction. 3. Installing the DVD Player Battery Removing the Battery Pack: 1. Figure 9. Removing the DVD Player Battery 35 The unit will fit snugly to the player. Figure 8. Close the player cover. 3. Slide the battery towards the rear of the unit.
... release button in "Stop" mode and that the AC power supply has been disconnected. 2. The lock position is in the down direction. 3. Installing the DVD Player Battery Removing the Battery Pack: 1. Figure 9. Removing the DVD Player Battery 35 The unit will fit snugly to the player. Figure 8. Close the player cover. 3. Slide the battery towards the rear of the unit.


