
Owners Manual
Page 5
TABLE OF CONTENTS Safety Precautions ...1-2 ...3 Repeat Playback ...19 DVD Programmable Memory ...20 DVD Programmable Memory ...20 Important Safety Instructions Table of Contents ...4 Disc Formats ...5 Accessories ...6 Remote Control ...6 Control Reference Guide ...7-9 Mounting Instructions ...10-11 Connections ...12-13 Connecting the TV Antenna ...12 Connecting the Unit to a TV or other Video Equipment ......
TABLE OF CONTENTS Safety Precautions ...1-2 ...3 Repeat Playback ...19 DVD Programmable Memory ...20 DVD Programmable Memory ...20 Important Safety Instructions Table of Contents ...4 Disc Formats ...5 Accessories ...6 Remote Control ...6 Control Reference Guide ...7-9 Mounting Instructions ...10-11 Connections ...12-13 Connecting the TV Antenna ...12 Connecting the Unit to a TV or other Video Equipment ......
Owners Manual
Page 7
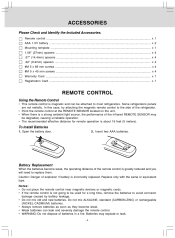
...NICKEL-CADMIUM) batteries. • Always remove batteries as soon as they become weak, the operating distance of the infrared REMOTE SENSOR may explode or leak. -6- Batteries may be degraded, causing unreliable operation. • The recommended effective distance for ... #M 5 x 69 mm screws ...x 4 #M 5 x 40 mm screws ...x 4 Warranty Card ...x 1 Registration Card ...x 1 REMOTE CONTROL Using the Remote Control • This remote control is magnetic and can leak and severely damage the remote control. • WARNING: Do not dispose of explosion if battery is not going to be attached to...
...NICKEL-CADMIUM) batteries. • Always remove batteries as soon as they become weak, the operating distance of the infrared REMOTE SENSOR may explode or leak. -6- Batteries may be degraded, causing unreliable operation. • The recommended effective distance for ... #M 5 x 69 mm screws ...x 4 #M 5 x 40 mm screws ...x 4 Warranty Card ...x 1 Registration Card ...x 1 REMOTE CONTROL Using the Remote Control • This remote control is magnetic and can leak and severely damage the remote control. • WARNING: Do not dispose of explosion if battery is not going to be attached to...
Owners Manual
Page 8
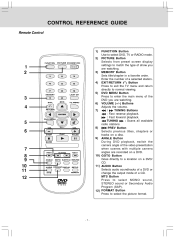
... titles, chapters or tracks on a DVD/ CD. 11) AUDIO Button Selects audio soundtracks of a DVD or change the output mode of a CD. CONTROL REFERENCE GUIDE Remote Control PICTURE 1 2 1 4 7 2 5 8 0 EXIT TV MENU 3 6 9 LAST CH 3 4 RETURN DVD MENU MUTE 5 6 STOP BAND 7 8 9 10 11 12 SOUND FORMAT MTS FUNCTION Button Use to select DVD...
... titles, chapters or tracks on a DVD/ CD. 11) AUDIO Button Selects audio soundtracks of a DVD or change the output mode of a CD. CONTROL REFERENCE GUIDE Remote Control PICTURE 1 2 1 4 7 2 5 8 0 EXIT TV MENU 3 6 9 LAST CH 3 4 RETURN DVD MENU MUTE 5 6 STOP BAND 7 8 9 10 11 12 SOUND FORMAT MTS FUNCTION Button Use to select DVD...
Owners Manual
Page 9
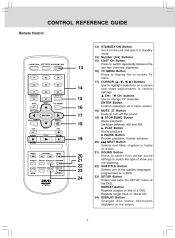
.../BAND Button 19) Stops playback. REPEAT Button Repeats chapter or title of the DVD. buttons CH+ / Use to turn off the sound. CONTROL REFERENCE GUIDE Remote Control PICTURE 13 1 4 7 2 5 8 0 EXIT TV MENU 3 6 14 9 LAST CH 15 16 13) STANDBY/ON Button Turns on the unit and puts it in standby mode...
.../BAND Button 19) Stops playback. REPEAT Button Repeats chapter or title of the DVD. buttons CH+ / Use to turn off the sound. CONTROL REFERENCE GUIDE Remote Control PICTURE 13 1 4 7 2 5 8 0 EXIT TV MENU 3 6 14 9 LAST CH 15 16 13) STANDBY/ON Button Turns on the unit and puts it in standby mode...
Owners Manual
Page 10
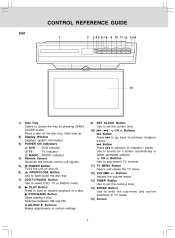
... Tray Opens or closes the tray by pressing OPEN/ CLOSE button. POWER ON Indicators DVD : DVD indicator TV : TV indicator RADIO : RADIO indicator Remote Sensor Receives the remote control unit signals. POWER Button Turns the unit on the disc tray, label side up. DVD/TV/RADIO Button Use to previous chapters/ Press...
... Tray Opens or closes the tray by pressing OPEN/ CLOSE button. POWER ON Indicators DVD : DVD indicator TV : TV indicator RADIO : RADIO indicator Remote Sensor Receives the remote control unit signals. POWER Button Turns the unit on the disc tray, label side up. DVD/TV/RADIO Button Use to previous chapters/ Press...
Owners Manual
Page 15
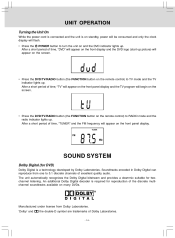
...front panel display and the TV program will appear on the screen. • Press the DVD/TV/RADIO button (the FUNCTION button on the remote control) to RADIO mode and the radio indicator lights up . UNIT OPERATION Turning the Unit On While the power cord is connected and the ... and the DVD logo (start-up picture) will begin on the screen. • Press the DVD/TV/RADIO button (the FUNCTION button on the remote control) to TV mode and the TV indicator lights up . The unit automatically recognizes the Dolby Digital bitstream and provides a downmix suitable for twochannel listening...
...front panel display and the TV program will appear on the screen. • Press the DVD/TV/RADIO button (the FUNCTION button on the remote control) to RADIO mode and the radio indicator lights up . UNIT OPERATION Turning the Unit On While the power cord is connected and the ... and the DVD logo (start-up picture) will begin on the screen. • Press the DVD/TV/RADIO button (the FUNCTION button on the remote control) to TV mode and the TV indicator lights up . The unit automatically recognizes the Dolby Digital bitstream and provides a downmix suitable for twochannel listening...
Owners Manual
Page 17
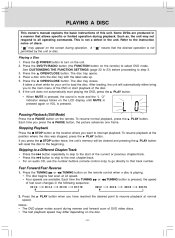
...that track number. PLAY button. To resume playback at the location where you want to interrupt playback. For an audio CD, use the number buttons (remote control only) to go directly to load the disc. Fast Forward/Fast Reverse 1. Press the TUNING or TUNING button on the... disc. 6. Each time the TUNING or TUNING button is not a defect in the unit. Press the DVD/TV/RADIO button (the FUNCTION button on the remote control when a disc is mute and the "L O" indicator always blinks on the unit. 2. Press the OPEN/CLOSE button. After loading, the unit will automatically either...
...that track number. PLAY button. To resume playback at the location where you want to interrupt playback. For an audio CD, use the number buttons (remote control only) to go directly to load the disc. Fast Forward/Fast Reverse 1. Press the TUNING or TUNING button on the... disc. 6. Each time the TUNING or TUNING button is not a defect in the unit. Press the DVD/TV/RADIO button (the FUNCTION button on the remote control when a disc is mute and the "L O" indicator always blinks on the unit. 2. Press the OPEN/CLOSE button. After loading, the unit will automatically either...
Owners Manual
Page 19
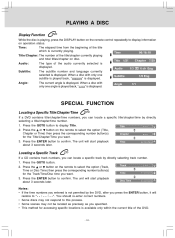
...as you want . 3. PLAYING A DISC Display Function While the disc is playing, press the DISPLAY button on the remote control repeatedly to display information on the remote to select the option (Title, Chapter or Time) then press the corresponding number button(s) for accessing specific locations is ...subtitle is played back, " " is available only within the current title of the title/chapter currently playing and total titles/chapter on the remote to select the option (Track, Time or Disc Time) then press the corresponding number button(s) for the Track/Time/Disc time you specified...
...as you want . 3. PLAYING A DISC Display Function While the disc is playing, press the DISPLAY button on the remote control repeatedly to display information on the remote to select the option (Title, Chapter or Time) then press the corresponding number button(s) for accessing specific locations is ...subtitle is played back, " " is available only within the current title of the title/chapter currently playing and total titles/chapter on the remote to select the option (Track, Time or Disc Time) then press the corresponding number button(s) for the Track/Time/Disc time you specified...
Owners Manual
Page 20
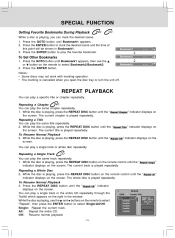
... button until the " the screen. SPECIAL FUNCTION Setting Favorite Bookmarks During Playback While a disc is playing, press the REPEAT DISC button on the remote control until the " indicator displays on the screen. Press the ENTER button to select Bookmark2/Bookmark3. 2. REPEAT PLAYBACK You can play a single...appears on the right in Bookmark1. 3. Single: Repeat the current track. Press the GOTO button until the " " indicator displays on the remote to mark the desired scene and the time of this point will be shown in the window. While the disc is played repeatedly. The...
... button until the " the screen. SPECIAL FUNCTION Setting Favorite Bookmarks During Playback While a disc is playing, press the REPEAT DISC button on the remote control until the " indicator displays on the screen. Press the ENTER button to select Bookmark2/Bookmark3. 2. REPEAT PLAYBACK You can play a single...appears on the right in Bookmark1. 3. Single: Repeat the current track. Press the GOTO button until the " " indicator displays on the remote to mark the desired scene and the time of this point will be shown in the window. While the disc is played repeatedly. The...
Owners Manual
Page 21
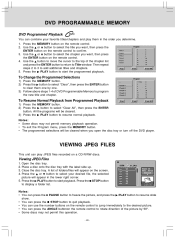
... not permit memory playback operation. • To exit the Program menu, press the MEMORY button. • The programmed selections will appear on the remote control. 2. Close the disc tray. Notes: • You can press the PAUSE button to freeze the picture, and press the PLAY button to...1. Press the MEMORY button on the screen. Then repeat steps 2 to 3 to select your favorite titles/chapters and play JPEG files recorded on the remote control. 4. VIEWING JPEG FILES This unit can combine your desired file, the selected 4. Open the disc tray. 2. or button to add additional titles...
... not permit memory playback operation. • To exit the Program menu, press the MEMORY button. • The programmed selections will appear on the remote control. 2. Close the disc tray. Notes: • You can press the PAUSE button to freeze the picture, and press the PLAY button to...1. Press the MEMORY button on the screen. Then repeat steps 2 to 3 to select your favorite titles/chapters and play JPEG files recorded on the remote control. 4. VIEWING JPEG FILES This unit can combine your desired file, the selected 4. Open the disc tray. 2. or button to add additional titles...
Owners Manual
Page 22
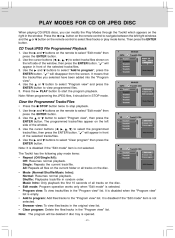
... view tracks/files in the "Program view" list. Clear program: Delete the files/tracks in the "Program view" list. Press the or button on the remote control to navigate between the left side of the selected tracks/files. 3. Use the cursor buttons ( , , , ) to select tracks/files shown on ...the left /right windows and the or button on the remote control to select files/tracks or play mode items: • Repeat (Off/Single/All): Off: Resumes normal playback. " " will appear in front of the ...
... view tracks/files in the "Program view" list. Clear program: Delete the files/tracks in the "Program view" list. Press the or button on the remote control to navigate between the left side of the selected tracks/files. 3. Use the cursor buttons ( , , , ) to select tracks/files shown on ...the left /right windows and the or button on the remote control to select files/tracks or play mode items: • Repeat (Off/Single/All): Off: Resumes normal playback. " " will appear in front of the ...

Owners Manual
Page 25
... CH buttons (the CH+ or CH- Connect the AC power cord. Manual searching for TV channels. 7. button on the remote) to select a channel, or press the number button on the remote) to start the search for TV channels 1. Note: • When a channel is selected, the channel number is completed.... antenna terminal before searching TV channels 1. Press the ENTER button to select TV mode. Press the DVD/TV/RADIO button (the FUNCTION button on the remote to select the channel you want to watch. • For channels 1 to 9, enter one-digit channel number. • For channels 10 to ...
... CH buttons (the CH+ or CH- Connect the AC power cord. Manual searching for TV channels. 7. button on the remote) to select a channel, or press the number button on the remote) to start the search for TV channels 1. Note: • When a channel is selected, the channel number is completed.... antenna terminal before searching TV channels 1. Press the ENTER button to select TV mode. Press the DVD/TV/RADIO button (the FUNCTION button on the remote to select the channel you want to watch. • For channels 1 to 9, enter one-digit channel number. • For channels 10 to ...
Owners Manual
Page 26
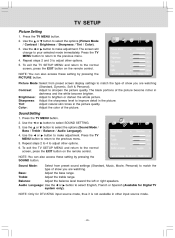
... Mode / Contrast / Brightness / Sharpness / Tint / Color). 3. Use the or button to the normal screen, press the EXIT button on the remote control. To exit the TV SETUP MENU and return to make adjustment. NOTE: You can also access these setting by pressing the PICTURE button. Press...system only). The screen will change to adjust other options. 5. Repeat steps 2 to 4 to the normal screen, press the EXIT button on the remote control. Balance: Adjust the balance level toward the left or right speakers. Repeat steps 2 and 3 to your selected mode immediately. Contrast : Adjust...
... Mode / Contrast / Brightness / Sharpness / Tint / Color). 3. Use the or button to the normal screen, press the EXIT button on the remote control. To exit the TV SETUP MENU and return to make adjustment. NOTE: You can also access these setting by pressing the PICTURE button. Press...system only). The screen will change to adjust other options. 5. Repeat steps 2 to 4 to the normal screen, press the EXIT button on the remote control. Balance: Adjust the balance level toward the left or right speakers. Repeat steps 2 and 3 to your selected mode immediately. Contrast : Adjust...
Owners Manual
Page 27
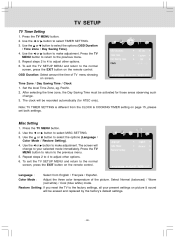
... settings, all your selected mode immediately. Language : Color Mode : Select from the CLOCK & COOKING TIMER setting on the remote control. Restore Setting: If you reset the TV to your present settings on the remote control. Press the TV MENU button. 2. Use the or button to the previous menu. 5. Pacific. UP/DOWN ADJUST...
... settings, all your selected mode immediately. Language : Color Mode : Select from the CLOCK & COOKING TIMER setting on the remote control. Restore Setting: If you reset the TV to your present settings on the remote control. Press the TV MENU button. 2. Use the or button to the previous menu. 5. Pacific. UP/DOWN ADJUST...

Owners Manual
Page 28
... skip function of stored channels in TV CHANNEL SETTING, then you can not be cleared and the Auto Scan Channels will be shown on the remote control. Use the or button to receive cable signal. Antenna : Auto Scan : Select "CATV" to select the options (Antenna / Auto Scan / Auto Scan Add CH...
... skip function of stored channels in TV CHANNEL SETTING, then you can not be cleared and the Auto Scan Channels will be shown on the remote control. Use the or button to receive cable signal. Antenna : Auto Scan : Select "CATV" to select the options (Antenna / Auto Scan / Auto Scan Add CH...
Owners Manual
Page 29
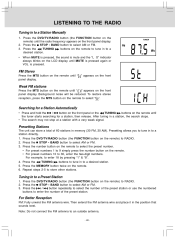
... the tuner starts searching for a Station Automatically • Press and hold the / button on the front panel or the TUNING buttons on the remote. • For preset numbers 10 to select " ". Press the STOP • BAND button to select AM or FM. / button repeatedly to a Station ...an outside antenna. - 28 - Press the MEMORY button twice on the LCD display until the radio frequency appears on the remote) to RADIO. 2. Press the TUNING buttons on the remote to tune in to store other stations. After tuning in the position that sounds best. For example, to a Preset Station...
... the tuner starts searching for a Station Automatically • Press and hold the / button on the front panel or the TUNING buttons on the remote. • For preset numbers 10 to select " ". Press the STOP • BAND button to select AM or FM. / button repeatedly to a Station ...an outside antenna. - 28 - Press the MEMORY button twice on the LCD display until the radio frequency appears on the remote) to RADIO. 2. Press the TUNING buttons on the remote to tune in to store other stations. After tuning in the position that sounds best. For example, to a Preset Station...
Owners Manual
Page 30
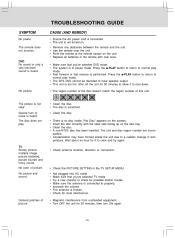
...return to normal play mode. • The DTS DVD cannot be decoded to a sudden change in the remote with the label side facing up on Remove any obstacles between the remote and the unit. TV Snowy picture, multiple image, picture distorted, picture blurred and noisy sound. The ...antenna is not turned on the disc tray. TROUBLESHOOTING GUIDE SYMPTOM No power. The remote does not function. Insert the disc correctly with new ones. The unit and disc region number are incompatible. • Condensation may have formed ...
...return to normal play mode. • The DTS DVD cannot be decoded to a sudden change in the remote with the label side facing up on Remove any obstacles between the remote and the unit. TV Snowy picture, multiple image, picture distorted, picture blurred and noisy sound. The ...antenna is not turned on the disc tray. TROUBLESHOOTING GUIDE SYMPTOM No power. The remote does not function. Insert the disc correctly with new ones. The unit and disc region number are incompatible. • Condensation may have formed ...


