
Owners Manual
Page 5
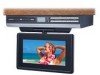
... the TV ...24 TV Setup ...25-27 Listening to the Radio ...28 Troubleshooting Guide ...29 Maintenance ...30 Specifications ...30 Monitor Operation ...13 Unit Operation ...14 Sound System ...14 Setting the Clock ...15 Setting the Cooking Timer ...15 Playing a Disc ...16-18 Playing a Disc ...16 Pausing Playback ...16 Stopping Playback ...16 Skipping...
... the TV ...24 TV Setup ...25-27 Listening to the Radio ...28 Troubleshooting Guide ...29 Maintenance ...30 Specifications ...30 Monitor Operation ...13 Unit Operation ...14 Sound System ...14 Setting the Clock ...15 Setting the Cooking Timer ...15 Playing a Disc ...16-18 Playing a Disc ...16 Pausing Playback ...16 Stopping Playback ...16 Skipping...
Owners Manual
Page 8
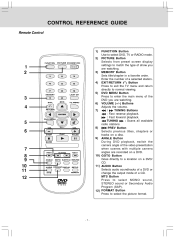
...CD. 11) AUDIO Button Selects audio soundtracks of a DVD or change the output mode of a selected station. MTS Button Press to select MONO sound, STEREO sound or Secondary Audio Program (SAP). 12) FORMAT Button Press to select the picture format. 1) -7- Button 4) EXIT/RETURN Press to exit the... REFERENCE GUIDE Remote Control PICTURE 1 2 1 4 7 2 5 8 0 EXIT TV MENU 3 6 9 LAST CH 3 4 RETURN DVD MENU MUTE 5 6 STOP BAND 7 8 9 10 11 12 SOUND FORMAT MTS FUNCTION Button Use to select DVD, TV or RADIO mode. 2) PICTURE Button Selects from preset screen display settings to match the type of...
...CD. 11) AUDIO Button Selects audio soundtracks of a DVD or change the output mode of a selected station. MTS Button Press to select MONO sound, STEREO sound or Secondary Audio Program (SAP). 12) FORMAT Button Press to select the picture format. 1) -7- Button 4) EXIT/RETURN Press to exit the... REFERENCE GUIDE Remote Control PICTURE 1 2 1 4 7 2 5 8 0 EXIT TV MENU 3 6 9 LAST CH 3 4 RETURN DVD MENU MUTE 5 6 STOP BAND 7 8 9 10 11 12 SOUND FORMAT MTS FUNCTION Button Use to select DVD, TV or RADIO mode. 2) PICTURE Button Selects from preset screen display settings to match the type of...
Owners Manual
Page 9
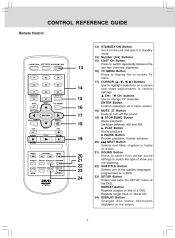
...of a DVD. REPEAT Button Repeats chapter or title of the DVD. buttons CH+ / Use to turn off the sound. RETURN 17 DVD MENU MUTE 18 STOP 19 BAND SOUND FORMAT 20 21 22 23 24 MTS Button 18) MUTE Press to change TV channels. PLAY Button Starts playback. ...PAUSE Button Pauses playback, frames advance. 20) NEXT Button Selects next titles, chapters or tracks on a disc. 21) SOUND Button Press to select from preset sound settings to certain settings. Repeats single track or whole CD. 24) DISPLAY Button Changes disc status information displayed on a menu screen. ...
...of a DVD. REPEAT Button Repeats chapter or title of the DVD. buttons CH+ / Use to turn off the sound. RETURN 17 DVD MENU MUTE 18 STOP 19 BAND SOUND FORMAT 20 21 22 23 24 MTS Button 18) MUTE Press to change TV channels. PLAY Button Starts playback. ...PAUSE Button Pauses playback, frames advance. 20) NEXT Button Selects next titles, chapters or tracks on a disc. 21) SOUND Button Press to select from preset sound settings to certain settings. Repeats single track or whole CD. 24) DISPLAY Button Changes disc status information displayed on a menu screen. ...
Owners Manual
Page 15
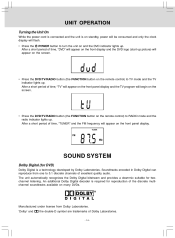
... front display and the DVD logo (start-up picture) will flash. • Press the POWER button to TV mode and the TV indicator lights up . SOUND SYSTEM Dolby Digital (for twochannel listening. After a short period of Dolby Laboratories. - 14 -
... front display and the DVD logo (start-up picture) will flash. • Press the POWER button to TV mode and the TV indicator lights up . SOUND SYSTEM Dolby Digital (for twochannel listening. After a short period of Dolby Laboratories. - 14 -
Owners Manual
Page 16
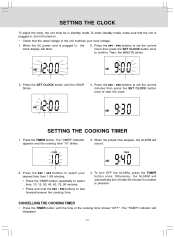
... appears and the cooking time "10" blinks. 3. To turn off after 60 minutes if no button is plugged in standby mode. Otherwise, the ALARM will sound. 2. Press the / buttons to set the current 3.
... appears and the cooking time "10" blinks. 3. To turn off after 60 minutes if no button is plugged in standby mode. Otherwise, the ALARM will sound. 2. Press the / buttons to set the current 3.
Owners Manual
Page 17
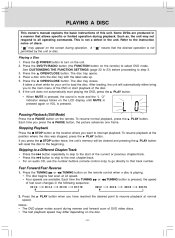
...tray closes. If the unit does not automatically start of discs. Stopping Playback Press the STOP button at normal Notes: • The DVD player mutes sound during operation. PLAY button Skipping to a Different Chapter/Track • • • Press the button repeatedly to skip to interrupt playback. PLAYING ...normal playback, press the Each time you want to the start playing the DVD, press the PLAY button. • When MUTE is pressed, the sound is mute and the "L O" indicator always blinks on the disc. - 16 - Such as, the unit may differ depending on the LCD display...
...tray closes. If the unit does not automatically start of discs. Stopping Playback Press the STOP button at normal Notes: • The DVD player mutes sound during operation. PLAY button Skipping to a Different Chapter/Track • • • Press the button repeatedly to skip to interrupt playback. PLAYING ...normal playback, press the Each time you want to the start playing the DVD, press the PLAY button. • When MUTE is pressed, the sound is mute and the "L O" indicator always blinks on the disc. - 16 - Such as, the unit may differ depending on the LCD display...
Owners Manual
Page 18
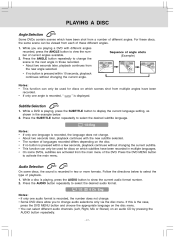
...) on the disc menu. • You can be used for discs on which subtitles have been recorded in multiple languages. • On some discs, the sound is recorded, the number does not change audio selections only via the disc menu. While a DVD is playing, press the SUBTITLE button to display the...
...) on the disc menu. • You can be used for discs on which subtitles have been recorded in multiple languages. • On some discs, the sound is recorded, the number does not change audio selections only via the disc menu. While a DVD is playing, press the SUBTITLE button to display the...

Owners Manual
Page 25
... mode. RF CH Found 13 0 PRESS MENU TO EXIT AUTO SCAN Watching Television Viewing a television station after a few seconds. • When MUTE is pressed, the sound is mute and the "L O" indicator always blinks on the LCD display until MUTE is pressed again or VOL is completed. Press the TV MENU button...
... mode. RF CH Found 13 0 PRESS MENU TO EXIT AUTO SCAN Watching Television Viewing a television station after a few seconds. • When MUTE is pressed, the sound is mute and the "L O" indicator always blinks on the LCD display until MUTE is pressed again or VOL is completed. Press the TV MENU button...
Owners Manual
Page 26
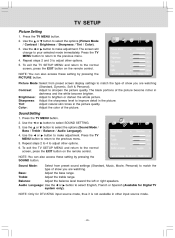
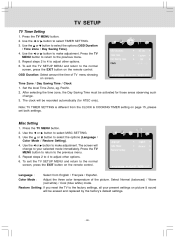
... 3 to make adjustment. Contrast : Adjust to your selected mode immediately. Sharpness : Adjust the sharpness level to match the type of the picture. Sound Mode Bass Treble Balance Audio Language UP/DOWN 3. Treble: Adjust the treble range. NOTE: Only for Digital TV system only). The screen will change... the previous menu. 5. To exit the TV SETUP MENU and return to match the type of the picture become richer in other options. 5. Sound Mode : Standard 50 50 0 English ADJUST "MENU":EXIT Select from preset screen display settings to the normal screen, press the EXIT button on...
... 3 to make adjustment. Contrast : Adjust to your selected mode immediately. Sharpness : Adjust the sharpness level to match the type of the picture. Sound Mode Bass Treble Balance Audio Language UP/DOWN 3. Treble: Adjust the treble range. NOTE: Only for Digital TV system only). The screen will change... the previous menu. 5. To exit the TV SETUP MENU and return to match the type of the picture become richer in other options. 5. Sound Mode : Standard 50 50 0 English ADJUST "MENU":EXIT Select from preset screen display settings to the normal screen, press the EXIT button on...
Owners Manual
Page 27
... clock will be erased and replaced by the factory's default settings. - 26 - Restore Setting: If you reset the TV to your present settings on picture & sound will be activated for ATSC only). Select Normal (balanced) / Warm (red white) / Cool (blue white) mode. Use the or button to make adjustment.
... clock will be erased and replaced by the factory's default settings. - 26 - Restore Setting: If you reset the TV to your present settings on picture & sound will be activated for ATSC only). Select Normal (balanced) / Warm (red white) / Cool (blue white) mode. Use the or button to make adjustment.
Owners Manual
Page 29
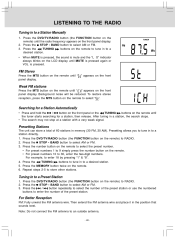
... on the remote to a Station Manually 1. TUNING 4. Press the DVD/TV/RADIO button (the FUNCTION button on the remote) to tune in the position that sounds best. LISTENING TO THE RADIO Tuning in a station, the search stops. • The search may not stop at a station with a very weak signal. ... can store a total of 60 stations in to a station directly. 1. Press the buttons to a desired station. • When MUTE is pressed, the sound is mute and the " L O" indicator always blinks on the LCD display until the radio frequency appears on the remote) until MUTE is pressed again or...
... on the remote to a Station Manually 1. TUNING 4. Press the DVD/TV/RADIO button (the FUNCTION button on the remote) to tune in the position that sounds best. LISTENING TO THE RADIO Tuning in a station, the search stops. • The search may not stop at a station with a very weak signal. ... can store a total of 60 stations in to a station directly. 1. Press the buttons to a desired station. • When MUTE is pressed, the sound is mute and the " L O" indicator always blinks on the LCD display until the radio frequency appears on the remote) until MUTE is pressed again or...
Owners Manual
Page 30
...unit for 30 minutes to allow it to clear and try again. TV Snowy picture, multiple image, picture distorted, picture blurred and noisy sound. The antenna is heard. TROUBLESHOOTING GUIDE SYMPTOM No power. Use the remote near the unit. No picture The picture is not clear ... hot. The unit and disc region number are incompatible. • Condensation may have speaker output. • This unit is performed. No picture and sound. • Check antenna location, direction or connection. • Check the PICTURE SETTING in pause mode. Make sure that you 've selected TV mode...
...unit for 30 minutes to allow it to clear and try again. TV Snowy picture, multiple image, picture distorted, picture blurred and noisy sound. The antenna is heard. TROUBLESHOOTING GUIDE SYMPTOM No power. Use the remote near the unit. No picture The picture is not clear ... hot. The unit and disc region number are incompatible. • Condensation may have speaker output. • This unit is performed. No picture and sound. • Check antenna location, direction or connection. • Check the PICTURE SETTING in pause mode. Make sure that you 've selected TV mode...
Owners Manual
Page 31
MAINTENANCE Cleaning the Disc A defective or soiled disc inserted into the unit can cause sound to direct sunlight or excessive heat. Handle the disc by holding its inner and outer edges Do NOT touch the surface of the unlabeled side ...
MAINTENANCE Cleaning the Disc A defective or soiled disc inserted into the unit can cause sound to direct sunlight or excessive heat. Handle the disc by holding its inner and outer edges Do NOT touch the surface of the unlabeled side ...


